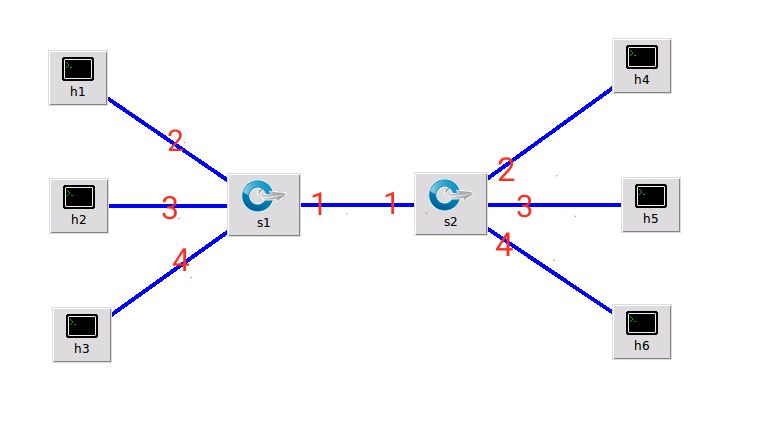
1.实验拓扑

python编写网络拓扑
#!/usr/bin/python
#创建网络拓扑

from mininet.topo import Topo
from mininet.net import Mininet
from mininet.node import RemoteController,CPULimitedHost
from mininet.link import TCLink
from mininet.util import dumpNodeConnections

class MyTopo( Topo ):
    "Simple topology example."

    def __init__( self ):
        "Create custom topo."

        # Initialize topology
        Topo.__init__( self )
        L1 = 2
        s = []

        # add core ovs
        for i in range( L1 ):
                sw = self.addSwitch( 's{}'.format( i + 1 ) )
                s.append( sw )
        # link s1 and s2
	self.addLink(s[0],s[1])

        #add hosts and its links with edge ovs
        count = 1
        for sw1 in s:
                for i in range(3):
                	host = self.addHost( 'h{}'.format( count ) )
                	self.addLink( sw1, host )
                	count += 1
topos = { 'mytopo': ( lambda: MyTopo() ) }
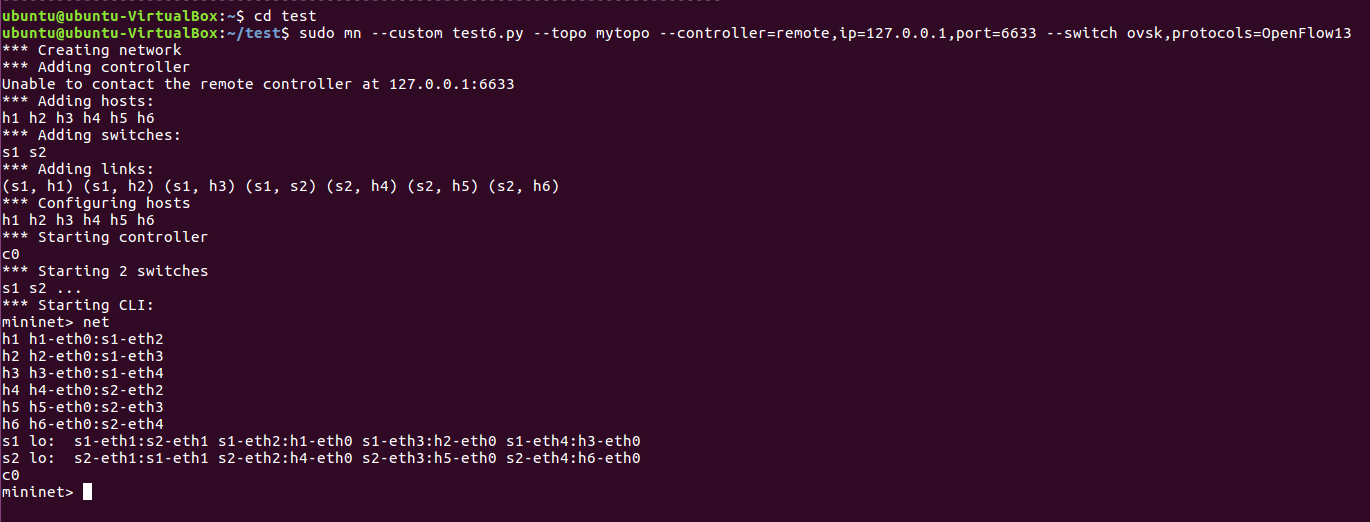
编译拓扑
sudo mn --custom test6.py --topo mytopo --controller=remote,ip=127.0.0.1,port=6633 --switch ovsk,protocols=OpenFlow13

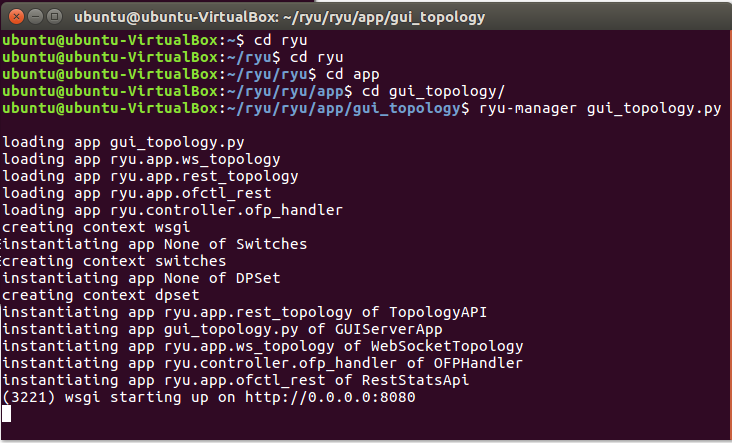
连接ryu控制器

2.使用Ryu的REST API下发流表实现和第2次实验同样的VLAN
s11.sh
#h1->s1
curl -X POST -d '{
    "dpid": 1,
    "priority":1,
    "match":{
        "in_port":2
    },
    "actions":[
        {
            "type": "PUSH_VLAN",     # s1将从主机发来的数据包打上vlan_tag
            "ethertype": 33024       # 帧类型0x8100(=33024): 表示IEEE 802.1Q的VLAN数据帧
        },
        {
            "type": "SET_FIELD",
            "field": "vlan_vid",     # 设置VLAN ID
            "value": 4096            # 设置vlan_id的值
        },
        {
            "type": "OUTPUT",
            "port": 1
        }
    ]
}' http://127.0.0.1:8080/stats/flowentry/add

#h2->s1
curl -X POST -d '{
    "dpid": 1,
    "priority":1,
    "match":{
        "in_port":3
    },
    "actions":[
        {
            "type": "PUSH_VLAN",     # s1将从主机发来的数据包打上vlan_tag
            "ethertype": 33024       # 帧类型0x8100(=33024): 表示IEEE 802.1Q的VLAN数据帧
        },
        {
            "type": "SET_FIELD",
            "field": "vlan_vid",     # 设置VLAN ID
            "value": 4097            # 设置vlan_id的值
        },
        {
            "type": "OUTPUT",
            "port": 1
        }
    ]
}' http://127.0.0.1:8080/stats/flowentry/add

#h3->s1
curl -X POST -d '{
    "dpid": 1,
    "priority":1,
    "match":{
        "in_port":4
    },
    "actions":[
        {
            "type": "PUSH_VLAN",     # s1将从主机发来的数据包打上vlan_tag
            "ethertype": 33024       # 帧类型0x8100(=33024): 表示IEEE 802.1Q的VLAN数据帧
        },
        {
            "type": "SET_FIELD",
            "field": "vlan_vid",     # 设置VLAN ID
            "value": 4098            # 设置vlan_id的值
        },
        {
            "type": "OUTPUT",
            "port": 1
        }
    ]
}' http://127.0.0.1:8080/stats/flowentry/add


#s1->h1
curl -X POST -d '{
    "dpid": 1,
    "priority":1,
    "match":{
        "dl_vlan": "0"
    },
    "actions":[
        {
            "type": "POP_VLAN",     # 给进入交换机的包去除 vlan_tag
        },
        {
            "type": "OUTPUT",
            "port": 2
        }
    ]
}' http://localhost:8080/stats/flowentry/add

#s1->h2
curl -X POST -d '{
    "dpid": 1,
    "priority":1,
    "match":{
        "dl_vlan": "1"
    },
    "actions":[
        {
            "type": "POP_VLAN",     # 给进入交换机的包去除 vlan_tag
        },
        {
            "type": "OUTPUT",
            "port": 3
        }
    ]
}' http://localhost:8080/stats/flowentry/add

#s1->h3
curl -X POST -d '{
    "dpid": 1,
    "priority":1,
    "match":{
        "dl_vlan": "2"
    },
    "actions":[
        {
            "type": "POP_VLAN",     # 给进入交换机的包去除 vlan_tag
        },
        {
            "type": "OUTPUT",
            "port": 4
        }
    ]
}' http://localhost:8080/stats/flowentry/add
s22.sh
#h1->s2
curl -X POST -d '{
    "dpid": 2,
    "priority":1,
    "match":{
        "in_port":2
    },
    "actions":[
        {
            "type": "PUSH_VLAN",     # s2将从主机发来的数据包打上vlan_tag
            "ethertype": 33024       # 帧类型0x8100(=33024): 表示IEEE 802.1Q的VLAN数据帧
        },
        {
            "type": "SET_FIELD",
            "field": "vlan_vid",     # 设置VLAN ID
            "value": 4096            # 设置vlan_id的值
        },
        {
            "type": "OUTPUT",
            "port": 1
        }
    ]
}' http://127.0.0.1:8080/stats/flowentry/add

#h2->s2
curl -X POST -d '{
    "dpid": 2,
    "priority":1,
    "match":{
        "in_port":3
    },
    "actions":[
        {
            "type": "PUSH_VLAN",     # s2将从主机发来的数据包打上vlan_tag
            "ethertype": 33024       # 帧类型0x8100(=33024): 表示IEEE 802.1Q的VLAN数据帧
        },
        {
            "type": "SET_FIELD",
            "field": "vlan_vid",     # 设置VLAN ID
            "value": 4097            # 设置vlan_id的值
        },
        {
            "type": "OUTPUT",
            "port": 1
        }
    ]
}' http://127.0.0.1:8080/stats/flowentry/add

#h3->s2
curl -X POST -d '{
    "dpid": 2,
    "priority":1,
    "match":{
        "in_port":4
    },
    "actions":[
        {
            "type": "PUSH_VLAN",     # s2将从主机发来的数据包打上vlan_tag
            "ethertype": 33024       # 帧类型0x8100(=33024): 表示IEEE 802.1Q的VLAN数据帧
        },
        {
            "type": "SET_FIELD",
            "field": "vlan_vid",     # 设置VLAN ID
            "value": 4098            # 设置vlan_id的值
        },
        {
            "type": "OUTPUT",
            "port": 1
        }
    ]
}' http://127.0.0.1:8080/stats/flowentry/add


#s2->h1
curl -X POST -d '{
    "dpid": 2,
    "priority":1,
    "match":{
        "dl_vlan": "0"
    },
    "actions":[
        {
            "type": "POP_VLAN",     # 给进入交换机的包去除 vlan_tag
        },
        {
            "type": "OUTPUT",
            "port": 2
        }
    ]
}' http://localhost:8080/stats/flowentry/add

#s2->h2
curl -X POST -d '{
    "dpid": 2,
    "priority":1,
    "match":{
        "dl_vlan": "1"
    },
    "actions":[
        {
            "type": "POP_VLAN",     # 给进入交换机的包去除 vlan_tag
        },
        {
            "type": "OUTPUT",
            "port": 3
        }
    ]
}' http://localhost:8080/stats/flowentry/add

#s2->h3
curl -X POST -d '{
    "dpid": 2,
    "priority":1,
    "match":{
        "dl_vlan": "2"
    },
    "actions":[
        {
            "type": "POP_VLAN",     # 给进入交换机的包去除 vlan_tag
        },
        {
            "type": "OUTPUT",
            "port": 4
        }
    ]
}' http://localhost:8080/stats/flowentry/add
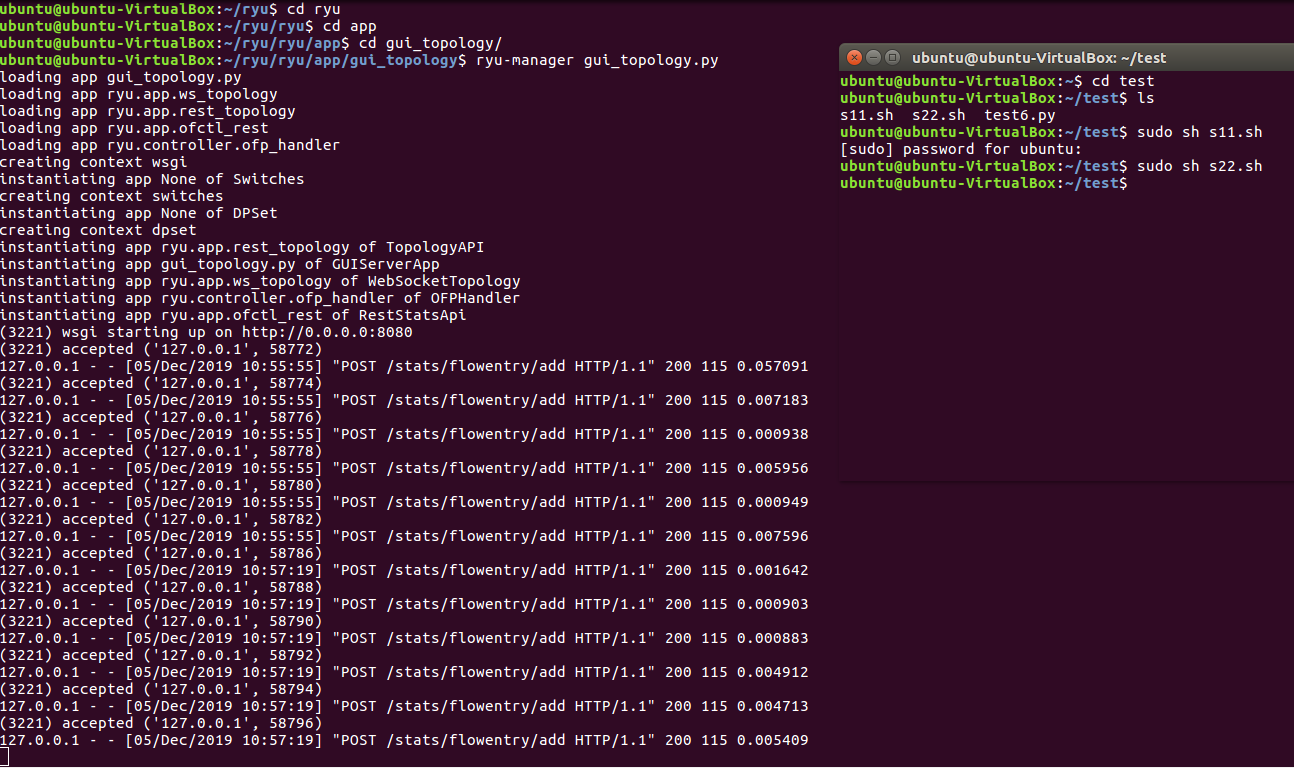
使用sh执行s11.sh

使用sh执行s22.sh

查看流表
sudo ovs-ofctl -O OpenFlow13 dump-flows s1
sudo ovs-ofctl -O OpenFlow13 dump-flows s2

3.对比两种方法,写出你的实验体会
- 实验二中的方法是使用命令来下发流表,如果命令中出现一个字符错误需要修改的话,还需要左移光标进行修改,十分麻烦,而在这次实验中,将流表项写在脚本中,只要json的格式没问题,就可以成功下发流表,在后续的修改中也是非常方便的,而且这些脚本也比较容易保存。都是固定格式,只要修改固定项的内容就可以,非常方便。