一、MHA简介
1、MHA
Master High Availability,对主节点进行监控,可实现自动故障转移至其它从节点;通过提升某一从节点为新的主节点,基于主从复制实现,还需要客户端配合实现,目前MHA主要支持一主多从的架构,要搭建MHA,要求一个复制集群中必须最少有三台 数据库服务器,一主二从,即一台充当master,一台充当备用master,另外一台充当从库。
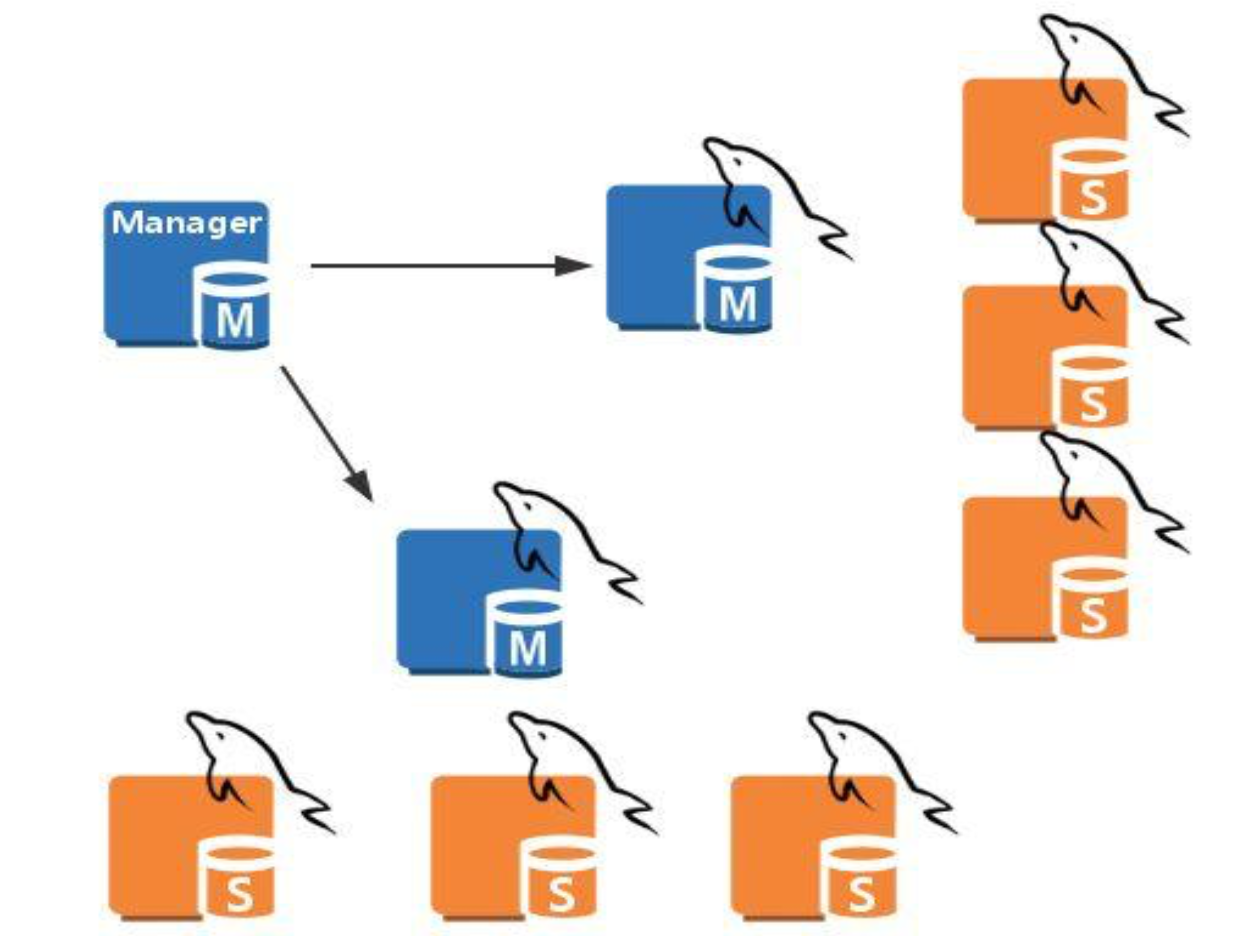
2、MHA集群架构
3、MHA的工作原理
4、MHA软件组成
masterha_check_repl 检查MySQL复制状况
masterha_manger 启动MHA
masterha_check_status 检测当前MHA运行状态
masterha_master_monitor 检测master是否宕机
masterha_master_switch 故障转移(自动或手动)
masterha_conf_host 添加或删除配置的server信息
apply_diff_relay_logs 识别差异的中继日志事件并将其差异的事件应用于其他的slave
filter_mysqlbinlog 去除不必要的ROLLBACK事件(MHA已不再使用此工具)
purge_relay_logs 清除中继日志(不会阻塞SQL线程)
master_ip_ailover_script 更新Application使用的masterip
shutdown_script 强制关闭master节点
report_script 发送报告
init_conf_load_script 加载初始配置参数
master_ip_online_change_script 更新master节点ip地址
(4) 配置文件:
global配置:为各application提供默认配置
application配置:为每个主从复制集群
二、实验环境
主机:4台,一台MHA Manager (192.168.214.17),三台主从复制架构(一主多从),master (192.168.214.27),slave1 (192.168.214.37),slave2 (192.168.214.47)
系统:CentOS7.6
数据库:mariadb-server-5.5.60(光盘yum源)
MHA软件包:mha4mysql-manager-0.56,mha4mysql-node-0.56
三、相关步骤
1、三台主从节点主点先安装mariadb数据库,使用光盘yum源
[root@centos7-27 ~]# yum install -y mariadb-server
[root@centos7-37 ~]# yum install -y mariadb-server
[root@centos7-47 ~]# yum install -y mariadb-server
2、准备MHA软件包,MHA Manager节点需要mha4mysql-manager和mha4mysql-node,其它三个节点只需要mha4mysql-node
[root@centos7-17 ~]# ll mha4mysql*
-rw-r--r-- 1 root root 87119 Dec  9 10:32 mha4mysql-manager-0.56-0.el6.noarch.rpm
-rw-r--r-- 1 root root 36326 Dec  9 10:32 mha4mysql-node-0.56-0.el6.noarch.rpm
[root@centos7-27 ~]# ll mha4mysql*
-rw-r--r-- 1 root root 36326 Dec  9 10:32 mha4mysql-node-0.56-0.el6.noarch.rpm
[root@centos7-37 ~]# ll mha4mysql*
-rw-r--r-- 1 root root 36326 Dec  9 10:32 mha4mysql-node-0.56-0.el6.noarch.rpm
[root@centos7-47 ~]# ll mha4mysql*
-rw-r--r-- 1 root root 36326 Dec  9 10:32 mha4mysql-node-0.56-0.el6.noarch.rpm
3、安装MHA软件包,MHA Manager节安装mha4mysql-manager时需要依赖epel源,这里使用阿里云的epel源
[root@centos7-17 ~]# cat /etc/yum.repos.d/base.repo
[development]
name=dvdbase repo
baseurl=file:///mnt/cdrom/
enabled=1
gpgcheck=1
gpgkey=file:///mnt/cdrom/RPM-GPG-KEY-CentOS-7

[aliyunEpel]
name=aliyun epel
baseurl=https://mirrors.aliyun.com/epel/$releasever/$basearch
enabled=1
gpgcheck=1
gpgkey=https://mirrors.aliyun.com/epel/RPM-GPG-KEY-EPEL-$releasever
[root@centos7-17 ~]# yum install -y mha4mysql*
[root@centos7-27 ~]# yum install -y mha4mysql-node-0.56-0.el6.noarch.rpm
[root@centos7-37 ~]# yum install -y mha4mysql-node-0.56-0.el6.noarch.rpm
[root@centos7-47 ~]# yum install -y mha4mysql-node-0.56-0.el6.noarch.rpm
4、配置主从复制(一主多从)
1). master节点
[root@centos7-27 ~]# vim /etc/my.cnf
[mysqld]
server-id=27    #添加此项
bin-log    #添加此项
skip_name_resolve=1    #添加此项
datadir=/var/lib/mysql
socket=/var/lib/mysql/mysql.sock
# Disabling symbolic-links is recommended to prevent assorted security risks
symbolic-links=0
# Settings user and group are ignored when systemd is used.
# If you need to run mysqld under a different user or group,
# customize your systemd unit file for mariadb according to the
# instructions in http://fedoraproject.org/wiki/Systemd

[mysqld_safe]
log-error=/var/log/mariadb/mariadb.log
pid-file=/var/run/mariadb/mariadb.pid

#
# include all files from the config directory
#
!includedir /etc/my.cnf.d
[root@centos7-27 ~]# systemctl start mariadb
[root@centos7-27 ~]# mysql
Welcome to the MariaDB monitor.  Commands end with ; or g.
Your MariaDB connection id is 2
Server version: 5.5.60-MariaDB MariaDB Server

Copyright (c) 2000, 2018, Oracle, MariaDB Corporation Ab and others.

Type 'help;' or 'h' for help. Type 'c' to clear the current input statement.

MariaDB [(none)]> show master logs;
+--------------------+-----------+
| Log_name           | File_size |
+--------------------+-----------+
| mariadb-bin.000001 |       245 |
+--------------------+-----------+
1 row in set (0.00 sec)

MariaDB [(none)]> grant replication slave on *.* to repluser@'192.168.214.%' identified by 'centos';    #添加主从复制用户
Query OK, 0 rows affected (0.00 sec)

MariaDB [(none)]> grant all on *.* to mhauser@'192.168.214.%' identified by 'mhauser';    #添加mha管理用户
Query OK, 0 rows affected (0.00 sec)
2). slave节点,两台节点的配置一样,以slave1(192.168.214.37)为例
[root@centos7-37 ~]# cat /etc/my.cnf
[mysqld]
server-id=37    #添加此项,slave2上的值记得改成47
log_bin    #添加此项
read-only    #添加此项
skip_name_resolve=1    #添加此项
relay_log_purge=0    #添加此项,是否清除中继日志,默认开启,这里把它关闭,因为需要用到中继日志
...以下省略
[root@centos7-37 ~]# systemctl start mariadb
[root@centos7-37 ~]# mysql
Welcome to the MariaDB monitor.  Commands end with ; or g.
Your MariaDB connection id is 6
Server version: 5.5.60-MariaDB MariaDB Server

Copyright (c) 2000, 2018, Oracle, MariaDB Corporation Ab and others.

Type 'help;' or 'h' for help. Type 'c' to clear the current input statement.

MariaDB [(none)]> CHANGE MASTER TO     #配置连接主节点的信息
    -> MASTER_HOST='192.168.214.27',    #主节点IP
    -> MASTER_USER='repluser',    #用于复制的账号
    -> MASTER_PASSWORD='centos',  #密码
    -> MASTER_LOG_FILE='mariadb-bin.000001', #要复制的二进制日志
    -> MASTER_LOG_POS=245;   #开始复制的二进制日志的位置
Query OK, 0 rows affected (0.01 sec)

MariaDB [(none)]> start slave;    #开启复制线程
Query OK, 0 rows affected (0.00 sec)

MariaDB [(none)]> show slave statusG;  #可用于查看开启状态
5、配置MHA Manager主机和其它三台主机的基于key验证的ssh服务
[root@centos7-17 ~]# ssh-keygen  #生成密钥
Generating public/private rsa key pair.
Enter file in which to save the key (/root/.ssh/id_rsa):
Enter passphrase (empty for no passphrase):
Enter same passphrase again:
Your identification has been saved in /root/.ssh/id_rsa.
Your public key has been saved in /root/.ssh/id_rsa.pub.
The key fingerprint is:
SHA256:F8VxSwWdphlQLd1J9csOHEW932/ZIhi6agC2BxDJ89A root@centos7.localdomain
The key's randomart image is:
+---[RSA 2048]----+
|oo.        o=oOBO|
|o+ E       ..=.B=|
| .+       .  .B o|
|  +.       ..oo..|
| . +    S .  o oo|
|  . o    ..   o o|
|   . .   . o   .+|
|      . . . . ..+|
|     .....   . o |
+----[SHA256]-----+
[root@centos7-17 ~]# ls -a .ssh
.  ..  id_rsa  id_rsa.pub  known_hosts
#拷贝公钥到本地,然后把本地的.ssh文件夹复制到其它三台主机的/root/目录下
#即可实现四台主机之前相互之间都可以互机登录而不用输密码
#如果只是配置MHA Manage登陆其它三台,只需要用以下命令
# ssh-copy-id -i  /root/.ssh/id_rsa.pub root@192.168.214.27
[root@centos7-17 ~]# ssh-copy-id -i /root/.ssh/id_rsa.pub root@192.168.214.17
[root@centos7-17 ~]# scp -r .ssh root@192.168.214.27:/root/
[root@centos7-17 ~]# scp -r .ssh root@192.168.214.37:/root/
[root@centos7-17 ~]# scp -r .ssh root@192.168.214.47:/root/
6、配置MHA Manager节点的配置文件
[root@centos7-17 ~]# mkdir /etc/mha/
[root@centos7-17 ~]# vim /etc/mha/app1.cnf
[server default]
user=mhauser    #管理用户
password=mhauser    #密码
manager_workdir=/data/mastermha/app1/
manager_log=/data/mastermha/app1/manager.log
remote_workdir=/data/mastermha/app1/
ssh_user=root  #ssh用户
repl_user=repluser #复制用户
repl_password=centos  #密码
ping_interval=1    #监测master的时间1s

[server1]
hostname=192.168.214.27
candidate_master=1    #此选项表示优先使用此主节点
[server2]
hostname=192.168.214.37
candidate_master=1
[server3]
hostname=192.168.214.47
7、验证与启动
[root@centos7-17 ~]# masterha_check_ssh --conf=/etc/mha/app1.cnf  #验证ssh
[root@centos7-17 ~]# masterha_check_repl --conf=/etc/mha/app1.cnf  #验证主从复制
[root@centos7-17 ~]# masterha_manager --conf=/etc/mha/app1.cnf  #启动
注意:masterha_manager --conf=/etc/mha/app1.cnf 这种启动是一次性的(完成一次切换后就退出了),且只是在当前会话;建议后台启动运行:nohup masterha_manager --conf=/etc/mha/app1.cnf > mha.log
8、测试当mater节点断开时,主从的切换
[root@centos7-27 ~]# systemctl stop mariadb  #关闭主节点数据库服务
[root@centos7-37 ~]# mysql
Welcome to the MariaDB monitor.  Commands end with ; or g.
Your MariaDB connection id is 21
Server version: 5.5.60-MariaDB MariaDB Server

Copyright (c) 2000, 2018, Oracle, MariaDB Corporation Ab and others.

Type 'help;' or 'h' for help. Type 'c' to clear the current input statement.

MariaDB [(none)]> show slave statusG;   #查询为空,说明slave1节点已提升为主节点
Empty set (0.00 sec)
MariaDB [(none)]> show variables like 'read_only'; #slave1节点的read-only选项也关闭了
+---------------+-------+
| Variable_name | Value |
+---------------+-------+
| read_only     | OFF   |
+---------------+-------+
1 row in set (0.00 sec)

[root@centos7-47 ~]# mysql
MariaDB [(none)]> show slave statusG;   #在slave2上查看
*************************** 1. row ***************************
               Slave_IO_State: Waiting for master to send event
                  Master_Host: 192.168.214.37  #主节点变为了slave1
                  Master_User: repluser
                  Master_Port: 3306
                Connect_Retry: 60
              Master_Log_File: mariadb-bin.000001
          Read_Master_Log_Pos: 245
               Relay_Log_File: mariadb-relay-bin.000002
                Relay_Log_Pos: 531
        Relay_Master_Log_File: mariadb-bin.000001
             Slave_IO_Running: Yes
            Slave_SQL_Running: Yes
...以下省略