一、通过代理工厂模式配置通知
①、前置通知、后置通知:
定义某接口:ISomeService,并自定义方法
|
1
2
3
4
5
|
public interface ISomeService { public void tran() throws Exception; public void log();} |
定义类 实现该接口,并重写方法:
|
1
2
3
4
5
6
7
8
9
10
|
public class SomeService implements ISomeService{ public void tran() throws Exception{ System.out.println("开启事务!!"); } public void log() { System.out.println("记录日志!!"); } |
定义前置通知类,并实现MethodBeforeAdvice该接口
|
1
2
3
4
5
6
7
|
public class MyBefore implements MethodBeforeAdvice{ public void before(Method arg0, Object[] arg1, Object arg2) throws Throwable { System.out.println("==before=="); } |
定义后置通知类,并实现AfterReturningAdvice该接口
|
1
2
3
4
5
6
7
|
public class MyAfter implements AfterReturningAdvice{ public void afterReturning(Object arg0, Method arg1, Object[] arg2, Object arg3) throws Throwable { System.out.println("==after=="); } |
配置Spring配置文件applicationContext.xml:
代理工厂:ProxyFactoryBean

测试类:

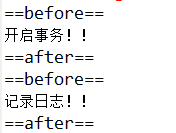
实现效果:
② 环绕通知 MethodInterceptor
环绕增强在目标方法的前后都可以织入增强处理。环绕增强是功能最强大的强大处理。Spring把目标方法的控制权全部交给了他。在环绕增强处理中,可以获取或修改目标方法的参数、返回值、可以对它进行异常处理,甚至可以决定目标方法是否执行。

配置Spring文件:
|
1
2
3
4
5
6
7
8
9
|
<!-- 环绕增强 --> <bean id="some" class="cn.happy.entity.SomeService"></bean> <bean id="arround" class="cn.happy.arround.MyInterceptor"></bean> <bean id="factory" class="org.springframework.aop.framework.ProxyFactoryBean"> <property name="target" ref="some"></property> <property name="interceptorNames" value="arround"></property></bean> |
实现效果:

通过MethodInterceptor接口实现了环绕增强。该接口要求实现invoke()方法,其参数MethodInvocation不但封装目标方法及其参数组,还封装了被代理目标对象。通过proceed()方法可以调用目标对象的相应方法,从而实现对目标方法的完全控制!
③异常通知:
特点是在目标方法抛出异常时织入增强处理。通过ThrowsAdvice接口实现异常抛出增强,但ThrowsAdvice接口中并没有定义任何方法,但是我们在定义异常抛出的增强方法时必须遵守以下方法签名:
|
1
|
void afterThrowing([Method method,Object[]arguments,Object target,] Throwable ex) |

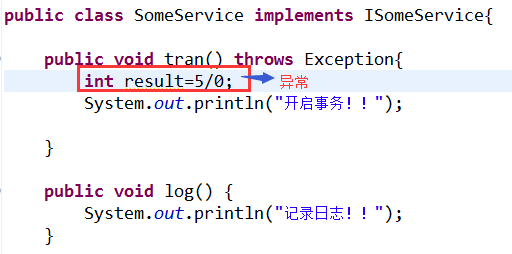
实现类出现异常情况下:
Spring配置文件:
|
1
2
3
4
5
6
7
8
9
10
|
<!-- 异常通知 --> <bean id="some" class="cn.happy.entity.SomeService"></bean> <bean id="throws" class="cn.happy.throwsAdvice.MyThrows"></bean> <bean id="factory" class="org.springframework.aop.framework.ProxyFactoryBean"> <property name="target" ref="some"></property> <property name="interceptorNames" value="throws"></property></bean> |
测试类:
若将异常抛给上级处理,则在控制台通过,单测报错,若将异常手动抛出,则相反

|
1
2
3
4
5
6
7
8
9
10
11
12
13
|
@Testpublic void proxyTest(){ ApplicationContext ctx=new ClassPathXmlApplicationContext("applicationContext.xml"); ISomeService ser=(ISomeService) ctx.getBean("factory"); //ser.tran(); try { ser.tran(); } catch (Exception e) { e.printStackTrace(); } ser.log(); } |
二、顾问Advisor
顾问Advisor是Spring提供的另一种切面。其可以完成更为复杂的切面织入功能。PointcutAdvisor是顾问的一种,可以指定具体的切入点。顾问将通知进行了包装,会根据不同的通知类型,在不同的时间点,将切面织入到不同的切入点。
PointcutAdvisor接口有两个较为常用的实现类:
*:NameMatchMethodPointcutAdvisor 名称匹配方法切入点顾问
*: RegexpMethodPointcutAdvisor 正则表达式匹配方法切入点顾问
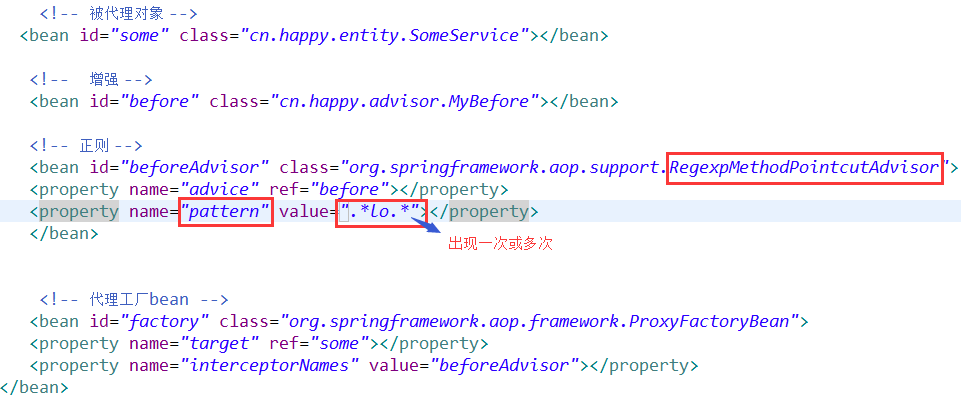
<property name="pattern" value=".*do.*"></property> 表示方法全名(包名,接口名,方法名)
运算符名称意义:
. 点号 表示任意单个字符
+ 加号 表示前一个字符出现一次或者多次
* 星号 表示前一个字符出现0次或者多次
如何实现:
同理:定义接口和实现类,并自定义方法。以及前置增强的类。关键点在Spring配置文件
①名称匹配方法切入点顾问

② 正则表达式匹配方法切入点顾问
三、自动代理生成器
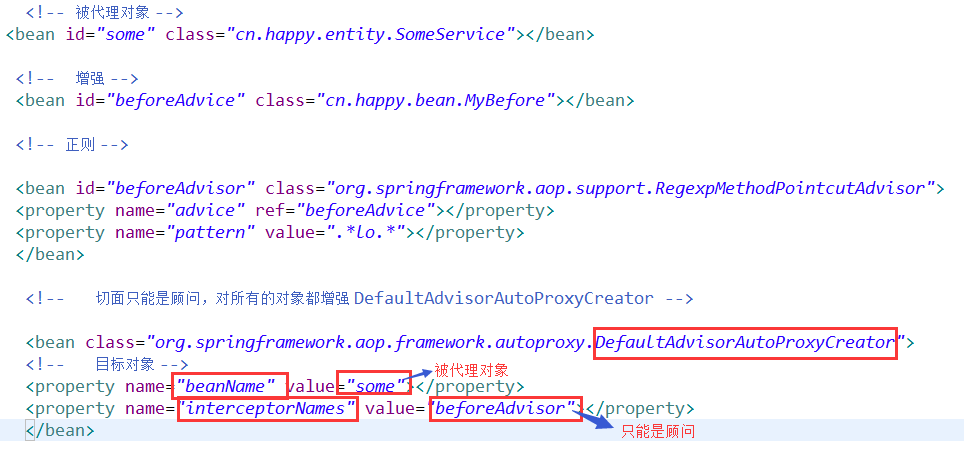
注意:默认Advisor自动代理生成器,切面只能是顾问,对所有的对象都增强
两种实现方式:
① 默认Advisor自动代理生成器 DefaultAdvisorAutoProxyCreator
② BeanName自动代理生成器 BeanNameAutoProxyCreator
在这里 无需配置代理工厂bean,测试类getBean()取的id是配置文件的被代理对象
切面只能是顾问的情况下:
实现效果:

既可以是通知也可以是顾问的情况下:

实现效果:

测试类:
|
1
2
3
4
5
6
7
8
9
|
public class Test01 {@Testpublic void proxyTest(){ ApplicationContext ctx=new ClassPathXmlApplicationContext("applicationContext.xml"); ISomeService ser=(ISomeService) ctx.getBean("some"); ser.tran(); ser.log(); } |
四、Spring的经典AOP配置方案、使用的是Aspectj第三方框架,实现了AOP思想。注解配置的AOP,纯POJO <aop:config>
具体步骤:
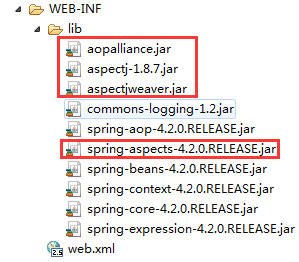
① 在项目中添加SpringAOP相关的JAR文件
②使用注解定义前置增强和后置增强实现日志功能
③编写Spring配置文件,织入注解定义的增强
④编写代码获取带有增强处理的业务对象
核心JAR包:
实现思路:
1、定义接口实现类,并重写该方法
|
1
2
3
|
public interface ISomeService {public void list();} |
|
1
2
3
4
5
6
7
|
public class SomeService implements ISomeService{ public void list() { System.out.println("SomeService.list()"); }} |
2、通过注解实现增强,自定义类
使用@Aspect注解将该类定义为切面,并且使用@Before注解将该方法定义为前置增强,增强定义完后,就可以在Spring配置文件中织入使用注解定义的增强了
|
1
2
3
4
5
6
7
8
9
10
|
@Aspectpublic class MyAspectj {@Before(value = "execution(* *..service.*.*(..))") public void MyBeforeAdvice(){ System.out.println("==before==");}} |
3、Spring配置文件

4、进行测试:
|
1
2
3
4
5
6
7
8
|
public class Test01 {@Testpublic void proxyTest(){ ApplicationContext ctx=new ClassPathXmlApplicationContext("applicationContext.xml"); ISomeService ser=(ISomeService) ctx.getBean("some"); ser.list(); } |
实现效果:

※※※补充点:
切入点表达式:
execution(【modifiers-pattern?】 访问修饰符
ret-type-pattern 返回值类型
【declaring-type-pattern?】 全限定性类名
name-pattern(param-pattern) 方法名(参数名) 包名.类型名.方法名
【throws-pattern?】) 抛出异常类型
public void doLog(String log){
}
切入点表达式要匹配的对象就是目标方法的方法名。所以,execution表达式中明显就是方法的签名。
注意:表达式中加[]的部分表示可省略部分,各部分间用空格分开。在其中可以使用以下符号:
符号意义:
* 0至多个任意字符
.. 用在方法参数中,表示任意多个参数
用在包名后,表示当前包及其子包路径
+ 用在类名后,表示当前类及其子类
用在接口后,表示当前接口及其实现类
案例:
execution(public * *(..)) 指定切入点为:任意公共方法
execution(* set*(..)) 指定切入点为:任何一个以"set"开始的方法