通过学习Vue自定义组件,可以开发一些小功能,自娱自乐,巩固学习的基础知识,本文以一个简单的拼图小游戏的例子,简述Vue自定义组件的开发,调用等基本流程,仅供学习分享使用,如有不足之处,还请指正。
涉及知识点
关于Vue组件的基础知识,前篇已有介绍,本例涉及知识点如下:
- 拼图游戏,只有相邻的元素才可以交换位置,那如何判断两个元素相邻,方法如下:
- 左右相邻:y轴坐标相同,x轴相减的绝对值等于一个元素的宽度。
- 上下相邻:x轴坐标相同,y轴相减的绝对值等于一个元素的高度。
- 如何判断拼图中的可以与之交换位置的空白,方法如下:
- 通过ref引用属性,将空白属性,定义为empty,其他定义为block,以便区分。
- 如何将一张图放到每一个元素上,并只显示一块内容,方法如下:
- 将背景图的位置和元素的坐标起始位置关联起来,即将图片的向左上方平移即可。
- 元素之间的切换平滑过渡。在本例中,通过css样式设置,所有元素的移动都在0.3s内完成,达到平滑过渡的效果。
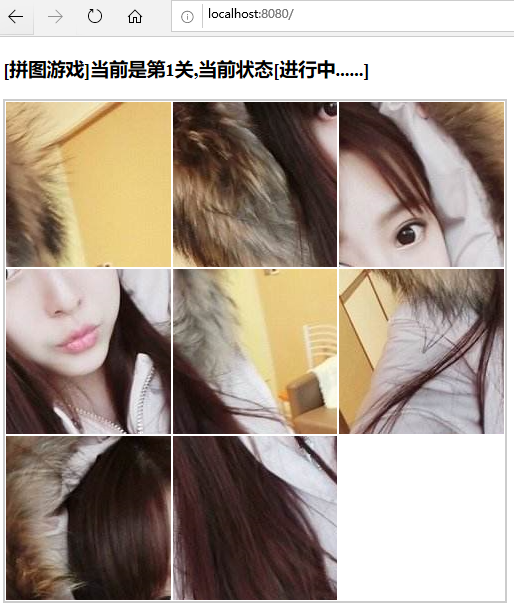
示例效果图
本例中拼图游戏一共分5关,分别是3*3,4*4等,难度逐级增加,所用图片的均是500px*500px大小,如下图所示:

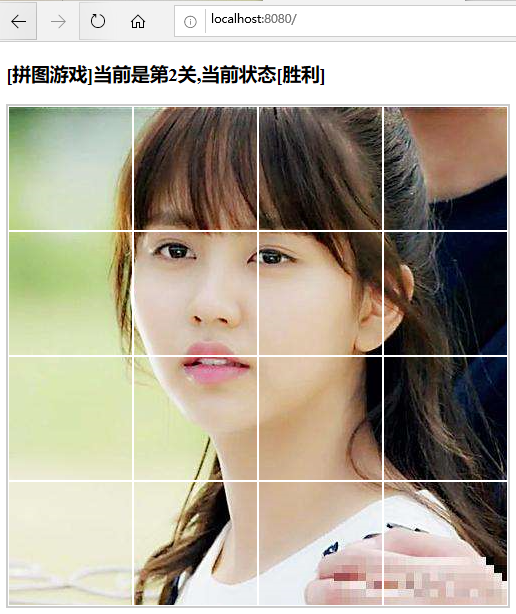
当拼图完成时,询问是否进行下一关,如下所示:

下一关,效果如下所示:
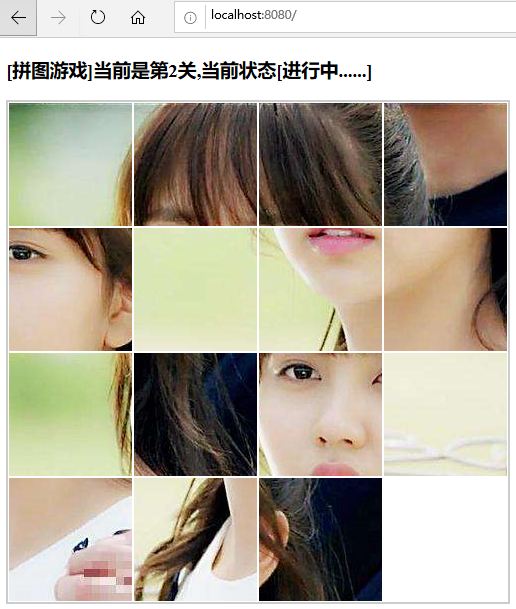
其他效果图类似,只是分的行和列递增,拼图难度增加,但是处理逻辑都是相同的。
核心源码
关于Puzzle.vue源码,如下所示:
模板部分(template),主要是元素的布局,本例采用v-for动态加载,如下所示:


 1 <template>
 2   <div class="puzzle" :style="{width+'px',height:height+'px'}">
 3     <div
 4       v-for="(item,index) in blockPoints"
 5       :key="item.id"
 6       :style="{blockWidth+'px',
 7         height:blockHeight+'px',
 8         left:item.x+'px',top:item.y+'px',
 9         backgroundImage:`url(${img})`,
10         backgroundPosition:`-${correctPoints[index].x}px -${correctPoints[index].y}px`,
11         opacity: index===blockPoints.length-1 && 0 }"
12       v-on:click="handleClick"
13       class="puzzle__block"
14       :ref="index===blockPoints.length-1?'empty':'block'"
15       :data-correctX="correctPoints[index].x"
16       :data-correctY="correctPoints[index].y"
17     ></div>
18   </div>
19 </template>
脚本部分(Script),主要用于逻辑的校验和判断,如下所示:
  1 <script>
  2 export default {
  3   props: {
  4     img: {
  5       // 图片路径
  6       type: String,
  7       required: true,
  8     },
  9      {
 10       // 图片总宽度
 11       type: Number,
 12       default: 500,
 13     },
 14     height: {
 15       // 图片总高度
 16       type: Number,
 17       default: 500,
 18     },
 19     row: {
 20       // 行数
 21       type: Number,
 22       default: 3,
 23     },
 24     col: {
 25       // 列数
 26       type: Number,
 27       default: 3,
 28     },
 29   },
 30   data() {
 31     return {
 32       status: {
 33         type: String,
 34         default: "进行中......",
 35       },
 36     };
 37   },
 38   methods: {
 39     handleClick(e) {
 40       const blockDom = e.target;
 41       const empthDom = this.$refs.empty[0];
 42       const { left, top } = blockDom.style;
 43       if (!this.isAdjacent(blockDom, empthDom)) {
 44         return;
 45       }
 46       //交换元素
 47       blockDom.style.left = empthDom.style.left;
 48       blockDom.style.top = empthDom.style.top;
 49       empthDom.style.left = left;
 50       empthDom.style.top = top;
 51       const winFlag = this.winCheck();
 52       if (winFlag) {
 53         //   console.log('success');
 54         this.winGame(empthDom);
 55       }
 56     },
 57     isAdjacent(blockDom, empthDom) {
 58       // 判断是否相邻
 59       const { left: blockLeft, top: blockTop, width, height } = blockDom.style;
 60       const { left: emptyLeft, top: emptyTop } = empthDom.style;
 61       const xDis = Math.floor(
 62         Math.abs(parseFloat(blockLeft) - parseFloat(emptyLeft))
 63       );
 64       const yDis = Math.floor(
 65         Math.abs(parseFloat(blockTop) - parseFloat(emptyTop))
 66       );
 67       const flag =
 68         (blockLeft === emptyLeft && yDis === parseInt(height)) ||
 69         (blockTop === emptyTop && xDis === parseInt(width));
 70       console.log(flag);
 71       return flag;
 72     },
 73     winCheck() {
 74       // 判断是否完成
 75       const blockDomArr = this.$refs.block;
 76       return blockDomArr.every((dom) => {
 77         const { left: domLeft, top: domTop } = dom.style;
 78         const { correctx: correctX, correcty: correctY } = dom.dataset;
 79         const flag =
 80           parseInt(domLeft) === parseInt(correctX) &&
 81           parseInt(domTop) === parseInt(correctY);
 82         return flag;
 83       });
 84       // console.log(blockDomArr.length);
 85     },
 86     winGame(empthDom) {
 87       //通关
 88       setTimeout(() => {
 89         this.status = "胜利";
 90         alert("恭喜通关");
 91         empthDom.style.opacity = 1;
 92         this.$emit("getStatus");
 93         setTimeout(() => {
 94           this.goToNextLevel();
 95         }, 300);
 96       }, 300);
 97     },
 98     goToNextLevel() {
 99       const answerFlag = window.confirm("现在进行下一关么?");
100       if (answerFlag) {
101         this.status = "进行中......";
102         this.$emit("next");
103       }
104     },
105   },
106   computed: {
107     blockWidth() {
108       return this.width / this.col;
109     },
110     blockHeight() {
111       return this.height / this.row;
112     },
113     correctPoints() {
114       const { row, col, blockWidth, blockHeight } = this;
115       const arr = [];
116       for (let i = 0; i < row; i++) {
117         for (let j = 0; j < col; j++) {
118           arr.push({
119             x: j * blockWidth,
120             y: i * blockHeight,
121             id: new Date().getTime() + Math.random() * 100,
122           });
123         }
124       }
125       return arr;
126     },
127     blockPoints() {
128       const points = this.correctPoints;
129       const length = points.length; //数组的长度
130       const lastEle = points[length - 1]; //最后一个元素
131       const newArr = [...points];
132       newArr.length = length - 1;
133       //打乱顺序
134       newArr.sort(() => Math.random() - 0.5);
135       newArr.push(lastEle);
136       return newArr;
137     },
138   },
139 };
140 </script>
样式部分(Style),主要用于外观样式的设置,如下所示:
 1 <style>
 2 .puzzle {
 3   box-sizing: content-box;
 4   border: 2px solid #cccccc;
 5   position: relative;
 6 }
 7 .puzzle__block {
 8   border: 1px solid #ffffff;
 9   box-sizing: border-box;
10   /* background-color: rebeccapurple; */
11   position: absolute;
12   transition: all 0.3s;
13 }
14 </style>
拼图组件的调用App.vue
首先组件需要引入和注册,采用使用,如下所示:
 1 <script>
 2 import puzzle from "./Puzzle";
 3 export default {
 4   components: {
 5     puzzle,
 6   },
 7   data() {
 8     return {
 9       level: 0,
10       puzzleConfig: [
11         { img: "./img/001.jpg", row: 3, col: 3 },
12         { img: "./img/002.jpg", row: 4, col: 4 },
13         { img: "./img/003.jpg", row: 5, col: 5 },
14         { img: "./img/004.jpg", row: 6, col: 6 },
15         { img: "./img/005.jpg", row: 7, col: 7 },
16       ],
17       status: "进行中......",
18     };
19   },
20   methods: {
21     handleNext() {
22       console.log("next");
23       this.status = this.$refs.dpuzzle.status;
24       this.level++;
25       if (this.level == this.puzzleConfig.length - 1) {
26         const answerFlag = window.confirm("已经是最后一关了,需要重新开始么?");
27         if (answerFlag) {
28           this.level = 0;
29         }
30       }
31     },
32     getStatus() {
33       this.status = this.$refs.dpuzzle.status;
34     },
35   },
36 };
37 </script>
组件的调用,如下所示:
1 <template>
2   <div>
3     <h3>[拼图游戏]当前是第{{level+1}}关,当前状态[{{status}}]</h3>
4     <puzzle ref="dpuzzle" @getStatus="getStatus" @next="handleNext" v-bind="puzzleConfig[level]" />
5     <!-- <button @click="handleNext" style="20px,height:20px" value="下一关">下一关</button> -->
6   </div>
7 </template>
注意事项:
如果获取组件内部的元素的值,在组件调用时采用ref属性,然后获取组件内的data属性值。
组件内如果调用父组件的方法,本文采用触发注册事件的方式this.$emit("next");
如果需要学习参考源码的朋友,可以点击源码链接进行下载。
备注
浪淘沙令·帘外雨潺潺
作者:李煜【五代十国南唐后主】
帘外雨潺潺,春意阑珊。
罗衾不耐五更寒。
梦里不知身是客,一晌贪欢。
独自莫凭栏,无限江山,别时容易见时难。
流水落花春去也,天上人间。