WPF通过样式,不仅可以方便的设置控件元素的展示方式,给用户呈现多样化的体验,还简化配置,避免重复设置元素的属性,以达到节约成本,提高工作效率的目的。本文以一个简单的小例子,简述如果设置WPF的样式,仅供学习分享使用,如有不足之处,还请指正。
什么是样式?
基础样式
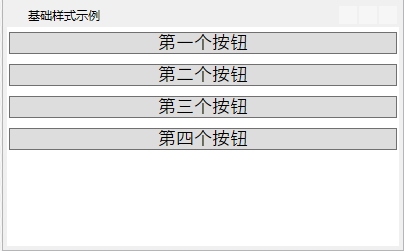
1. 通过TargetType设置样式
通过控件类型,统一设置样式【如:字体,大小,边距等】,以便于形成统一的风格。如下所示:
示例源码
通过设置样式的TargetType="Button",则可以使所有的按钮应用同一个样式,统一风格。如下所示:
 1 <Window x:Class="WpfApp1.SevenWindow"
 2         xmlns="http://schemas.microsoft.com/winfx/2006/xaml/presentation"
 3         xmlns:x="http://schemas.microsoft.com/winfx/2006/xaml"
 4         xmlns:d="http://schemas.microsoft.com/expression/blend/2008"
 5         xmlns:mc="http://schemas.openxmlformats.org/markup-compatibility/2006"
 6         xmlns:local="clr-namespace:WpfApp1"
 7         mc:Ignorable="d"
 8         Title="基础样式示例" Height="250" Width="400">
 9     <Window.Resources>
10         <Style  TargetType="Button"  >
11             <Setter Property="Button.Margin" Value="2,5,2,5"></Setter>
12             <Setter Property="Control.FontFamily" Value="SimSun-ExtB"></Setter>
13             <Setter Property="Control.FontSize" Value="18"></Setter>
14         </Style>
15     </Window.Resources>
16     <StackPanel>
17         <Button x:Name="button1" Content="第一个按钮"></Button>
18         <Button x:Name="button2" Content="第二个按钮" ></Button>
19         <Button x:Name="button3" Content="第三个按钮"></Button>
20         <Button x:Name="button4" Content="第四个按钮" ></Button>
21     </StackPanel>
22 </Window>
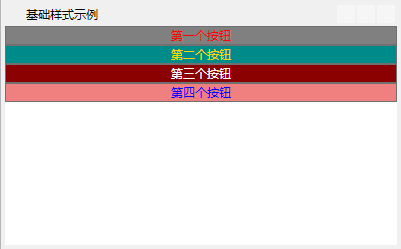
2. 通过Key设置样式
如果需要对每一个控件元素,都设置不同的样式,则可以通过不同的Key加以区分,如下所示:
示例源码
分别设置不同的样式,每一个样式都有一个唯一的Key,然后分别绑定到各个元素的Style属性上,如下所示:
 1 <Window x:Class="WpfApp1.SevenWindow"
 2         xmlns="http://schemas.microsoft.com/winfx/2006/xaml/presentation"
 3         xmlns:x="http://schemas.microsoft.com/winfx/2006/xaml"
 4         xmlns:d="http://schemas.microsoft.com/expression/blend/2008"
 5         xmlns:mc="http://schemas.openxmlformats.org/markup-compatibility/2006"
 6         xmlns:local="clr-namespace:WpfApp1"
 7         mc:Ignorable="d"
 8         Title="基础样式示例" Height="250" Width="400">
 9     <Window.Resources>
10         <Style TargetType="Button" >
11             <Setter Property="Button.Margin" Value="2,5,2,5"></Setter>
12             <Setter Property="Control.FontFamily" Value="SimSun-ExtB"></Setter>
13             <Setter Property="Control.FontSize" Value="16"></Setter>
14         </Style>
15         <Style x:Key="first">
16             <Setter Property="Control.Foreground" Value="Red"></Setter>
17             <Setter Property="Control.Background" Value="Gray"></Setter>
18         </Style>
19         <Style x:Key="second">
20             <Setter Property="ItemsControl.Foreground" Value="Gold"></Setter>
21             <Setter Property="ItemsControl.Background" Value="DarkCyan"></Setter>
22         </Style>
23         <Style x:Key="third">
24             <Setter Property="ItemsControl.Foreground" Value="White"></Setter>
25             <Setter Property="ItemsControl.Background" Value="DarkRed"></Setter>
26         </Style>
27         <Style x:Key="four">
28             <Setter Property="ItemsControl.Foreground" Value="Blue"></Setter>
29             <Setter Property="ItemsControl.Background" Value="LightCoral"></Setter>
30         </Style>
31     </Window.Resources>
32     <StackPanel>
33         <Button x:Name="button1" Content="第一个按钮" Style="{StaticResource first}"></Button>
34         <Button x:Name="button2" Content="第二个按钮" Style="{StaticResource second}"></Button>
35         <Button x:Name="button3" Content="第三个按钮" Style="{StaticResource third}"></Button>
36         <Button x:Name="button4" Content="第四个按钮" Style="{StaticResource four}"></Button>
37     </StackPanel>
38 </Window>
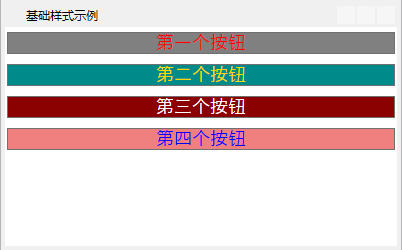
3. 样式继承
通过仔细观察发现,在设置了单独样式以后,统一的样式失去了作用,说明每一个元素控件,只能绑定一个样式,那怎么办才能让统一样式起作用呢?答案就是面向对象思想中的继承。
在WPF中,通过设置BasedOn来继承父样式,如下所示:
示例源码
在每一个样式通过BasedOn属性继承父样式,如下所示:
 1 <Window x:Class="WpfApp1.SevenWindow"
 2         xmlns="http://schemas.microsoft.com/winfx/2006/xaml/presentation"
 3         xmlns:x="http://schemas.microsoft.com/winfx/2006/xaml"
 4         xmlns:d="http://schemas.microsoft.com/expression/blend/2008"
 5         xmlns:mc="http://schemas.openxmlformats.org/markup-compatibility/2006"
 6         xmlns:local="clr-namespace:WpfApp1"
 7         mc:Ignorable="d"
 8         Title="基础样式示例" Height="250" Width="400">
 9     <Window.Resources>
10         <Style x:Key="base" >
11             <Setter Property="Control.Margin" Value="2,5,2,5"></Setter>
12             <Setter Property="Control.FontFamily" Value="SimSun-ExtB"></Setter>
13             <Setter Property="Control.FontSize" Value="18"></Setter>
14         </Style>
15         <Style x:Key="first" BasedOn="{StaticResource base}">
16             <Setter Property="Control.Foreground" Value="Red"></Setter>
17             <Setter Property="Control.Background" Value="Gray"></Setter>
18         </Style>
19         <Style x:Key="second" BasedOn="{StaticResource base}">
20             <Setter Property="ItemsControl.Foreground" Value="Gold"></Setter>
21             <Setter Property="ItemsControl.Background" Value="DarkCyan"></Setter>
22         </Style>
23         <Style x:Key="third" BasedOn="{StaticResource base}">
24             <Setter Property="ItemsControl.Foreground" Value="White"></Setter>
25             <Setter Property="ItemsControl.Background" Value="DarkRed"></Setter>
26         </Style>
27         <Style x:Key="four" BasedOn="{StaticResource base}">
28             <Setter Property="ItemsControl.Foreground" Value="Blue"></Setter>
29             <Setter Property="ItemsControl.Background" Value="LightCoral"></Setter>
30         </Style>
31     </Window.Resources>
32     <StackPanel>
33         <Button x:Name="button1" Content="第一个按钮" Style="{StaticResource first}"></Button>
34         <Button x:Name="button2" Content="第二个按钮" Style="{StaticResource second}"></Button>
35         <Button x:Name="button3" Content="第三个按钮" Style="{StaticResource third}"></Button>
36         <Button x:Name="button4" Content="第四个按钮" Style="{StaticResource four}"></Button>
37     </StackPanel>
38 </Window>
注意:如果样式要被其他样式继承,则最好不要使用TargetType指定。一般情况下,可能为报错【只能根据带有基类型“IFrameworkInputElement”的目标类型的 Style。】
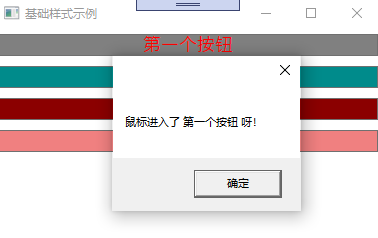
4. 样式中绑定事件
在WPF中的样式中,通过EventSetter进行事件绑定,如下所示:
示例源码
在样式中,通过EventSetter设置事件,如下所示:
 1 <Window x:Class="WpfApp1.SevenWindow"
 2         xmlns="http://schemas.microsoft.com/winfx/2006/xaml/presentation"
 3         xmlns:x="http://schemas.microsoft.com/winfx/2006/xaml"
 4         xmlns:d="http://schemas.microsoft.com/expression/blend/2008"
 5         xmlns:mc="http://schemas.openxmlformats.org/markup-compatibility/2006"
 6         xmlns:local="clr-namespace:WpfApp1"
 7         mc:Ignorable="d"
 8         Title="基础样式示例" Height="250" Width="400">
 9     <Window.Resources>
10         <Style x:Key="base">
11             <Setter Property="Control.Margin" Value="2,5,2,5"></Setter>
12             <Setter Property="Control.FontFamily" Value="SimSun-ExtB"></Setter>
13             <Setter Property="Control.FontSize" Value="18"></Setter>
14         </Style>
15         <Style x:Key="first" BasedOn="{StaticResource base}">
16             <Setter Property="Control.Foreground" Value="Red"></Setter>
17             <Setter Property="Control.Background" Value="Gray"></Setter>
18             <EventSetter Event="Button.MouseEnter" Handler="FirstButton_MouseEnter"></EventSetter>
19         </Style>
20     </Window.Resources>
21     <StackPanel>
22         <Button x:Name="button1" Content="第一个按钮" Style="{StaticResource first}"></Button>
23     </StackPanel>
24 </Window>
其中FirstButton_MouseEnter,文后台定义的一个事件函数,如下所示:
1  private void FirstButton_MouseEnter(object sender,MouseEventArgs e)
2 {
3       Button btn = (Button)sender;
4       MessageBox.Show("鼠标进入了 "+btn.Content.ToString()+" 呀!");
5 }
触发器
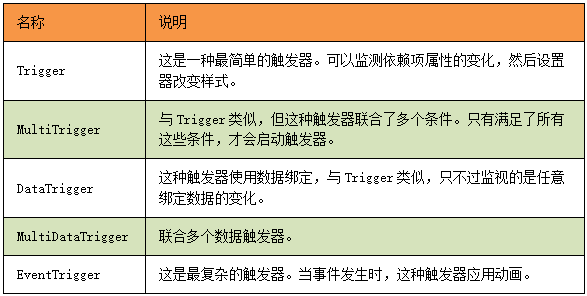
1. 基础触发器
触发器,是指当满足一定条件,然后触发相关的样式设置,如下所示:

示例源码
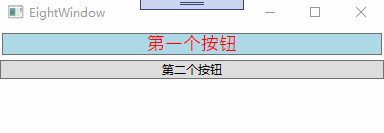
示例中设置了两个触发器:1.Control.IsMouseOver鼠标覆盖在按钮上时,设置对应的样式。2. Control.IsFocused,控件聚焦时,设置对应的样式。如下所示:
 1 <Window x:Class="WpfApp1.EightWindow"
 2         xmlns="http://schemas.microsoft.com/winfx/2006/xaml/presentation"
 3         xmlns:x="http://schemas.microsoft.com/winfx/2006/xaml"
 4         xmlns:d="http://schemas.microsoft.com/expression/blend/2008"
 5         xmlns:mc="http://schemas.openxmlformats.org/markup-compatibility/2006"
 6         xmlns:local="clr-namespace:WpfApp1"
 7         mc:Ignorable="d"
 8         Title="EightWindow" Height="350" Width="400">
 9     <Window.Resources>
10         <Style x:Key="first">
11             <Setter Property="Control.Margin" Value="2,5,2,5"></Setter>
12             <Setter Property="Control.FontFamily" Value="SimSun-ExtB"></Setter>
13             <Setter Property="Control.FontSize" Value="18"></Setter>
14             <Setter Property="Control.Foreground" Value="Red"></Setter>
15             <Setter Property="Control.Background" Value="LightBlue"></Setter>
16             <Style.Triggers>
17                 <Trigger Property="Control.IsMouseOver" Value="True">
18                     <Setter Property="ItemsControl.Background" Value="AliceBlue"></Setter>
19                     <Setter Property="Control.FontSize" Value="28"></Setter>
20                 </Trigger>
21                 <Trigger Property="Control.IsFocused" Value="True">
22                     <Setter Property="ItemsControl.Background" Value="DarkGoldenrod"></Setter>
23                     <Setter Property="Control.FontSize" Value="28"></Setter>
24                 </Trigger>
25             </Style.Triggers>
26         </Style>
27     </Window.Resources>
28     <StackPanel>
29         <Button x:Name="button1" Content="第一个按钮" Style="{StaticResource first}"></Button>
30     </StackPanel>
31 </Window>
注意:如果样式触发器,设置了多个,且条件相互覆盖时,以最后的设置为准。
2. 多条件触发器
如果需要多个条件同时满足,才能设置对应的样式,则可以通过MultiTrigger来设置,如下所示:
 1 <Window x:Class="WpfApp1.EightWindow"
 2         xmlns="http://schemas.microsoft.com/winfx/2006/xaml/presentation"
 3         xmlns:x="http://schemas.microsoft.com/winfx/2006/xaml"
 4         xmlns:d="http://schemas.microsoft.com/expression/blend/2008"
 5         xmlns:mc="http://schemas.openxmlformats.org/markup-compatibility/2006"
 6         xmlns:local="clr-namespace:WpfApp1"
 7         mc:Ignorable="d"
 8         Title="EightWindow" Height="350" Width="400">
 9     <Window.Resources>
10         <Style x:Key="first">
11             <Setter Property="Control.Margin" Value="2,5,2,5"></Setter>
12             <Setter Property="Control.FontFamily" Value="SimSun-ExtB"></Setter>
13             <Setter Property="Control.FontSize" Value="18"></Setter>
14             <Setter Property="Control.Foreground" Value="Red"></Setter>
15             <Setter Property="Control.Background" Value="LightBlue"></Setter>
16             <Style.Triggers>
17                 <MultiTrigger>
18                     <MultiTrigger.Conditions>
19                         <Condition Property="Control.IsMouseOver" Value="True"></Condition>
20                         <Condition Property="Control.IsFocused" Value="True"></Condition>
21                     </MultiTrigger.Conditions>
22                     <MultiTrigger.Setters>
23                         <Setter Property="ItemsControl.Background" Value="Gainsboro"></Setter>
24                         <Setter Property="Control.FontSize" Value="20"></Setter>
25                     </MultiTrigger.Setters>
26                 </MultiTrigger>
27             </Style.Triggers>
28         </Style>
29     </Window.Resources>
30     <StackPanel>
31         <Button x:Name="button1" Content="第一个按钮" Style="{StaticResource first}"></Button>
32         <Button x:Name="button2" Content="第二个按钮" ></Button>
33     </StackPanel>
34 </Window>
3. 事件触发器
事件触发器,是指某一个事件发生时,触发的相关动作,主要用于动画,如下所示:
示例源码
当鼠标进入时,字体变大,当鼠标离开时,字体恢复,如下所示:
 1 <Window x:Class="WpfApp1.EightWindow"
 2         xmlns="http://schemas.microsoft.com/winfx/2006/xaml/presentation"
 3         xmlns:x="http://schemas.microsoft.com/winfx/2006/xaml"
 4         xmlns:d="http://schemas.microsoft.com/expression/blend/2008"
 5         xmlns:mc="http://schemas.openxmlformats.org/markup-compatibility/2006"
 6         xmlns:local="clr-namespace:WpfApp1"
 7         mc:Ignorable="d"
 8         Title="EightWindow" Height="350" Width="400">
 9     <Window.Resources>
10         <Style x:Key="first">
11             <Setter Property="Control.Margin" Value="2,5,2,5"></Setter>
12             <Setter Property="Control.FontFamily" Value="SimSun-ExtB"></Setter>
13             <Setter Property="Control.FontSize" Value="18"></Setter>
14             <Setter Property="Control.Foreground" Value="Red"></Setter>
15             <Setter Property="Control.Background" Value="LightBlue"></Setter>
16             <Style.Triggers>
17                 <EventTrigger RoutedEvent="Mouse.MouseEnter" >
18                     <EventTrigger.Actions>
19                         <BeginStoryboard>
20                             <Storyboard>
21                                 <DoubleAnimation Duration="00:00:02" To="28" From="12" Storyboard.TargetProperty="FontSize"></DoubleAnimation>
22                             </Storyboard>
23                         </BeginStoryboard>
24                     </EventTrigger.Actions>
25                 </EventTrigger>
26                 <EventTrigger RoutedEvent="Mouse.MouseLeave">
27                     <EventTrigger.Actions>
28                         <BeginStoryboard>
29                             <Storyboard>
30                                 <DoubleAnimation Duration="00:00:01" Storyboard.TargetProperty="FontSize" To="18"  />
34                             </Storyboard>
35                         </BeginStoryboard>
36                     </EventTrigger.Actions>
37                 </EventTrigger>
38             </Style.Triggers>
39         </Style>
40     </Window.Resources>
41     <StackPanel>
42         <Button x:Name="button1" Content="第一个按钮" Style="{StaticResource first}"></Button>
43         <Button x:Name="button2" Content="第二个按钮" ></Button>
44     </StackPanel>
45 </Window>
备注
走进WPF,感受WPF之美,本文旨在抛砖引玉,共同学习,一起进步。