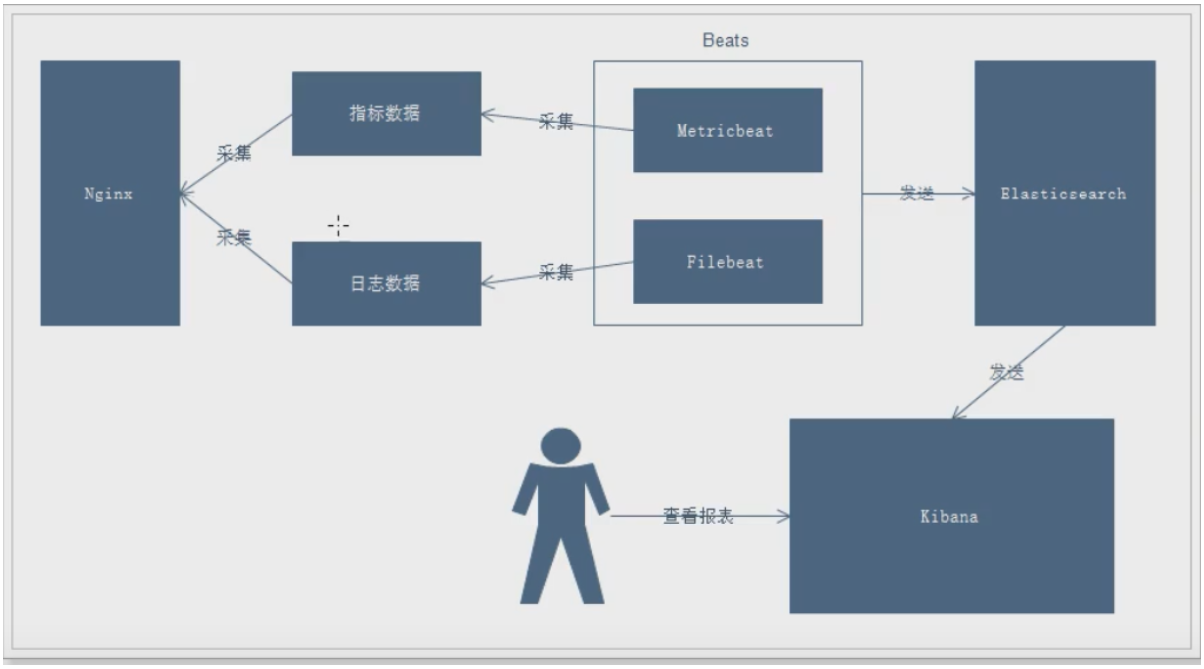
一、ELK日志业务流程

说明:
- 通过Beats采集Nginx的指标数据和日志数据
- Beats采集到数据后发送到Elasticsearch中
- Kibana读取数据进行分析
- 用户通过Kibana进行查看分析报表
二、安装nginx
省略
三、安装filebeat
3.1、什么是filebeat?
### Filebeat工作原理
Filebeat主要由下面几个组件组成: harvester、prospector 、input
#### harvester
- 负责读取单个文件的内容
- harvester逐行读取每个文件(一行一行读取),并把这些内容发送到输出
- 每个文件启动一个harvester,并且harvester负责打开和关闭这些文件,这就意味着harvester运行时文件描述符保持着打开的状态。
- 在harvester正在读取文件内容的时候,文件被删除或者重命名了,那么Filebeat就会续读这个文件,这就会造成一个问题,就是只要负责这个文件的harvester没用关闭,那么磁盘空间就不会被释放,默认情况下,Filebeat保存问价你打开直到close_inactive到达
#### prospector
- prospector(探测器)负责管理harvester(收集器)并找到所有要读取的文件来源
- 如果输入类型为日志,则查找器将查找路径匹配的所有文件,并为每个文件启动一个harvester
- Filebeat目前支持两种prospector类型:log和stdin
- Filebeat如何保持文件的状态
- Filebeat保存每个文件的状态并经常将状态刷新到磁盘上的注册文件中
- 该状态用于记住harvester正在读取的最后偏移量,并确保发送所有日志行。
- 如果输出(例如ElasticSearch或Logstash)无法访问,Filebeat会跟踪最后发送的行,并在输出再次可以用时继续读取文件。
- 在Filebeat运行时,每个prospector内存中也会保存的文件状态信息,当重新启动Filebat时,将使用注册文件的数量来重建文件状态,Filebeat将每个harvester在从保存的最后偏移量继续读取
- 文件状态记录在data/registry文件中
### input
- 一个input负责管理harvester,并找到所有要读取的源
- 如果input类型是log,则input查找驱动器上与已定义的glob路径匹配的所有文件,并为每个文件启动一个harvester
- 每个input都在自己的Go例程中运行
- 下面的例子配置Filebeat从所有匹配指定的glob模式的文件中读取行
```yml
filebeat.inputs:
- type: log
paths:
- /var/log/*.log
- /var/path2/*.log
```
### 启动命令
```bash
./filebeat -e -c mogublog-es.yml
./filebeat -e -c mogublog-es.yml -d "publish"
```
### 参数说明
- **-e:**输出到标准输出,默认输出到syslog和logs下
- **-c:**指定配置文件
- **-d:**输出debug信息
3.2、下载
官网地址:https://www.elastic.co/cn/downloads/beats/filebeat
wget https://artifacts.elastic.co/downloads/beats/filebeat/filebeat-6.5.4-linux-x86_64.tar.gz
3.3、安装
[root@node1 app]# tar -zxvf filebeat-6.5.4-linux-x86_64.tar.gz && mv filebeat-6.5.4-linux-x86_64 filebeat && cd filebeat
3.4、启动
# 创建配置文件、添加如下内容
[root@node1 filebeat]# vim test1.yml
filebeat.inputs: # filebeat input输入
- type: stdin    # 标准输入
  enabled: true  # 启用标准输入
setup.template.settings:
  index.number_of_shards: 3 # 指定下载数
output.console:  # 控制台输出
  pretty: true   # 启用美化功能
  enable: true

# 启动
[root@node1 filebeat]# ./filebeat -e -c test1.yml
3.5、读取文件启动
再次创建一个文件名字为test2.yml,写入以下文件
[root@node1 filebeat]# cat test2.yml
filebeat.inputs:
- type: log
  enabled: true
  paths:
    - /app/test/logs/*.log
setup.template.settings:
  index.number_of_shards: 3
output.console:
  pretty: true
  enable: true
添加完成后,我们在到下面目录创建一个日志文件
[root@node1 filebeat]# mkdir -p /app/test/logs
[root@node1 filebeat]# cd /app/test/logs/
# 追加内容
[root@node1 logs]# echo "hello" >> a.log
启动filebeat
[root@node1 filebeat]# ./filebeat -e -c test2.yml
3.6、自定义字段启动
当元数据没办法支撑我们的业务时,我们还可以自定义添加一些字段
再次创建一个文件名字为test3.yml,写入以下文件
filebeat.inputs:
- type: log
  enabled: true
  paths:
    - /app/test/logs/*.log
  tags: ["web", "test"]  #添加自定义tag,便于后续的处理
  fields:  #添加自定义字段
    from: test-web
  fields_under_root: true #true为添加到根节点,false为添加到子节点中
setup.template.settings:
  index.number_of_shards: 3
output.console:
  pretty: true
  enable: true
启动
[root@node1 filebeat]# ./filebeat -e -c test3.yml
再次写入数据查看结果
# 写入数据
[root@node1 logs]# echo "aaax" > axxx.log

2020-12-05T21:48:40.398+0800	INFO	log/harvester.go:254	Harvester started for file: /app/test/logs/axxx.log
{
  "@timestamp": "2020-12-05T13:48:40.398Z",
  "@metadata": {
    "beat": "filebeat",
    "type": "doc",
    "version": "6.5.4"
  },
  "host": {
    "name": "node1"
  },
  "beat": {
    "name": "node1",
    "hostname": "node1",
    "version": "6.5.4"
  },
  "source": "/app/test/logs/axxx.log",
  "offset": 0,
  "message": "aaax",   # 可以看到刚刚自定义的标签
  "tags": [
    "web",
    "test"
  ],
  "from": "test-web", #	可以看到刚刚自定义的字段(且在子节点)
  "prospector": {
    "type": "log"
  },
  "input": {
    "type": "log"
  }
}
四、输出到ElasticSearch
我们可以通过配置,将修改成如下所示
[root@node1 filebeat]# cat test3.yml
filebeat.inputs:
- type: log
  enabled: true
  paths:
    - /app/test/logs/*.log
  tags: ["web", "test"]  #添加自定义tag,便于后续的处理
  fields:  #添加自定义字段
    from: test-web
  fields_under_root: true #true为添加到根节点,false为添加到子节点中
setup.template.settings:
  index.number_of_shards: 3
#output.console:
#  pretty: true
#  enable: true
# 上面的注释,改成以下2行
output.elasticsearch:
  hosts: ["192.168.1.111","192.168.1.112","192.168.1.113"]
再次启动
[root@node1 filebeat]# ./filebeat -e -c test3.yml
写入数据
[root@node1 logs]# echo "1213" > aa.log
查看结果,说明已经成功连接到了elasticsearch集群中
2020-12-05T22:05:43.376+0800	INFO	log/harvester.go:254	Harvester started for file: /app/test/logs/aa.log
2020-12-05T22:05:44.380+0800	INFO	pipeline/output.go:95	Connecting to backoff(elasticsearch(http://192.168.1.113:9200))
2020-12-05T22:05:44.380+0800	INFO	pipeline/output.go:95	Connecting to backoff(elasticsearch(http://192.168.1.111:9200))
2020-12-05T22:05:44.381+0800	INFO	pipeline/output.go:95	Connecting to backoff(elasticsearch(http://192.168.1.112:9200))
页面查看, 0 1 2 三个分片

五、读取nginx配置文件
修改配置文件如下
[root@node1 filebeat]# cp test3.yml red_nginx.yml
[root@node1 filebeat]# cat red_nginx.yml
filebeat.inputs:
- type: log
  enabled: true
  paths:
    - /app/nginx/logs/*.log
  tags: ["nginx"]  #添加自定义tag,便于后续的处理
setup.template.settings:
  index.number_of_shards: 3
output.elasticsearch:
  hosts: ["192.168.1.111","192.168.1.112","192.168.1.113"]
启动
[root@node1 filebeat]# ./filebeat -e -c red_nginx.yml
六、结合Module收集日志
6.1、Module介绍
前面要想实现日志数据的读取以及处理都是自己手动配置的,其实,在Filebeat中,有大量的Module,可以简化我们的配置,直接就可以使用,如下:
[root@node1 filebeat]# ./filebeat modules list
Enabled:

Disabled:
apache2
auditd
elasticsearch
haproxy
icinga
iis
kafka
kibana
logstash
mongodb
mysql
nginx
osquery
postgresql
redis
suricata
system
traefik
以看到,内置了很多的module,但是都没有启用,如果需要启用需要进行enable操作:
#启动
./filebeat modules enable nginx
#禁用
./filebeat modules disable nginx
可以发现,nginx的module已经被启用。
[root@node1 filebeat]# ./filebeat modules list
Enabled:
nginx
6.2、nginx module 配置
我们到下面的目录,就能看到module的配置了
# 进入到module目录
[root@node1 filebeat]# cd modules.d/
#查看文件
[root@node1 modules.d]# vim nginx.yml
修改后得到的文件内容如下所示
# Module: nginx
# Docs: https://www.elastic.co/guide/en/beats/filebeat/7.9/filebeat-module-nginx.html

- module: nginx
  # Access logs
  access:
    enabled: true
    # 添加日志文件
    var.paths: ["/app/nginx/logs/access.log*"]

    # Set custom paths for the log files. If left empty,
    # Filebeat will choose the paths depending on your OS.
    #var.paths:

  # Error logs
  error:
    enabled: true
    var.paths: ["/app/nginx/logs/error.log*"]
修改filebeat配置文件
[root@node1 filebeat]# cat red_nginx.yml
setup.template.settings:
  index.number_of_shards: 3
output.elasticsearch:
  hosts: ["192.168.1.111","192.168.1.112","192.168.1.113"]
filebeat.config.modules:
  path: ${path.config}/modules.d/*.yml
  reload.enabled: false
又一次启动!
[root@node1 filebeat]# ./filebeat -e -c red_nginx.yml
报错了,意思是要在ES节点上安装这2个包(好像7版本不会报错!!!)
sudo bin/elasticsearch-plugin install ingest-user-agent
sudo bin/elasticsearch-plugin install ingest-geoip
安装,这样安装有点慢,可以自行到网上下载安装包解压
# 切换到elsearch用户
# 进入/app/elasticsearch
# 执行,网速不是很慢的朋友都下挺快的
[elsearch@master elasticsearch]$ bin/elasticsearch-plugin install ingest-user-agent
[elsearch@master elasticsearch]$ bin/elasticsearch-plugin install ingest-geoip

# 然后重启集群
[elsearch@slave1 elasticsearch]$ jps |grep Elasticsearch |awk '{print $1}'|xargs kill -9
[elsearch@slave1 elasticsearch]$ /app/elasticsearch/bin/elasticsearch -d
然后再次启动,就不报错了
[root@node1 filebeat]# ./filebeat -e -c red_nginx.yml
页面查看日志也正常
{
"_index": "filebeat-6.5.4-2020.12.06",
"_type": "doc",
"_id": "6lYMNHYBOXECivMsy6S_",
"_version": 1,
"_score": 1,
"_source": {
"offset": 7542,
"nginx": {
"access": {
"referrer": "-",
"response_code": "200",
"remote_ip": "192.168.1.129",
"method": "GET",
"user_name": "-",
"http_version": "1.1",
"body_sent": {
"bytes": "10"
},
"remote_ip_list": [
"192.168.1.129"
],
"url": "/",
"user_agent": {
"patch": "0",
"original": "curl/7.29.0",
"major": "7",
"minor": "29",
"os": "Other",
"name": "curl",
"os_name": "Other",
"device": "Other"
}
}
},
"prospector": {
"type": "log"
},
"read_timestamp": "2020-12-05T17:56:59.585Z",
"source": "/app/nginx/logs/access.log",
"fileset": {
"module": "nginx",
"name": "access"
},
"input": {
"type": "log"
},
"@timestamp": "2020-12-05T17:56:53.000Z",
"beat": {
"hostname": "node1",
"name": "node1",
"version": "6.5.4"
},
"host": {
"name": "node1"
}
}
}