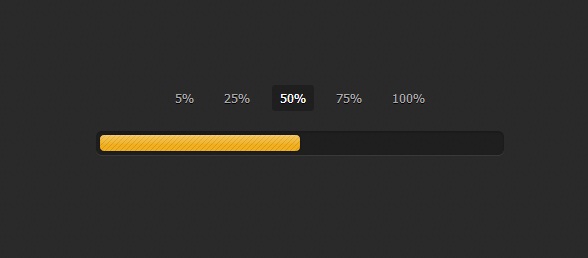
今天是周末,看到一款利用CSS3实现的进度条应用,觉得非常棒,就将它分享给大家,并且将这款CSS3进度条的实现过程大致整理了一下,实现的关键是根据当前的进度需要能改变进度条的背景颜色。下面是效果图:
从外观上来看,这款进度条还是比较优雅的,有jQuery UI的风格。下面我们来看看具体实现的过程。主要是两部分代码,HTML和CSS3。
HTML代码:
<input type="radio" class="radio" name="progress" value="five" id="five">
    <label for="five" class="label">5%</label>

    <input type="radio" class="radio" name="progress" value="twentyfive" id="twentyfive" checked>
    <label for="twentyfive" class="label">25%</label>

    <input type="radio" class="radio" name="progress" value="fifty" id="fifty">
    <label for="fifty" class="label">50%</label>

    <input type="radio" class="radio" name="progress" value="seventyfive" id="seventyfive">
    <label for="seventyfive" class="label">75%</label>

    <input type="radio" class="radio" name="progress" value="onehundred" id="onehundred">
    <label for="onehundred" class="label">100%</label>

    <div class="progress">
      <div class="progress-bar"></div>
    </div>
主要由两部分,一部分是选择进度的按钮,点击按钮即会让进度条跳转到相应进度的位置并显示对应的背景颜色。
还有一部分HTML则是进度条的容器,进度条就在这个容器中发生各种变化。
CSS3代码:
.container {
  margin: 80px auto;
  width: 640px;
  text-align: center;
}
.container .progress {
  margin: 0 auto;
  width: 400px;
}

.progress {
  padding: 4px;
  background: rgba(0, 0, 0, 0.25);
  border-radius: 6px;
  -webkit-box-shadow: inset 0 1px 2px rgba(0, 0, 0, 0.25), 0 1px rgba(255, 255, 255, 0.08);
  box-shadow: inset 0 1px 2px rgba(0, 0, 0, 0.25), 0 1px rgba(255, 255, 255, 0.08);
}

.progress-bar {
  position: relative;
  height: 16px;
  border-radius: 4px;
  -webkit-transition: 0.4s linear;
  -moz-transition: 0.4s linear;
  -o-transition: 0.4s linear;
  transition: 0.4s linear;
  -webkit-transition-property: width, background-color;
  -moz-transition-property: width, background-color;
  -o-transition-property: width, background-color;
  transition-property: width, background-color;
  -webkit-box-shadow: 0 0 1px 1px rgba(0, 0, 0, 0.25), inset 0 1px rgba(255, 255, 255, 0.1);
  box-shadow: 0 0 1px 1px rgba(0, 0, 0, 0.25), inset 0 1px rgba(255, 255, 255, 0.1);
}
.progress-bar:before, .progress-bar:after {
  content: '';
  position: absolute;
  top: 0;
  left: 0;
  right: 0;
}
.progress-bar:before {
  bottom: 0;
  background: url("../img/stripes.png") 0 0 repeat;
  border-radius: 4px 4px 0 0;
}
.progress-bar:after {
  z-index: 2;
  bottom: 45%;
  border-radius: 4px;
  background-image: -webkit-linear-gradient(top, rgba(255, 255, 255, 0.3), rgba(255, 255, 255, 0.05));
  background-image: -moz-linear-gradient(top, rgba(255, 255, 255, 0.3), rgba(255, 255, 255, 0.05));
  background-image: -o-linear-gradient(top, rgba(255, 255, 255, 0.3), rgba(255, 255, 255, 0.05));
  background-image: linear-gradient(to bottom, rgba(255, 255, 255, 0.3), rgba(255, 255, 255, 0.05));
}
上面的CSS代码是对进度条的样式进行定义,并采用渐变的CSS3属性来让进度条的背景颜色更加时尚。
接下来是关键的按钮选择进度的CSS代码:
#five:checked ~ .progress > .progress-bar {
  width: 5%;
  background-color: #f63a0f;
}

#twentyfive:checked ~ .progress > .progress-bar {
  width: 25%;
  background-color: #f27011;
}

#fifty:checked ~ .progress > .progress-bar {
  width: 50%;
  background-color: #f2b01e;
}

#seventyfive:checked ~ .progress > .progress-bar {
  width: 75%;
  background-color: #f2d31b;
}

#onehundred:checked ~ .progress > .progress-bar {
  width: 100%;
  background-color: #86e01e;
}

.radio {
  display: none;
}

.label {
  display: inline-block;
  margin: 0 5px 20px;
  padding: 3px 8px;
  color: #aaa;
  text-shadow: 0 1px black;
  border-radius: 3px;
  cursor: pointer;
}
.radio:checked + .label {
  color: white;
  background: rgba(0, 0, 0, 0.25);
}
用上面的CSS3代码就可以取代js来实现点击选中的事件,非常方便。
实现的方式大致就是这样,你也可以下载源码自己研究。下载地址>>
