- UIGravityBehavior为视图提供重力行为
-
UICollisionBehavior给视图增加碰撞边界
-
UIPushBehavior拖动view使用动画
-
UISnapBehavior拖动到指定位置
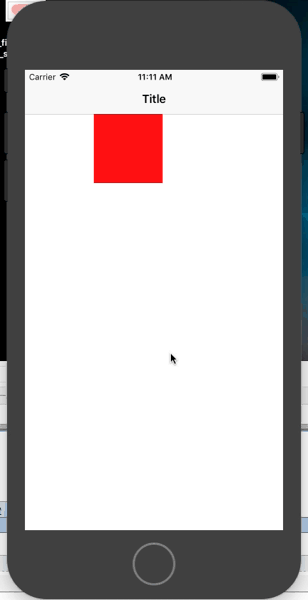
UIGravityBehavior的使用,如果运行就开始动画,则使用代码1,如果指定事件运行,这是用代码2
这里是代码实现
class ViewController: UIViewController{

    //给UI组件添加重力效果
    // UIGravityBehavior
    var redView:UIView?
    var animator:UIDynamicAnimator?

    override func viewDidLoad() {
        super.viewDidLoad()

        redView = UIView.init(frame: CGRect.init(x: 100, y: 64,  100, height: 100))
        if let theReadView = redView{
            theReadView.backgroundColor = UIColor.red
            view.addSubview(theReadView)
            animator = UIDynamicAnimator.init(referenceView: view)
            //这里是代码1
            /*
            if let theAnimator = animator{
                let gravity = UIGravityBehavior.init(items: [theReadView])
                theAnimator.addBehavior(gravity)
            }
            */
        }
    }
    override func touchesBegan(_ touches: Set<UITouch>, with event: UIEvent?) {
        //这里是代码2
         if let theReadView = redView{
            let gravity = UIGravityBehavior.init(items: [theReadView])
            animator?.addBehavior(gravity)
         }
    }

}
这里可以看出来,RedView直接超出屏幕了,如果指定碰撞边界,或者防止两个碰撞重叠
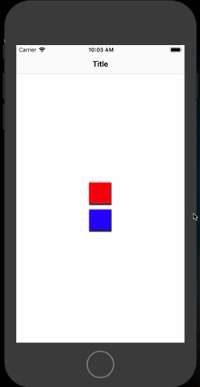
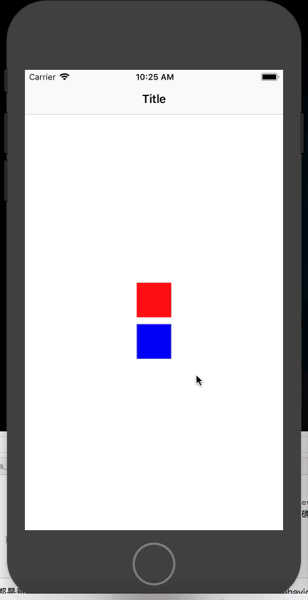
UICollisionBehavior的使用
class ViewController: UIViewController{

    //给UI组件添加重力效果
    // UIGravityBehavior
    var squareViews = [AnyObject]()
    var animator:UIDynamicAnimator?

    override func viewDidLoad() {
        super.viewDidLoad()
        let colors = [UIColor.red,UIColor.blue]
        var currentCenterPoint = view.center
        let eachSize = CGSize.init( 50, height: 50)
        for counter in 0..<2{
            let newView = UIView.init(frame: CGRect.init(x: 0, y: 0,  eachSize.width, height: eachSize.height))
            newView.backgroundColor = colors[counter]
            newView.center = currentCenterPoint
            currentCenterPoint.y += eachSize.height+10
            squareViews.append(newView)
            view.addSubview(newView)
        }

    }
    override func touchesBegan(_ touches: Set<UITouch>, with event: UIEvent?) {
        animator = UIDynamicAnimator.init(referenceView: self.view)
        /*创建重力*/
        let gravity = UIGravityBehavior.init(items: squareViews as! [UIDynamicItem])
        animator!.addBehavior(gravity)
        /*创建碰撞监测*/
        let collision = UICollisionBehavior.init(items: squareViews as! [UIDynamicItem])
        collision.translatesReferenceBoundsIntoBoundary = true//确保动画对象使用父视图作为参考视图进行初始化
        animator!.addBehavior(collision)
    }

}
以上都是垂直下落,但是如果自己设置下落路线,可以使用UICollisionBehavior的方法
open func addBoundary(withIdentifier identifier: NSCopying, from p1: CGPoint, to p2: CGPoint)
//withIdentifier 边界标识符,如果传入改表示符,就可以得到该对象  from开始点 to结束点
        collision.addBoundary(withIdentifier: "Identifier" as NSCopying, from: CGPoint.init(x: 0, y:  0), to: CGPoint.init(x: view.bounds.size.width-50, y: view.bounds.size.height-50))
效果图
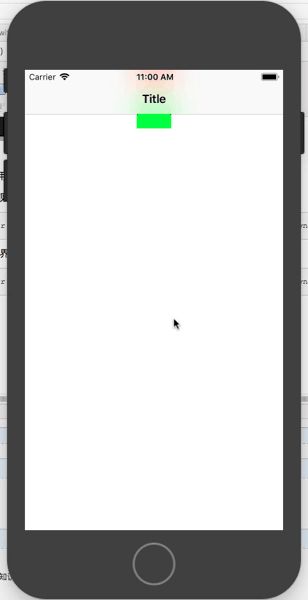
UICollisionBehaviorDelegate的使用,如果想要监测不同物体间的碰撞,可以使用代理,
当一个物体碰撞另外一个物体会实现代理方法,
public func collisionBehavior(_ behavior: UICollisionBehavior, beganContactFor item: UIDynamicItem, withBoundaryIdentifier identifier: NSCopying?, at p: CGPoint)
当一个无物体脱离边界,不在于边界接触是,触发
public func collisionBehavior(_ behavior: UICollisionBehavior, endedContactFor item: UIDynamicItem, withBoundaryIdentifier identifier: NSCopying?)
class ViewController: UIViewController,UICollisionBehaviorDelegate{

    //给UI组件添加重力效果
    // UIGravityBehavior
    var squareViews = [AnyObject]()
    var animator:UIDynamicAnimator?
    let bottomBoundary = "bottomBoundary"
    override func viewDidLoad() {
        super.viewDidLoad()
        let colors = [UIColor.red,UIColor.green]
        var currentCenterPoint = CGPoint.init(x: view.center.x, y: 0)
        let eachSize = CGSize.init( 50, height: 50)
        for counter in 0..<2{
            let newView = UIView.init(frame: CGRect.init(x: 0, y: 0,  eachSize.width, height: eachSize.height))
            newView.backgroundColor = colors[counter]
            newView.center = currentCenterPoint
            currentCenterPoint.y += eachSize.height+10
            squareViews.append(newView)
            view.addSubview(newView)
        }

    }
    override func touchesBegan(_ touches: Set<UITouch>, with event: UIEvent?) {
        animator = UIDynamicAnimator.init(referenceView: self.view)
        /*创建重力*/
        let gravity = UIGravityBehavior.init(items: squareViews as! [UIDynamicItem])
        animator!.addBehavior(gravity)
        /*创建碰撞监测*/
        let collision = UICollisionBehavior.init(items: squareViews as! [UIDynamicItem])
        collision.translatesReferenceBoundsIntoBoundary = true//确保动画对象使用父视图作为参考视图进行初始化

        //withIdentifier 边界标识符,如果传入改表示符,就可以得到该对象  from开始点 to结束点
        collision.addBoundary(withIdentifier: bottomBoundary as NSCopying, from: CGPoint.init(x: 0, y:  view.bounds.size.height-100), to: CGPoint.init(x: view.bounds.size.width, y: view.bounds.size.height-100))
        collision.collisionDelegate = self
        animator!.addBehavior(collision)


    }
    //
    public func collisionBehavior(_ behavior: UICollisionBehavior, beganContactFor item: UIDynamicItem, withBoundaryIdentifier identifier: NSCopying?, at p: CGPoint){
        if identifier == nil{
            return;
        }
        if identifier as? String == bottomBoundary{
            UIView.animate(withDuration: 1, animations: {
                let view = item as! UIView
                view.backgroundColor = UIColor.red
                view.alpha = 0
                view.transform = CGAffineTransform.init(scaleX: 2, y: 2)
            }) { (finish) in
                let view = item as! UIView
                behavior.removeItem(item)
                view.removeFromSuperview()
            }

        }
    }

}
UIPushBehavior的使用
class ViewController: UIViewController{

    // UIPushBehavior 推动,需要设置推动的弧度和推动的力量值,就是angle和magnitude
    var squareView :UIView?
    var animator :UIDynamicAnimator?
    var pushBehavior :UIPushBehavior?

    //初始化squareView
    func createSmallSquareView(){
        squareView = UIView.init(frame: CGRect.init(x: 0, y: 0,  80, height: 80))
        if let theSquareView = squareView{
            theSquareView.backgroundColor = UIColor.green
            theSquareView.center = view.center
            view.addSubview(theSquareView)
        }
    }
    func createGestureRecognizer(){

        let gapGestureRecognizer = UITapGestureRecognizer.init(target: self, action: #selector(hadleTop(tap:)));
        self.view.addGestureRecognizer(gapGestureRecognizer)
    }

    func createAnimatorAndBehaviors(){
        animator = UIDynamicAnimator.init(referenceView: self.view)
        if let theSquareView = squareView{
            /*创建碰撞监测*/
            let collision = UICollisionBehavior.init(items: [squareView] as! [UIDynamicItem])
            collision.translatesReferenceBoundsIntoBoundary = true//确保动画对象使用父视图作为参考视图进行初始化
            pushBehavior = UIPushBehavior.init(items: [theSquareView], mode: .continuous)
            animator?.addBehavior(collision)
            animator?.addBehavior(pushBehavior!)
        }
    }

    override func viewDidLoad() {
        super.viewDidLoad()
        createGestureRecognizer()
        createSmallSquareView()
        createAnimatorAndBehaviors()

    }
    @objc func hadleTop(tap:UITapGestureRecognizer){
        let tapPoint = tap.location(in: view)
        let squareViewCenterPoint = self.squareView!.center
        /*获取方块与中心点的距离*/
        let deltax = tapPoint.x - squareViewCenterPoint.x
        let dettay = tapPoint.y - squareViewCenterPoint.y
        /*计算方块视图和点击触点的角度,从而得到推动的角度,用户监测两个点角度的公式*/
        let angle = atan2(dettay, deltax)
        pushBehavior!.angle = angle //设置推动的弧度
        /*距离公式*/
        let distanceBetweenPoints = sqrt(pow(tapPoint.x - squareViewCenterPoint.x, 2.0)+pow(tapPoint.y-squareViewCenterPoint.y, 2.0))
        pushBehavior!.magnitude = distanceBetweenPoints/200.0//设置重力值,越大,相当于对于的力量越大,每一个点力量值会实现100点每平方秒的加速度

    }


}
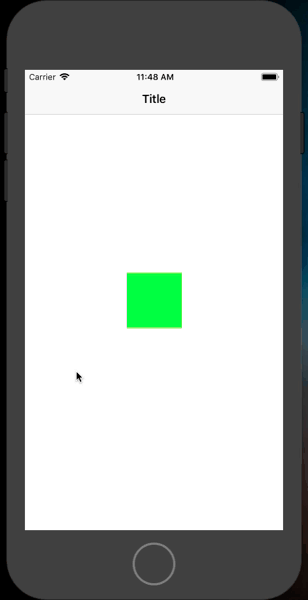
UISnapBehavior的使用

class ViewController: UIViewController{

    // UIPushBehavior 推动,需要设置推动的弧度和推动的力量值,就是angle和magnitude
    var squareView :UIView?
    var animator :UIDynamicAnimator?
    var snapBehavior :UISnapBehavior?

    //初始化squareView
    func createSmallSquareView(){
        squareView = UIView.init(frame: CGRect.init(x: 0, y: 0,  80, height: 80))
        if let theSquareView = squareView{
            theSquareView.backgroundColor = UIColor.green
            theSquareView.center = view.center
            view.addSubview(theSquareView)
        }
    }
    func createGestureRecognizer(){

        let gapGestureRecognizer = UITapGestureRecognizer.init(target: self, action: #selector(hadleTop(tap:)));
        self.view.addGestureRecognizer(gapGestureRecognizer)
    }

    func createAnimatorAndBehaviors(){
        animator = UIDynamicAnimator.init(referenceView: self.view)
        if let theSquareView = squareView{
            /*创建碰撞监测*/
            let collision = UICollisionBehavior.init(items: [squareView] as! [UIDynamicItem])
            collision.translatesReferenceBoundsIntoBoundary = true//确保动画对象使用父视图作为参考视图进行初始化
            snapBehavior = UISnapBehavior.init(item: theSquareView, snapTo: theSquareView.center)
            snapBehavior!.damping = 0.5
            animator?.addBehavior(collision)
            animator?.addBehavior(snapBehavior!)
        }
    }

    override func viewDidLoad() {
        super.viewDidLoad()
        createGestureRecognizer()
        createSmallSquareView()
        createAnimatorAndBehaviors()

    }
    @objc func hadleTop(tap:UITapGestureRecognizer){
        let tapPoint = tap.location(in: view)
        if let theSnap = snapBehavior{
            animator!.removeBehavior(theSnap)
        }

        snapBehavior = UISnapBehavior.init(item: squareView!, snapTo: tapPoint)
        snapBehavior!.damping = 0.5
        animator?.addBehavior(snapBehavior!)

    }


}