一、消息中间件的应用场景
异步处理
场景:用户注册,信息写入数据库后,需要给用户发送注册成功的邮件,再发送注册成功的邮件。
1.同步调用:注册成功后,顺序执行发送邮件方法,发送短信方法,最后响应用户

2.并行调用:注册成功后,用多线程的方式并发执行发邮件和发短信方法,最后响应用户
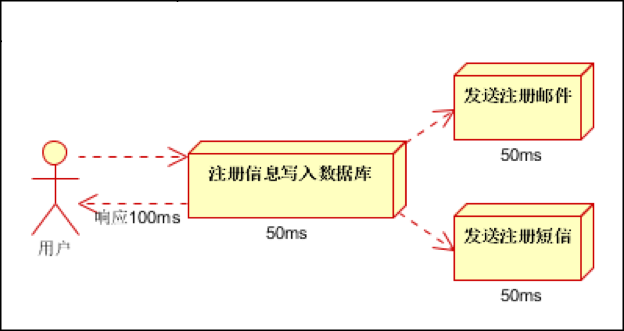
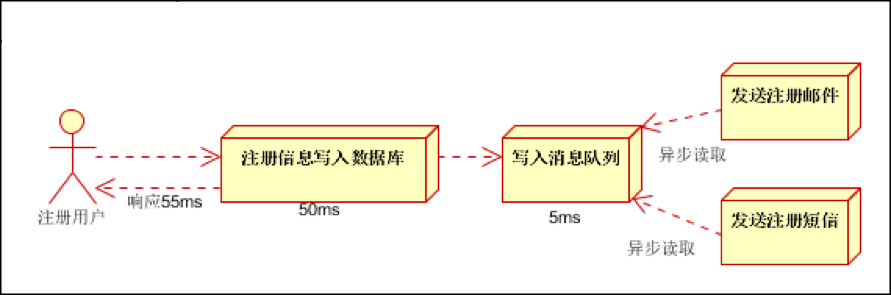
3.消息队列:注册成功后,将要发送的消息用很短的时间写入消息队列中,之后响应用户;发送邮件的服务和发送短息的服务就可以从消息队列中异步读去,然后发送任务。
应用解耦
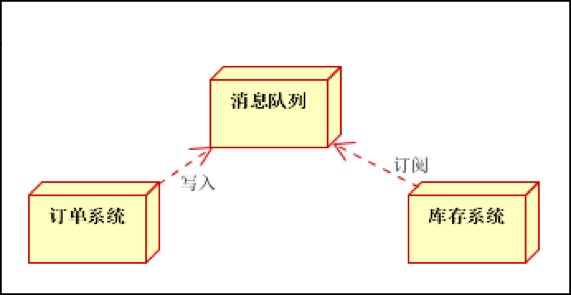
场景:购物下单后,调用库存系统,更新库存。
1.耦合的方式:订单系统,写调用库存系统的逻辑。

2.解耦的方式:订单系统,将下达的消息写入消息队列,库存系统从消息队列中读取消息,更新库存。
流量削峰
秒杀场景中,我们可以设置一个定长的消息队列,秒杀开始,谁快谁先进入队列,然后快速返回用户是否秒到 ,之后在平稳的处理秒杀后的业务。

二、消息服务中间件概述
-
- 大多应用中,可通过消息服务中间件来提升系统异步通信、扩展解耦能力
-
- 消息服务中两个重要概念:
消息代理(message broker)和目的地(destination) 当消息发送者发送消息以后,将由消息代理接管,消息代理保证消息传递到指定目
的地。
- 消息服务中两个重要概念:
-
- 消息队列主要有两种形式的目的地
-
- 队列(queue):点对点消息通信(point-to-point)
-
- 主题(topic):发布(publish)/订阅(subscribe)消息通信
-
- 点对点式:
-
- 消息发送者发送消息,消息代理将其放入一个队列中,消息接收者从队列中获取消息内容, 消息读取后被移出队列
-
- 消息只有唯一的发送者和接受者,但并不是说只能有一个接收者
-
- 发布订阅式:
- 发送者(发布者)发送消息到主题,多个接收者(订阅者)监听(订阅)这个主题,那么 就会在消息到达时同时收到消息
-
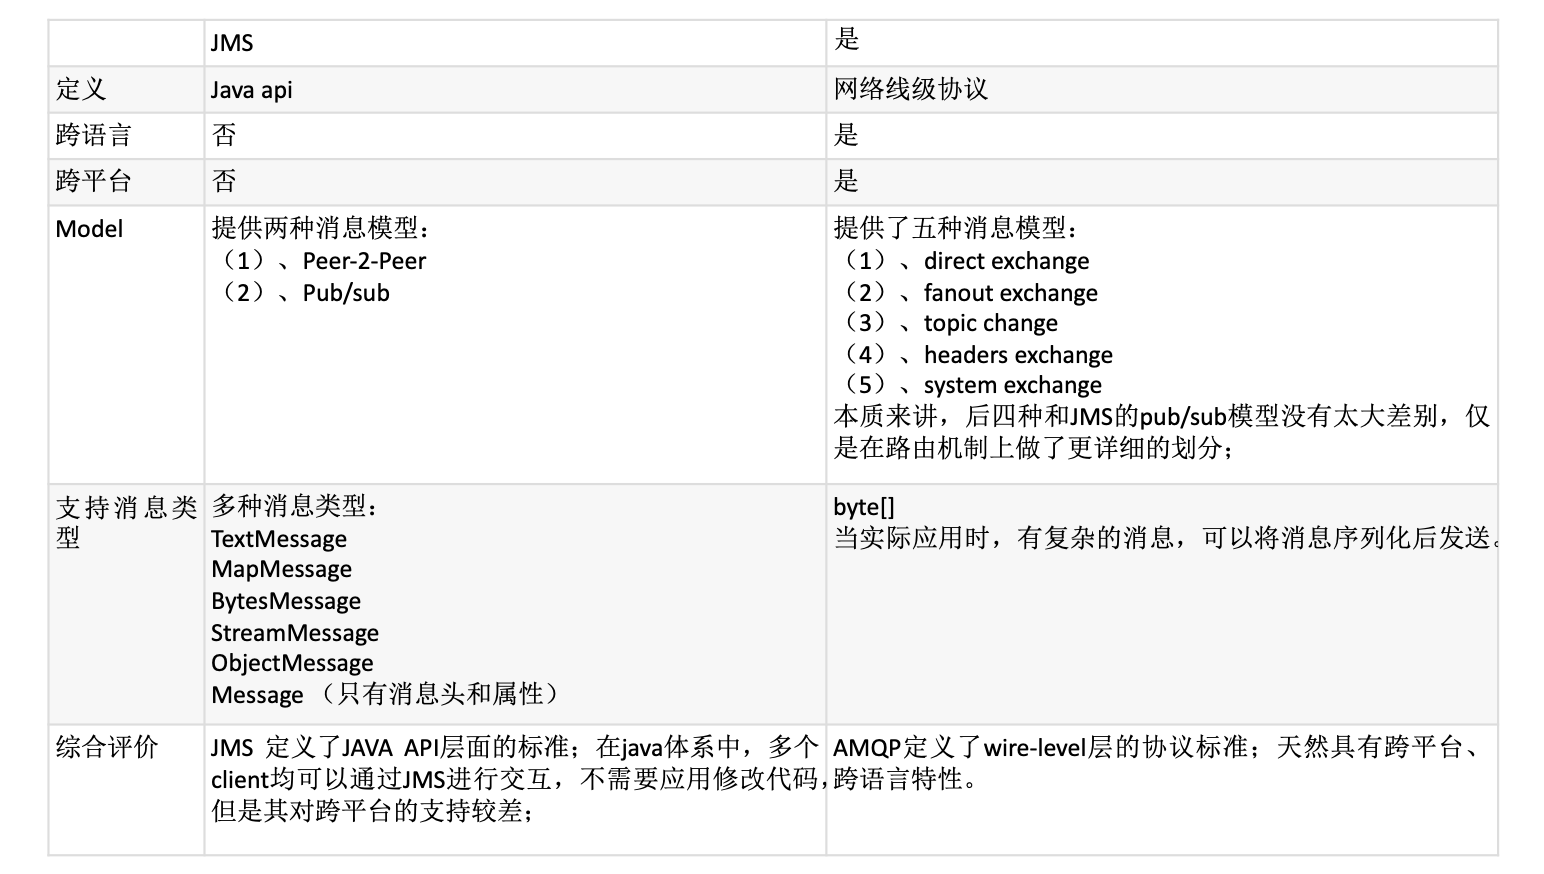
- JMS(Java Message Service)JAVA消息服务:
- 基于JVM消息代理的规范。ActiveMQ、HornetMQ是JMS实现
-
- AMQP(Advanced Message Queuing Protocol)
- 高级消息队列协议,也是一个消息代理的规范,兼容JMS
- RabbitMQ是AMQP的实现
-
- Spring支持
- spring-jms提供了对JMS的支持
- spring-rabbit提供了对AMQP的支持
- 需要ConnectionFactory的实现来连接消息代理
- 提供JmsTemplate、RabbitTemplate来发送消息
- @JmsListener(JMS)、@RabbitListener(AMQP)注解在方法上监听消息代理发 布的消息
- @EnableJms、@EnableRabbit开启支持
-
- Spring Boot自动配置
- JmsAutoConfiguration
- RabbitAutoConfiguration
三、RabbitMQ简介
RabbitMQ是一个由erlang开发的AMQP(Advanved Message Queue Protocol)的开源实现。
1. 核心概念
- Message :消息,消息是不具名的,它由消息头和消息体组成。消息体是不透明的,而消息头则由一系列的可选属性组 成,这些属性包括routing-key(路由键)、priority(相对于其他消息的优先权)、delivery-mode(指出 该消息可能需要持久性存储)等。
- Publisher :消息的生产者,也是一个向交换器发布消息的客户端应用程序。
- Exchange :交换器,用来接收生产者发送的消息并将这些消息路由给服务器中的队列。Exchange有4种类型:direct(默认),fanout, topic, 和headers,不同类型的Exchange转发消息的策略有所区别
- Queue :消息队列,用来保存消息直到发送给消费者。它是消息的容器,也是消息的终点。一个消息可投入一个或多个队列。消息一直在队列里面,等待消费者连接到这个队列将其取走。
- Binding :绑定,用于消息队列和交换器之间的关联。一个绑定就是基于路由键将交换器和消息队列连接起来的路由规则,所以可以将交换器理解成一个由绑定构成的路由表。Exchange 和Queue的绑定可以是多对多的关系。
- Connection :网络连接,比如一个TCP连接。
- Channel :信道,多路复用连接中的一条独立的双向数据流通道。信道是建立在真实的TCP连接内的虚 拟连接,AMQP 命令都是通过信道发出去的,不管是发布消息、订阅队列还是接收消息,这 些动作都是通过信道完成。因为对于操作系统来说建立和销毁 TCP 都是非常昂贵的开销,所 以引入了信道的概念,以复用一条 TCP 连接。
- Consumer :消息的消费者,表示一个从消息队列中取得消息的客户端应用程序。
- Virtual Host :虚拟主机,表示一批交换器、消息队列和相关对象。虚拟主机是共享相同的身份认证和加 密环境的独立服务器域。每个 vhost 本质上就是一个 mini 版的 RabbitMQ 服务器,拥有 自己的队列、交换器、绑定和权限机制。vhost 是 AMQP 概念的基础,必须在连接时指定, RabbitMQ 默认的 vhost 是 / 。
- Broker :表示消息队列服务器实体。

四、RabbitMQ运行机制
AMQP 中的消息路由
AMQP 中消息的路由过程和 Java 开发者熟悉的 JMS 存在一些差别,AMQP 中增加了 Exchange 和 Binding 的角色。生产者把消息发布到 Exchange 上,消息最终到达队列并被 消费者接收,而 Binding 决定交换器的消息应该发送到那个队列。

Exchange 类型
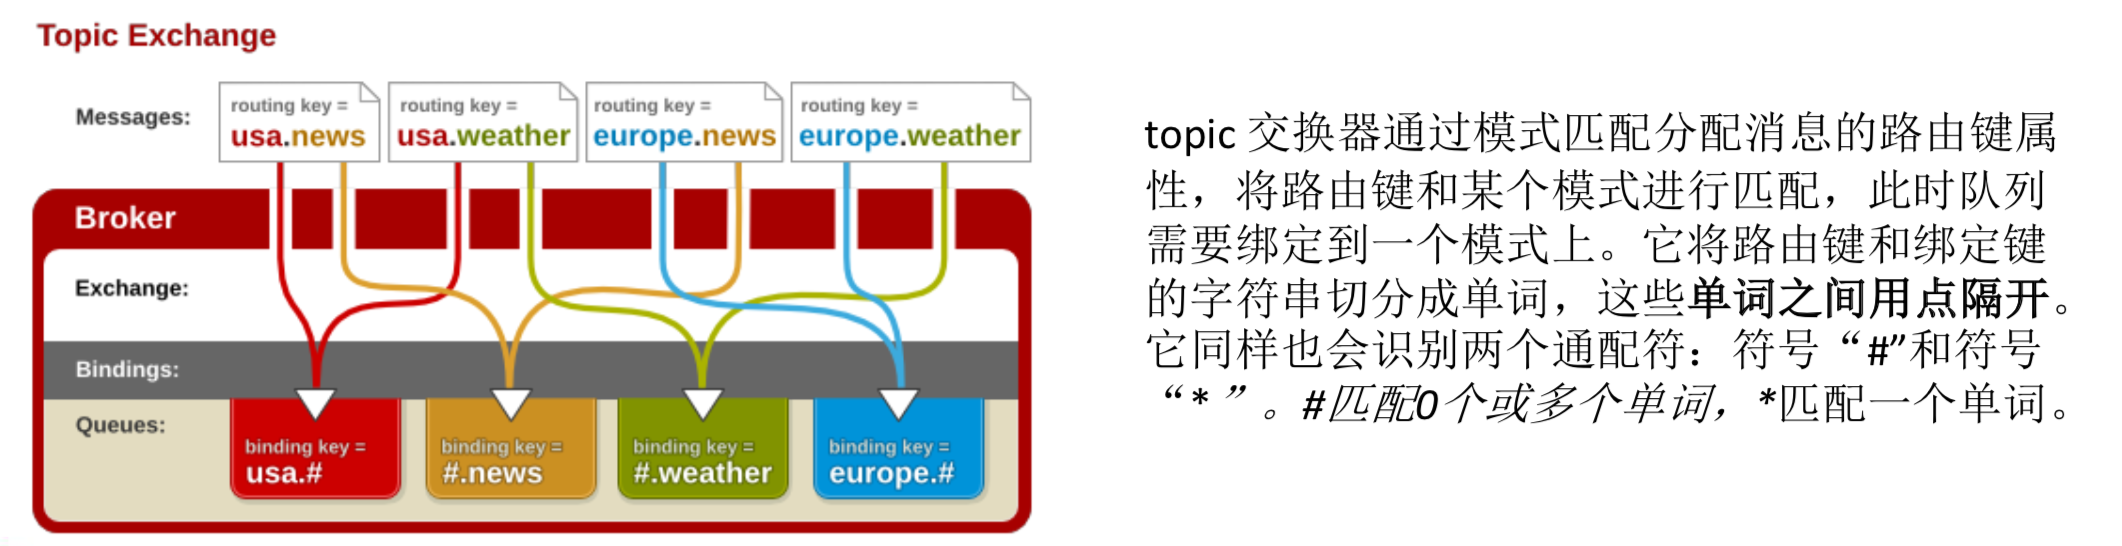
Exchange分发消息时根据类型的不同分发策略有区别,目前共四种类型:direct、fanout、topic、headers 。headers 匹配 AMQP 消息的 header 而不是路由键, headers 交换器和 direct 交换器完全一致,但性能差很多,目前几乎用不到了,所以直接看另外三种类型:

五、RabbitMQ安装
我们使用 docker 来安装 RabbitMQ。
我们在 docker hub上选择官方的带management管理界面的最新版本。

#获取rabbitmq镜像
docker pull rabbitmq:3-management
#启动 rabbitmq镜像,5672是mq通信端口,15672是mq的web管理界面端口
run -d -p 5672:5672 -p 15672:15672 --name myrabbitmq 镜像ID
访问127.0.0.1:15672 ,用账号:guest 密码:guest 登录,界面如下:

对rabbitmq的详细使用在这里,就不讲解了,我们这节的重点是整合rabbitmq。
六、整合RabbitMQ
创建项目引入rabbitmq依赖。
1. pom.xml
<?xml version="1.0" encoding="UTF-8"?>
<project xmlns="http://maven.apache.org/POM/4.0.0" xmlns:xsi="http://www.w3.org/2001/XMLSchema-instance"
	xsi:schemaLocation="http://maven.apache.org/POM/4.0.0 http://maven.apache.org/xsd/maven-4.0.0.xsd">
	<modelVersion>4.0.0</modelVersion>

	<groupId>com.gf</groupId>
	<artifactId>springboot-rabbitmq</artifactId>
	<version>0.0.1-SNAPSHOT</version>
	<packaging>jar</packaging>

	<name>springboot-rabbitmq</name>
	<description>Demo project for Spring Boot</description>

	<parent>
		<groupId>org.springframework.boot</groupId>
		<artifactId>spring-boot-starter-parent</artifactId>
		<version>2.0.5.RELEASE</version>
		<relativePath/> <!-- lookup parent from repository -->
	</parent>

	<properties>
		<project.build.sourceEncoding>UTF-8</project.build.sourceEncoding>
		<project.reporting.outputEncoding>UTF-8</project.reporting.outputEncoding>
		<java.version>1.8</java.version>
	</properties>

	<dependencies>
		<dependency>
			<groupId>org.springframework.boot</groupId>
			<artifactId>spring-boot-starter-amqp</artifactId>
		</dependency>
		<dependency>
			<groupId>org.springframework.boot</groupId>
			<artifactId>spring-boot-starter-web</artifactId>
		</dependency>

		<dependency>
			<groupId>org.springframework.boot</groupId>
			<artifactId>spring-boot-starter-test</artifactId>
			<scope>test</scope>
		</dependency>
	</dependencies>

	<build>
		<plugins>
			<plugin>
				<groupId>org.springframework.boot</groupId>
				<artifactId>spring-boot-maven-plugin</artifactId>
			</plugin>
		</plugins>
	</build>

</project>
2. MyAMQPConfig
package com.gf.config;

import org.springframework.amqp.support.converter.Jackson2JsonMessageConverter;
import org.springframework.context.annotation.Bean;
import org.springframework.context.annotation.Configuration;
import org.springframework.amqp.support.converter.MessageConverter;

/**
 * 自定义消息转换器,默认是jdk的序列化转换器,我们自定义为json的
 */
@Configuration
public class MyAMQPConfig {

    @Bean
    public MessageConverter messageConverter() {
        return new Jackson2JsonMessageConverter();
    }

}
3. springboot 测试类
我们测试创建管理配置、发送消息、接收消息
package com.gf;

import org.junit.Test;
import org.junit.runner.RunWith;
import org.springframework.amqp.core.AmqpAdmin;
import org.springframework.amqp.core.Binding;
import org.springframework.amqp.core.DirectExchange;
import org.springframework.amqp.core.FanoutExchange;
import org.springframework.amqp.core.Queue;
import org.springframework.amqp.core.TopicExchange;
import org.springframework.amqp.rabbit.core.RabbitTemplate;
import org.springframework.beans.factory.annotation.Autowired;
import org.springframework.boot.test.context.SpringBootTest;
import org.springframework.test.context.junit4.SpringRunner;

import java.util.Arrays;
import java.util.HashMap;
import java.util.Map;

@RunWith(SpringRunner.class)
@SpringBootTest
public class SpringbootRabbitmqApplicationTests {

	@Autowired
	RabbitTemplate rabbitTemplate;

	@Autowired
	AmqpAdmin amqpAdmin;

	@Test
	public void contextLoads() {
	}

	@Test
	public void create(){
		//创建Exchange
		amqpAdmin.declareExchange( new DirectExchange( "exchange.direct") );
		amqpAdmin.declareExchange( new FanoutExchange( "exchange.fanout") );
		amqpAdmin.declareExchange( new TopicExchange( "exchange.topic") );

		//创建Queue
		amqpAdmin.declareQueue( new Queue( "direct.queue" , true ) );
		amqpAdmin.declareQueue( new Queue( "fanout.queue" , true ) );

		//绑定Queue
		amqpAdmin.declareBinding( new Binding( "direct.queue" , Binding.DestinationType.QUEUE , "exchange.direct" , "direct.queue" , null ) );
		amqpAdmin.declareBinding( new Binding( "fanout.queue" , Binding.DestinationType.QUEUE , "exchange.direct" , "fanout.queue" , null ) );
		amqpAdmin.declareBinding( new Binding( "direct.queue" , Binding.DestinationType.QUEUE , "exchange.fanout" , "" , null ) );
		amqpAdmin.declareBinding( new Binding( "fanout.queue" , Binding.DestinationType.QUEUE , "exchange.fanout" , "" , null ) );
		amqpAdmin.declareBinding( new Binding( "direct.queue" , Binding.DestinationType.QUEUE , "exchange.topic" , "direct.#" , null ) );
		amqpAdmin.declareBinding( new Binding( "fanout.queue" , Binding.DestinationType.QUEUE , "exchange.topic" , "direct.*" , null ) );


	}

	@Test
	public void send2Direct() {
		Map<String , Object> map = new HashMap<>();
		map.put( "msg" , "这是一条点对点消息" );
		map.put( "data" , Arrays.asList("helloworld" , 123 , true) );

		rabbitTemplate.convertAndSend( "exchange.direct" , "direct.queue" , map );

	}

	@Test
	public void send2Topic() {
		Map<String , Object> map = new HashMap<>();
		map.put( "msg" , "这是一条广播消息" );
		map.put( "data" , Arrays.asList("topic消息" , 123 , true) );

		rabbitTemplate.convertAndSend( "exchange.fanout" , "", map );

	}

	@Test
	public void receive() {
		Object o = rabbitTemplate.receiveAndConvert( "direct.queue" );
		o.getClass();
		System.out.println(o.getClass());
		System.out.println(o);
	}

}
监听消息
4. 启动类
package com.gf;

import org.springframework.amqp.rabbit.annotation.EnableRabbit;
import org.springframework.boot.SpringApplication;
import org.springframework.boot.autoconfigure.SpringBootApplication;

/**
 * 自动配置
 * 1. RabbitAutoConfiguration
 * 2. 自动配置了连接工厂ConnectionFactory
 * 3. RabbitProperties 封装了RabbitMQ的配置
 * 4. RabbitTemplate : 给RabbitMQ发送和接受消息
 * 5. AmqpAdmin : RabbitMQ系统管理功能组件
 * 6. @EnableRabbit + @RabbitListener
 */
@EnableRabbit
@SpringBootApplication
public class SpringbootRabbitmqApplication {

	public static void main(String[] args) {
		SpringApplication.run(SpringbootRabbitmqApplication.class, args);
	}
}
5. MQService
package com.gf.service;


import org.springframework.amqp.core.Message;
import org.springframework.amqp.rabbit.annotation.RabbitListener;
import org.springframework.stereotype.Service;

@Service
public class MQService {

    @RabbitListener(queues = "fanout.queue")
    public void receive(Message message) {
        System.out.println("收到消息 : " + new String(message.getBody()));

    }

}
源码下载:https://github.com/gf-huanchupk/SpringBootLearning
欢迎扫码或微信搜索公众号《程序员果果》关注我,关注有惊喜~