Sanic问题
1.什么是Web框架?
2.为什么要用Web框架?
3.在Python中常用的Web框架有
django flask tornado sanic
Sanic
简介
Sanic是一个类Flask的基于Python3.5以上的Web框架,它除了与Flask功能类似外,它还支持异步请求处理,是一个异步协程框架。这意味着你可以使用async/await语法,编写非阻塞的快速代码,而且使你的程序运行速度加快。
关于asyncio包的介绍:使用asyncio处理并发
官方提供的速度对比:

产生原因:
使用较早的异步框架是aiohttp,它提供了server端和client端,对asyncio做了很好的封装。但是开发方式和最流行的微框架flask不同,flask开发简单,轻量,高效。将两者结合起来就有了sanic。
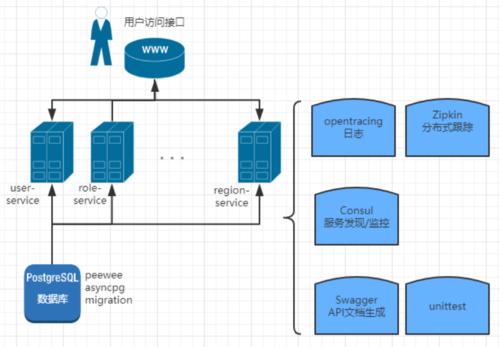
微服务是近几年比较火的开发模式,它解决了复杂性问题,提高开发效率,便于部署等优点,正是结合这些优点, 以Sanic为基础,集成多个流行的库来搭建微服务。
uvloop
uvloop 是 asyncio 默认事件循环的替代品,实现的功能完整,切即插即用。uvloop是用CPython 写的,建于libuv之上。uvloop 可以使 asyncio 更快。事实上,它至少比 nodejs、gevent 和其他 Python 异步框架要快两倍 。基于 uvloop 的 asyncio 的速度几乎接近了 Go 程序的速度。
由于uvloop 还只能在 Linux 平台 和 Python3.5+以上版本使用。所以高性能部分Windows用不了。
uvloop的安装使用:
pip install uvloop

import asyncio
import uvloop
asyncio.set_event_loop_policy(uvloop.EventLoopPolicy())
Flask与Sanic的对比
架构对比:
Flask:

特点对比:
flask:
简单,轻量,高效
werkzeug(路由模块)Jinja2(模板引擎)
Werkzeug是一个遵循WSGI协议的python函数库
其内部实现了很多Web框架底层的东西,比如request和response对象;
- 与WSGI规范的兼容;支持Unicode;
- 支持基本的会话管理和签名Cookie;
- 集成URL请求路由等
Flask-SQLalchemy:操作数据库、
Flask-script:插入脚本
Flask-migrate:管理迁移数据库
Flask-Session:Session存储方式指定
sanic:
简单,轻量,高效,异步
由werkzeug的DispatcherMiddleware驱动的调度程序
uvloop为核心引擎,使sanic在很多情况下单机并发甚至不亚于Golang
asyncpg为数据库驱动,进行数据库连接,执行sql语句执行
aiohttp为Client,对其他微服务进行访问
peewee为ORM,但是只是用来做模型设计和migration
opentracing为分布式追踪系统
unittest做单元测试,并且使用mock来避免访问其他微服务
swagger做API标准,能自动生成API文档
Sanic使用
1.简单使用
1.1安装
pip install sanic
1.2起步
from sanic import Sanic
from sanic.response import json

app = Sanic()

@app.route("/")
async def test(request):
    return json({"hello": "world"})

if __name__ == "__main__":
    app.run(host="0.0.0.0", port=8000)
2.路由
request路由规则与flask一致,一看就懂,可以使用变量、正则来设置。
@app.route('/')
async def index():
    return text('Index Page')

@app.route('/hello')
async def hello():
    return text('Hello World')
注意:必须使用async def语法定义函数,来保证其可以进行异步处理.
2.1请求参数
Sanic的基础路由支持请求参数的操作,使用尖括号<PARAM>将指定参数括起来,请求参数将作为路由函数的关键字参数。
from sanic.response import text

@app.route('/tag/<tag>')
async def tag_handler(request, tag):
    return text('Tag - {}'.format(tag))
注意:也可以指定参数的类型,要在参数名字后面添加:type指定参数类型,如果参数与指定的参数类型不匹配,则Sanic会抛出NotFound的异常,从而导致页面出现404: Page not found的错误。
from sanic.response import text

@app.route('/number/<integer_arg:int>')
async def integer_handler(request, integer_arg):
    return text('Integer - {}'.format(integer_arg))

@app.route('/number/<number_arg:number>')
async def number_handler(request, number_arg):
    return text('Number - {}'.format(number_arg))

@app.route('/person/<name:[A-z]>')
async def person_handler(request, name):
    return text('Person - {}'.format(name))

@app.route('/folder/<folder_id:[A-z0-9]{0,4}>')
async def folder_handler(request, folder_id):
    return text('Folder - {}'.format(folder_id))
2.2HTTP 请求类型
@app.route装饰器接受一个可选的参数methods,它允许定义的函数使用列表中任何一个的HTTP方法。
from sanic.response import text

@app.route('/post', methods=['POST'])
async def post_handler(request):
    return text('POST request - {}'.format(request.json))

@app.route('/get', methods=['GET'])
async def get_handler(request):
    return text('GET request - {}'.format(request.args))
2.3 add_route方法
路由通常使用@app.route装饰器进行添加的。但是,这个装饰器只是app.add_route方法的一个封装。
from sanic.response import text

# Define the handler functions
async def handler1(request):
    return text('OK')

async def handler2(request, name):
    return text('Folder - {}'.format(name))

async def person_handler2(request, name):
    return text('Person - {}'.format(name))

# Add each handler function as a route
app.add_route(handler1, '/test')
app.add_route(handler2, '/folder/<name>')
app.add_route(person_handler2, '/person/<name:[A-z]>', methods=['GET'])
3.请求
当接收端接收到一个HTTP请求的时候,路由函数就会传递一个Request对象
不像Flask 一样提供一个全局变量 request
Flask 是同步请求,每次请求都有一个独立的新线程来处理,这个线程中也只处理这一个请求。而Sanic是基于协程的处理方式,一个线程可以同时处理几个、几十个甚至几百个请求,把request作为全局变量显然会比较难以处理
3.1json格式的数据
from sanic.response import json

@app.route("/json")
def post_json(request):
    return json({ "received": True, "message": request.json })
3.2arg(dict类型)-查询字符串变量
from sanic.response import json

@app.route("/query_string")
def query_string(request):
    return json({ "parsed": True, "args": request.args, "url": request.url, "query_string": request.query_string })
3.3files(File对象的字典)-具有名称,正文和类型的文件列表
from sanic.response import json

@app.route("/files")
def post_json(request):
    test_file = request.files.get('test')

    file_parameters = {
        'body': test_file.body,
        'name': test_file.name,
        'type': test_file.type,
    }

    return json({ "received": True, "file_names": request.files.keys(), "test_file_parameters": file_parameters })
3.4 form(dict)-发送的表单数据
from sanic.response import json

@app.route("/form")
def post_json(request):
    return json({ "received": True, "form_data": request.form, "test": request.form.get('test') })
3.5
ip(str类型)-请求者的IP地址
app-对正在处理此请求的Sanic应用程序对象的引用
url:完整的请求URL
scheme:与请求相关联的URL类型,http或是https
host:与请求相关联的主机
path:请求的地址
4.响应
使用sanic.response模块中的函数来创建响应
4.1纯文本
from sanic import response

@app.route('/text')
def handle_request(request):
    return response.text('Hello world!')
4.2 HTML
from sanic import response

@app.route('/html')
def handle_request(request):
    return response.html('<p>Hello world!</p>')
4.3 json
from sanic import response

@app.route('/json')
def handle_request(request):
    return response.json({'message': 'Hello world!'})
4.4 文件
from sanic import response

@app.route('/file')
async def handle_request(request):
    return await response.file('/srv/www/whatever.png')
4.5 Streaming
from sanic import response

@app.route("/streaming")
async def index(request):
    async def streaming_fn(response):
        response.write('foo')
        response.write('bar')
    return response.stream(streaming_fn, content_type='text/plain')
4.6 重定向
from sanic import response

@app.route('/redirect')
def handle_request(request):
    return response.redirect('/json')
5.配置
Sanic将配置保存在config应用程序对象的属性中。配置的是一个可以使用点运算进行修改或是类似字典类型的对象。
app = Sanic('myapp')
app.config.DB_NAME = 'appdb'
app.config.DB_USER = 'appuser'

也可以:(配置的对象实际上是一个字典)
db_settings = {
    'DB_HOST': 'localhost',
    'DB_NAME': 'appdb',
    'DB_USER': 'appuser'
}
app.config.update(db_settings)
5.1加载配置
# 环境加载
app = Sanic(load_vars=False)

# 对象加载
import myapp.default_settings

app = Sanic('myapp')
app.config.from_object(myapp.default_settings)

# 文件加载
通常情况下,你想要从文件中加载配置参数。你可以从from_file(/path/to/config_file)来加载配置参数。然而,这需要程序知道配置文件的位置,所以你可以在环境变量中指定配置文件的路径,并让Sanic寻找配置文件并使用配置文件。
app = Sanic('myapp')
app.config.from_envvar('MYAPP_SETTINGS')
然后你可以在MYAPP_SETTINGS环境设置下运行你的应用程序
$ MYAPP_SETTINGS=/path/to/config_file python3 myapp.py
INFO: Goin' Fast @ http://0.0.0.0:8000

配置文件是常规的Python文件,运行它们只是为了加载配置。这允许你使用任何正确的逻辑进行正确的配置。只要uppercase变量被添加到配置中,最常见的配置包括简单的键值对
# config_file
DB_HOST = 'localhost'
DB_NAME = 'appdb'
DB_USER = 'appuser'
6.异常
# 抛出异常
# sanic.exceptions中导入与raise相关的异常
from sanic.exceptions import ServerError

@app.route('/killme')
def i_am_ready_to_die(request):
    raise ServerError("Something bad happened", status_code=500)

# 处理异常
# 需要覆盖Sanic对异常的默认处理,就需要使用@app.exception装饰器,该装饰器期望使用一个异常列表来处理参数。你可以传递一个SanicException来捕捉它们。装饰器异常处理函数必须使用Request和Exception对象来作为参数
from sanic.response import text
from sanic.exceptions import NotFound

@app.exception(NotFound)
def ignore_404s(request, exception):
    return text("Yep, I totally found the page: {}".format(request.url))

常用异常:
NotFound: 找不到合适的路由请求
ServerError: 服务器内部出现问题时调用
7.中间件和监听
7.1 中间件
中间件是在向服务器请求之前或之后执行的功能。它们可用来修改用户自定义处理函数的请求或响应。
两种不同类型的中间件:请求request和响应response。 都是使用@app.middleware装饰器进行声明的,利用'request'或'response'字符串来表示其参数类型。
# 不修改任何信息
@app.middleware('request')
async def print_on_request(request):
    print("I print when a request is received by the server")

@app.middleware('response')
async def print_on_response(request, response):
    print("I print when a response is returned by the server")
app = Sanic(__name__)

@app.middleware('response')
async def custom_banner(request, response):
    response.headers["Server"] = "Fake-Server"

@app.middleware('response')
async def prevent_xss(request, response):
    response.headers["x-xss-protection"] = "1; mode=block"

app.run(host="0.0.0.0", port=8000)
7.2 监听器
如果你想要在服务启动或关闭时执行启动/拆卸代码,可以使用以下的监听器:before_server_start,after_server_start,before_server_stop,after_server_stop,监听器在接收app对象和asyncio循环的函数上实现为装饰器
@app.listener('before_server_start')
async def setup_db(app, loop):
    app.db = await db_setup()

@app.listener('after_server_start')
async def notify_server_started(app, loop):
    print('Server successfully started!')

@app.listener('before_server_stop')
async def notify_server_stopping(app, loop):
    print('Server shutting down!')

@app.listener('after_server_stop')
async def close_db(app, loop):
    await app.db.close()
8.蓝图
和flask中的蓝图一样,用于组织项目结构
from sanic.response import json
from sanic import Blueprint

bp = Blueprint('my_blueprint')

@bp.route('/')
async def bp_root():
    return json({'my': 'blueprint'})
8.1注册蓝图
from sanic import Sanic
from my_blueprint import bp

app = Sanic(__name__)
app.blueprint(bp)

app.run(host='0.0.0.0', port=8000, debug=True)
8.2 蓝图中间件
使用蓝图可以在全局注册中间件
from sanic import Blueprint
bp = Blueprint('my_blueprint')

@bp.middleware
async def print_on_request(request):
    print("I am a spy")

@bp.middleware('request')
async def halt_request(request):
    return text('I halted the request')

@bp.middleware('response')
async def halt_response(request, response):
    return text('I halted the response')
8.3 异常
蓝图来应用全局的异常
@bp.exception(NotFound)
def ignore_404s(request, exception):
    return text("Yep, I totally found the page: {}".format(request.url))
8.4 静态文件
在蓝图定义下提供给全局的静态文件
bp.static('/folder/to/serve', '/web/path')
8.5 监听
bp = Blueprint('my_blueprint')

@bp.listener('before_server_start')
async def setup_connection(app, loop):
    global database
    database = mysql.connect(host='127.0.0.1'...)

@bp.listener('after_server_stop')
async def close_connection(app, loop):
    await database.close()
注意:如果多进程模式运行(超过1个进程),这些将在进程fork之后被触发。
8.6 api版本控制
当蓝图被初始化时,它可以使用一个可选的url_prefix参数,这个参数将被添加到蓝图上定义的所有路由上.
# blueprints.py
from sanic.response import text
from sanic import Blueprint

blueprint_v1 = Blueprint('v1', url_prefix='/v1')
blueprint_v2 = Blueprint('v2', url_prefix='/v2')

@blueprint_v1.route('/')
async def api_v1_root(request):
    return text('Welcome to version 1 of our documentation')

@blueprint_v2.route('/')
async def api_v2_root(request):
    return text('Welcome to version 2 of our documentation')
9.Cookies
Cookies是持续保存在用户浏览器中的数据片段。Sanic可以读取和写入Cookies,并以键值对的形式保存。
9.1 读Cookies
通过Request对象的cookies字典访问访问用户的cookies
from sanic.response import text

@app.route("/cookie")
async def test(request):
    test_cookie = request.cookies.get('test')
    return text("Test cookie set to: {}".format(test_cookie))
9.2 写Cookies
返回一个响应时,可以在Response对象上设置Cookies
from sanic.response import text

@app.route("/cookie")
async def test(request):
    response = text("There's a cookie up in this response")
    response.cookies['test'] = 'It worked!'
    response.cookies['test']['domain'] = '.gotta-go-fast.com'
    response.cookies['test']['httponly'] = True
    return response
9.3 删Cookies
from sanic.response import text

@app.route("/cookie")
async def test(request):
    response = text("Time to eat some cookies muahaha")

    # This cookie will be set to expire in 0 seconds
    del response.cookies['kill_me']

    # This cookie will self destruct in 5 seconds
    response.cookies['short_life'] = 'Glad to be here'
    response.cookies['short_life']['max-age'] = 5
    del response.cookies['favorite_color']

    # This cookie will remain unchanged
    response.cookies['favorite_color'] = 'blue'
    response.cookies['favorite_color'] = 'pink'
    del response.cookies['favorite_color']

    return response
10.基于类的视图
基于类的视图只是为了实现对响应行为的请求的简单类。它们提供了在同一端点对不同HTTP请求类型进行区分处理的方法。
基于类的视图是HTTPMethodView的子类。你可以为每个HTTP请求实现你想要的类方法。如果一个请求没有定义方法,一个405:Method not allowed的响应就会生成。
要在端点上注册基于类的视图,就需要使用app.add_route方法。它的第一个参数是as_view方法定义的类,第二个参数是URL端点。
from sanic import Sanic
from sanic.views import HTTPMethodView
from sanic.response import text

app = Sanic('some_name')

class SimpleView(HTTPMethodView):

  def get(self, request):
      return text('I am get method')

  async def post(self, request):	#也可以使用异步async语法
      return text('I am post method')

  def put(self, request):
      return text('I am put method')

  def patch(self, request):
      return text('I am patch method')

  def delete(self, request):
      return text('I am delete method')

app.add_route(SimpleView.as_view(), '/')


# 也可加装饰器,设置decorators类变量。当调用as_view方法的时候,会应用于类中。
class ViewWithDecorator(HTTPMethodView):
  decorators = [some_decorator_here]

  def get(self, request, name):
    return text('Hello I have a decorator')

app.add_route(ViewWithDecorator.as_view(), '/url')
11.日志
Sanic允许你使用python3 的logging API对请求不同类型日志进行记录
from sanic import Sanic
from sanic.config import LOGGING

# The default logging handlers are ['accessStream', 'errorStream']
# but we change it to use other handlers here for demo purpose
LOGGING['loggers']['network']['handlers'] = [
    'accessSysLog', 'errorSysLog']

app = Sanic('test')

@app.route('/')
async def test(request):
    return response.text('Hello World!')

if __name__ == "__main__":
  app.run(log_config=LOGGING)

# 关闭日志
if __name__ == "__main__":
  app.run(log_config=None)
11.2日志配置参数
默认情况下,使用sanic.config.LOGGING字典来设置log_config参数
| 参数 | 说明 |
|---|---|
| accessStream | 使用logging.StreamHandler 登录控制台的请求信息 |
| internal | 使用logging.StreamHandler 内部信息在控制台输出 |
| errorStream | 使用logging.StreamHandler 控制台的错误信息和追溯信息 |
| accessSysLog | 使用logging.handlers.SysLogHandler 记录到syslog的请求信息 |
| errorSysLog | 使用logging.handlers.SysLogHandler syslog的错误消息和追溯记录 |
| accessFilter | 使用sanic.log.DefaultFilter 只允许DEBUG,INFO和NONE(0)级别的过滤器 |
| errorFilter | 使用sanic.log.DefaultFilter 只允许在WARNING,ERROR和CRITICAL级别的过滤器。 |
默认访问日志
%(asctime)s - (%(name)s)[%(levelname)s][%(host)s]: %(request)s %(message)s %(status)d %(byte)d
12.run参数
| 参数 | 说明 |
|---|---|
| host | (默认“127.0.0.1”),服务器主机的地址 |
| port | (默认8000), 服务器的端口 |
| debug | (默认False),启用调试(减慢服务器速度) |
| ssl | (默认None),用于工作者SSL加密的SSLContext |
| sock | (默认None),服务器接受连接的Socket |
| worker | 默认值1,生成的工作进程数 |
| loop | 默认None,asyncio`兼容的事件循环。如果没有指定,Sanic会创建自己的事件循环。 |
| protocol | 默认HttpProtocol:asyncio.protocol的子类 |
12.1 多进程
Sanic在主进程中只侦听一个CPU内核。要启动其它核心,只需指定run参数中进程的数量。
app.run(host='0.0.0.0', port=1337, workers=4) #进程数和CPU核心数一样
12.2 命令运行sanic
python -m sanic server.app --host=0.0.0.0 --port=1337 --workers=4
12.3 异步的支持
异步支持合适与其他应用程序(特别是loop)共享sanic进程。但是请注意,因为此方法不支持使用多个进程,一般不是运行应用程序的首选方式
server = app.create_server(host="0.0.0.0", port=8000)
loop = asyncio.get_event_loop()
task = asyncio.ensure_future(server)
loop.run_forever()
13.扩展
| 组件 | 说明 |
|---|---|
| Sessions | session的支持,允许使用redis,memcache或内存进行存储 |
| CORS | 用于处理跨域资源共享的扩展 |
| Compress | 允许您轻松地压缩Sanic响应。 |
| Jinja2 | Jinja2模板框架。 |
| OpenAPI/Swagger | OpenAPI支持,以及Swagger UI。 |
| Pagination | 简单的分页支持。 |
| Sanic CRUD | 基于peewee 模型的CRUD(创建/检索/更新/删除)REST API自动生成的框架。 |
| UserAgent | 添加user_agent到请求 |
| Limiter | 限制sanic速率。 |
| Sanic EnvConfig | 将环境变量加入sanic配置。 |
| Babel | 借助Babel库,向Sanic应用程序添加i18n/l10n支持。 |
| Dispatch | 由werkzeug的DispatcherMiddleware驱动的调度程序。可以作为Sanic-to-WSGI适配器 |
| Sanic-OAuth | 用于连接和创建自己的token授权的库。 |
| Sanic-nginx-docker-example | 在nginx使用docker-compose的一个简单易用的Sanic例子。 |
| sanic-prometheus | Sanic的Prometheus指标 |
| Sanic-RestPlus | Sanic的Flask-RestPlus端口。基于SwaggerUI的全功能REST API。 |
| sanic-transmute | 可从python函数和类生成API,并自动生成Swagger UI文档。 |
| pytest-sanic | 一个用于Sanic的pytest插件。可以测试异步代码。 |
| jinja2-sanic | 一个用于Sanic的jinja2模板渲染器。 |