最近在看 Okhttp 的源码。不得不说源码设计的很巧妙,从中能学到很多。其实网上关于 Okhttp 的文章已经很多了,自己也看了很多。但是俗话说得好,好记性不如烂笔头,当你动手的时候,你会发现你在看的时候没有注意到的很多细节。
本次要分析的 Okhttp 版本是 3.8.1,在 gradle 中引用如下:
implementation 'com.squareup.okhttp3:okhttp:3.8.1'
implementation 'com.squareup.okio:okio:1.7.0'
之所以选择分析3.8.1,是因为最新版是采用 Kotlin 写的,因为本人 Kotlin 实力不允许,所以只能分析 Java 版本。
使用示例
1、发起一个异步 GET 请求,代码具体如下:
String url = "http://wwww.baidu.com";
OkHttpClient okHttpClient = new OkHttpClient();
final Request request = new Request.Builder()
        .url(url)
        .get()//默认就是GET请求,可以不写
        .build();
Call call = okHttpClient.newCall(request);
call.enqueue(new Callback() {
    @Override
    public void onFailure(Call call, IOException e) {
        Log.d(TAG, "onFailure: ");
    }

    @Override
    public void onResponse(Call call, Response response) throws IOException {
        Log.d(TAG, "onResponse: " + response.body().string());
    }
});
2、发起一个同步 GET 请求,代码具体如下:
String url = "http://wwww.baidu.com";
OkHttpClient okHttpClient = new OkHttpClient();
final Request request = new Request.Builder()
        .url(url)
        .build();
final Call call = okHttpClient.newCall(request);
new Thread(new Runnable() {
    @Override
    public void run() {
        try {
            Response response = call.execute();
            Log.d(TAG, "run: " + response.body().string());
        } catch (IOException e) {
            e.printStackTrace();
        }
    }
}).start();
可以看到两个请求基本大同小异,总结下过程如下:
-
先创建 OkHttpClient 实例;
-
构造 Request 实例,传入 url 等相关参数;
-
通过前两步中的实例对象构建 Call 对象;
-
异步请求通过 Call#enqueue(Callback) 方法来提交异步请求,同步请求通过 Call#execute() 直接获取 Reponse ;
通过示例,大家简单了解 Okhttp 中的一些对象,下面开始梳理整个请求逻辑。先从 OkHttpClient 开始。
OkHttpClient
当我们发起请求的时候,需要先构造 okHttpClient 对象,代码具体如下:
  public OkHttpClient() {
    this(new Builder());
  }
可以发现是使用了 builder 建造者模式;来看看里面的内容
public Builder() {
      dispatcher = new Dispatcher();  // 调度器
      protocols = DEFAULT_PROTOCOLS;  // 协议
      connectionSpecs = DEFAULT_CONNECTION_SPECS; //传输层版本和连接协议
      eventListenerFactory = EventListener.factory(EventListener.NONE);
      proxySelector = ProxySelector.getDefault();
      cookieJar = CookieJar.NO_COOKIES;    //cookie
      socketFactory = SocketFactory.getDefault();
      hostnameVerifier = OkHostnameVerifier.INSTANCE;
      certificatePinner = CertificatePinner.DEFAULT;   //证书链
      proxyAuthenticator = Authenticator.NONE;    //代理身份验证
      authenticator = Authenticator.NONE;    //本地身份验证
      connectionPool = new ConnectionPool();    //链接池 复用连接
      dns = Dns.SYSTEM;   //域名
      followSslRedirects = true;
      followRedirects = true;   //本地重定向
      retryOnConnectionFailure = true;
      connectTimeout = 10_000;
      readTimeout = 10_000;   //读取超时
      writeTimeout = 10_000;  //写入超时
      pingInterval = 0;
}
- 里面包含了很多对象,其实 OKhttp 的很多功能模块都包装进这个类,让这个类单独提供对外的 API,这种外观模式的设计十分的优雅,叫做外观模式。
- 而内部模块比较多,就使用了 Builder 模式(建造器模式),通常用于参数比较多情况。
- 它的方法只有一个:newCall 返回一个 Call 对象(一个准备好了的可以执行和取消的请求)。
Request
  Request(Builder builder) {
    this.url = builder.url;
    this.method = builder.method;
    this.headers = builder.headers.build();
    this.body = builder.body;
    this.tag = builder.tag != null ? builder.tag : this;
  }
Call
HTTP请求任务封装。可以说我们能用到的操纵基本上都定义在这个接口里面了,所以也可以说这个类是 Okhttp 类的核心类了。我们可以通过 Call 对象来操作请求了。而 Call 接口内部提供了 Factory 工厂方法模式 (将对象的创建延迟到工厂类的子类去进行,从而实现动态配置),下面是 Call 接口的具体内容:
public interface Call extends Cloneable {
  /** Returns the original request that initiated this call. */
  Request request();

  /**
   * Invokes the request immediately, and blocks until the response can be processed or is in
   * error.*/
  Response execute() throws IOException;

  /**
   * Schedules the request to be executed at some point in the future.*/
  void enqueue(Callback responseCallback);

  /** Cancels the request, if possible. Requests that are already complete cannot be canceled. */
  void cancel();

  /**
   * Returns true if this call has been either {@linkplain #execute() executed} or {@linkplain
   * #enqueue(Callback) enqueued}. It is an error to execute a call more than once.
   */
  boolean isExecuted();

  boolean isCanceled();

  /**
   * Create a new, identical call to this one which can be enqueued or executed even if this call
   * has already been.
   */
  Call clone();

  interface Factory {
    Call newCall(Request request);
  }
}
RealCall
RealCall 继承自 Call,是真正发起请求的的实体类。RealCall 主要方法:
-
同步请求 :client.newCall(request).execute();
-
异步请求: client.newCall(request).enqueue();
下面我们来看看里面具体的内容:
 RealCall(OkHttpClient client, Request originalRequest, boolean forWebSocket) {
    final EventListener.Factory eventListenerFactory = client.eventListenerFactory();

    this.client = client;
    this.originalRequest = originalRequest;
    this.forWebSocket = forWebSocket;
    this.retryAndFollowUpInterceptor = new RetryAndFollowUpInterceptor(client, forWebSocket);

    // TODO(jwilson): this is unsafe publication and not threadsafe.
    this.eventListener = eventListenerFactory.create(this);
  }
可以发现,其内部持有了 client,原始请求,以及请求事件回调 Listener 等。我们看下请求的回调 Listener 的具体内容:
  public void fetchStart(Call call) {
  }

  public void dnsStart(Call call, String domainName) {
  }

  public void dnsEnd(Call call, String domainName, List<InetAddress> inetAddressList,
      Throwable throwable) {
  }

  public void connectStart(Call call, InetAddress address, int port) {
  }

  public void secureConnectStart(Call call) {
  }

  public void secureConnectEnd(Call call, Handshake handshake,
      Throwable throwable) {
  }

  public void connectEnd(Call call,  InetAddress address, int port, String protocol,
      Throwable throwable) {
  }

  public void requestHeadersStart(Call call) {
  }

  public void requestHeadersEnd(Call call, Throwable throwable) {
  }

  public void requestBodyStart(Call call) {
  }

  public void requestBodyEnd(Call call, Throwable throwable) {
  }

  public void responseHeadersStart(Call call) {
  }

  public void responseHeadersEnd(Call call, Throwable throwable) {
  }

  public void responseBodyStart(Call call) {
  }

  public void responseBodyEnd(Call call, Throwable throwable) {
  }

  public void fetchEnd(Call call, Throwable throwable) {
  }
可以看到 OkHttp 的回调做得非常细致,有各种各样的回调,不管你想不想用,都帮你考虑到了呢。这样我们可以监听具体的回调,然后做一些操作。
接下去就要开始讲异步请求的具体步骤呢。先从异步请求讲起,这也是我们最常用的。
// RealCall
@Override public void enqueue(Callback responseCallback) {
    synchronized (this) {
      if (executed) throw new IllegalStateException("Already Executed");
      executed = true;
    }
    captureCallStackTrace();
    client.dispatcher().enqueue(new AsyncCall(responseCallback));
  }
可以看到上述代码做了几件事:
- synchronized (this) 确保每个call只能被执行一次不能重复执行,如果想要完全相同的 call,可以调用如下方法:进行克隆
@SuppressWarnings("CloneDoesntCallSuperClone") // We are a final type & this saves clearing state.
@Override public RealCall clone() {
    return RealCall.newRealCall(client, originalRequest, forWebSocket);
}
- 利用 dispatcher 调度器,来进行实际的执行 client.dispatcher().enqueue(new AsyncCall(responseCallback)),在上面的 OkHttpClient.Builder 可以看出已经初始化了 Dispatcher。
心细的读者可能发现一个问题了,那就是这里 enqueue 明明是一个封装了 responseCallback 的 AsyncCall ,怎么就会变成加入队列执行请求了呢?这个下面我会进行解释。
Dispatcher
Dispatcher 是 Okhttp 的调度器,用来管理控制请求的队列。内部通过线程池来确保队列的有序运行。先看下 enqueue 方法的具体内容:
 synchronized void enqueue(AsyncCall call) {
    if (runningAsyncCalls.size() < maxRequests && runningCallsForHost(call) < maxRequestsPerHost) {
      runningAsyncCalls.add(call);
      executorService().execute(call);
    } else {
      readyAsyncCalls.add(call);
    }
  }
可以看到内部存在两个队列,一个是正在运行的队列 runningAsyncCalls,另一个是 readyAsyncCalls 队列。如果当前运行数小于最大运行数,并且当前请求的host小于最大请求个数,那么就会直接加入运行队列,并运行。如果超了,就会加入准备队列。
  /** Ready async calls in the order they'll be run. */
  private final Deque<AsyncCall> readyAsyncCalls = new ArrayDeque<>();

  /** Running asynchronous calls. Includes canceled calls that haven't finished yet. */
  private final Deque<AsyncCall> runningAsyncCalls = new ArrayDeque<>();

  /** Running synchronous calls. Includes canceled calls that haven't finished yet. */
  private final Deque<RealCall> runningSyncCalls = new ArrayDeque<>();
实际上还有一个同步队列,没有给同步队列做限制,只要一加入就开始执行请求。
当请求队列完成请求后需要进行移除,看下 finished 的代码逻辑:
  private <T> void finished(Deque<T> calls, T call, boolean promoteCalls) {
    int runningCallsCount;
    Runnable idleCallback;
    synchronized (this) {
      if (!calls.remove(call)) throw new AssertionError("Call wasn't in-flight!");
      if (promoteCalls) promoteCalls();
      runningCallsCount = runningCallsCount();
      idleCallback = this.idleCallback;
    }

    if (runningCallsCount == 0 && idleCallback != null) {
      idleCallback.run();
    }
  }
可以看到,这是使用了泛型,不用关心具体传入的队列是哪一个,直接就可以移除。promoteCalls 为 true 代表是异步请求队列,还得从 readyAsyncCalls 队列里面取出一个队列添加到 runningAsyncCalls 队列里面去执行请求。
private void promoteCalls() {
    if (runningAsyncCalls.size() >= maxRequests) return; // Already running max capacity.
    if (readyAsyncCalls.isEmpty()) return; // No ready calls to promote.

    for (Iterator<AsyncCall> i = readyAsyncCalls.iterator(); i.hasNext(); ) {
      AsyncCall call = i.next();

      if (runningCallsForHost(call) < maxRequestsPerHost) {
        i.remove();
        runningAsyncCalls.add(call);
        executorService().execute(call);
      }

      if (runningAsyncCalls.size() >= maxRequests) return; // Reached max capacity.
    }
  }
通过上述代码,关于调度器的功能作用就基本理清了。
AsyncCall
AsyncCall 是 RealCall 里面的内部类,继承自 NamedRunnable,是自定义的Runnable,可以为线程设置 name。内部代码具体如下:
public abstract class NamedRunnable implements Runnable {
  protected final String name;

  public NamedRunnable(String format, Object... args) {
    this.name = Util.format(format, args);
  }

  @Override public final void run() {
    String oldName = Thread.currentThread().getName();
    Thread.currentThread().setName(name);
    try {
      execute();
    } finally {
      Thread.currentThread().setName(oldName);
    }
  }

  protected abstract void execute();
}
可以发现,在 run 方法内部调用了execute 方法,这个方法就是真正的发起请求的逻辑。下面我们看下 AsyncCall 中的该方法得具体内容:
  @Override protected void execute() {
      boolean signalledCallback = false;
      try {
        Response response = getResponseWithInterceptorChain();
        if (retryAndFollowUpInterceptor.isCanceled()) {
          signalledCallback = true;
          responseCallback.onFailure(RealCall.this, new IOException("Canceled"));
        } else {
          signalledCallback = true;
          responseCallback.onResponse(RealCall.this, response);
        }
      } catch (IOException e) {
        if (signalledCallback) {
          // Do not signal the callback twice!
          Platform.get().log(INFO, "Callback failure for " + toLoggableString(), e);
        } else {
          responseCallback.onFailure(RealCall.this, e);
        }
      } finally {
        client.dispatcher().finished(this);
      }
    }
  }
获取响应数据最终是是通过 getResponseWithInterceptorChain() 来获取的。然后通过回调将 Response 返回给用户。
下面看下 getResponseWithInterceptorChain 方法内部的具体逻辑:
//Realcall 核心代码 开始真正的执行网络请求
  Response getResponseWithInterceptorChain() throws IOException {
    // Build a full stack of interceptors.
    // 责任链
    List<Interceptor> interceptors = new ArrayList<>();
    // 在配置okhttpClient 时设置的intercept 由用户自己设置
    interceptors.addAll(client.interceptors());
    // 负责处理失败后的重试与重定向
    interceptors.add(retryAndFollowUpInterceptor);
    // 负责把用户构造的请求转换为发送到服务器的请求 、把服务器返回的响应转换为用户友好的响应 处理 配置请求头等信息
    // 从应用程序代码到网络代码的桥梁。首先,它根据用户请求构建网络请求。然后它继续呼叫网络。最后,它根据网络响应构建用户响应。
    interceptors.add(new BridgeInterceptor(client.cookieJar()));
    // 处理 缓存配置 根据条件(存在响应缓存并被设置为不变的或者响应在有效期内)返回缓存响应
    // 设置请求头(If-None-Match、If-Modified-Since等) 服务器可能返回304(未修改)
    // 可配置用户自己设置的缓存拦截器
    interceptors.add(new CacheInterceptor(client.internalCache()));
    // 连接服务器 负责和服务器建立连接 这里才是真正的请求网络
    interceptors.add(new ConnectInterceptor(client));
    if (!forWebSocket) {
      // 配置okhttpClient 时设置的networkInterceptors
      // 返回观察单个网络请求和响应的不可变拦截器列表。
      interceptors.addAll(client.networkInterceptors());
    }
    // 执行流操作(写出请求体、获得响应数据) 负责向服务器发送请求数据、从服务器读取响应数据
    // 进行http请求报文的封装与请求报文的解析
    interceptors.add(new CallServerInterceptor(forWebSocket));

    // 创建责任链
    Interceptor.Chain chain = new RealInterceptorChain(interceptors, null, null, null, 0,
        originalRequest, this, eventListener, client.connectTimeoutMillis(),
        client.readTimeoutMillis(), client.writeTimeoutMillis());

    //TODO 执行责任链
    return chain.proceed(originalRequest);
  }
RealInterceptorChain
  public RealInterceptorChain(List<Interceptor> interceptors, StreamAllocation streamAllocation,
      HttpCodec httpCodec, RealConnection connection, int index, Request request) {
    this.interceptors = interceptors;
    this.connection = connection;
    this.streamAllocation = streamAllocation;
    this.httpCodec = httpCodec;
    this.index = index;
    this.request = request;
  }
// 责任链处理
public Response proceed(Request request, StreamAllocation streamAllocation, HttpCodec httpCodec,
      RealConnection connection) throws IOException {
    if (index >= interceptors.size()) throw new AssertionError();

    calls++;

    // If we already have a stream, confirm that the incoming request will use it.
    if (this.httpCodec != null && !this.connection.supportsUrl(request.url())) {
      throw new IllegalStateException("network interceptor " + interceptors.get(index - 1)
          + " must retain the same host and port");
    }

    // If we already have a stream, confirm that this is the only call to chain.proceed().
    if (this.httpCodec != null && calls > 1) {
      throw new IllegalStateException("network interceptor " + interceptors.get(index - 1)
          + " must call proceed() exactly once");
    }

    // Call the next interceptor in the chain.
    RealInterceptorChain next = new RealInterceptorChain(
        interceptors, streamAllocation, httpCodec, connection, index + 1, request);
    Interceptor interceptor = interceptors.get(index);
    Response response = interceptor.intercept(next);

    // Confirm that the next interceptor made its required call to chain.proceed().
    if (httpCodec != null && index + 1 < interceptors.size() && next.calls != 1) {
      throw new IllegalStateException("network interceptor " + interceptor
          + " must call proceed() exactly once");
    }

    // Confirm that the intercepted response isn't null.
    if (response == null) {
      throw new NullPointerException("interceptor " + interceptor + " returned null");
    }

    return response;
  }
首先是看构造函数,内部持有了当前责任链的所有拦截器list,还包括 RealConnection,index (当前正在处理拦截器索引)等。
接下去看 proceed 方法里的逻辑,归来起来就是如下:
-
首先是通过 index 和 calls 来做了一些安全判断,避免重复处理,。
-
将索引号 index +1,新创建一个 chain。
-
根据目前的 index 获取拦截器,然后将新的 chain 传入到获取拦截器中。
-
拦截器做完自己的操作后,会调用新创建的 chain 的 proceed 方法,交由下一个拦截器来处理。
-
当数据返回后,从后往前,拦截器会依次对数据做一些处理,最终用户获得请求的数据。
通过上述往复循环,最终所有的拦截器都会走两遍,一次是对请求体做操作,一次是对返回体做操作,最终用户获得处理后的数据。
下面来看一个具体的拦截器 。
CacheInterceptor
CacheInterceptor 代码比较长,我们一步一步的来进行分析。
首先我们先分析上部分代码当没有网络的情况下是如何处理获取缓存的。
  @Override public Response intercept(Chain chain) throws IOException
  {
// 获取request对应缓存的Response 如果用户没有配置缓存拦截器 cacheCandidate == null
    Response cacheCandidate = cache != null
        ? cache.get(chain.request())
        : null;

    // 执行响应缓存策略
    long now = System.currentTimeMillis();
    CacheStrategy strategy = new CacheStrategy.Factory(now, chain.request(), cacheCandidate).get();
    // 如果networkRequest == null 则说明不使用网络请求
    Request networkRequest = strategy.networkRequest;
    // 获取缓存中(CacheStrategy)的Response
    Response cacheResponse = strategy.cacheResponse;

    if (cache != null) {
      cache.trackResponse(strategy);
    }
    // 缓存无效 关闭资源
    if (cacheCandidate != null && cacheResponse == null) {
      closeQuietly(cacheCandidate.body()); // The cache candidate wasn't applicable. Close it.
    }

    // If we're forbidden from using the network and the cache is insufficient, fail.
    // networkRequest == null 不实用网路请求 且没有缓存 cacheResponse == null  返回失败
    if (networkRequest == null && cacheResponse == null) {
      return new Response.Builder()
          .request(chain.request())
          .protocol(Protocol.HTTP_1_1)
          .code(504)
          .message("Unsatisfiable Request (only-if-cached)")
          .body(Util.EMPTY_RESPONSE)
          .sentRequestAtMillis(-1L)
          .receivedResponseAtMillis(System.currentTimeMillis())
          .build();
    }

    // 不使用网络请求 且存在缓存 直接返回响应
    // If we don't need the network, we're done.
    if (networkRequest == null) {
      return cacheResponse.newBuilder()
          .cacheResponse(stripBody(cacheResponse))
          .build();
    }
    }
上述的代码,主要做了几件事:
-
如果用户自己配置了缓存拦截器,cacheCandidate = cache.Response 获取用户自己存储的 Response,否则 cacheCandidate = null,同时从 CacheStrategy 获取cacheResponse 和 networkRequest;
-
如果 cacheCandidate != null 而 cacheResponse == null 说明缓存无效清楚 cacheCandidate 缓存。
-
如果 networkRequest == null 说明没有网络,cacheResponse == null 没有缓存,返回失败的信息,责任链此时也就终止,不会在往下继续执行。
-
如果 networkRequest == null 说明没有网络,cacheResponse != null 有缓存,返回缓存的信息,责任链此时也就终止,不会在往下继续执行。
上部分代码,其实就是没有网络的时候的处理。那么下部分代码肯定是,有网络的时候处理:
    // 执行下一个拦截器
    Response networkResponse = null;
    try {
      networkResponse = chain.proceed(networkRequest);
    } finally {
      // If we're crashing on I/O or otherwise, don't leak the cache body.
      if (networkResponse == null && cacheCandidate != null) {
        closeQuietly(cacheCandidate.body());
      }
    }

    // 网络请求 回来 更新缓存
    // If we have a cache response too, then we're doing a conditional get.
    // 如果存在缓存 更新
    if (cacheResponse != null) {
      // 304响应码 自从上次请求后,请求需要响应的内容未发生改变
      if (networkResponse.code() == HTTP_NOT_MODIFIED) {
        Response response = cacheResponse.newBuilder()
            .headers(combine(cacheResponse.headers(), networkResponse.headers()))
            .sentRequestAtMillis(networkResponse.sentRequestAtMillis())
            .receivedResponseAtMillis(networkResponse.receivedResponseAtMillis())
            .cacheResponse(stripBody(cacheResponse))
            .networkResponse(stripBody(networkResponse))
            .build();
        networkResponse.body().close();

        // Update the cache after combining headers but before stripping the
        // Content-Encoding header (as performed by initContentStream()).
        cache.trackConditionalCacheHit();
        cache.update(cacheResponse, response);
        return response;
      } else {
        closeQuietly(cacheResponse.body());
      }
    }
    // 缓存Response
    Response response = networkResponse.newBuilder()
        .cacheResponse(stripBody(cacheResponse))
        .networkResponse(stripBody(networkResponse))
        .build();

    if (cache != null) {
      if (HttpHeaders.hasBody(response) && CacheStrategy.isCacheable(response, networkRequest)) {
        // Offer this request to the cache.
        CacheRequest cacheRequest = cache.put(response);
        return cacheWritingResponse(cacheRequest, response);
      }

      if (HttpMethod.invalidatesCache(networkRequest.method())) {
        try {
          cache.remove(networkRequest);
        } catch (IOException ignored) {
          // The cache cannot be written.
        }
      }
    }

    return response;
  }
上面的代码主要做了这几件事:
-
执行下一个拦截器,也就是请求网络
-
责任链执行完毕后,会返回最终响应数据,如果缓存存在更新缓存,如果缓存不存在加入到缓存中去。
这就跟前面讲的对应上了,请求前做一些处理,比如判断缓存是否存在,网络是否可用等操作;数据回来之后,更新缓存,在传给上一个拦截器去做处理。
这样就体现出了责任链的好处了,当责任链执行完毕,如果拦截器想要拿到最终的数据做其他的逻辑处理等,这样就不用在做其他的调用方法逻辑了,直接在当前的拦截器就可以拿到最终的数据。这也是okhttp设计的最优雅最核心的功能。
到这里,异步请求逻辑基本就梳理完了。
同步请求
同步请求会直接调用 Call#ececute 方法,记住这个 execute 方法的返回实体是 Reponse,所以它直接返回了请求。
// RealCall
// 同步执行请求 直接返回一个请求的结果
  @Override public Response execute() throws IOException {
    synchronized (this) {
      if (executed) throw new IllegalStateException("Already Executed");
      executed = true;
    }
    captureCallStackTrace();
    // 调用监听的开始方法
    eventListener.callStart(this);
    try {
      // 添加到队列中去
      client.dispatcher().executed(this);
      // 获取请求的返回数据
      Response result = getResponseWithInterceptorChain();
      if (result == null) throw new IOException("Canceled");
      return result;
    } catch (IOException e) {
      eventListener.callFailed(this, e);
      throw e;
    } finally {
      // 执行调度器的完成方法 移除队列
      client.dispatcher().finished(this);
    }
  }
主要做了几件事:
-
synchronized (this) 避免重复执行,上面的文章部分有讲。
-
client.dispatcher().executed(this),实际上调度器只是将 call 加入到了同步执行队列中。
-
getResponseWithInterceptorChain() 最核心的代码,相当于同步请求直接就开始运行,请求网络得到响应数据,返回给用户
-
client.dispatcher().finished(this); 执行调度器的完成方法 移除队列
可以看出,在同步请求的方法中,涉及到 dispatcher 只是告知了执行状态,开始执行了(调用 executed),执行完毕了(调用 finished)其他的并没有涉及到。dispatcher 更多的是服务异步请求。
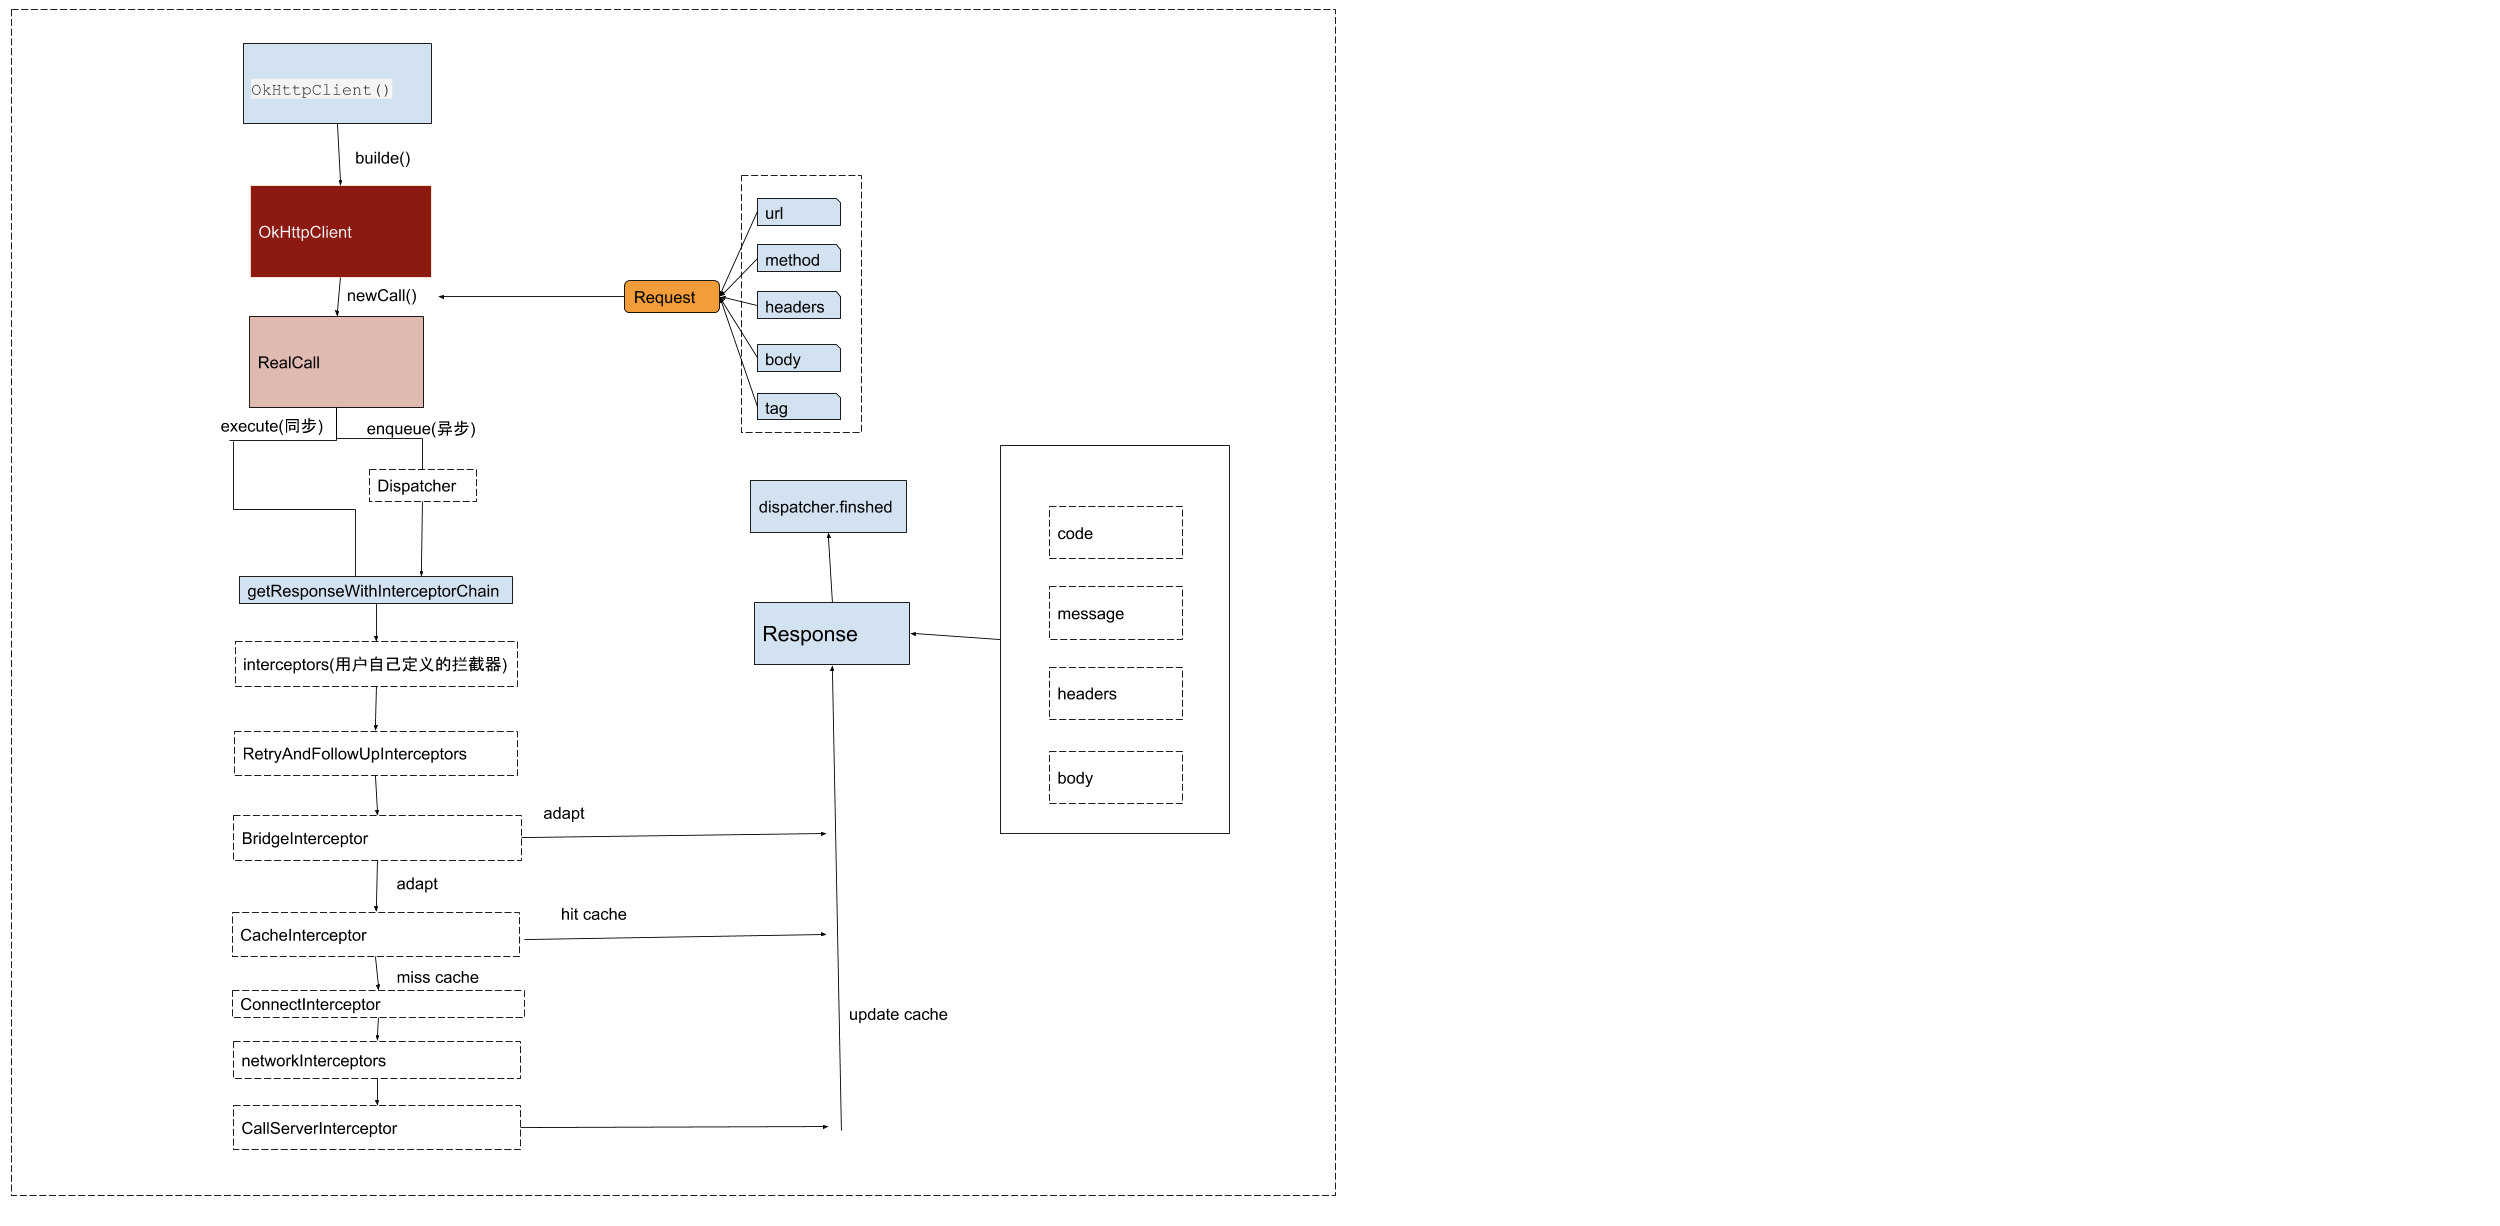
以上就是对 Okhttp 请求流程的梳理,后面附一张盗的流程图