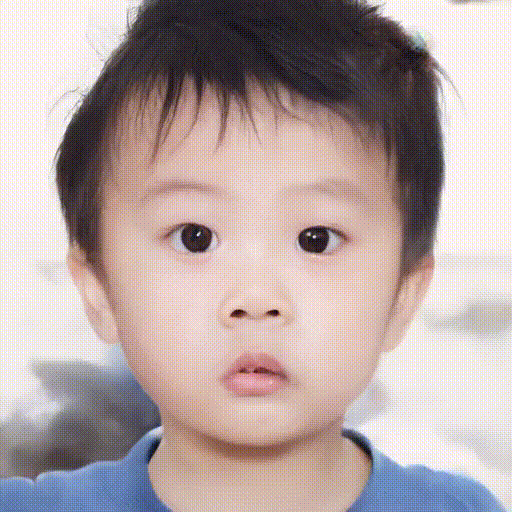
摘要:本案例可根据一张父亲和母亲的正脸照片,生成孩子的照片,并且可以调节参数,看看不同性别和年龄孩子的长相。
本文分享自华为云社区《BabyGAN:根据父母照片生成孩子照片》,作者: 山海之光。
本案例可根据一张父亲和母亲的正脸照片,生成孩子的照片,并且可以调节参数,看看不同性别和年龄孩子的长相。
为保证照片的生成效果,上传父母的照片时尽量上传能露出五官且浅色底的照片。
本案例仅用于学习交流,请勿用于其他用途。
另外,由于技术不完善的原因,生成的孩子照片可能会有扭曲或失真,你可以更换不同的父母照片,重新生成孩子照片,直到达到满意的生成效果为止。
下面开始按步骤运行本案例。
1. 安装所需的模块
本步骤耗时约4分钟
!pip install imutils moviepy dlib
2. 下载代码和模型文件
import os
import moxing as mox

root_dir = '/home/ma-user/work/ma_share/'
code_dir = os.path.join(root_dir, 'BabyGAN')
if not os.path.exists(os.path.join(root_dir, 'BabyGAN.zip')):
    mox.file.copy('obs://arthur-1/BabyGAN/BabyGAN.zip', os.path.join(root_dir, 'BabyGAN.zip'))
    os.system('cd %s; unzip BabyGAN.zip' % root_dir)

os.chdir(code_dir)
3. 加载相关模块及模型
import cv2
import math
import pickle
import imageio
import warnings
import PIL.Image
import numpy as np
from glob import glob
from PIL import Image
import tensorflow as tf
from random import randrange
import moviepy.editor as mpy
import matplotlib.pyplot as plt
from IPython.display import clear_output
from moviepy.video.io.ffmpeg_writer import FFMPEG_VideoWriter

import config
import dnnlib
import dnnlib.tflib as tflib
from encoder.generator_model import Generator

%matplotlib inline
warnings.filterwarnings("ignore")
加载模型文件,本代码块只可执行一次,如果发生报错,请restart kernel,重新运行所有代码
tflib.init_tf()
URL_FFHQ = "./karras2019stylegan-ffhq-1024x1024.pkl"
with dnnlib.util.open_url(URL_FFHQ, cache_dir=config.cache_dir) as f:
    generator_network, discriminator_network, Gs_network = pickle.load(f)
generator = Generator(Gs_network, batch_size=1, randomize_noise=False)
model_scale = int(2 * (math.log(1024, 2) - 1))
age_direction = np.load('./ffhq_dataset/latent_directions/age.npy')
horizontal_direction = np.load('./ffhq_dataset/latent_directions/angle_horizontal.npy')
vertical_direction = np.load('./ffhq_dataset/latent_directions/angle_vertical.npy')
eyes_open_direction = np.load('./ffhq_dataset/latent_directions/eyes_open.npy')
gender_direction = np.load('./ffhq_dataset/latent_directions/gender.npy')
smile_direction = np.load('./ffhq_dataset/latent_directions/smile.npy')
def get_watermarked(pil_image: Image) -> Image:
    try:
        image = cv2.cvtColor(np.array(pil_image), cv2.COLOR_RGB2BGR)
        (h, w) = image.shape[:2]
        image = np.dstack([image, np.ones((h, w), dtype="uint8") * 255])
        pct = 0.08
        full_watermark = cv2.imread('./media/logo.png', cv2.IMREAD_UNCHANGED)
        (fwH, fwW) = full_watermark.shape[:2]
        wH = int(pct * h * 2)
        wW = int((wH * fwW) / fwH * 0.1)
        watermark = cv2.resize(full_watermark, (wH, wW), interpolation=cv2.INTER_AREA)
        overlay = np.zeros((h, w, 4), dtype="uint8")
        (wH, wW) = watermark.shape[:2]
        overlay[h - wH - 10: h - 10, 10: 10 + wW] = watermark
        output = image.copy()
        cv2.addWeighted(overlay, 0.5, output, 1.0, 0, output)
        rgb_image = cv2.cvtColor(output, cv2.COLOR_BGR2RGB)
        return Image.fromarray(rgb_image)
    except:
        return pil_image
def generate_final_images(latent_vector, direction, coeffs, i):
    new_latent_vector = latent_vector.copy()
    new_latent_vector[:8] = (latent_vector + coeffs * direction)[:8]
    new_latent_vector = new_latent_vector.reshape((1, 18, 512))
    generator.set_dlatents(new_latent_vector)
    img_array = generator.generate_images()[0]
    img = PIL.Image.fromarray(img_array, 'RGB')
    if size[0] >= 512: img = get_watermarked(img)
    img_path = "./for_animation/" + str(i) + ".png"
    img.thumbnail(animation_size, PIL.Image.ANTIALIAS)
    img.save(img_path)
    face_img.append(imageio.imread(img_path))
    clear_output()
    return img
def generate_final_image(latent_vector, direction, coeffs):
    new_latent_vector = latent_vector.copy()
    new_latent_vector[:8] = (latent_vector + coeffs * direction)[:8]
    new_latent_vector = new_latent_vector.reshape((1, 18, 512))
    generator.set_dlatents(new_latent_vector)
    img_array = generator.generate_images()[0]
    img = PIL.Image.fromarray(img_array, 'RGB')
    if size[0] >= 512: img = get_watermarked(img)
    img.thumbnail(size, PIL.Image.ANTIALIAS)
    img.save("face.png")
    if download_image == True: files.download("face.png")
    return img
def plot_three_images(imgB, fs=10):
    f, axarr = plt.subplots(1, 3, figsize=(fs, fs))
    axarr[0].imshow(Image.open('./aligned_images/father_01.png'))
    axarr[0].title.set_text("Father's photo")
    axarr[1].imshow(imgB)
    axarr[1].title.set_text("Child's photo")
    axarr[2].imshow(Image.open('./aligned_images/mother_01.png'))
    axarr[2].title.set_text("Mother's photo")
    plt.setp(plt.gcf().get_axes(), xticks=[], yticks=[])
    plt.show()
4. 准备好父亲和母亲的照片
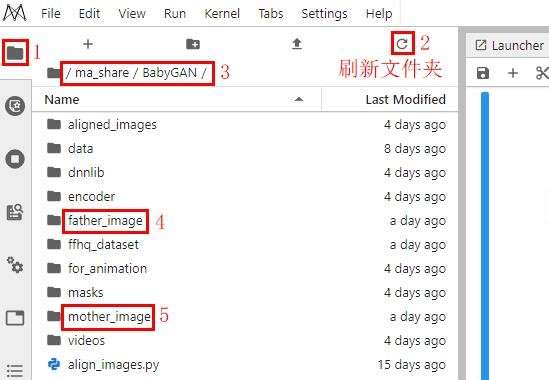
本案例已各准备好一张默认的父母亲照片,可在左侧边栏的文件资源管理窗口中,进入到 ma_share/BabyGAN 目录,再进入到 father_image 或 mother_image 目录即可看到已提供的父母亲照片,如下图所示:
如果你需更换父母亲的照片,请查看本文第11节“更换父亲和母亲的照片”
if len(glob(os.path.join('./father_image', '*.jpg'))) != 1 or (not os.path.exists('./father_image/father.jpg')):
    raise Exception('请在 ma_share/BabyGAN/father_image 目录下准备一张父亲的照片,且命名为father.jpg')

if len(glob(os.path.join('./mother_image', '*.jpg'))) != 1 or (not os.path.exists('./mother_image/mother.jpg')):
    raise Exception('请在 ma_share/BabyGAN/father_image 目录下准备一张母亲的照片,且命名为mother.jpg')
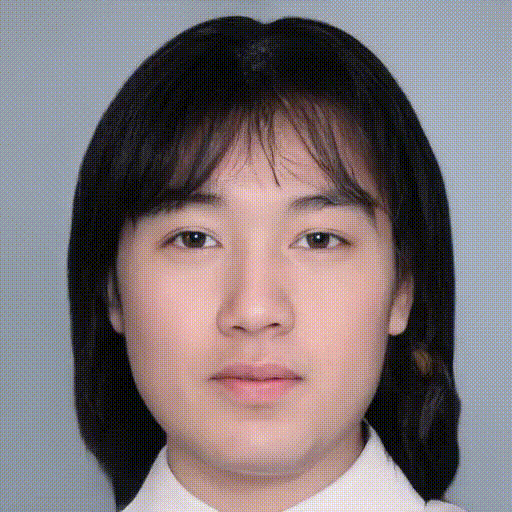
5. 获取父亲的脸部区域,并进行人脸对齐
!python align_images.py ./father_image ./aligned_images
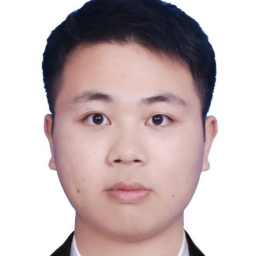
查看父亲的人脸
if os.path.isfile('./aligned_images/father_01.png'):
    pil_father = Image.open('./aligned_images/father_01.png')
    (fat_width, fat_height) = pil_father.size
    resize_fat = max(fat_width, fat_height) / 256
    display(pil_father.resize((int(fat_width / resize_fat), int(fat_height / resize_fat))))
else:
    raise ValueError('No face was found or there is more than one in the photo.')
6. 获取母亲的脸部区域,并进行人脸对齐
!python align_images.py ./mother_image ./aligned_images
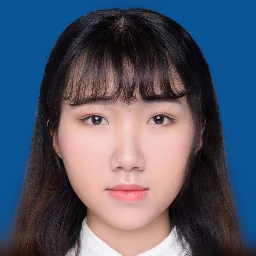
查看母亲的人脸
if os.path.isfile('./aligned_images/mother_01.png'):
    pil_mother = Image.open('./aligned_images/mother_01.png')
    (mot_width, mot_height) = pil_mother.size
    resize_mot = max(mot_width, mot_height) / 256
    display(pil_mother.resize((int(mot_width / resize_mot), int(mot_height / resize_mot))))
else:
    raise ValueError('No face was found or there is more than one in the photo.')
7. 提取人脸特征
本步骤耗时约3分钟
!python encode_images.py
    --early_stopping False
    --lr=0.25
    --batch_size=2
    --iterations=100
    --output_video=False
    ./aligned_images
    ./generated_images
    ./latent_representations

if len(glob(os.path.join('./generated_images', '*.png'))) == 2:
    first_face = np.load('./latent_representations/father_01.npy')
    second_face = np.load('./latent_representations/mother_01.npy')
    print("Generation of latent representation is complete! Now comes the fun part.")
else:
    raise ValueError('Something wrong. It may be impossible to read the face in the photos. Upload other photos and try again.')
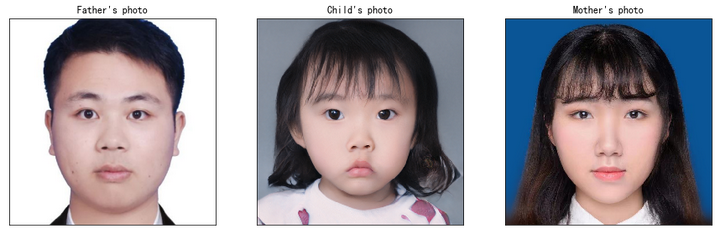
8. 生成一家三口照片
请修改下面代码中的 gender_influence 和 person_age参数,
gender_influence:性别影响因子,取值范围[0.01, 0.99],取值越接近0,父亲的容貌影响越大,反之母亲影响越大;
person_age:年龄影响因子,取值范围[10, 50],设置该值后,将生成对应年龄的小孩的容貌。
每次修改该参数值后,重新运行下面的代码块,即可生成孩子的新照片
genes_influence = 0.8  # 性别影响因子,取值范围[0.01, 0.99],取值越接近0,父亲的容貌影响越大,反之母亲影响越大
person_age = 10  # 年龄影响因子,取值范围[10, 50],设置该值后,将生成对应年龄的小孩的容貌

style = "Default"
if style == "Father's photo":
    lr = ((np.arange(1, model_scale + 1) / model_scale) ** genes_influence).reshape((model_scale, 1))
    rl = 1 - lr
    hybrid_face = (lr * first_face) + (rl * second_face)
elif style == "Mother's photo":
    lr = ((np.arange(1, model_scale + 1) / model_scale) ** (1 - genes_influence)).reshape((model_scale, 1))
    rl = 1 - lr
    hybrid_face = (rl * first_face) + (lr * second_face)
else:
    hybrid_face = ((1 - genes_influence) * first_face) + (genes_influence * second_face)

intensity = -((person_age / 5) - 6)
resolution = "512"
size = int(resolution), int(resolution)

download_image = False
face = generate_final_image(hybrid_face, age_direction, intensity)
plot_three_images(face, fs=15)
9. 查看孩子各年龄段的容貌
请修改下面代码中的 gender_influence 参数,该参数是性别影响因子,取值范围[0.01, 0.99],取值越接近0,父亲的容貌影响越大,反之母亲影响越大。
每次修改该参数值后,要重新运行下面的代码块
gender_influence = 0.8  # 性别影响因子,取值范围[0.01, 0.99],取值越接近0,父亲的容貌影响越大,反之母亲影响越大

!rm -rf ./for_animation
!mkdir ./for_animation
face_img = []
hybrid_face = ((1 - gender_influence) * first_face) + (gender_influence * second_face)
animation_resolution = "512"
animation_size = int(animation_resolution), int(animation_resolution)
frames_number = 50
download_image = False
for i in range(0, frames_number, 1):
    intensity = (8 * (i / (frames_number - 1))) - 4
    generate_final_images(hybrid_face, age_direction, intensity, i)
    clear_output()
    print(str(i) + " of {} photo generated".format(str(frames_number)))

for j in reversed(face_img):
    face_img.append(j)

automatic_download = False

if gender_influence <= 0.3:
    animation_name = "boy.mp4"
elif gender_influence >= 0.7:
    animation_name = "girl.mp4"
else:
    animation_name = "animation.mp4"

imageio.mimsave('./for_animation/' + animation_name, face_img)
clear_output()
display(mpy.ipython_display('./for_animation/' + animation_name, height=400, autoplay=1, loop=1))
10. 查看孩子不同性别的容貌
请修改下面代码中的 person_age 参数,该参数是年龄影响因子,取值范围[10, 50],设置该值后,将生成对应年龄的小孩的容貌。
每次修改该参数值后,要重新运行下面的代码块
person_age = 10  # 小孩的年龄,取值范围[10, 50],设置该值后,将生成对应年龄的小孩的容貌

!rm -rf ./for_animation
!mkdir ./for_animation
face_img = []
intensity = -((person_age / 5) - 6)
animation_resolution = "512"
animation_size = int(animation_resolution), int(animation_resolution)
frames_number = 50  # 容貌变化的图像数,取值范围[10, 50]
download_image = False

for i in range(1, frames_number):
    gender_influence = i / frames_number
    hybrid_face = ((1 - gender_influence) * first_face) + (gender_influence * second_face)
    face = generate_final_images(hybrid_face, age_direction, intensity, i)
    clear_output()
    print(str(i) + " of {} photo generated".format(str(frames_number)))

for j in reversed(face_img):
    face_img.append(j)

animation_name = str(person_age) + "_years.mp4"
imageio.mimsave('./for_animation/' + animation_name, face_img)
clear_output()
display(mpy.ipython_display('./for_animation/' + animation_name, height=400, autoplay=1, loop=1))
11. 更换父亲和母亲的照片
接下来,你可以上传自己感兴趣的父母亲照片到father_image 和 mother_image目录下,重新运行代码,即可生成新的孩子照片。
你需要按照如下规则和步骤进行:
1、参考下图的操作,进入到 ma_share/BabyGAN 目录;
2、准备一张父亲的照片,上传到 father_image 目录下,命名必须为father.jpg;(如果你不知道上传文件到 JupyterLab 的方法,请查看此文档)
3、准备一张母亲的照片,上传到 mother_image 目录下,命名必须为mother.jpg;
4、father_image 和 mother_image目录都只允许存在一张照片;
5、重新运行步骤4~10的代码。