silverlight 3D 特效对象解释:
1、LinearGradientBrush GradientStop:
2、StackPanel.Effect
DropShadowEffect :
3、StackPanel.Projection :
PlaneProjection:
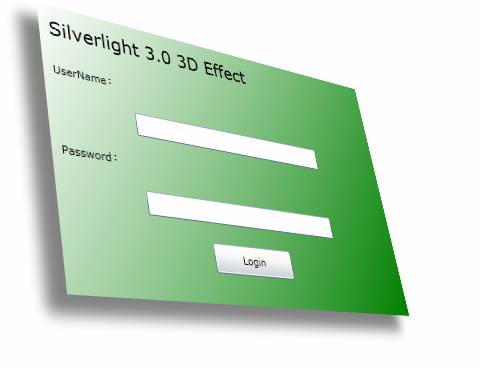
XAML代码实现:
<!—渐变特效-->
<StackPanel Margin="35">
<StackPanel.Background>
<LinearGradientBrush>
<GradientStop Color="White" Offset="0.0" />
<GradientStop Color="Green" Offset="1.0" />
</LinearGradientBrush>
</StackPanel.Background>
<!—投影特效-->
<StackPanel.Effect>
<DropShadowEffect BlurRadius="20"
Direction="220"
Color="Black"
Opacity="0.5"
ShadowDepth="25"/>
</StackPanel.Effect>
<!-- 3D Effects 特效-->
<StackPanel.Projection>
<PlaneProjection RotationX="-30" RotationZ="-10" RotationY="-40"/>
</StackPanel.Projection>
<TextBlock Margin="10" Text="Silverlight 3.0 3D Effect" FontSize="20"/>
<TextBlock Margin="10" Text="UserName:êo"/>
<TextBox Width="240" Margin="10"/>
<TextBlock Margin="10" Text="Password:êo"/>
<PasswordBox Width="240" Margin="10"/>
<Button Margin="10" Content="Login" Width="100" Height="30" />
</StackPanel>
二维平面中变换形状变换:
<1>旋转 (RotateTransform)
创建一个 RotateTransform 并指定其 Angle。45 度的 Angle 将元素沿顺时针方向旋转 45 度;90 度将元素沿顺时针方向旋转 90 度;依此类推。如果您要控制元素的旋转点,请设置 CenterX 和 CenterY 属性。这些属性值以要变换的元素的坐标空间表示。CenterX 和 CenterY 具有默认值 0。最后,通过设置形状的 RenderTransform 属性将 RotateTransform 应用到元素。围绕点 (0,0) 旋转 45 度的矩形:
<Grid x:Name="LayoutRoot" Background="White">
<Rectangle Width="50" Height="50" Fill="RoyalBlue">
<Rectangle.RenderTransform>
<RotateTransform Angle="45" />
</Rectangle.RenderTransform>
</Rectangle>
</Grid>
<2>缩放 (ScaleTransform)
<3>斜切 (SkewTransform)
<4>转换 (TranslateTransform)
在 XAML 中指定颜色的不透明度
在 XAML 中,指定颜色的不透明度的方法之一就是使用 ARGB 十六进制表示法。ARGB 十六进制表示法使用以下语法:#aarrggbb. aa 表示用于指定颜色的不透明度的两位十六进制值。rr、gg 和 bb 分别表示用于指定颜色中的红色分量、绿色分量和蓝色分量的两位十六进制值。每个十六进制数字都可能具有 0-9 或 A-F 中的一个值。其中 0 是最小值,F 是最大值。alpha 值 00 用于指定完全透明的颜色,而 alpha 值 FF 用于创建完全不透明的颜色
<Rectangle Width="100" Height="100">
<Rectangle.Fill>
<LinearGradientBrush StartPoint="0,0">
<GradientStop Color="#200000FF" Offset="0.0" />
<GradientStop Color="#FF0000FF" Offset="1.0" />
</LinearGradientBrush>
</Rectangle.Fill>
</Rectangle>
Geometry 对象
Geometry 对象(如 EllipseGeometry、PathGeometry 和 GeometryGroup)可以用于描绘二维 (2-D) 形状的几何图形.
Geometry 和 Shape 类的相似之处在于它们均描绘二维形状(例如,比较 EllipseGeometry 和 Ellipse),但它们之间也存在一些重要的区别。例如,Shape 对象是 UIElement 对象,而 Geometry 对象不是。因为是 UIElement 对象,所以 Shape 对象可以进行自我呈现并具有 Opacity、OpacityMask 以及 Geometry 对象所没有的其他图形属性。尽管 Shape 对象比 Geometry 对象更易于使用,但 Geometry 对象更通用。
一个 Shape(Path 类)使用 Geometry 来描绘内容。通过使用 Geometry 设置 Path 的 Data 属性以及设置它的 Fill 和 Stroke 属性,可以呈现 Geometry。
1、从 (10,20) 绘制到 (100,130) 的 LineGeometry
<Canvas Width="200" Height="200">
<Path Stroke="Black" StrokeThickness="1" >
<Path.Data>
<LineGeometry StartPoint="10,20" EndPoint="100,130" />
</Path.Data>
</Path>
</Canvas>
2绘制在 (50,50) 处的 EllipseGeometry
<Canvas>
<Path Fill="Gold" Stroke="Black" StrokeThickness="1">
<Path.Data>
<EllipseGeometry Center="50,50" RadiusX="50" RadiusY="50" />
</Path.Data>
</Path>
</Canvas>
3、用于剪辑图像的 EllipseGeometry
下面的示例演示如何将 EllipseGeometry 用作图像的剪辑区域。用 Width 200 和 Height 150 定义了一个 Image 对象。一个 RadiusX 值为 100、RadiusY 值为 75、Center 值为 100,75 的 EllipseGeometry 设置为图像的 Clip 属性。只有位于椭圆区域内部的图像部分才会显示。
<Grid x:Name="LayoutRoot" Background="White">
<Image Source="Water_lilies.jpg"
Width="200" Height="150">
<Image.Clip>
<EllipseGeometry RadiusX="100" RadiusY="75" Center="100,75"/>
</Image.Clip>
</Image>
</Grid>