目录:
一、通知
二、键盘的弹出事件监听(原理:通知)
1、类似微信聊天,底部弹出到键盘的上方
2、键盘隐藏
3、"return"键盘改成"发送"
三、应用程序总结
1、info.plist
2、pch文件 预编译文件 Log打印总结
3、UIApplication 应用程序对象
(1)获取iUIApplication 程序图标设置
(2)应用启动的过程
4、自定义控制器
5、三种创建控制器的方法
1)纯代码方式创建(即自定义控制器创建)
2)storyboard创建控制器(默认)
3)通过Xib方式创建控制器
6、UINavigationController导航控制器
(1)常用方法:初始化
(2)常用跳转方法
(3)Storyboard方式跳转
(4)导航栏内容设置
隐藏navigationBar
(5)导航栏控制器的生命周期
(6)Xcode11之后彻底删除stroyboard
一、通知:
1、基本流程
    //创建一个通知的发布者
    NotificationSend *send1=[[NotificationSend alloc]init];
    //创建一个通知的监监听着
    NotificationListener *listener=[[NotificationListener alloc] init];

    //创建通知对象
     NSNotificationCenter *notificationCentter=[NSNotificationCenter defaultCenter];
    /**
     监听通知
     参数一:哪个类要监听
     参数二:类里面要监听的方法
     参数三:监听通知的名称
     参数四:哪个类发送的通知(发送通知的对象 )
        如果没有指定监听的名称nil :所有send1通知都会收到,
     */
    [notificationCentter addObserver:listener selector:@selector(notification:) name:@"通知1" object:send1];
    //发布通知
    /**
     参数一:通知的名称
     参数二:通知的发布者
     参数三:发送通知携带对象
     */
    [notificationCentter postNotificationName:@"通知1" object:send1 userInfo:@{@"name":@"张三"}];
2、监听着操作
@implementation NotificationListener
- (void) notification:(NSNotification *)notification{
//    notification.name//通知的名称
//    notification.object//通知是哪个对象发送的
//    notification.userInfo//字典, 包含了通知的具体内容
    NSLog(@"我收到通知了%@",notification);
}
- (void)dealloc
{
    //移除通知
    [[NSNotificationCenter defaultCenter] removeObserver:self];
}
二、键盘的弹出事件监听(原理:通知)
1、类似微信聊天,底部弹出到键盘的上方
(1)添加键盘监听事件
    //       UIKeyboardWillShowNotification//键盘即将显示
    //       UIKeyboardDidShowNotification//键盘显示完毕
    //       UIKeyboardWillHideNotification//键盘即将隐藏
    //       UIKeyboardDidHideNotification//键盘隐藏完毕
    //       UIKeyboardWillChangeFrameNotification//键盘Frame大小即将改变
    //       UIKeyboardDidChangeFrameNotification//键盘frame大小改变完毕
    //设置键盘监听
    [notificationCenter addObserver:self selector:@selector(keyeyboardWillChangeFrameNotification:) name:UIKeyboardWillChangeFrameNotification object:nil];
(2)在设置监听的类里面写通知类的方法
- (void) keyeyboardWillChangeFrameNotification:(NSNotification *)noteInfo{
     NSLog(@"keyeyboardWillChangeFrameNotification%@",noteInfo.userInfo);
     //1.获取键盘的Y值:让整个self.view平移到键盘上方
     CGRect keyRect= [noteInfo.userInfo[UIKeyboardFrameEndUserInfoKey] CGRectValue];
     CGFloat keyboardY=keyRect.origin.y;
     CGFloat transformValue =keyboardY-self.view.frame.size.height;
     self.view.transform=CGAffineTransformMakeTranslation(0, transformValue);

     NSLog(@"%@=====",[NSString stringWithFormat:@"%.2f", keyboardY]);

//    UIKeyboardFrameBeginUserInfoKey = NSRect: {{0, 812}, {375, 366.66666666666674}};//键盘frame在还没有改变之前的位置
//    UIKeyboardFrameEndUserInfoKey = NSRect: {{0, 445.33333333333326}, {375, 366.66666666666674}};//键盘frame改变完成之后的位置

//    UIKeyboardCenterEndUserInfoKey = NSPoint: {187.5, 628.66666666666663};  //改变之后中心点的坐标
//    UIKeyboardCenterBeginUserInfoKey = NSPoint: {187.5, 995.33333333333337};//改变之前中心点的作弊啊

//    UIKeyboardBoundsUserInfoKey = NSRect: {{0, 0}, {375, 366.66666666666674}};
//    UIKeyboardAnimationDurationUserInfoKey = 0.25;//动画执行的时间
//    UIKeyboardAnimationCurveUserInfoKey = 7;  //平移模式匀速
//    UIKeyboardIsLocalUserInfoKey = 1
}
(3)移除通知
- (void)dealloc
{
    //移除通知
    [[NSNotificationCenter defaultCenter] removeObserver:self];
}
2、键盘隐藏
    //键盘隐藏,让控制器所管理的控制器结束编辑
    [self.view endEditing:YES];
3、"return"键盘改成"发送"
1)在xib上修改UITextField 中Return key的值为send
2)设置代理,重写代理方法
//设置代理
 self.etCode.delegate=self;
/**
是否允许编辑:false不允许:默认YES
 */
- (BOOL)textFieldShouldBeginEditing:(UITextField *)textField{
    return NO;
}
/**
return键单击时调用
 */
- (BOOL)textFieldShouldReturn:(UITextField *)textField{
    //写发送的代码逻辑
    return YES;
}
三、应用程序总结
1、info.plist
Bundle display name :应用的名称
Bundle versions string, short:应用发布的版本号
Bundle identifier:应用的唯一标识
Main storyboard file base name:应用启动默认加载的storyboard文件名称
Supported interface orientations (iPad):屏幕的方向
View controller-based status bar appearance 是否隐藏状态栏
   //获取info.plist文件
    NSDictionary *dict= [NSBundle mainBundle].infoDictionary;
    NSLog(@"%@",dict);
    NSString *appName= dict[@"CFBundleDisplayName"];
2、pch文件 预编译文件 Log打印总结
//开发的时候打印,但是发布的时候不打印的NSLog
#ifdef DEBUG
#define NSLog(...) NSLog(@"%s 第%d行
 %@

",__func__,__LINE__,[NSString stringWithFormat:__VA_ARGS__])
#else
#define NSLog(...)
#endif
3、UIApplication 应用程序对象
(1)获取iUIApplication 程序图标设置
//解决添加不进去windows按钮
[[[UIApplication sharedApplication].windows lastObject] addSubview: customWindow];
    UIApplication *app=  [UIApplication sharedApplication];
    //设置应用图片上面的数字
    UIUserNotificationCategory *category=[[UIUserNotificationCategory alloc]init];
    NSSet *set=[NSSet setWithObject:category];
    UIUserNotificationSettings *setting=[UIUserNotificationSettings settingsForTypes:UIUserNotificationTypeBadge categories:set];
    [app registerUserNotificationSettings:setting];
    app.applicationIconBadgeNumber=10;

    //设置连网状态指示器
    app.networkActivityIndicatorVisible=YES;

    //状态栏的管理
    app.statusBarHidden=YES;
(2)应用启动的过程
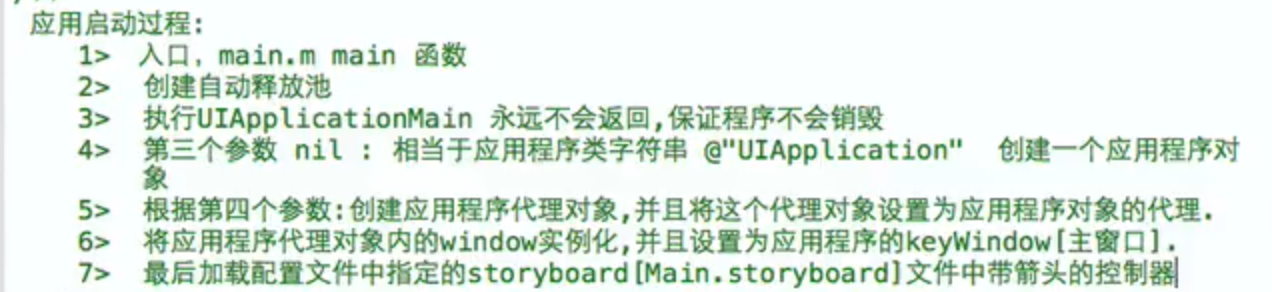
//应用程序加载完毕
- (BOOL)application:(UIApplication *)application didFinishLaunchingWithOptions:(NSDictionary *)launchOptions {
    // Override point for customization after application launch.
      NSLog(@"%@",@"应用程序加载完毕");
    return YES;
}
//即将变为不活跃状态:失去焦点
- (void)applicationWillResignActive:(UIApplication *)application{
    NSLog(@"%@",@"即将变为不活跃状态:失去焦点");
}
//应用程序进入后台
- (void)applicationDidEnterBackground:(UIApplication *)application{
     NSLog(@"%@",@"应用程序进入后台");
}
//即将进入前台
- (void)applicationWillEnterForeground:(UIApplication *)application{
      NSLog(@"%@",@"即将进入前台");
}
//应用变为活跃状态:获取焦点
- (void)applicationDidBecomeActive:(UIApplication *)application{
      NSLog(@"%@",@"应用变为活跃状态:获取焦点");
}
//应用即将销毁
- (void)applicationWillTerminate:(UIApplication *)application{
      NSLog(@"%@",@"应用即将销毁");
}
//应用接收到内存警告:
- (void)applicationDidReceiveMemoryWarning:(UIApplication *)application{
      NSLog(@"%@",@"应用接收到内存警告");
}
4、自定义控制器
1)删除Main.storyboard的启动方式
在plist文件中删除Main storyboard file base name:
2)设置主窗口
在AppDelegate.h中添加
@property (nonatomic, strong) UIWindow * window;
在AppDelegate.h中设置主窗口、根控制器
//应用程序加载完毕
- (BOOL)application:(UIApplication *)application didFinishLaunchingWithOptions:(NSDictionary *)launchOptions {
    // Override point for customization after application launch.
      NSLog(@"%@",@"应用程序加载完毕");
    //创建窗口并且指定大小,默认是隐藏的
    self.window=[[UIWindow alloc]initWithFrame:[UIScreen mainScreen].bounds];
//     self.window.bounds = [UIScreen mainScreen].bounds;
    //将窗口作为应用程序的主窗口方式一
//    [self.window makeKeyAndVisible];
    //将窗口作为应用程序的主窗口方式二
    [self.window makeKeyWindow];
    self.window.hidden=NO;

    //设置主窗口的背景颜色
    self.window.backgroundColor = [UIColor whiteColor];
    //设置窗口的根控制器
    ViewController *viewC=[[ViewController alloc] init];
    self.window.rootViewController=viewC;
    return YES;
}
self.view 生命周期 : loadView ------加载完成之后执行viewDidLoad
5、三种创建控制器的方法
1)纯代码方式创建(即自定义控制器创建)
2)storyboard创建控制器(默认)
(1)创建一个storyboard文件
(2)代码中初始化
     使用storyboard的设置
     */
    UIStoryboard *viewStoryBoard = [UIStoryboard storyboardWithName:@"Login" bundle:nil];
    //方式一勾选 is initial view Controller
    UIViewController *viewC=[viewStoryBoard instantiateInitialViewController];
    //方式二(1)勾选 is initial view Controller     (2)StoryBoard中添加StoryBoard ID为LoginView
     ViewController *viewVc = [viewStoryBoard instantiateViewControllerWithIdentifier:@"LoginView"];
3)通过Xib方式创建控制器
(1)先创建自定义控制器类
(2)指定xib
修改xib的 fileOwner
将fileOwner的view线拖至xib内view
     //xib名字和viewController 名称不相同
     ViewController *viewC1=  [[ViewController alloc] initWithNibName:@"Login" bundle:nil];
     //xib名字和viewController 名称相同xib名称view
     ViewController *viewC2=  [[ViewController alloc] init];

     //xib名字和viewController 完全一致
     ViewController *viewC3=  [[ViewController alloc] init];
6、UINavigationController导航控制器
(1)常用方法:初始化
   //设置窗口的根控制器
    ViewController *viewC=[[ViewController alloc] init];
    //设置UINavigationController控制器的根控制器为ViewController
    UINavigationController *uiNaC=[[UINavigationController alloc]initWithRootViewController:viewC];
    //设置根控制器为UINavigationController;
    self.window.rootViewController=uiNaC;
(2)常用跳转方法
     LoginController *loginC=[[LoginController alloc] init];
    //跳到login控制器
    [self.navigationController pushViewController:loginC animated:YES];
    //返回到上一层控制器
    [self.navigationController popViewControllerAnimated:YES];
     //返回到根控制器
    [self.navigationController popToRootViewControllerAnimated:YES];
    //返回到指定的控制器,必须是已经存在在栈里面的
     NSArray *vcs=  self.navigationController.viewControllers;
    [self.navigationControllerpopToViewController:vcs[0] animated:YES];
(3)Storyboard方式跳转
根据连线进行跳转,返回需要创建代码控制器进行返回同代码
(4)导航栏内容设置
 //获取当前控制器的导航栏设置标题
    self.navigationItem.title=@"登录";
    //设置中间view
    UIButton *bt=[UIButton buttonWithType:UIButtonTypeContactAdd];
    [bt addTarget:self action:@selector(btOnclick) forControlEvents:UIControlEventTouchUpInside];
    self.navigationItem.titleView=bt;
    //设置左侧按钮
    UIBarButtonItem *btLeftItem=[[UIBarButtonItem alloc]initWithBarButtonSystemItem:UIBarButtonSystemItemCancel target:self action:@selector(cancleOnclick)];
    self.navigationItem.leftBarButtonItem=btLeftItem;
    //设置右侧按钮
      UIBarButtonItem *btRightItem=[[UIBarButtonItem alloc]initWithBarButtonSystemItem:UIBarButtonSystemItemDone target:self action:@selector(cancleOnclick)];

     self.navigationItem.rightBarButtonItem=btRightItem;
    //左侧设置多个按钮
     self.navigationItem.rightBarButtonItems=@[btRightItem,btLeftItem];

    //设置左上角返回按钮
      UIBarButtonItem *backBarItem=[[UIBarButtonItem alloc]initWithTitle:@"返回" style:UIBarButtonItemStylePlain target:self action:@selector(cancleOnclick)];
      //隐藏返回按钮
      self.navigationItem.backBarButtonItem=backBarItem;
      //隐藏navigationItem
      self.navigationController.navigationBar.hidden = true
//隐藏navigationBar
(1)在基类中写并且注册代理UINavigationControllerDelegate
- (void)navigationController:(UINavigationController*)navigationController willShowViewController:(UIViewController*)viewController animated:(BOOL)animated {

    if(viewController == self){
        [navigationController setNavigationBarHidden:YES animated:YES];
    }else{

        //系统相册继承自 UINavigationController 这个不能隐藏 所有就直接return
        if ([navigationController isKindOfClass:[UIImagePickerController class]]) {
            return;
        }

        //不在本页时,显示真正的navbar
        [navigationController setNavigationBarHidden:NO animated:YES];
        //当不显示本页时,要么就push到下一页,要么就被pop了,那么就将delegate设置为nil,防止出现BAD ACCESS
        //之前将这段代码放在viewDidDisappear和dealloc中,这两种情况可能已经被pop了,self.navigationController为nil,这里采用手动持有navigationController的引用来解决
        if(navigationController.delegate == self){
            //如果delegate是自己才设置为nil,因为viewWillAppear调用的比此方法较早,其他controller如果设置了delegate就可能会被误伤
            navigationController.delegate = nil;
        }
    }
}

(2)在需要使用的页面进行隐藏
//注意是 viewWillAppear 方法
-(void)viewWillAppear:(BOOL)animated
{
    [super viewWillAppear:animated];
    //设置代理即可
    self.navigationController.delegate = self;
}
(5)导航栏控制器的生命周期

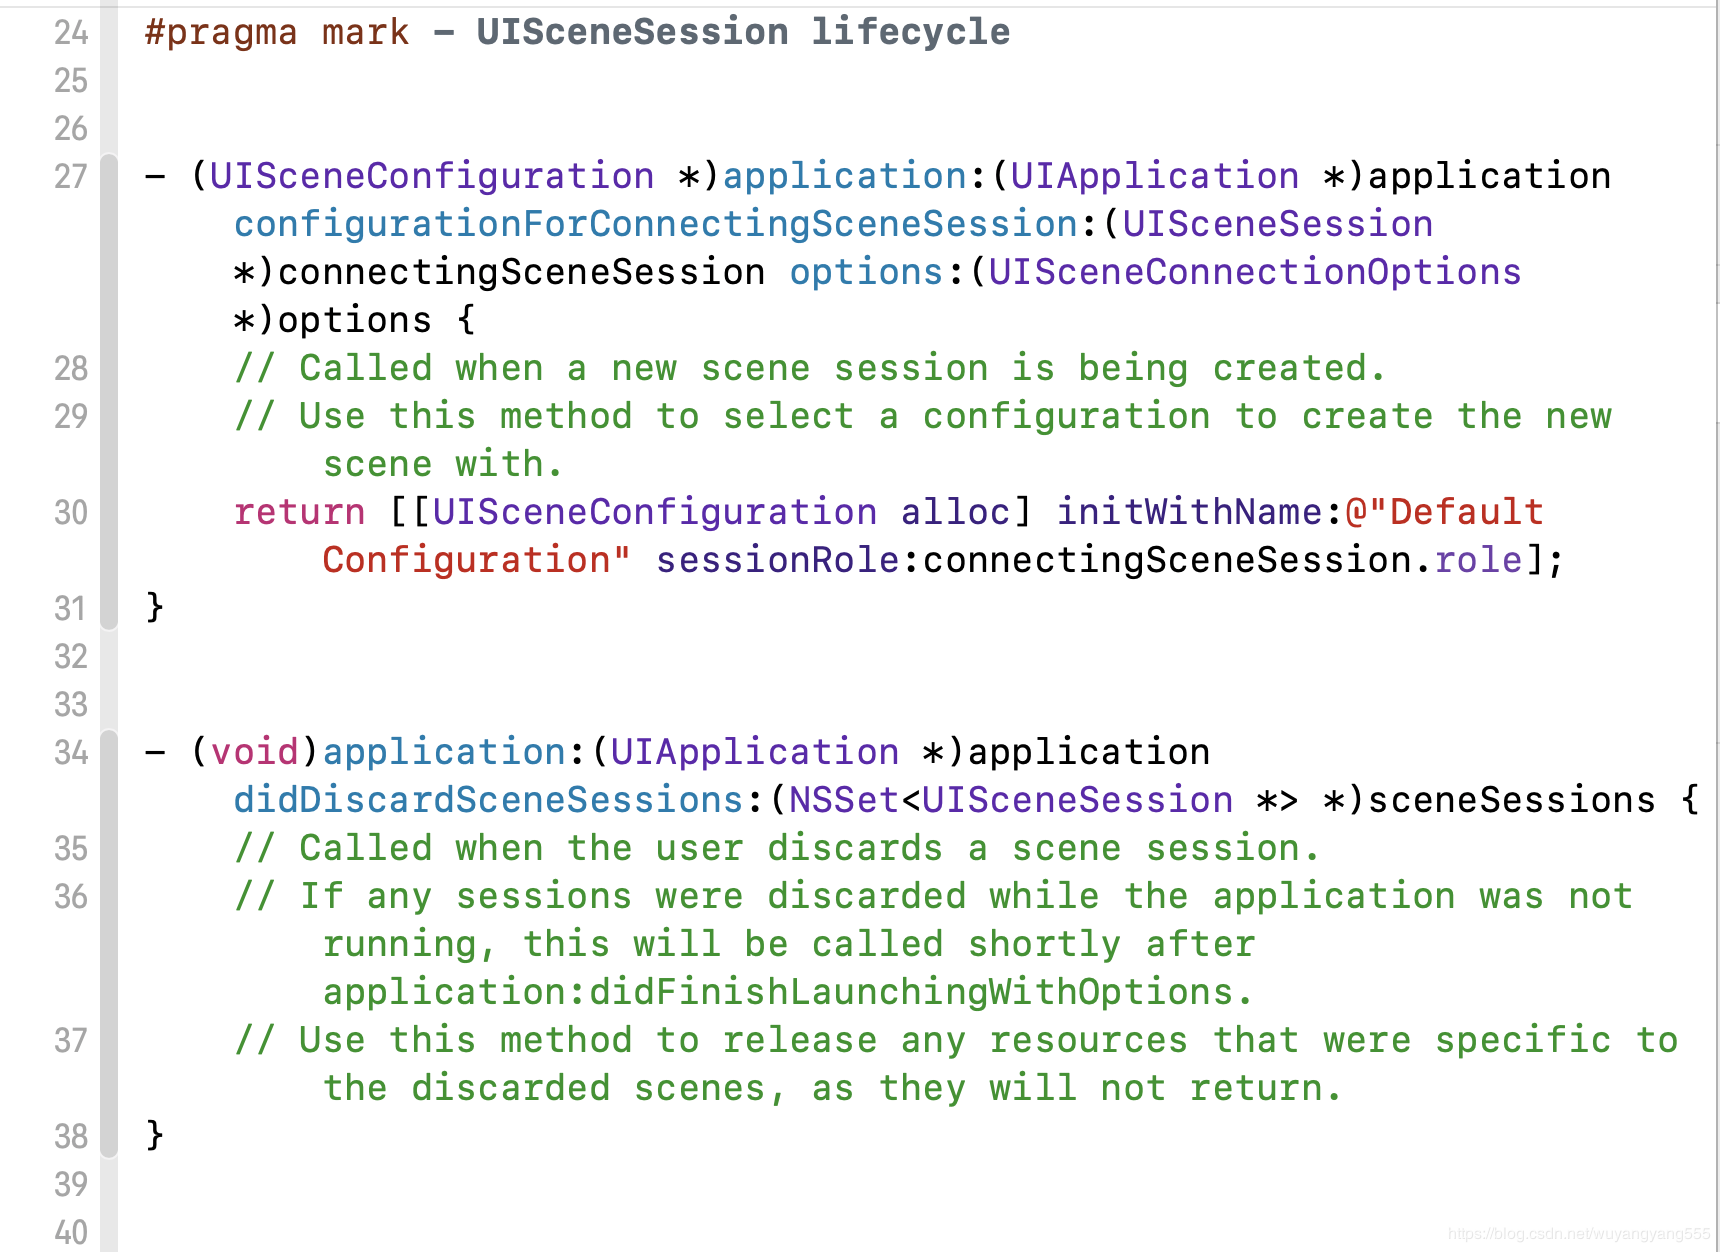
(6)Xcode11之后彻底删除stroyboard
1)删除info.plist中的 Application Scene Manifest
2)项目目录,删掉Scenedelegate.h和Scenedelegate.m这两个文件。
3)咱们再进入Appdelegate.m,注释或者删掉图示里面内容
4)在APPdelegate.h里面添加window属性
@property (strong, nonatomic) UIWindow * window;