ueditor下载好之后直接复制到项目的WebContent目录下,并将ueditorjsplib下的jar包复制或者剪切到项目的lib目录下。先看一下效果,如下:
1.文件的上传
首先在ueditor/jsp目录下找到config.json文件,就拿Image上传来说吧。
"imageUrlPrefix": "http://localhost:8080/HJZGG_BLOG", /* 图片访问路径前缀 */。开始的时候imageUrlPrefix这个属性值是空的。
另外一个就是"imagePathFormat": "/fileUpload/image/{yyyy}{mm}{dd}/{time}{rand:6}", /* 上传保存路径,可以自定义保存路径和文件名格式 */。这个我已经改过了。
2.ueditor和struct2整合
如果项目中使用了Apache Struts2框架,将/* 过滤 ,由于该框架默认使用Apache的Commons FileUpload组件,和内建的FileUploadInterceptor拦截器实现文件上传,将request中的文件域封装到action中的一个File类型的属性中,并删除request中的原有文件域,这样就会导致ueditor文件上传不能成功。
解决办法:重写struct2的过滤器,对ueditor的请求不进行过滤。
import org.apache.struts2.dispatcher.ng.filter.StrutsPrepareAndExecuteFilter;

    /**

     * Servlet Filter implementation class MyStrutsPrepareAndExecuteFilter

     */

    public class MyStrutsPrepareAndExecuteFilter extends StrutsPrepareAndExecuteFilter{

        public void doFilter(ServletRequest request, ServletResponse response, FilterChain chain) throws IOException, ServletException {

               HttpServletRequest req = (HttpServletRequest) request;

               String url = req.getRequestURI();

               if (url.contains("/ueditor/jsp/controller.jsp")) {//ueditor的不过滤

                   chain.doFilter(request, response);

               }else{

                   super.doFilter(request, response, chain);

               }

        }

    }
注意:只是重写StrutsPrepareAndExecuteFilter的doFilter方法,不要重写其他的,否则可能会出错。
然后更改web.xml中filter的配置
  <filter>
    <filter-name>struts2</filter-name>
    <filter-class>
     <!--org.apache.struts2.dispatcher.ng.filter.StrutsPrepareAndExecuteFilter 这是之前的配置-->
         com.blog.filter.MyStrutsPrepareAndExecuteFilter
    </filter-class>
  </filter>
  <filter-mapping>
    <filter-name>struts2</filter-name>
    <url-pattern>/*</url-pattern>
    <dispatcher>REQUEST</dispatcher>
    <dispatcher>FORWARD</dispatcher>
  </filter-mapping>
3.ueditor的初始化细节
从ueditor/index.html中可以看到,实例化编辑器, 建议使用工厂方法getEditor创建和引用编辑器实例,如果在某个闭包下引用该编辑器,直接调用UE.getEditor('editor')就能拿到相关的实例,即如下:
var ue = UE.getEditor('editor'), 我们可以找到函数的原型中还有一个参数,就是用来初始化ueditor的属性的。函数原型位于ueditor.all.js中。
   UE.getEditor = function (id, opt) {

        var editor = instances[id];

        if (!editor) {

            editor = instances[id] = new UE.ui.Editor(opt);

            editor.render(id);

        }

        return editor;

    };
初始化,例如:var ue = UE.getEditor('editor', {initialFrameHeight:340,initialFrameWidth:760,maximumWords:1000,autoHeightEnabled:false});
我们定义了初始高度、初始宽度、最大输入字数,不允许自动增高(尤其是最后这个,当你放入很大的图片后,编辑框总是会变得很高)
如果我没有设置autoHeightEnabled:false这个参数,编辑框总是会随着图片的拉伸变得很高。
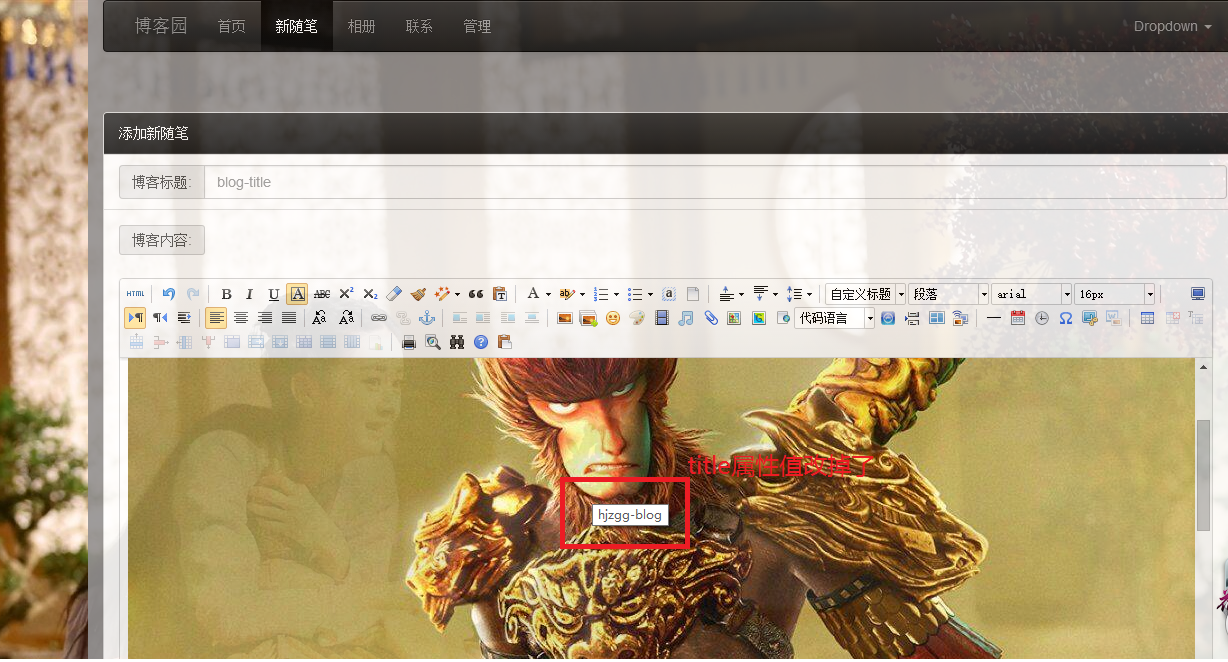
4.解决ueditor上传图片后属性title的内容
图片上传之后,鼠标放在图片上,出现title属性的内容,这个内容是图片的随机名称,看着可不爽。
解决办法:首先看你引用的是ueditor.all.js还是ueditor.all.min.js, 到相应的文件ctrl+F,寻找“loader.setAttribute('title', json.title || '')”,然后自己可以设置title的值。具体函数如下。
  function callback(){

        try{

            var link, json, loader,

                body = (iframe.contentDocument || iframe.contentWindow.document).body,

                result = body.innerText || body.textContent || '';

            json = (new Function("return " + result))();

            link = me.options.imageUrlPrefix + json.url;

            if(json.state == 'SUCCESS' && json.url) {

                loader = me.document.getElementById(loadingId);

                loader.setAttribute('src', link);

                loader.setAttribute('_src', link);

                //loader.setAttribute('title', json.title || '');

                loader.setAttribute('title', 'hjzgg-blog');

                loader.setAttribute('alt', json.original || '');

                loader.removeAttribute('id');

                domUtils.removeClasses(loader, 'loadingclass');

            } else {

                showErrorLoader && showErrorLoader(json.state);

            }

        }catch(er){

            showErrorLoader && showErrorLoader(me.getLang('simpleupload.loadError'));

        }

        form.reset();

        domUtils.un(iframe, 'load', callback);

    }
5.ueditor页面刷新或者切换之后导致编辑的内容丢失问题解决
首先找到ueditor.all.js这个文件,ctrl+F寻找"plugins/autosave.js", 然后会发现一个save方法,本地的缓存都是通过这个函数保存的。
方式1:是通过window.localStorage,关于它的基本用法参考:http://blog.sina.com.cn/s/blog_621403ef0101bk3j.html
首先在sava方法里增加一句,window.localStorage.setItem("local_data", saveData);保存我们的数据,然后在页面刷新的时候读出来,将之前的数据重新赋给ueditor。
    var ue = UE.getEditor('editor', {initialFrameHeight:500, maximumWords:10000, autoHeightEnabled:false});
    $(function(){
        var preData =  UE.Editor.prototype.getPreferences(UE.saveKey);
        //判断ueditor 编辑器是否创建成功
        ue.addListener("ready", function () {
            // editor准备好之后才可以使用
            ue.setContent(window.localStorage.getItem("local_data"));
        });
    });
方式2:函数跟踪会发现:function save ( editor ){}函数中调用了me.setPreferences( saveKey, saveData ); 如果想找到saveData 就必须通过saveKey来找到,在ueditor 中的index.html中,提供了这样的一个函数:
function getLocalData () {
    alert(UE.getEditor('editor').execCommand( "getlocaldata" ));
}
也就是通过执行一个 execCommand 方法来执行一个 “getlocaldata”命令就可得到本地缓存的数据。ctrl+f寻找“getlocaldata”, 然后会找到下面的代码:
      commands:{
            'clearlocaldata':{
                execCommand:function (cmd, name) {
                    if ( saveKey && me.getPreferences( saveKey ) ) {
                        me.removePreferences( saveKey )
                    }
                },
                notNeedUndo: true,
                ignoreContentChange:true
            },

            'getlocaldata':{
                execCommand:function (cmd, name) {                   return saveKey ? me.getPreferences( saveKey ) || '' : '';
                },
                notNeedUndo: true,
                ignoreContentChange:true
            },
由于每次刷新页面或者页面切换时,saveKey变量会初始化,就不会得到我们之前保存的数据了。但是我们可根据给定计算savekey的方法来重新给savekey赋值。savekey的初始化就在不远处,很容易看到,如下。
      'ready':function(){

                var _suffix = "-drafts-data",
                    key = null;
                if ( me.key ) {
                    key = me.key + _suffix;
                } else {
                    key = ( me.container.parentNode.id || 'ue-common' ) + _suffix;
                }

                //页面地址+编辑器ID 保持唯一
                saveKey = ( location.protocol + location.host + location.pathname ).replace( /[.:/]/g, '_' ) + key;
            },
接着重新设置saveKey的值,作如下操作:
         'getlocaldata':{
                execCommand:function (cmd, name) {
                    var _suffix = "-drafts-data",
                    key = null;
                    if ( me.key ) {
                         key = me.key + _suffix;
                    } else {
                         key = ( me.container.parentNode.id || 'ue-common' ) + _suffix;
                    }

                    //页面地址+编辑器ID 保持唯一
                    var tmp_saveKey = ( location.protocol + location.host + location.pathname ).replace( /[.:/]/g, '_' ) + key;
                    return me.getPreferences( tmp_saveKey ) || '';
                    //return saveKey ? me.getPreferences( tmp_saveKey ) || '' : '';
                },
                notNeedUndo: true,
                ignoreContentChange:true
            },
然后在初始化ueditor时,调用UE.getEditor('editor').execCommand( "getlocaldata" )就可以看到缓存的数据
var ue = UE.getEditor('editor', {initialFrameHeight:500, maximumWords:10000, autoHeightEnabled:false});
alert(UE.getEditor('editor').execCommand( "getlocaldata" ))
最后一步将,缓存的数据重置到ueditor中
  var ue = UE.getEditor('editor', {initialFrameHeight:500, maximumWords:10000, autoHeightEnabled:false});
    $(function(){
        var preData =  UE.Editor.prototype.getPreferences(UE.saveKey);
        //判断ueditor 编辑器是否创建成功
        ue.addListener("ready", function () {
            // editor准备好之后才可以使用
            ue.setContent(UE.getEditor('editor').execCommand( "getlocaldata" ));
        });
    });
6.ueditor数据存储和展示
1.ueditor初始化
  String.prototype.replaceAll = function(reallyDo, replaceWith, ignoreCase) {
        if (!RegExp.prototype.isPrototypeOf(reallyDo)) {
            return this.replace(new RegExp(reallyDo, (ignoreCase ? "gi": "g")), replaceWith);
        } else {
            return this.replace(reallyDo, replaceWith);
        }
    }

    var ue = UE.getEditor('editor', {initialFrameHeight:500, maximumWords:10000, autoHeightEnabled:false});
2.得到ueditor中的内容(调用ueditor中的getContent方法):UE.getEditor('editor').getContent().replaceAll(' ', '<br>', false);至于为什么要将字符串中的换行符替换成<br>,是因为后台接收的时候,字符串换行符没有了。这样在展示的时候代码的位置会出现错乱。
3.从数据库中读出存入的content,然后展示到新的页面中,请参考:http://fex.baidu.com/ueditor/#start-uparse
4.从数据库中读出存入的content,然后重置到ueditor中(用于随笔的更新)。注意,得到的content是个字符串,比如说是"...<p>."..."..</p>...",但是赋值给js中的变量时,如:var content = "${sesson.content}"; 这样就错了,查看源码的就会发现,字符串中有很多的引号"。
解决方法:var content = ${fn:replace(session.content, '"', '\"')}, 将原始字符串中的引号 " 替换成 " 。