[注意]转载请注明出处:http://www.cnblogs.com/hukezhu/
上篇文章是使用了字典转模型的方法实现的,本篇引入一个新的概念xib(描述局部界面的文件)(相对于storyboard描述全局界面来说).
使用xib可以使用可视化界面开发来代替完全代码开发.(当然这不是绝对的,一般实际开发中会结合使用).
xib文件的加载过程:
0> 根据路径, 搜索对应的xib文件(nib文件)
1> 加载xib文件的时候, 会按顺序加载xib文件中的每个控件。
2> 对于每个控件, 创建的时候都会查找对应的Class属性中配置的是那个类, 那么就创建对应的类的对象。
3> 获取到某个视图以后, 按照在xib中配置的属性的值, 放在数组中,
4> 最后返回一个数组, 这个数组中包含创建的所有元素对象。
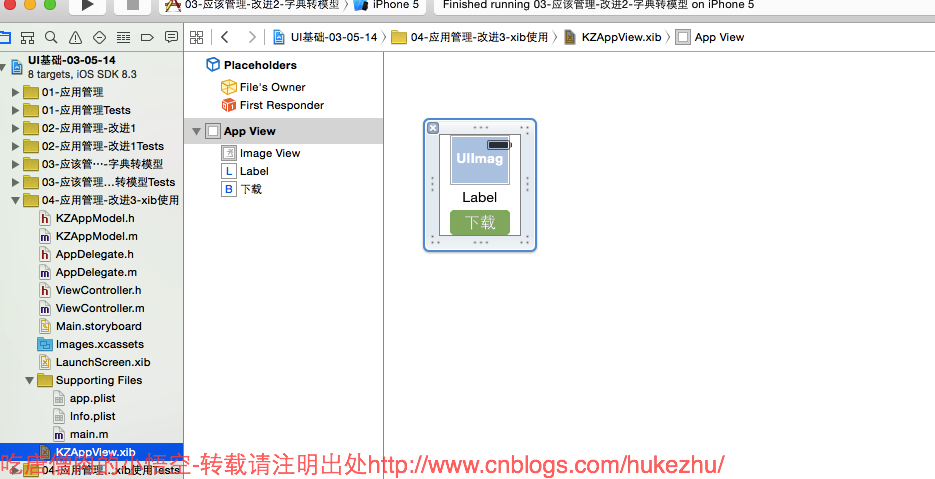
使用xib封装一个自定义view的步骤
1> 新建一个AppView.xib文件来描述AppView内部的结构
2> 新建一个继承UIView的自定义view,假设类名叫做(appView)
3> 修改UIView的类型为appView真实类型
4> 将内部的子控件跟appView进行属性连线
5> appView提供一个模型属性
6> 重写模型属性的set方法,因为在set方法中可以拿到外界控制器传递的模型数据
7> 把模型数据拆开,分别设置数据到对应的子控件中
补充:提供一个创建AppView的类方法,将读取xib文件的代码屏蔽起来
xib文件的创建过程:
xcode界面下,commond+ N--->ios--->Users interface--->view---->create如下图: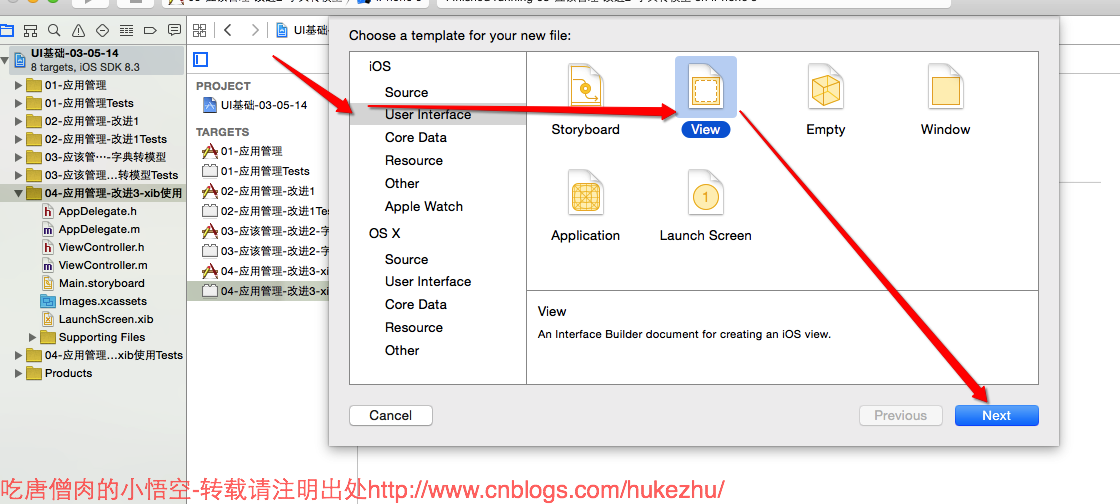

附上源代码:
KZAppView.h
 1 //
 2 //  KZAppModel.h
 3 //  UI基础-03-05-14
 4 //
 5 //  Created by hukezhu on 15/5/15.
 6 //
 7 //
 8
 9 #import <Foundation/Foundation.h>
10 /*吃唐僧肉的小悟空-转载请注明出处http://www.cnblogs.com/hukezhu/*/
11 @interface KZAppModel : NSObject
12 /**
13  *  应用图标
14  */
15 @property (nonatomic ,copy) NSString *icon;
16 /**
17  *  应用名称
18  */
19 @property (nonatomic ,copy) NSString *name;
20
21 /**
22  *  通过字典来初始化对象
23  *
24  *  @param dict 字典对象
25  *
26  *  @return 已经初始化完毕的模型对象
27  */
28 - (instancetype)initWithDict:(NSDictionary *)dict;
29
30 //类方法
31 + (instancetype)appWithModelDict:(NSDictionary *)dict;
32
33 @end
KZAppView.m
 1 //
 2 //  KZAppModel.m
 3 //  UI基础-03-05-14
 4 //
 5 //  Created by hukezhu on 15/5/15.
 6 //
 7 //
 8
 9 #import "KZAppModel.h"
10
11 @implementation KZAppModel
12 /*吃唐僧肉的小悟空-转载请注明出处http://www.cnblogs.com/hukezhu/*/
13 //对象方法
14 -(instancetype)initWithDict:(NSDictionary *)dict{
15
16     //重写构造方法的默认写法
17     if(self = [super init]){
18
19         //将字典的所有属性赋值给模型
20         self.icon = dict[@"icon"];
21         self.name = dict[@"name"];
22     }
23     return self;
24 }
25 //类方法
26 +(instancetype)appWithModelDict:(NSDictionary *)dict{
27
28     //注意此处是self
29     return [[self alloc]initWithDict:dict];
30 }
31 @end
ViewController.m
  1 //
  2 //  ViewController.m
  3 //  03-应用管理
  4 //
  5 //  Created by hukezhu on 15/5/14.
  6 //
  7 //
  8
  9 #import "ViewController.h"
 10 #import "KZAppModel.h"
 11
 12 @interface ViewController ()
 13 @property (nonatomic,strong)NSArray *apps;
 14 @end
 15
 16 @implementation ViewController
 17
 18 - (void)viewDidLoad {
 19     [super viewDidLoad];
 20
 21     //每一行的应用的个数
 22     int totalCol = 3;
 23     /*吃唐僧肉的小悟空-转载请注明出处http://www.cnblogs.com/hukezhu/*/
 24
 25     //添加一个小的view
 26     CGFloat appW = 80;
 27     CGFloat appH = 100;
 28     CGFloat marginX = 20;
 29     CGFloat marginY = 20;
 30     CGFloat hightMargin = 30;
 31     CGFloat leftMargin = (self.view.frame.size.width - totalCol * appW - (totalCol - 1) *marginX)* 0.5;
 32
 33
 34
 35     for (int i = 0; i < self.apps.count; i++) {
 36
 37
 38         //计算行号和列号
 39         int row = i / totalCol;
 40         int col = i % totalCol;
 41
 42         CGFloat appX = leftMargin + (marginX + appW)* col;
 43         CGFloat appY = hightMargin + (marginY + appH)* row;
 44
 45         //1.添加view
 46
 47
 48         //首先拿到一个格子视图
 49         UIView *appView = [[NSBundle mainBundle]loadNibNamed:@"KZAppView" owner:nil options:nil][0];
 50
 51         //1.2设置frame
 52         appView.frame = CGRectMake(appX, appY, appW, appH);
 53         //1.3设置背景色(便于代码阶段验证,之后会删除)
 54         //appView.backgroundColor = [UIColor redColor];
 55         //1.4将这个appView添加到view中
 56         [self.view addSubview:appView];
 57
 58         //加载数据
 59         //NSDictionary *dict = self.apps[i];
 60         //将数据赋值给模型对象
 61         KZAppModel *appModel = self.apps[i];
 62
 63
 64         //通过数组的特性拿到里面的小控件,进行赋值
 65         UIImageView *imageView = (UIImageView *)appView.subviews[0];
 66         imageView.image = [UIImage imageNamed:appModel.icon];
 67
 68         UILabel *label = appView.subviews[1];
 69         label.text = appModel.name;
 70
 71         UIButton *downBtn = (UIButton *)appView.subviews[2];
 72         [downBtn addTarget:self action:@selector(btnOnClick:) forControlEvents:UIControlEventTouchUpInside];
 73
 74
 75 //        //2.添加图片UIImageView
 76 //        CGFloat imageW = 60;
 77 //        CGFloat imageH = 50;
 78 //        CGFloat imageX = (appW - imageW)*0.5;
 79 //        CGFloat imageY = 0;
 80 //        UIImageView *imageView = [[UIImageView alloc]init];
 81 //        imageView.frame = CGRectMake(imageX, imageY, imageW, imageH);
 82 //        //imageView.backgroundColor = [UIColor blueColor];
 83 //        //imageView.image = [UIImage imageNamed:dict[@"icon"]];
 84 //        //从模型对象中取出数据
 85 //        imageView.image = [UIImage imageNamed:appModel.icon];
 86 //        [appView addSubview:imageView];
 87 //
 88 //
 89 //        //3.添加应用名称
 90 //
 91 //        CGFloat labelW = 80;
 92 //        CGFloat labelH = 25;
 93 //        CGFloat labelX = 0;
 94 //        CGFloat labelY = imageH;
 95 //        UILabel *label = [[UILabel alloc]init];
 96 //        label.frame = CGRectMake(labelX, labelY, labelW, labelH);
 97 //        //label.backgroundColor = [UIColor grayColor];
 98 //        //label.text = dict[@"name"];
 99 //        //从模型对象中取出数据name
100 //        label.text = appModel.name;
101 //
102 //        //设置字体大小
103 //        label.font = [UIFont systemFontOfSize:13];
104 //        //设置字体居中
105 //        label.textAlignment = NSTextAlignmentCenter;
106 //        [appView addSubview:label];
107 //
108 //        //4.添加下载按钮
109 //
110 //        CGFloat downloadW = 60;
111 //        CGFloat downloadH = 25;
112 //        CGFloat downloadX = 10;
113 //        CGFloat downloadY = labelH + labelY;
114 //        UIButton *downloadBtn = [[UIButton alloc]init];
115 //        downloadBtn.frame = CGRectMake(downloadX, downloadY, downloadW, downloadH);
116 //        //downloadBtn.backgroundColor = [UIColor yellowColor];
117 //        //设置背景图片
118 //        [downloadBtn setBackgroundImage:[UIImage imageNamed:@"buttongreen"] forState:UIControlStateNormal];
119 //        [downloadBtn setBackgroundImage:[UIImage imageNamed:@"buttongreen_highlighted"] forState:UIControlStateHighlighted];
120 //        //设置字体第一种方法
121 //        [downloadBtn setTitle:@"下载" forState:UIControlStateNormal];
122 //
123 //        //设置字体第二种方法(不推荐使用)
124 //        downloadBtn.titleLabel.text = @"下载";
125 //
126 //        //设置字体大小
127 //        downloadBtn.titleLabel.font = [UIFont systemFontOfSize:15];
128 //        [appView addSubview:downloadBtn];
129 //
130 //
131 //        [downloadBtn addTarget:self action:@selector(btnOnClick:) forControlEvents:UIControlEventTouchUpInside];
132     }
133
134
135
136
137
138 }
139 /*吃唐僧肉的小悟空-转载请注明出处http://www.cnblogs.com/hukezhu/*/
140 /**
141  *  按钮的点击方法
142  *
143  *  @param btn 将按钮本身传入方法中,哪个按钮被点击就调用这个方法
144  */
145 - (void)btnOnClick:(UIButton *)btn{
146
147     //NSLog(@"------%@",btn);
148     btn.enabled = NO;
149     [btn setTitle:@"已下载" forState:UIControlStateNormal];
150
151     CGFloat labelW = 120;
152     CGFloat labelH = 30;
153     CGFloat labelX = (self.view.frame.size.width - labelW)* 0.5;
154     CGFloat labelY = (self.view.frame.size.height - labelH)*0.5;
155     UILabel *label = [[UILabel alloc]init];
156     label.frame = CGRectMake(labelX, labelY, labelW, labelH);
157     label.text = @"正在下载";
158     //设置字体颜色
159     label.textColor = [UIColor redColor];
160     //设置字体居中
161     label.textAlignment = NSTextAlignmentCenter;
162     //设置 背景色
163     label.backgroundColor = [UIColor blackColor];
164
165     //设置圆角的半径
166     label.layer.cornerRadius = 8;
167     //将多余的部分减掉
168     label.layer.masksToBounds = YES;
169     //设置透明度
170     label.alpha = 0.0;
171     //将label添加到view中
172     [self.view addSubview:label];
173     //使用block动画,动画持续时间2秒
174     [UIView animateWithDuration:2.0 animations:^{
175         label.alpha = 0.5;
176     } completion:^(BOOL finished) {
177         if (finished) {
178             [UIView animateWithDuration:2.0 delay:0.1 options:UIViewAnimationOptionCurveLinear animations:^{
179                 label.alpha = 0.0;
180             } completion:^(BOOL finished) {
181                 //上面将透明度设置为0,界面上已经不显示这个label,但是它仍然在内存中,所以为了节约内存,仍要将其从内存中删除
182                 [label removeFromSuperview];
183
184             }];
185         }
186     }];
187
188 }
189 /**
190  *  "懒加载",加载应用数据
191  *
192  */
193 - (NSArray *)apps{
194
195     //如果_apps为空,才加载数据
196     if (_apps == nil) {
197         //获取plist的全路径
198         NSString *path = [[NSBundle mainBundle]pathForResource:@"app.plist" ofType:nil];
199
200         //加载数组
201         NSArray *dictArray = [NSArray arrayWithContentsOfFile:path];
202
203         //创建一个可变数组,来动态接收模型对象
204         NSMutableArray *array = [NSMutableArray array];
205
206         //通过循环,将字典数组的字典取出,转成模型对象
207         for (NSDictionary *dict in dictArray) {
208             KZAppModel *appModel = [KZAppModel appWithModelDict:dict];
209             [array addObject:appModel];
210         }
211         _apps = array;
212     }
213     return _apps;
214     /*吃唐僧肉的小悟空-转载请注明出处http://www.cnblogs.com/hukezhu/*/
215 }
216
217 - (void)didReceiveMemoryWarning {
218     [super didReceiveMemoryWarning];
219     // Dispose of any resources that can be recreated.
220 }
221
222 @end
xib文件加载的两种方式:
1 //方法1:
2 NSArray *objs = [[NSBundle mainBundle] loadNibNamed:@"KZAppView" owner:nil options:nil];
3 //这个方法会创建xib中的所有对象,并且将对象按顺序放到objs数组中
4
5
6 //方法2
7 //bundle参数可以为nil,默认就是main bundle
8 UINib *nib = [UINib nibWithNibName:@"KZAppView" bundle:[NSBundle mainBundle]];
9 NSArray *objs = [nib instantiateWithOwner:nil options:nil];
获取xib中的控件有两种方式:
1.通过绑定tag来实现
2.利用subviews[index];的特性实现
注意:两种方式都需要强制类型转换
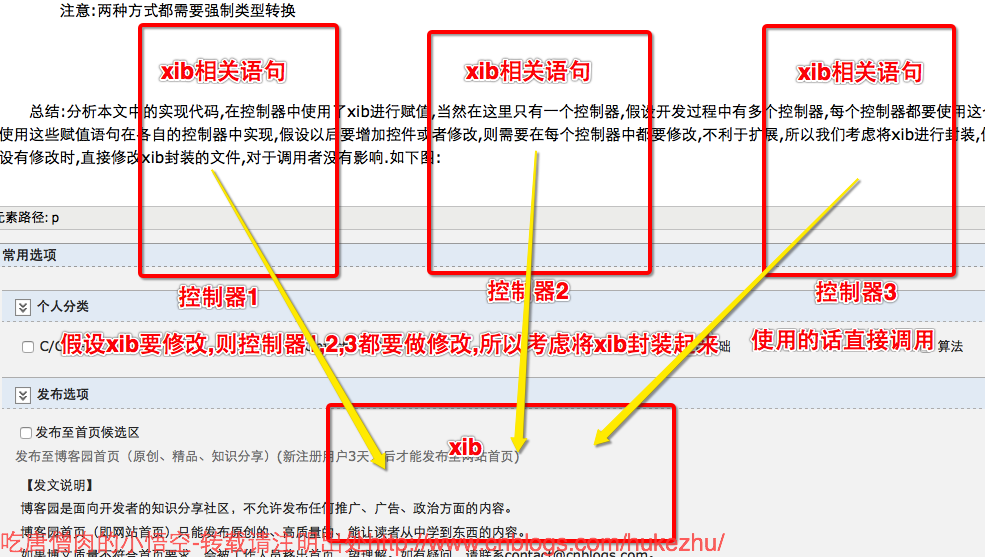
总结:分析本文中的实现代码,在控制器中使用了xib进行赋值,当然在这里只有一个控制器,假设开发过程中有多个控制器,每个控制器都要使用这个xib,那么每个控制器都要使用这些赋值语句在各自的控制器中实现,假设以后要增加控件或者修改,则需要在每个控制器中都要修改,不利于扩展,所以我们考虑将xib进行封装,使用xib时直接调用即可,假设有修改时,直接修改xib封装的文件,对于调用者没有影响.如下图:
所以,下篇文章再次进行改进,将xib进行封装.