一、Spring Security
1、什么是 Spring Security?
(1)基本认识
Spring Security 是基于 Spring 框架,用于解决 Web 应用安全性的 一种方案,是一款优秀的权限管理框架。
Web 应用的安全一般关注 用户认证(authentication) 以及 用户授权(authorization) 这两个部分。简单的理解就是 Web 应用 如何确定 你是谁 以及 你能干什么。
【官网地址:】
    https://spring.io/projects/spring-security
(2)用户认证(authentication)
用户认证就是 验证某个用户是否为系统中的合法主体,也即该用户是否能登陆系统,通常根据用户名以及密码进行确认。
简单的理解就是 使 Web 应用确定 你是谁。
(3)用户授权(authorization)
用户授权就是 验证某个用户是否有执行某个操作的权限。
简单的理解就是 使 Web 应用确定 你能干什么。
(4)记住几个点
【@EnableWebSecurity】
    用于开启 WebSecurity 模式。有时不需要也可以实现相应的功能。

【@EnableGlobalMethodSecurity】
    用于开启注解。常见参数为:prePostEnabled、securedEnabled。

【WebSecurityConfigurerAdapter】
    用于自定义 Security 策略。

【AuthenticationManagerBuilder】
    用于自定义 认证策略。
2、Spring Security 与 Shiro 简单比较一下?
(1)Spring Security
基于 Spring 框架开发,可以与 Spring 无缝整合。
属于重量级的权限控制框架(依赖其他组件、引入各种依赖),提供了全面的权限控制。
(2)Shiro
Apache 的轻量级权限控制框架,不与任何框架捆绑。
使用起来比 Spring Security 简单。
(3)使用
一般来说,使用 Shiro 可以解决大部分项目的问题,且容易操作。
而 SpringBoot 提供了自动化配置方案,通过较少的配置就可以使用 Spring Security。
所以常见组合通常为: SSM + Shiro 或者 SpringBoot / SpringCloud + Spring Security。
3、Spring Security 初体验(SpringBoot + Spring Security)
(1)步骤
【步骤:】
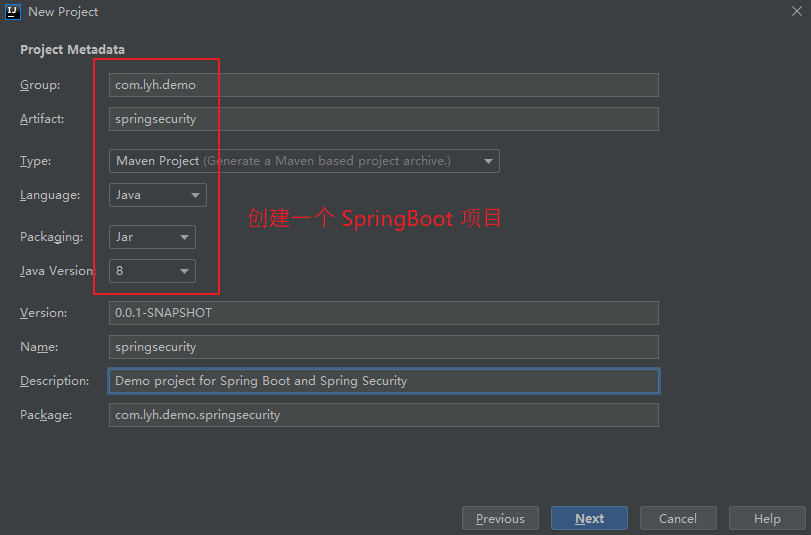
    Step1:新建一个 SpringBoot 项目。
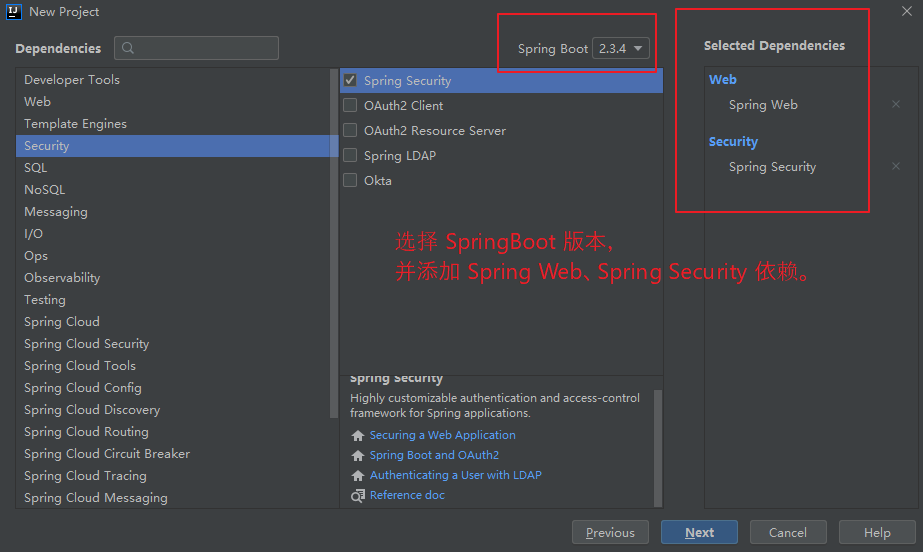
    Step2:引入 Web 依赖、Spring Security 依赖。
    Step3:新建一个 controller 进行测试。
注:
    此处仅导入依赖,未进行任何配置,所以显示的都是默认效果。

【效果:】
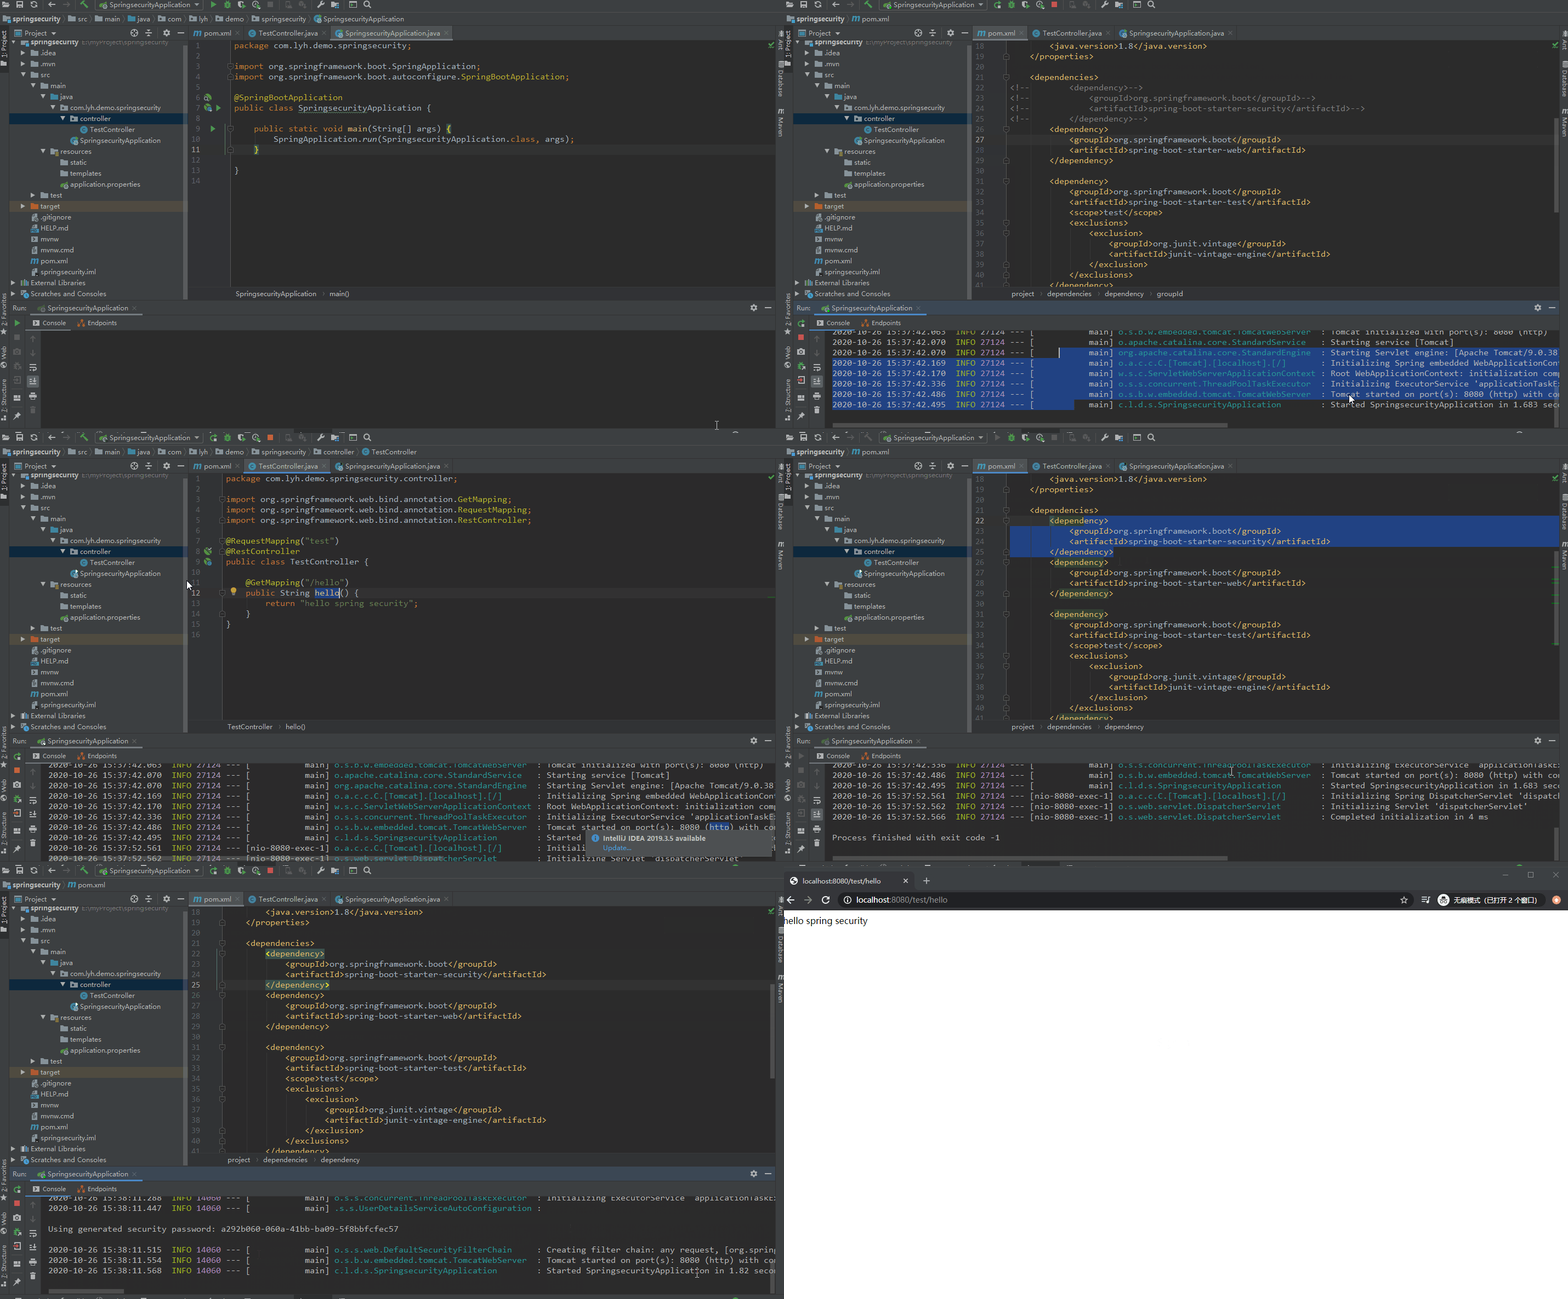
当 Spring Security 依赖存在时,访问 controller 时会默认跳转到登陆页面。
默认用户名为:user
密码在控制台上可以看到(随机生成)。
(2)新建一个 SpringBoot 项目,并添加 Web、Spring Security 等依赖。
【依赖:】
<dependency>
    <groupId>org.springframework.boot</groupId>
    <artifactId>spring-boot-starter-security</artifactId>
</dependency>
<dependency>
    <groupId>org.springframework.boot</groupId>
    <artifactId>spring-boot-starter-web</artifactId>
</dependency>
(3)新建一个 controller,并简单测试一下 Spring Security。
【controller:】
package com.lyh.demo.springsecurity.controller;

import org.springframework.web.bind.annotation.GetMapping;
import org.springframework.web.bind.annotation.RequestMapping;
import org.springframework.web.bind.annotation.RestController;

@RequestMapping("test")
@RestController
public class TestController {

    @GetMapping("/hello")
    public String hello() {
        return "hello spring security";
    }
}
如下图所示,未添加 SpringSecurity 依赖时,访问 controller 没有限制。
而 添加上依赖后,访问 controller 会首先跳转到登录页面,成功登录后才允许访问。
4、Spring Security 再次体验(SSM + Spring Security)
(1)步骤
使用 SSM 时,需要进行一些繁琐的配置,没有 SpringBoot 用起来舒服,
此处简单配置一下,后面介绍仍然以 SpringBoot 为主。
【步骤:】
    Step1:创建一个 maven 工程 或者 web 工程(能使用 SpringMVC 即可),可参考:https://www.cnblogs.com/l-y-h/p/12030104.html
    Step2:配置 SpringSecurity,并测试。
(2)新建 maven 工程,导入相关依赖
此处使用 tomcat 8 版本启动项目,tomcat 7 启动后在登录时可能会报错。
【依赖】
<dependency>
  <groupId>org.springframework.security</groupId>
  <artifactId>spring-security-core</artifactId>
  <version>5.3.4.RELEASE</version>
</dependency>
<dependency>
  <groupId>org.springframework.security</groupId>
  <artifactId>spring-security-web</artifactId>
  <version>5.3.4.RELEASE</version>
</dependency>
<dependency>
  <groupId>org.springframework.security</groupId>
  <artifactId>spring-security-config</artifactId>
  <version>5.3.4.RELEASE</version>
</dependency>
<dependency>
  <groupId>org.springframework</groupId>
  <artifactId>spring-webmvc</artifactId>
  <version>5.2.8.RELEASE</version>
</dependency>
<dependency>
  <groupId>junit</groupId>
  <artifactId>junit</artifactId>
  <version>4.11</version>
  <scope>test</scope>
</dependency>

【注意:(tomcat7 版本可能会报如下的错误,更换 tomcat 8 以上版本即可)】
java.lang.NoSuchMethodError: javax.servlet.http.HttpServletRequest.changeSessionId()Ljava/lang/String;
(3)配置基本的 web 环境(Spring 以及 SpringMVC)
【web.xml】
<?xml version="1.0" encoding="UTF-8"?>
<web-app xmlns="http://xmlns.jcp.org/xml/ns/javaee"
         xmlns:xsi="http://www.w3.org/2001/XMLSchema-instance"
         xsi:schemaLocation="http://xmlns.jcp.org/xml/ns/javaee http://xmlns.jcp.org/xml/ns/javaee/web-app_3_1.xsd"
         version="3.1">

  <!-- step1: 配置全局的参数,启动Spring容器 -->
  <context-param>
    <param-name>contextConfigLocation</param-name>
    <!-- 若没有提供值,默认会去找/WEB-INF/applicationContext.xml。 -->
    <param-value>classpath:applicationContext.xml</param-value>
  </context-param>
  <listener>
    <listener-class>org.springframework.web.context.ContextLoaderListener</listener-class>
  </listener>

  <!-- step2: 配置SpringMVC的前端控制器,用于拦截所有的请求  -->
  <servlet>
    <servlet-name>springmvcDispatcherServlet</servlet-name>
    <servlet-class>org.springframework.web.servlet.DispatcherServlet</servlet-class>

    <init-param>
      <param-name>contextConfigLocation</param-name>
      <!-- 若没有提供值,默认会去找WEB-INF/*-servlet.xml。 -->
      <param-value>classpath:dispatcher-servlet.xml</param-value>
    </init-param>
    <!-- 启动优先级,数值越小优先级越大 -->
    <load-on-startup>1</load-on-startup>
  </servlet>
  <servlet-mapping>
    <servlet-name>springmvcDispatcherServlet</servlet-name>
    <!-- 将DispatcherServlet请求映射配置为"/",则Spring MVC将捕获Web容器所有的请求,包括静态资源的请求 -->
    <url-pattern>/</url-pattern>
  </servlet-mapping>

  <!-- step3: characterEncodingFilter字符编码过滤器,放在所有过滤器的前面 -->
  <filter>
    <filter-name>characterEncodingFilter</filter-name>
    <filter-class>org.springframework.web.filter.CharacterEncodingFilter</filter-class>
    <init-param>
      <!--要使用的字符集,一般我们使用UTF-8(保险起见UTF-8最好)-->
      <param-name>encoding</param-name>
      <param-value>UTF-8</param-value>
    </init-param>
    <init-param>
      <!--是否强制设置request的编码为encoding,默认false,不建议更改-->
      <param-name>forceRequestEncoding</param-name>
      <param-value>false</param-value>
    </init-param>
    <init-param>
      <!--是否强制设置response的编码为encoding,建议设置为true-->
      <param-name>forceResponseEncoding</param-name>
      <param-value>true</param-value>
    </init-param>
  </filter>
  <filter-mapping>
    <filter-name>characterEncodingFilter</filter-name>
    <!--这里不能留空或者直接写 ' / ' ,否则可能不起作用-->
    <url-pattern>/*</url-pattern>
  </filter-mapping>

  <!-- step4: 配置过滤器,将post请求转为delete,put -->
  <filter>
    <filter-name>HiddenHttpMethodFilter</filter-name>
    <filter-class>org.springframework.web.filter.HiddenHttpMethodFilter</filter-class>
  </filter>
  <filter-mapping>
    <filter-name>HiddenHttpMethodFilter</filter-name>
    <url-pattern>/*</url-pattern>
  </filter-mapping>
</web-app>

【applicationContext.xml】
<?xml version="1.0" encoding="UTF-8"?>
<beans xmlns="http://www.springframework.org/schema/beans"
       xmlns:context="http://www.springframework.org/schema/context" xmlns:p="http://www.springframework.org/schema/p"
       xmlns:xsi="http://www.w3.org/2001/XMLSchema-instance"
       xsi:schemaLocation="
       http://www.springframework.org/schema/beans http://www.springframework.org/schema/beans/spring-beans-4.0.xsd
       http://www.springframework.org/schema/context http://www.springframework.org/schema/context/spring-context-4.0.xsd
       http://www.springframework.org/schema/util http://www.springframework.org/schema/util/spring-util-4.0.xsd">

    <!-- step1: 配置包扫描方式。扫描所有包,但是排除Controller层 -->
    <context:component-scan base-package="com.lyh.demo">
        <context:exclude-filter type="annotation" expression="org.springframework.stereotype.Controller"/>
    </context:component-scan>
</beans>

【dispatcher-servlet.xml】
<?xml version="1.0" encoding="UTF-8"?>
<beans xmlns="http://www.springframework.org/schema/beans"
       xmlns:xsi="http://www.w3.org/2001/XMLSchema-instance"
       xmlns:context="http://www.springframework.org/schema/context"
       xmlns:mvc="http://www.springframework.org/schema/mvc"
       xsi:schemaLocation="http://www.springframework.org/schema/beans
       http://www.springframework.org/schema/beans/spring-beans.xsd
       http://www.springframework.org/schema/context
       http://www.springframework.org/schema/context/spring-context.xsd
       http://www.springframework.org/schema/mvc
       http://www.springframework.org/schema/mvc/spring-mvc.xsd">

    <!-- step1: 配置Controller扫描方式 -->
    <!-- 使用组件扫描的方式可以一次扫描多个Controller,只需指定包路径即可 -->
    <context:component-scan base-package="com.lyh.demo" use-default-filters="false">
        <!-- 一般在SpringMVC的配置里,只扫描Controller层,Spring配置中扫描所有包,但是排除Controller层。
        context:include-filter要注意,如果base-package扫描的不是最终包,那么其他包还是会扫描、加载,如果在SpringMVC的配置中这么做,会导致Spring不能处理事务,
        所以此时需要在<context:component-scan>标签上,增加use-default-filters="false",就是真的只扫描context:include-filter包括的内容-->
        <context:include-filter type="annotation" expression="org.springframework.stereotype.Controller" />
    </context:component-scan>

    <!-- step2: 配置视图解析器 -->
    <bean id="defaultViewResolver" class="org.springframework.web.servlet.view.InternalResourceViewResolver">
        <property name="prefix" value="/WEB-INF/"/><!--设置JSP文件的目录位置-->
        <property name="suffix" value=".jsp"/>
    </bean>

    <!-- step3: 标准配置 -->
    <!-- 将springmvc不能处理的请求交给 spring 容器处理 -->
    <mvc:default-servlet-handler/>
    <!-- 简化注解配置,并提供更高级的功能 -->
    <mvc:annotation-driven />
</beans>
(4)配置 SpringSecurity,并新建一个 controller 进行测试
【web.xml 中配置核心过滤器链 springSecurityFilterChain】
<filter>
  <filter-name>springSecurityFilterChain</filter-name>
  <filter-class>org.springframework.web.filter.DelegatingFilterProxy</filter-class>
</filter>
<filter-mapping>
  <filter-name>springSecurityFilterChain</filter-name>
  <url-pattern>/*</url-pattern>
</filter-mapping>


【新建一个 spring-security.xml 用于进行 Spring Security 相关配置】
<?xml version="1.0" encoding="UTF-8"?>
<beans xmlns="http://www.springframework.org/schema/beans"
       xmlns:xsi="http://www.w3.org/2001/XMLSchema-instance"
       xmlns:security="http://www.springframework.org/schema/security"
       xsi:schemaLocation="
       http://www.springframework.org/schema/beans http://www.springframework.org/schema/beans/spring-beans-4.0.xsd
       http://www.springframework.org/schema/security http://www.springframework.org/schema/security/spring-security.xsd">

    <!--
        配置 Spring-Security.
        auto-config="true" 表示使用框架默认提供的登录界面
        use-expressions="true" 表示使用 Spring 的 EL 表达式
    -->
    <security:http auto-config="true" use-expressions="true">
        <!--
            配置拦截请求。
            pattern="/**" 表示拦截所有请求
            access="hasAnyRole('ROLE_USER')" 表示只有角色为 ROLE_USER 的用户才能访问并登陆系统
        -->
        <security:intercept-url pattern="/**" access="hasAnyRole('ROLE_USER')"/>
    </security:http>

    <!--
        配置用户信息(用户管理)
        密码默认是加密的,若不想密码加密,则可以在 密码前面添加 {noop}
    -->
    <security:authentication-manager>
        <security:authentication-provider>
            <security:user-service>
                <security:user name="tom" password="{noop}123456" authorities="ROLE_USER" />
                <security:user name="jarry" password="{noop}123456" authorities="ROLE_ADMIN" />
                <security:user name="jack" password="123456" authorities="ROLE_USER" />
            </security:user-service>
        </security:authentication-provider>
    </security:authentication-manager>
</beans>


【在 web.xml 中导入 spring-security.xml 文件(与导入 applicationContext.xml 类似,也可以在 applicationContext.xml 中通过 <import> 标签引入 spring-security.xml)】
<context-param>
  <param-name>contextConfigLocation</param-name>
  <!-- 若没有提供值,默认会去找/WEB-INF/applicationContext.xml。 -->
  <param-value>
    classpath:applicationContext.xml
    classpath:spring-security.xml
  </param-value>
</context-param>

【完整 web.xml 如下:】
<?xml version="1.0" encoding="UTF-8"?>
<web-app xmlns="http://xmlns.jcp.org/xml/ns/javaee"
         xmlns:xsi="http://www.w3.org/2001/XMLSchema-instance"
         xsi:schemaLocation="http://xmlns.jcp.org/xml/ns/javaee http://xmlns.jcp.org/xml/ns/javaee/web-app_3_1.xsd"
         version="3.1">

  <!-- step1: 配置全局的参数,启动Spring容器 -->
  <context-param>
    <param-name>contextConfigLocation</param-name>
    <!-- 若没有提供值,默认会去找/WEB-INF/applicationContext.xml。 -->
    <param-value>
      classpath:applicationContext.xml
      classpath:spring-security.xml
    </param-value>
  </context-param>
  <listener>
    <listener-class>org.springframework.web.context.ContextLoaderListener</listener-class>
  </listener>

  <!-- step2: 配置SpringMVC的前端控制器,用于拦截所有的请求  -->
  <servlet>
    <servlet-name>springmvcDispatcherServlet</servlet-name>
    <servlet-class>org.springframework.web.servlet.DispatcherServlet</servlet-class>

    <init-param>
      <param-name>contextConfigLocation</param-name>
      <!-- 若没有提供值,默认会去找WEB-INF/*-servlet.xml。 -->
      <param-value>classpath:dispatcher-servlet.xml</param-value>
    </init-param>
    <!-- 启动优先级,数值越小优先级越大 -->
    <load-on-startup>1</load-on-startup>
  </servlet>
  <servlet-mapping>
    <servlet-name>springmvcDispatcherServlet</servlet-name>
    <!-- 将DispatcherServlet请求映射配置为"/",则Spring MVC将捕获Web容器所有的请求,包括静态资源的请求 -->
    <url-pattern>/</url-pattern>
  </servlet-mapping>

  <!-- step3: characterEncodingFilter字符编码过滤器,放在所有过滤器的前面 -->
  <filter>
    <filter-name>characterEncodingFilter</filter-name>
    <filter-class>org.springframework.web.filter.CharacterEncodingFilter</filter-class>
    <init-param>
      <!--要使用的字符集,一般我们使用UTF-8(保险起见UTF-8最好)-->
      <param-name>encoding</param-name>
      <param-value>UTF-8</param-value>
    </init-param>
    <init-param>
      <!--是否强制设置request的编码为encoding,默认false,不建议更改-->
      <param-name>forceRequestEncoding</param-name>
      <param-value>false</param-value>
    </init-param>
    <init-param>
      <!--是否强制设置response的编码为encoding,建议设置为true-->
      <param-name>forceResponseEncoding</param-name>
      <param-value>true</param-value>
    </init-param>
  </filter>
  <filter-mapping>
    <filter-name>characterEncodingFilter</filter-name>
    <!--这里不能留空或者直接写 ' / ' ,否则可能不起作用-->
    <url-pattern>/*</url-pattern>
  </filter-mapping>

  <!-- step4: 配置过滤器,将post请求转为delete,put -->
  <filter>
    <filter-name>HiddenHttpMethodFilter</filter-name>
    <filter-class>org.springframework.web.filter.HiddenHttpMethodFilter</filter-class>
  </filter>
  <filter-mapping>
    <filter-name>HiddenHttpMethodFilter</filter-name>
    <url-pattern>/*</url-pattern>
  </filter-mapping>

  <!-- Step5:配置 SpringSecurity 核心过滤器链 -->
  <filter>
    <filter-name>springSecurityFilterChain</filter-name>
    <filter-class>org.springframework.web.filter.DelegatingFilterProxy</filter-class>
  </filter>
  <filter-mapping>
    <filter-name>springSecurityFilterChain</filter-name>
    <url-pattern>/*</url-pattern>
  </filter-mapping>
</web-app>

【新建一个 TestController.java 进行测试】
package com.lyh.demo.controller;

import org.springframework.web.bind.annotation.GetMapping;
import org.springframework.web.bind.annotation.RequestMapping;
import org.springframework.web.bind.annotation.RestController;

@RequestMapping("test")
@RestController
public class TestController {

    @GetMapping("/hello")
    public String hello() {
        return "hello spring security";
    }
}
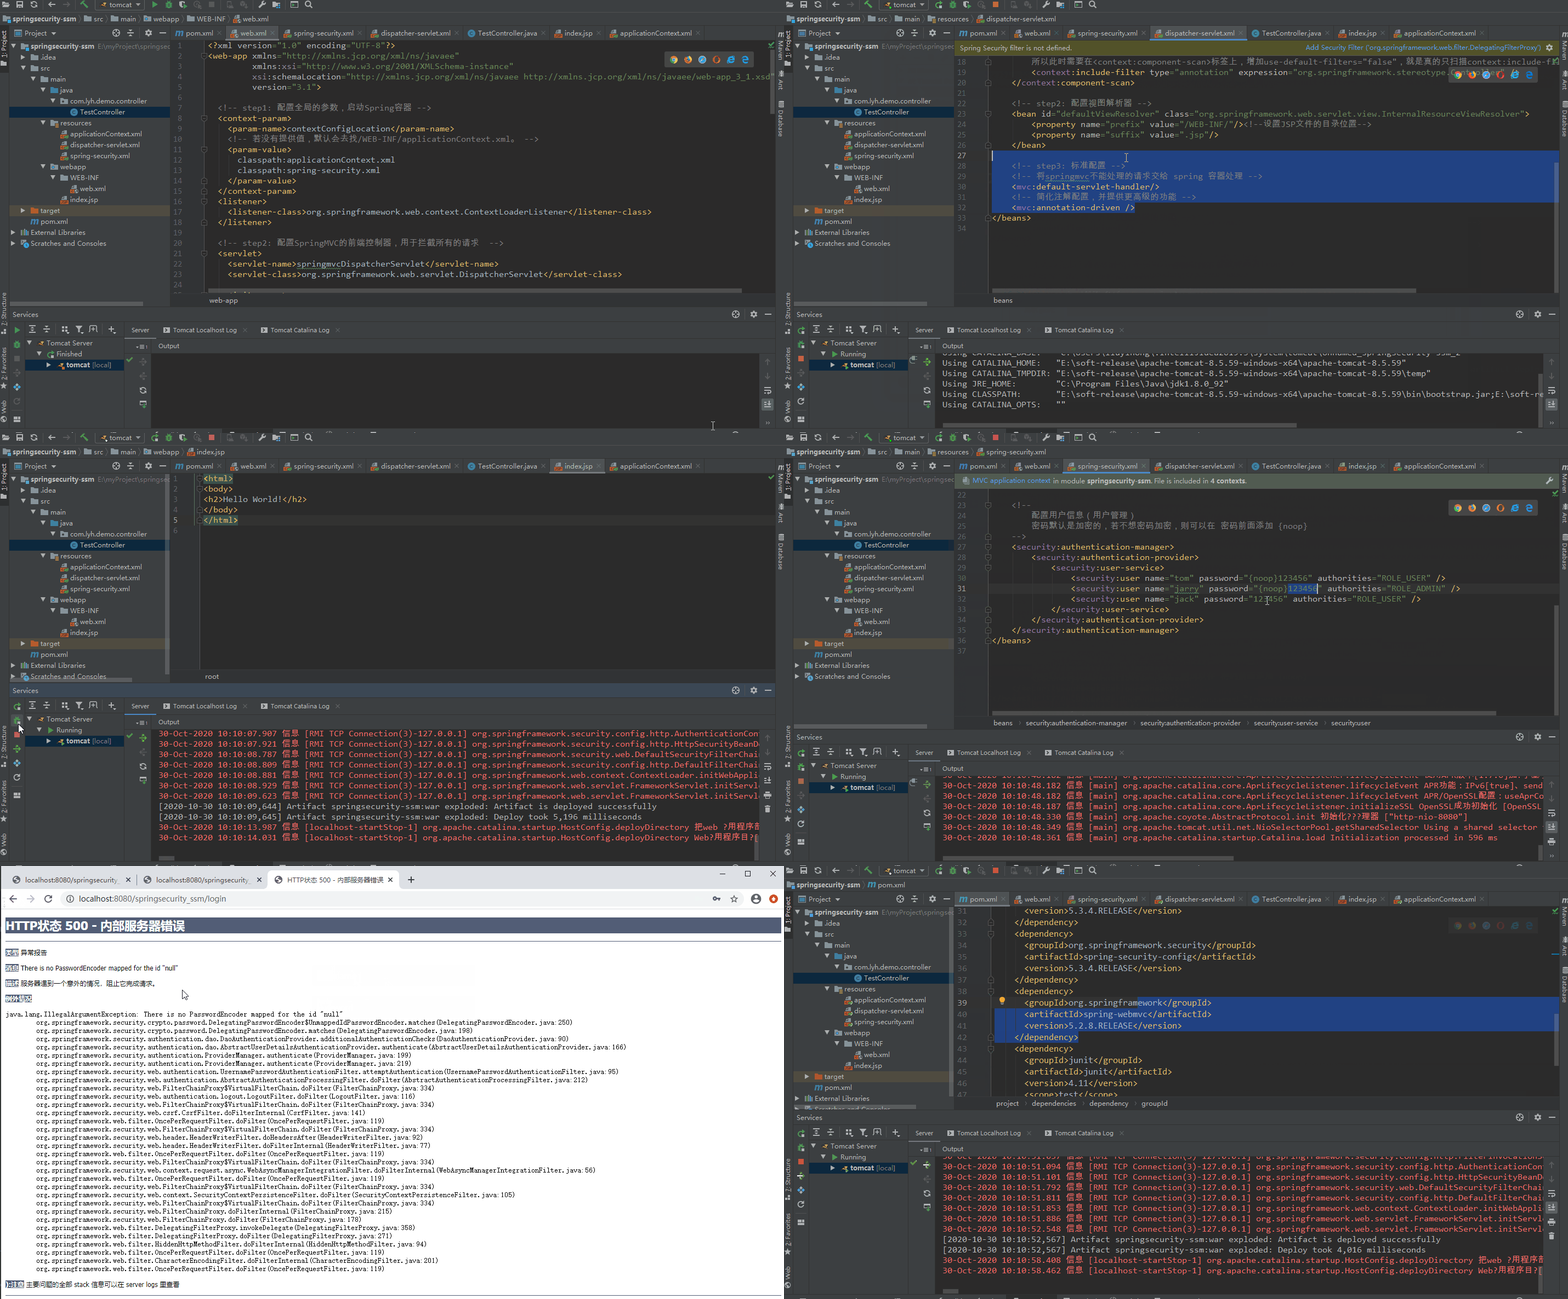
如下图所示,未配置 springSecurityFilterChain 时,等同于普通的系统登录。
配置 springSecurityFilterChain 后,在 spring-security.xml 中可以看到,
配置了如下内容:
拦截所有请求,并只允许拥有 ROLE_USER 这个角色的用户才可以登录。
设置了三个用户,tom 为 ROLE_USER 角色,且密码未加密,所以可以正常登陆。
jarry 为 ROLE_ADMIN 角色,没有权限,所以不能正常登陆。
jack 为 ROLE_USER 角色,但密码被加密,所以不能正常登陆。
5、Spring Security 过滤器链
(1)本质
Spring Security 基于 Servlet 过滤器实现的。
默认由 15 个过滤器组成过滤器链(可以通过配置添加、移除过滤器),通过过滤器拦截请求并进行相关操作。

(2)简单了解几个过滤器
【org.springframework.security.web.context.SecurityContextPersistenceFilter】
    此过滤器主要是在 SecurityContextRepository 中 保存或者更新 SecurityContext,并交给后续的过滤器操作。
    而 SecurityContext 中保存了当前用户认证、权限等信息。

【org.springframework.security.web.csrf.CsrfFilter】
    此过滤器用于防止 CSRF 攻击。Spring Security 4.0 开始,默认开启 CSRF 防护,针对 PUT、POST、DELETE 等请求进行防护。
注:
    CSRF 指的是 Cross Site Request Forgery,即 跨站请求伪造。
    简单理解为:攻击者冒用用户身份去执行操作。
   举例:
       用户打开浏览器并成功登陆某个网站 A,
       此时用户 未登出网站 A,且在同一浏览器中新增一个 Tab 页并访问 网站 B,
       而浏览器接收到网站 B 返回的恶意代码后,在用户不知情的情况下携带 cookie 等用户信息向 A 网站发送请求。
       网站 A 处理该请求,从而导致网站 B 的恶意代码被执行。
   简单理解就是:用户登录一个网站 A,并打开了另一个网站 B,B 网站携带恶意代码 且使用用户身份去访问 网站 A。

    XSS 指的是 Cross Site Scripting,即 跨站脚本。
    简单理解:攻击者将恶意代码嵌入网站,当用户访问网站时导致 恶意代码被执行。

【org.springframework.security.web.authentication.logout.LogoutFilter】
    匹配 URL(默认为 /logout),用于实现用户退出并清除认证信息。

【org.springframework.security.web.authentication.UsernamePasswordAuthenticationFilter】
    匹配 URL(默认为 /login),用于实现用户登录认证操作(必须为 POST 请求)。

【org.springframework.security.web.authentication.ui.DefaultLoginPageGeneratingFilter】
    若没有指定登录认证界面,此过滤器会提供一个默认的界面。

【org.springframework.security.web.authentication.ui.DefaultLogoutPageGeneratingFilter】
    若没有指定登出界面,此过滤器会提供一个默认的界面。

【org.springframework.security.web.authentication.AnonymousAuthenticationFilter】
    创建一个匿名身份,用于系统的访问。(兼容游客登录模式)

【org.springframework.security.web.access.ExceptionTranslationFilter】
    位于整个 springSecurityFilterChain 过滤链后方,用于处理链路中的异常(跳转到指定页面或者返回错误信息)。

【org.springframework.security.web.access.intercept.FilterSecurityInterceptor】
    获取资源访问的授权信息,根据 SecurityContext 中存储的用户信息来决定操作是否有权限。
(3)这些过滤器是如何加载进来的?
通过前面 SSM + Spring Security 可以看到,在 web.xml 中配置了名为 springSecurityFilterChain 的过滤器,可以 Debug 看下 DelegatingFilterProxy 加载的流程。
【基本流程:】
Step1:
    通过 DelegatingFilterProxy 过滤器的 doFilter() 获取到 FilterChainProxy 过滤器并执行。
Step2:
    通过 FilterChainProxy 过滤器的 doFilter() 调用 doFilterInternal() 加载到 过滤器链。
Step3:
    doFilterInternal() 内部通过 SecurityFilterChain 接口获取到 过滤器链。
Step4:
    SecurityFilterChain 接口实现类为 DefaultSecurityFilterChain。
二、SpringBoot + SpringSecurity 相关操作
1、三种认证方式(设置用户名、密码)
不进行任何 SpringSecurity 配置时,系统默认提供用户名以及密码,但是这种情况肯定不适用于工作场景。那么如何进行 认证呢?
(1)方式一:
通过配置文件 application.properties 或者 application.yml 中直接定义。
不太适用于实际工作场景。
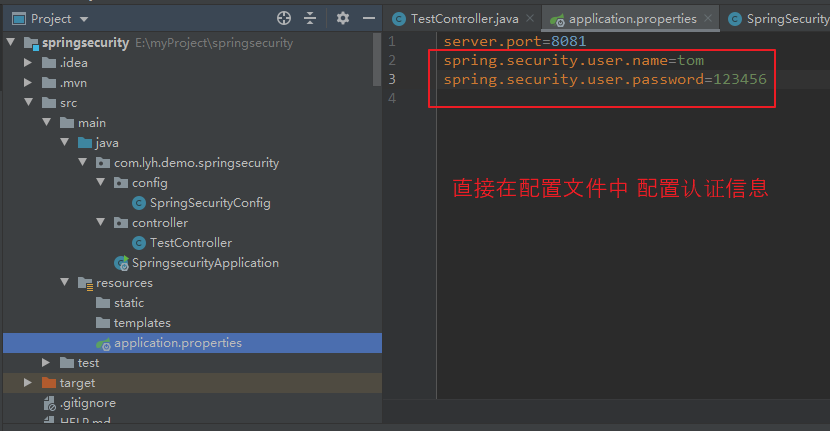
【在 application.properties 中直接定义 用户名、密码】
spring.security.user.name=tom
spring.security.user.password=123456
(2)方式二:
通过配置类的形式。(需要继承 WebSecurityConfigurerAdapter 抽象类)
不太适用于实际工作场景。
【通过配置类的形式:】
package com.lyh.demo.springsecurity.config;

import org.springframework.context.annotation.Bean;
import org.springframework.context.annotation.Configuration;
import org.springframework.security.config.annotation.authentication.builders.AuthenticationManagerBuilder;
import org.springframework.security.config.annotation.web.configuration.WebSecurityConfigurerAdapter;
import org.springframework.security.crypto.bcrypt.BCryptPasswordEncoder;
import org.springframework.security.crypto.password.PasswordEncoder;

/**
 * 配置 Spring Security
 */
@Configuration
public class SpringSecurityConfig extends WebSecurityConfigurerAdapter {
    @Override
    protected void configure(AuthenticationManagerBuilder auth) throws Exception {
        BCryptPasswordEncoder bCryptPasswordEncoder = new BCryptPasswordEncoder();
        auth.inMemoryAuthentication()
            .withUser("jack")
//            .password("{noop}" + "123456") // 未配置 PasswordEncoder 时,可以在 密码前拼接上 {noop},防止出错
            .password(bCryptPasswordEncoder.encode("123456"))
            .roles("admin");
    }

    /**
     * 配置加密类,若不配置,则 bCryptPasswordEncoder.encode() 进行加密时会出错。
     * java.lang.IllegalArgumentException: There is no PasswordEncoder mapped for the id "null"
     *
     * 若不想配置,可以在 设置 password 时,在密码前添加上 {noop}
     * @return 加密类
     */
    @Bean
    PasswordEncoder passwordEncoder() {
        return new BCryptPasswordEncoder();
    }
}

(3)方式三
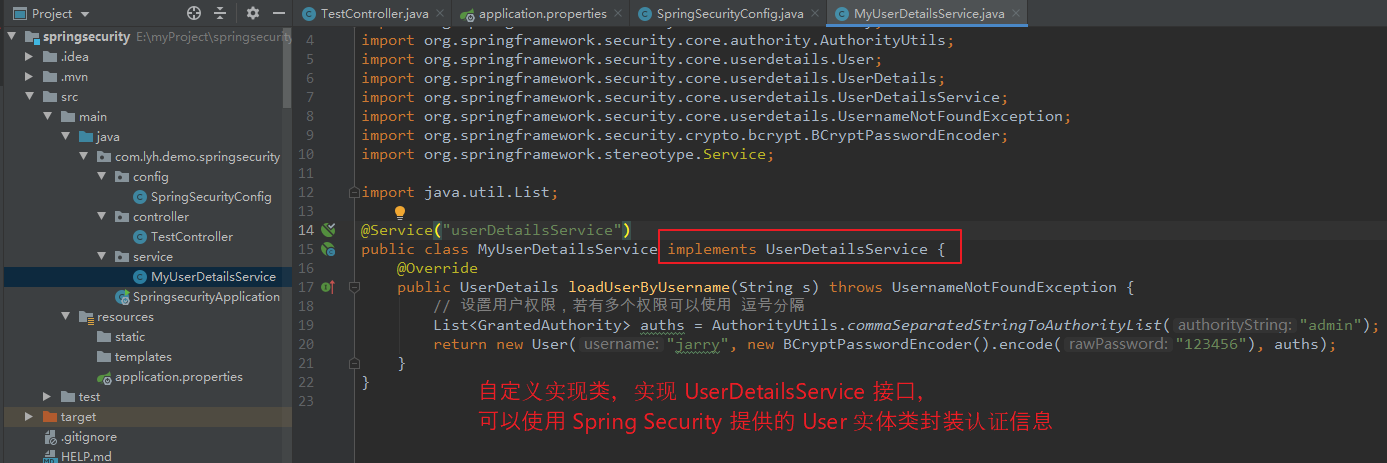
通过配置类 以及 自定义实现类(实现 UserDetailsService 接口)实现。
适用于工作场景(从数据库中查询出用户信息并认证)。
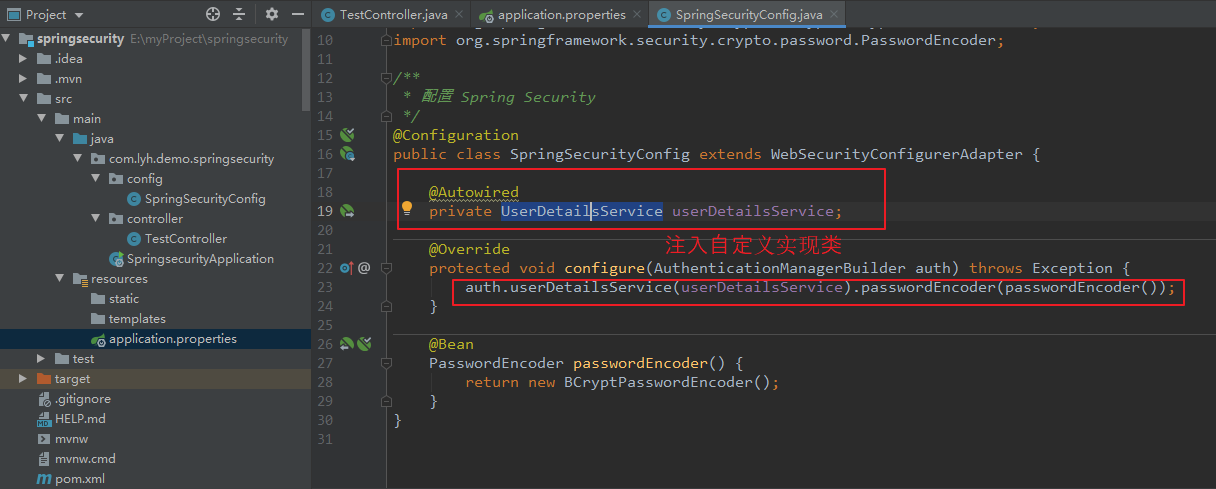
【步骤一:在配置类中 指定使用 UserDetailsService 接口,并注入其 实现类】
package com.lyh.demo.springsecurity.config;

import org.springframework.beans.factory.annotation.Autowired;
import org.springframework.context.annotation.Bean;
import org.springframework.context.annotation.Configuration;
import org.springframework.security.config.annotation.authentication.builders.AuthenticationManagerBuilder;
import org.springframework.security.config.annotation.web.configuration.WebSecurityConfigurerAdapter;
import org.springframework.security.core.userdetails.UserDetailsService;
import org.springframework.security.crypto.bcrypt.BCryptPasswordEncoder;
import org.springframework.security.crypto.password.PasswordEncoder;

/**
 * 配置 Spring Security
 */
@Configuration
public class SpringSecurityConfig extends WebSecurityConfigurerAdapter {

    @Autowired
    private UserDetailsService userDetailsService;

    @Override
    protected void configure(AuthenticationManagerBuilder auth) throws Exception {
        auth.userDetailsService(userDetailsService).passwordEncoder(passwordEncoder());
    }

    @Bean
    PasswordEncoder passwordEncoder() {
        return new BCryptPasswordEncoder();
    }
}
【步骤二:编写自定义实现类(实现 UserDetailsService 接口)】
package com.lyh.demo.springsecurity.service;

import org.springframework.security.core.GrantedAuthority;
import org.springframework.security.core.authority.AuthorityUtils;
import org.springframework.security.core.userdetails.User;
import org.springframework.security.core.userdetails.UserDetails;
import org.springframework.security.core.userdetails.UserDetailsService;
import org.springframework.security.core.userdetails.UsernameNotFoundException;
import org.springframework.security.crypto.bcrypt.BCryptPasswordEncoder;
import org.springframework.stereotype.Service;

import java.util.List;

@Service("userDetailsService")
public class MyUserDetailsService implements UserDetailsService {
    @Override
    public UserDetails loadUserByUsername(String s) throws UsernameNotFoundException {
        // 设置用户权限,若有多个权限可以使用 逗号分隔
        List<GrantedAuthority> auths = AuthorityUtils.commaSeparatedStringToAuthorityList("admin");
        return new User("jarry", new BCryptPasswordEncoder().encode("123456"), auths);
    }
}
2、SpringSecurity 中登录认证过程中 的密码加密(BCryptPasswordEncoder)
(1)为什么要了解密码加密?
Spring Security 5.0 以上版本 对于密码处理需要特别注意一下,前面也介绍了,Spring Security 认证时会对密码进行加密,采用 {encodingId}password 的形式设置加密方式。
如果不想密码加密,可以在配置密码时在 密码前拼接上 {noop}, 即 ({noop}password)。
而实际场景中,数据库存储的密码都是非明文存储(即存储的都是加密后的密码),所以有必要了解一下 SpringSecurity 加密相关内容。
【相关的 encodingId 与其 对应的 实体类 如下:】
public static PasswordEncoder createDelegatingPasswordEncoder() {
    String encodingId = "bcrypt";
    Map<String, PasswordEncoder> encoders = new HashMap();
    encoders.put(encodingId, new BCryptPasswordEncoder());
    encoders.put("ldap", new LdapShaPasswordEncoder());
    encoders.put("MD4", new Md4PasswordEncoder());
    encoders.put("MD5", new MessageDigestPasswordEncoder("MD5"));
    encoders.put("noop", NoOpPasswordEncoder.getInstance());
    encoders.put("pbkdf2", new Pbkdf2PasswordEncoder());
    encoders.put("scrypt", new SCryptPasswordEncoder());
    encoders.put("SHA-1", new MessageDigestPasswordEncoder("SHA-1"));
    encoders.put("SHA-256", new MessageDigestPasswordEncoder("SHA-256"));
    encoders.put("sha256", new StandardPasswordEncoder());
    encoders.put("argon2", new Argon2PasswordEncoder());
    return new DelegatingPasswordEncoder(encodingId, encoders);
}
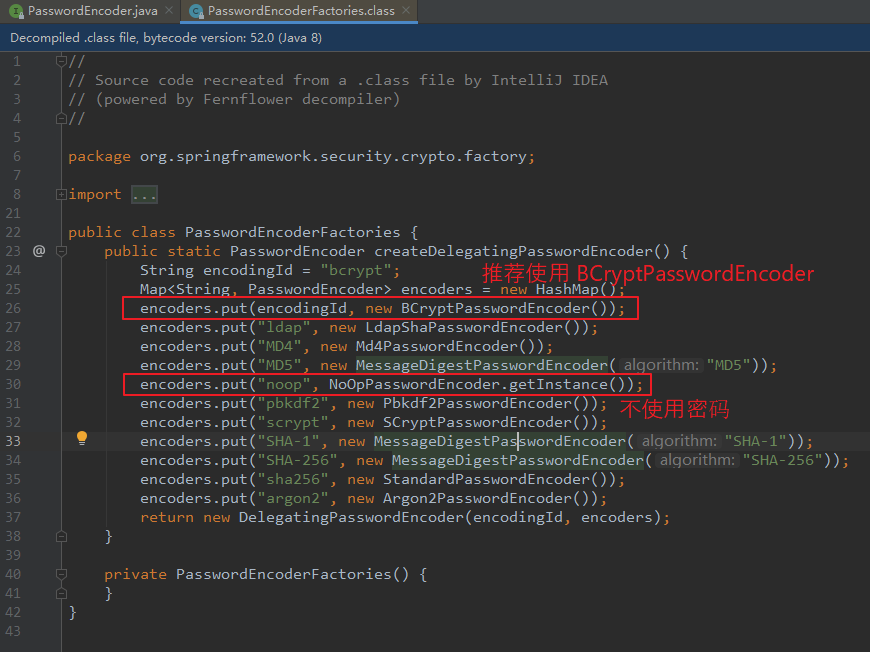
(2)PasswordEncoder
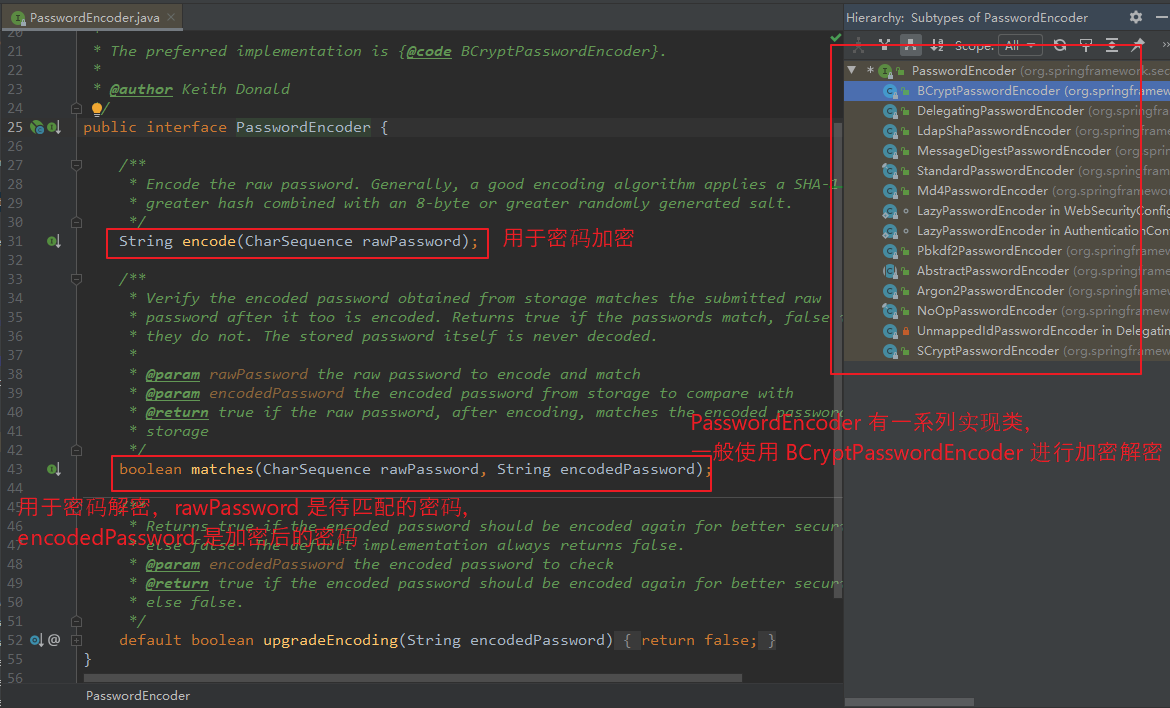
SpringSecurity 默认需要在容器中存在 PasswordEncoder 实例对象,用于进行密码加密。所以配置 SpringSecurity 时,需要在容器中配置一个 PasswordEncoder Bean 对象(一般使用 BCryptPasswordEncoder 实例对象)。
【在配置类中通过 @Bean 配置一个 PasswordEncoder 的 Bean 对象:】
@Bean
PasswordEncoder passwordEncoder() {
    return new BCryptPasswordEncoder();
}

【PasswordEncoder 常用方法:】
String encode(CharSequence rawPassword);   // 用于密码加密
boolean matches(CharSequence rawPassword, String encodedPassword); // 用于密码解密,rawPassword 表示待匹配的密码,encodedPassword 表示加密后的密码。
(3)BCryptPasswordEncoder
是最常用的一种密码解析器,其通过 哈希算法 并加上 随机盐(salt)的方式进行密码加密。
密码解密时,根据加密后的数据 A 得到盐值(salt),将待比较数据根据盐值进行一次加密得到 B,如果 B 与 A 是相同的结果,则说明密码是正确的。
密码加密、解密的关键点在于 盐值的计算。
密码加密相关代码如下所示:
【 encode() 加密:】
加密代码如下所示,首先调用 BCrypt.gensalt() 方法计算出 盐值(salt),
然后调用 BCrypt.hashpw() 方法,根据 盐值(salt)进行密码(password)加密。

而在 BCrypt 中的 hashpw() 中,会通过 salt.substring() 截取并得到真实的盐值(real_salt),
通过 B.crypt_raw() 求得一个哈希数组(hashed),通过 encode_base64() 进行加密。

public String encode(CharSequence rawPassword) {
   if (rawPassword == null) {
      throw new IllegalArgumentException("rawPassword cannot be null");
   }

   String salt;
   if (random != null) {
      salt = BCrypt.gensalt(version.getVersion(), strength, random);
   } else {
      salt = BCrypt.gensalt(version.getVersion(), strength);
   }
   return BCrypt.hashpw(rawPassword.toString(), salt);
}

【BCrypt】
public static String hashpw(String password, String salt) {
   byte passwordb[];

   passwordb = password.getBytes(StandardCharsets.UTF_8);

   return hashpw(passwordb, salt);
}

public static String hashpw(byte passwordb[], String salt) {
   BCrypt B;
   String real_salt;
   byte saltb[], hashed[];
   char minor = (char) 0;
   int rounds, off;
   StringBuilder rs = new StringBuilder();

   if (salt == null) {
      throw new IllegalArgumentException("salt cannot be null");
   }

   int saltLength = salt.length();

   if (saltLength < 28) {
      throw new IllegalArgumentException("Invalid salt");
   }

   if (salt.charAt(0) != '$' || salt.charAt(1) != '2')
      throw new IllegalArgumentException ("Invalid salt version");
   if (salt.charAt(2) == '$')
      off = 3;
   else {
      minor = salt.charAt(2);
      if ((minor != 'a' && minor != 'x' && minor != 'y' && minor != 'b')
            || salt.charAt(3) != '$')
         throw new IllegalArgumentException ("Invalid salt revision");
      off = 4;
   }

   // Extract number of rounds
   if (salt.charAt(off + 2) > '$')
      throw new IllegalArgumentException ("Missing salt rounds");

   if (off == 4 && saltLength < 29) {
      throw new IllegalArgumentException("Invalid salt");
   }
   rounds = Integer.parseInt(salt.substring(off, off + 2));

   real_salt = salt.substring(off + 3, off + 25);
   saltb = decode_base64(real_salt, BCRYPT_SALT_LEN);

   if (minor >= 'a') // add null terminator
      passwordb = Arrays.copyOf(passwordb, passwordb.length + 1);

   B = new BCrypt();
   hashed = B.crypt_raw(passwordb, saltb, rounds, minor == 'x', minor == 'a' ? 0x10000 : 0);

   rs.append("$2");
   if (minor >= 'a')
      rs.append(minor);
   rs.append("$");
   if (rounds < 10)
      rs.append("0");
   rs.append(rounds);
   rs.append("$");
   encode_base64(saltb, saltb.length, rs);
   encode_base64(hashed, bf_crypt_ciphertext.length * 4 - 1, rs);
   return rs.toString();
}
密码解密相关代码如下所示:
【matches() 解密:】
解密代码如下所示,首先确保 encodedPassword 是加密后的代码。
然后调用 BCrypt.checkpw() 进行密码匹配。

而 BCrypt 的 checkpw() 中,可以看到其会将待比较的密码 重新进行一次 hashpw() 密码加密。
而此时传入的盐值是 加密的代码,在 hashpw() 方法中会截取出相应的 盐值(real_salt)并用于加密。
加密完成后,再去比较新加密的密码 与 原来加密的密码 是否相同即可。

所以如果待比较的密码 与 加密的密码是相同的,也即相当于 根据相同的 盐值 再加密了一次,加密结果是相同的。


public boolean matches(CharSequence rawPassword, String encodedPassword) {
   if (rawPassword == null) {
      throw new IllegalArgumentException("rawPassword cannot be null");
   }

   if (encodedPassword == null || encodedPassword.length() == 0) {
      logger.warn("Empty encoded password");
      return false;
   }

   if (!BCRYPT_PATTERN.matcher(encodedPassword).matches()) {
      logger.warn("Encoded password does not look like BCrypt");
      return false;
   }

   return BCrypt.checkpw(rawPassword.toString(), encodedPassword);
}

【BCrypt】
public static boolean checkpw(String plaintext, String hashed) {
   return equalsNoEarlyReturn(hashed, hashpw(plaintext, hashed));
}

static boolean equalsNoEarlyReturn(String a, String b) {
   return MessageDigest.isEqual(a.getBytes(StandardCharsets.UTF_8), b.getBytes(StandardCharsets.UTF_8));
}
3、从数据库中查询用户信息并认证(MyBatis-Plus + MySQL 8 )
(1)建表(SQL)
MyBatis-Plus 使用可以参考:https://www.cnblogs.com/l-y-h/p/12859477.html
配置 SpringSecurity 时需要配置 使用密码加密,
若不使用加密,则需在设置密码时在密码前拼接上 {noop}。
若使用加密,则使用 BCryptPasswordEncoder 的 encode() 方法对其进行加密。
若数据库存储的已经是 BCryptPasswordEncoder 加密后的数据,不用再次加密。
此处为了方便理解,存储密码时均使用 明文存储。
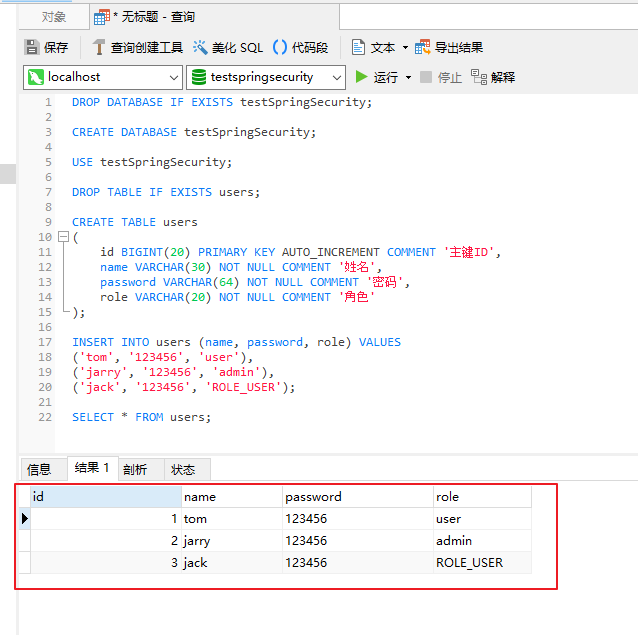
【建表 SQL :】
DROP DATABASE IF EXISTS testSpringSecurity;

CREATE DATABASE testSpringSecurity;

USE testSpringSecurity;

DROP TABLE IF EXISTS users;

CREATE TABLE users
(
    id BIGINT(20) PRIMARY KEY AUTO_INCREMENT COMMENT '主键ID',
    name VARCHAR(30) NOT NULL COMMENT '姓名',
    password VARCHAR(64) NOT NULL COMMENT '密码',
    role VARCHAR(20) NOT NULL COMMENT '角色'
);

INSERT INTO users (name, password, role) VALUES
('tom', '123456', 'user'),
('jarry', '123456', 'admin'),
('jack', '123456', 'ROLE_USER');
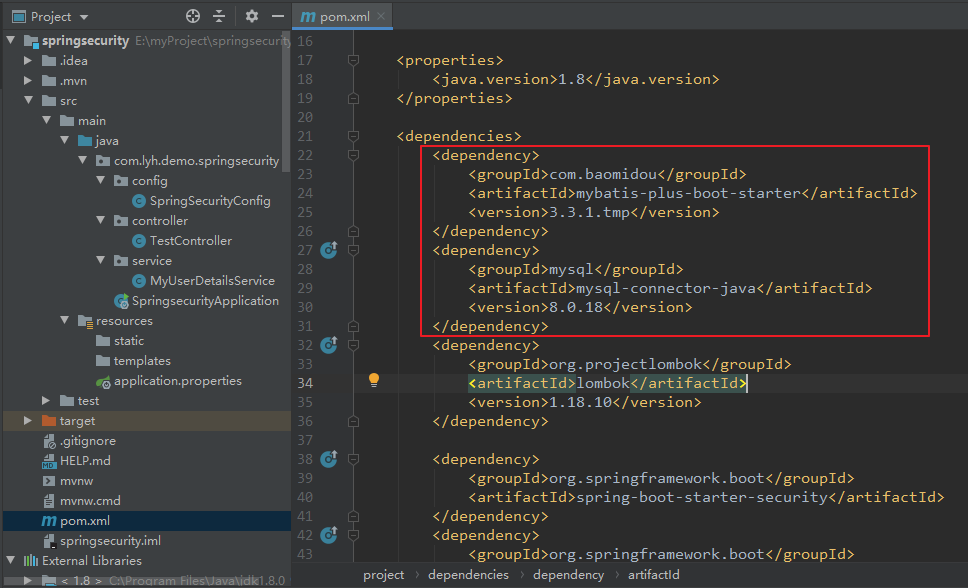
(2)引入 MyBatis-Plus 与 MySQL 相关依赖
【依赖:】
<dependency>
    <groupId>com.baomidou</groupId>
    <artifactId>mybatis-plus-boot-starter</artifactId>
    <version>3.3.1.tmp</version>
</dependency>
<dependency>
    <groupId>mysql</groupId>
    <artifactId>mysql-connector-java</artifactId>
    <version>8.0.18</version>
</dependency>
<dependency>
    <groupId>org.projectlombok</groupId>
    <artifactId>lombok</artifactId>
    <version>1.18.10</version>
</dependency>
(3)配置 MyBatis-Plus 以及 MySQL 数据源信息
【数据源信息】
spring:
  datasource:
    driver-class-name: com.mysql.cj.jdbc.Driver
    username: root
    password: 123456
    url: jdbc:mysql://localhost:3306/testSpringSecurity?useUnicode=true&characterEncoding=utf8
(4)编写 数据表对应的 实体类,以及相应的 mapper 或者 service(用于操作数据库)
【实体类:】
package com.lyh.demo.springsecurity.entity;

import lombok.Data;

@Data
public class Users {
    private Long id;
    private String name;
    private String password;
    private String role;
}

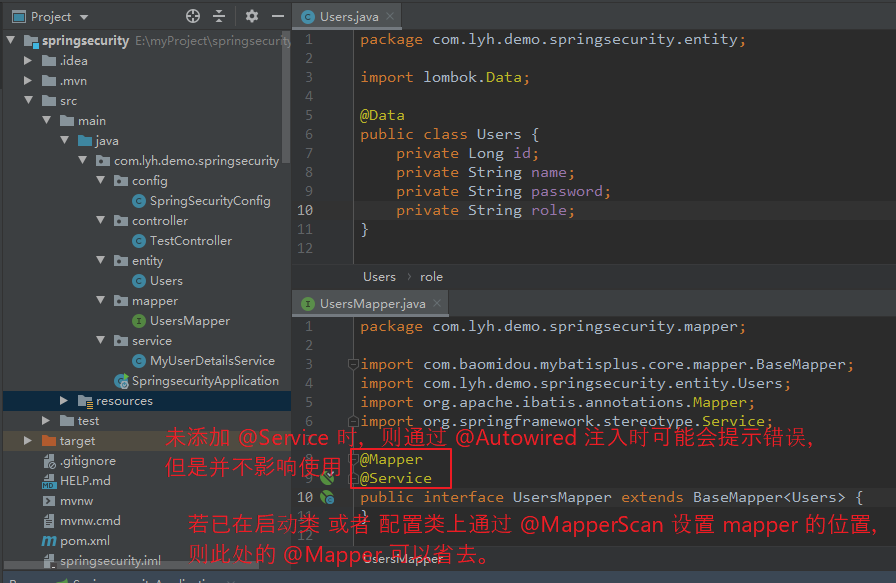
【Mapper:】
package com.lyh.demo.springsecurity.mapper;

import com.baomidou.mybatisplus.core.mapper.BaseMapper;
import com.lyh.demo.springsecurity.entity.Users;
import org.apache.ibatis.annotations.Mapper;
import org.springframework.stereotype.Service;

@Mapper
@Service
public interface UsersMapper extends BaseMapper<Users> {
}
(5)结合 SpringSecurity 进行安全验证。
通过前面分析,添加上 SpirngSecurity 配置类后,会执行 loadUserByUsername() 方法将需要认证的用户信息加载到当前认证系统中,所以在此添加 查询数据库的逻辑即可。
首先根据用户名 在数据库中 查询出相应的 用户、密码 并封装到 实体类中,并将此时的用户、密码、角色等加入到 当前认证系统中。然后再根据 输入的用户名、密码 进行验证。
【修改 MyUserDetailsService 中 loadUserByUsername() 代码:(改为从数据库中获取用户)】
package com.lyh.demo.springsecurity.service;

import com.baomidou.mybatisplus.core.conditions.query.QueryWrapper;
import com.lyh.demo.springsecurity.entity.Users;
import com.lyh.demo.springsecurity.mapper.UsersMapper;
import org.springframework.beans.factory.annotation.Autowired;
import org.springframework.security.core.GrantedAuthority;
import org.springframework.security.core.authority.AuthorityUtils;
import org.springframework.security.core.userdetails.User;
import org.springframework.security.core.userdetails.UserDetails;
import org.springframework.security.core.userdetails.UserDetailsService;
import org.springframework.security.core.userdetails.UsernameNotFoundException;
import org.springframework.security.crypto.bcrypt.BCryptPasswordEncoder;
import org.springframework.stereotype.Service;

import java.util.List;

@Service("userDetailsService")
public class MyUserDetailsService implements UserDetailsService {
    @Autowired
    private UsersMapper usersMapper;

    @Override
    public UserDetails loadUserByUsername(String name) throws UsernameNotFoundException {
        // 定义查询条件,根据用户名 从数据库查询 对应的 用户、密码、角色
        QueryWrapper<Users> queryWrapper = new QueryWrapper<>();
        queryWrapper.eq("name", name);
        Users user = usersMapper.selectOne(queryWrapper);

        // 用户不存在时,直接抛异常
        if (user == null) {
            throw new UsernameNotFoundException("用户不存在");
        }

        // 用户存在时,把 用户、密码、角色 加入到当前认证系统中
        List<GrantedAuthority> auths = AuthorityUtils.commaSeparatedStringToAuthorityList(user.getRole());
        // 将数据库中的密码进行 加密
        return new User(user.getName(), new BCryptPasswordEncoder().encode(user.getPassword()), auths);
//        return new User(user.getName(), user.getPassword(), auths); // 若数据库密码已经加密过,直接使用即可
    }
}

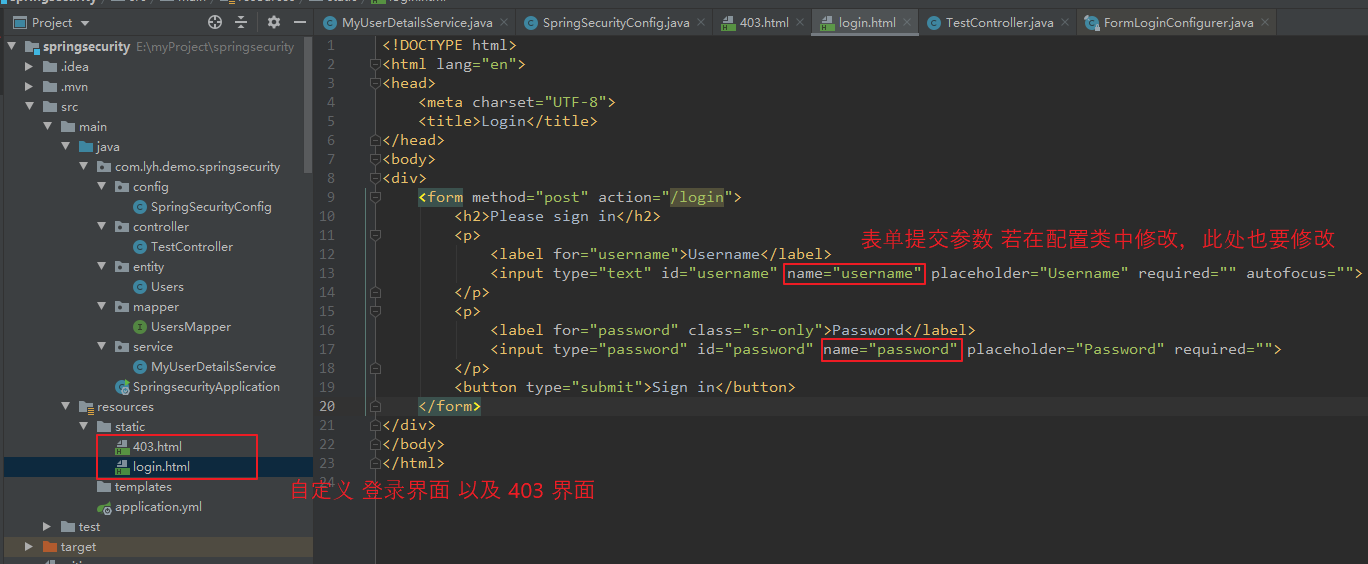
4、自定义页面(不使用默认页面)以及 页面跳转、页面访问权限控制
(1)自定义页面
在前面与 数据库 交互的基础上,添加如下代码。
【登录页面:(login.html)】
<!DOCTYPE html>
<html lang="en">
<head>
    <meta charset="UTF-8">
    <title>Login</title>
</head>
<body>
<div>
    <form method="post" action="/login">
        <h2>Please sign in</h2>
        <p>
            <label for="username">Username</label>
            <input type="text" id="username" name="username" placeholder="Username" required="" autofocus="">
        </p>
        <p>
            <label for="password" class="sr-only">Password</label>
            <input type="password" id="password" name="password" placeholder="Password" required="">
        </p>
        <button type="submit">Sign in</button>
    </form>
</div>
</body>
</html>

【403 页面:】
<!DOCTYPE html>
<html lang="en">
<head>
    <meta charset="UTF-8">
    <title>403</title>
</head>
<body>
<h1>403</h1>
</body>
</html>

【在 TestController 中添加一个 处理错误的逻辑:】
package com.lyh.demo.springsecurity.controller;

import org.springframework.web.bind.annotation.GetMapping;
import org.springframework.web.bind.annotation.PostMapping;
import org.springframework.web.bind.annotation.RequestMapping;
import org.springframework.web.bind.annotation.RestController;

@RequestMapping("test")
@RestController
public class TestController {

    @GetMapping("/hello")
    public String hello() {
        return "hello spring security";
    }

    @PostMapping("/error")
    public String error() {
        return "login error";
    }
}
(2)编写配置类,配置页面跳转规则
在配置类中,重写 configure() 方法,并通过 formLogin() 方法设置相关页面。
【配置类中重写 configure() 方法:】
package com.lyh.demo.springsecurity.config;

import org.springframework.beans.factory.annotation.Autowired;
import org.springframework.context.annotation.Bean;
import org.springframework.context.annotation.Configuration;
import org.springframework.security.config.annotation.authentication.builders.AuthenticationManagerBuilder;
import org.springframework.security.config.annotation.web.builders.HttpSecurity;
import org.springframework.security.config.annotation.web.configuration.WebSecurityConfigurerAdapter;
import org.springframework.security.core.userdetails.UserDetailsService;
import org.springframework.security.crypto.bcrypt.BCryptPasswordEncoder;
import org.springframework.security.crypto.password.PasswordEncoder;

/**
 * 配置 Spring Security
 */
@Configuration
public class SpringSecurityConfig extends WebSecurityConfigurerAdapter {

    @Autowired
    private UserDetailsService userDetailsService;

    @Override
    protected void configure(AuthenticationManagerBuilder auth) throws Exception {
        auth.userDetailsService(userDetailsService).passwordEncoder(passwordEncoder());
    }

    @Override
    protected void configure(HttpSecurity http) throws Exception {

        /**
         * csrf() 表示开启 csrf 防护。
         * disable() 表示关闭 csrf 防护。
         */
        http.csrf().disable();

        /**
         * formLogin() 用于自定义表单登录。
         * loginPage() 用于自定义登录页面。
         * defaultSuccessUrl() 登录成功后 跳转的路径。
         * loginProcessingUrl() 表单提交的 action 地址(默认为 /login,修改后,对应的表单 action 也要修改),由系统提供 UsernamePasswordAuthenticationFilter 过滤器拦截并处理。
         * usernameParameter() 用于自定义表单提交的用户参数名,默认为 username,修改后,对应的表单参数也要修改。
         * passwordParameter() 用于自定义表单提交的用户密码名,默认为 password,修改后,对应的表单参数也要修改。
         * failureForwardUrl() 用于自定义表单提交失败后 重定向地址,可用于前后端分离中,指向某个 controller,注意使用 POST 处理。
         */
        http.formLogin()
            .loginPage("/login.html")
            .loginProcessingUrl("/login")
            .defaultSuccessUrl("/test/hello")
            //.usernameParameter("name")
            //.passwordParameter("pwd")
            .failureForwardUrl("/test/error")
        ;

        /**
         * authorizeRequests()  用于 开启认证,基于 HttpServletRequest 对 url 进行身份控制并授权访问。
         * antMatchers() 用于匹配 url。
         * permitAll() 用于允许任何人访问该 url。
         * hasAuthority() 用于指定 具有某种权限的 人才能访问 url。
         * hasAnyAuthority() 用于指定 多个权限 进行访问,多个权限间使用逗号分隔。
         *
         * hasRole() 写法与 hasAuthority() 类似,但是其会在 角色前 拼接上 ROLE_,使用时需要注意。
         * hasAnyRole() 写法与 hasAnyAuthority() 类似,同样会在 角色前 拼接上 ROLE_。
         *
         * 使用时 hasAuthority()、hasAnyAuthority() 或者 hasAnyRole()、hasAnyAuthority() 任选一对即可,同时使用四种可能会出现问题。
         */
        http.authorizeRequests()
                .antMatchers("/test/hello").hasAuthority("user")
                //.antMatchers("/test/hello").hasAnyRole("USER,GOD")
                //.antMatchers("/test/hello").hasRole("GOD")
                .antMatchers("/test/hello").hasAnyAuthority("user,admin")
                .antMatchers("/login", "/test/error").permitAll();

        /**
         * 自定义 403 页面
         */
        http.exceptionHandling().accessDeniedPage("/403.html");
    }

    @Bean
    PasswordEncoder passwordEncoder() {
        return new BCryptPasswordEncoder();
    }
}
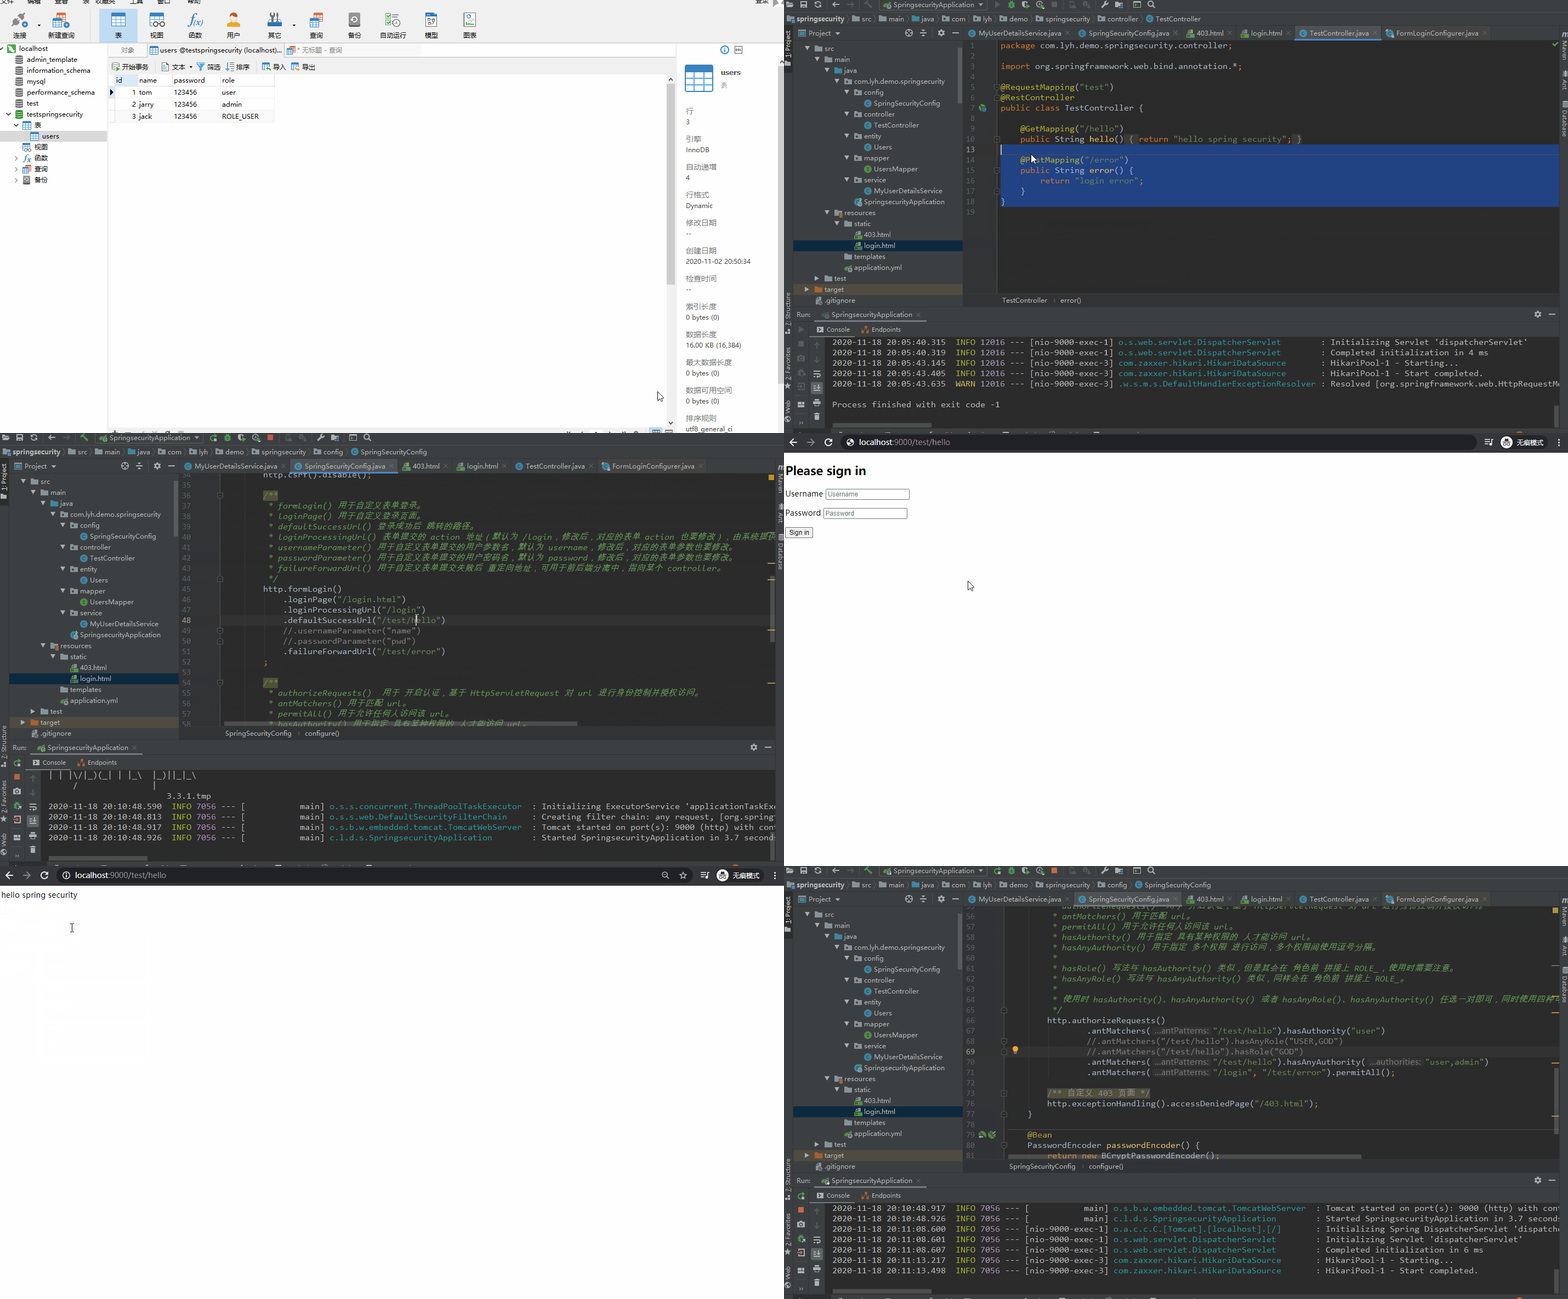
如下图所示,tom 的角色为 user、jarry 的角色为 admin,jack 的角色为 ROLE_USER。
只允许 user、admin 角色能够访问 /test/hello,即 tom、jarry 可以成功访问系统,而 jack 访问时会跳转到 403 页面,若 用户名 或者 密码输入错误时,将会跳转到 /test/error 画面。
5、了解几个注解
为了简化开发,可以使用注解进行相关操作(操作不太灵活,慎用)。
(1)@Secured
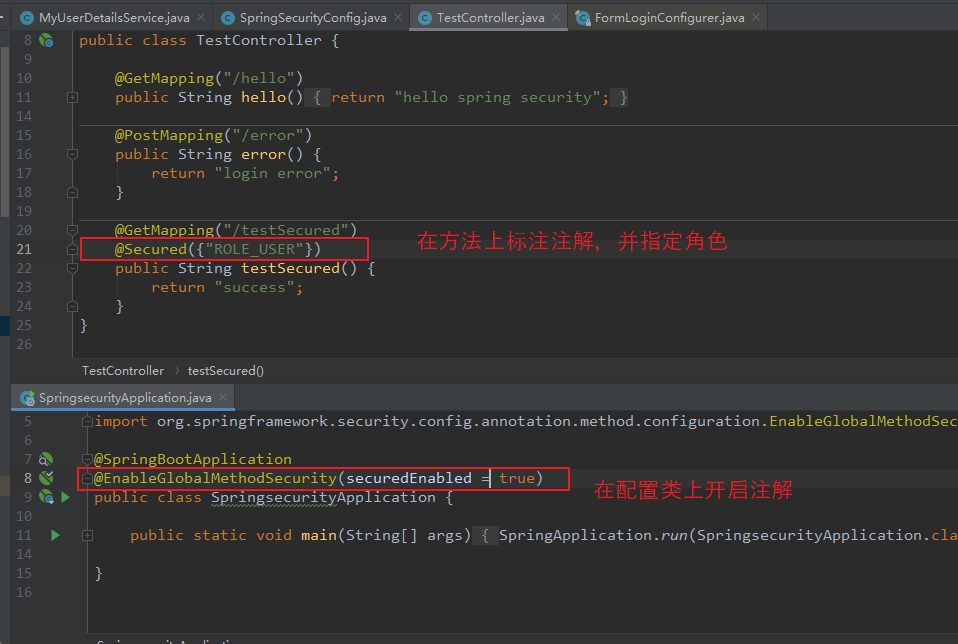
添加在 方法上,并可以指定用户角色,作用是只允许指定的用户角色去访问 该方法。
【使用步骤一:】
    在配置类上,通过 @EnableGlobalMethodSecurity(securedEnabled = true) 开启注解。

【使用步骤二:】
    在方法上添加注解 @Secured,并指定 角色,角色前缀要为 ROLE_。

@GetMapping("/testSecured")
@Secured({"ROLE_USER"})
public String testSecured() {
    return "success";
}

注:
    由于 角色需要使用 ROLE_ 为前缀,所以数据库存储的 角色需要以 ROLE_ 为前缀 或者 设置权限时手动加上 ROLE_。
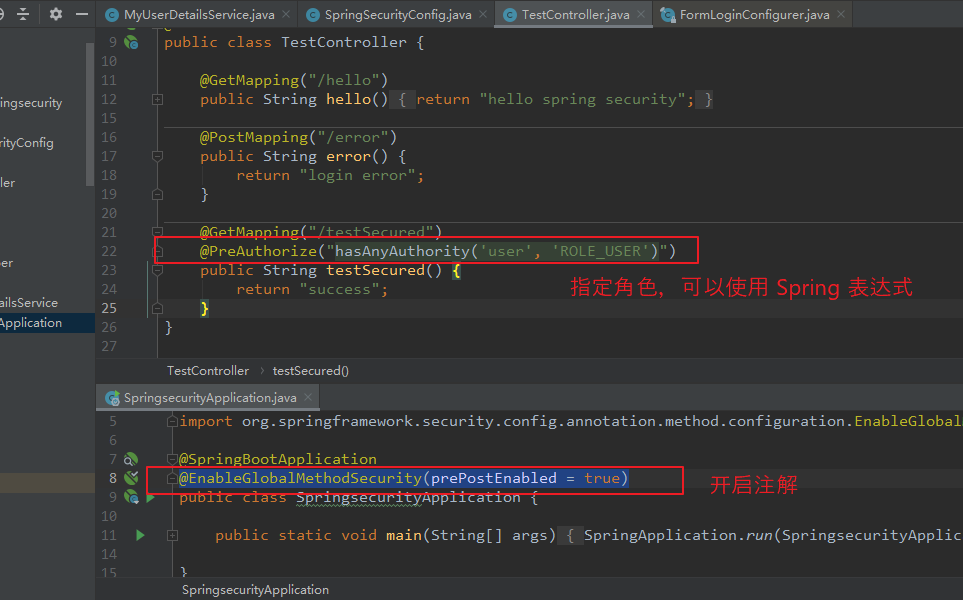
(2)@PreAuthorize
添加在 方法上,并可以指定用户角色,作用是只允许指定的用户角色去访问 该方法。
在进入方法之前 会进行 校验,校验通过后才能执行方法。
【使用步骤一:】
    在配置类上,通过 @EnableGlobalMethodSecurity(prePostEnabled = true) 开启注解。

【使用步骤二:】
    在方法上添加 @PreAuthorize 注解,并指定角色,角色的指定可以使用 Spring 表达式。

@GetMapping("/testSecured")
@PreAuthorize("hasAnyAuthority('user', 'ROLE_USER')")
public String testSecured() {
    return "success";
}
(3)@PostAuthorize
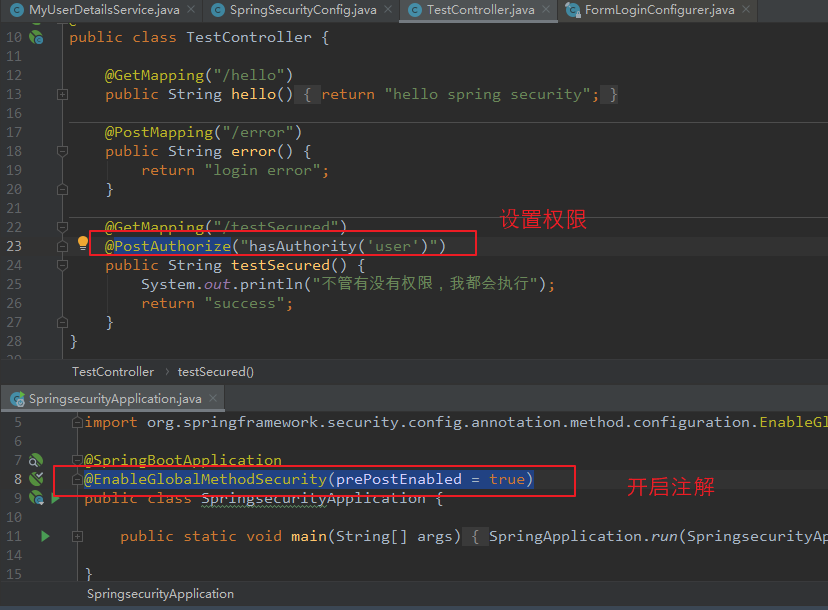
添加在 方法上,并可以指定用户角色,作用是只允许指定的用户角色去访问 该方法。
在进入方法之后 会进行 校验。不管有没有权限,都会执行方法,适合带有返回值的校验。
【使用步骤一:】
    在配置类上,通过 @EnableGlobalMethodSecurity(prePostEnabled = true) 开启注解。

【使用步骤二:】
    在方法上添加 @PostAuthorize 注解,并指定角色,角色的指定可以使用 Spring 表达式。

@GetMapping("/testSecured")
@PostAuthorize("hasAuthority('user')")
public String testSecured() {
    System.out.println("不管有没有权限,我都会执行");
    return "success";
}
6、用户注销操作
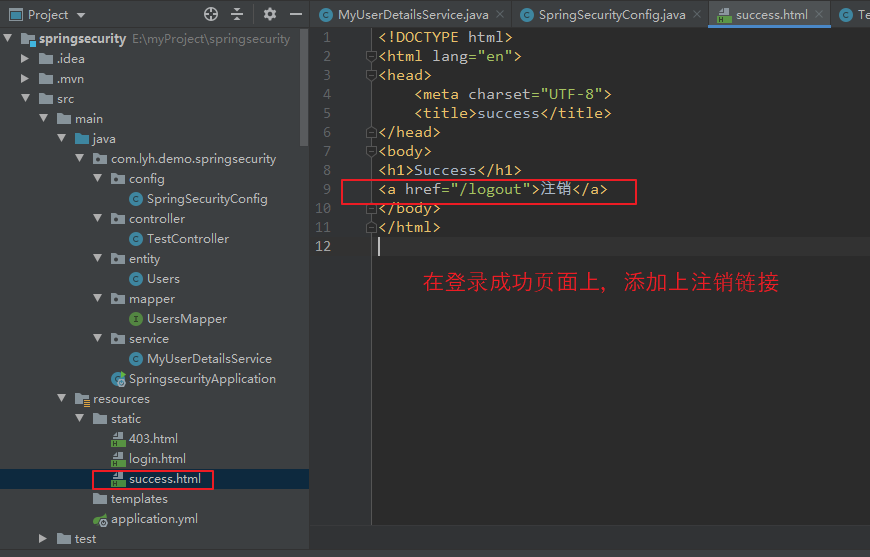
(1)自定义一个登录成功页面,并添加一个 退出链接。
【登录成功页面 success.html】
<!DOCTYPE html>
<html lang="en">
<head>
    <meta charset="UTF-8">
    <title>success</title>
</head>
<body>
<h1>Success</h1>
<a href="/logout">注销</a>
</body>
</html>
(2)编写配置类,修改页面退出规则。
此处为了跳转到 success.html 页面,还需要 通过 http.formLogin().defaultSuccessUrl() 去指定页面。
【添加退出规则:】
http.formLogin()
    .loginPage("/login.html")
    .loginProcessingUrl("/login")
    .defaultSuccessUrl("/success.html")
    //.usernameParameter("name")
    //.passwordParameter("pwd")
    .failureForwardUrl("/test/error")
;

/**
 * logout() 用于自定义退出逻辑。
 * logoutUrl() 用于拦截退出请求,默认为 /logout。
 * logoutSuccessUrl() 用于自定义退出成功后,跳转的页面。
 */
http.logout()
    .logoutUrl("/logout")
    .logoutSuccessUrl("/login.html")
;
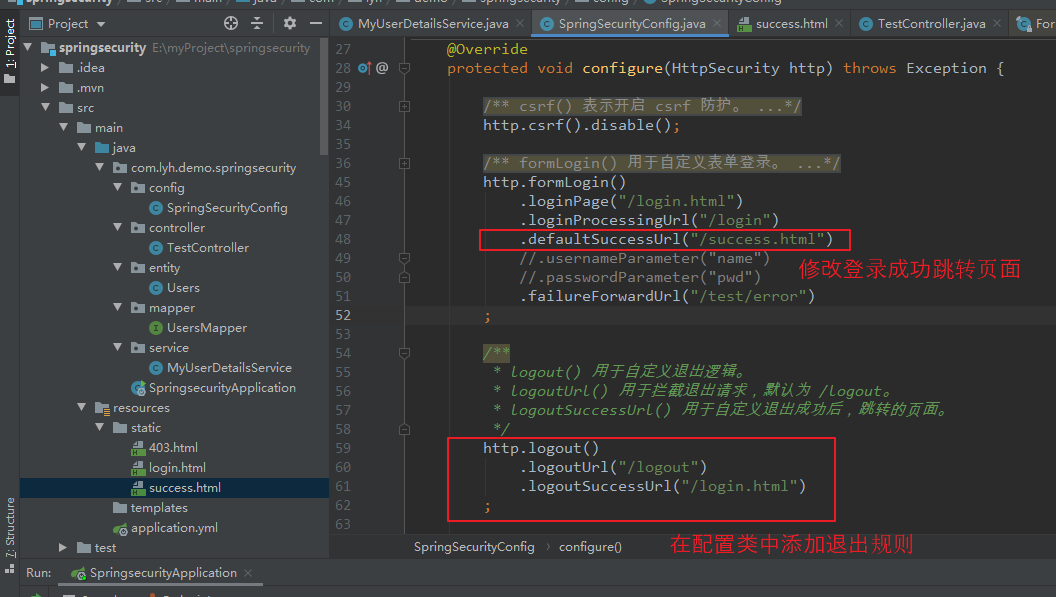
如下图所示,tom、jarry 可以访问 /test/hello,jack 不可以访问,所以当使用 tom、jarry 登录时可以成功登陆,jack 会显示 403,一旦点击注销后,需要再次进行登录才能继续访问 /test/hello。

7、记住我
(1)工作流程
记住我 功能上指的是 用户通过浏览器登录一次网站后,关闭浏览器并再次访问网站时,可以不用再次登录而直接进行相关操作。
【工作流程:】
第一次通过浏览器登录系统时:
    首先 用户名、密码 会被 UsernamePasswordAuthenticationFilter 过滤器拦截,并进行认证。
    认证通过后,会调用 RememberMeServices 生成 token,并将 token 写入数据库 以及 浏览器 cookie 中。

第二次通过浏览器登录系统时:
    直接携带 cookie 访问,会被 RememberMeAuthenticationFilter 过滤器拦截,根据 cookie 读取出 token 信息。
    从数据库中查找出 对应的 token 并比较,若相同,则可以登录系统,否则跳转到登录页面。
工作流程见下图(图片来源于网络):

(2)基本实现:
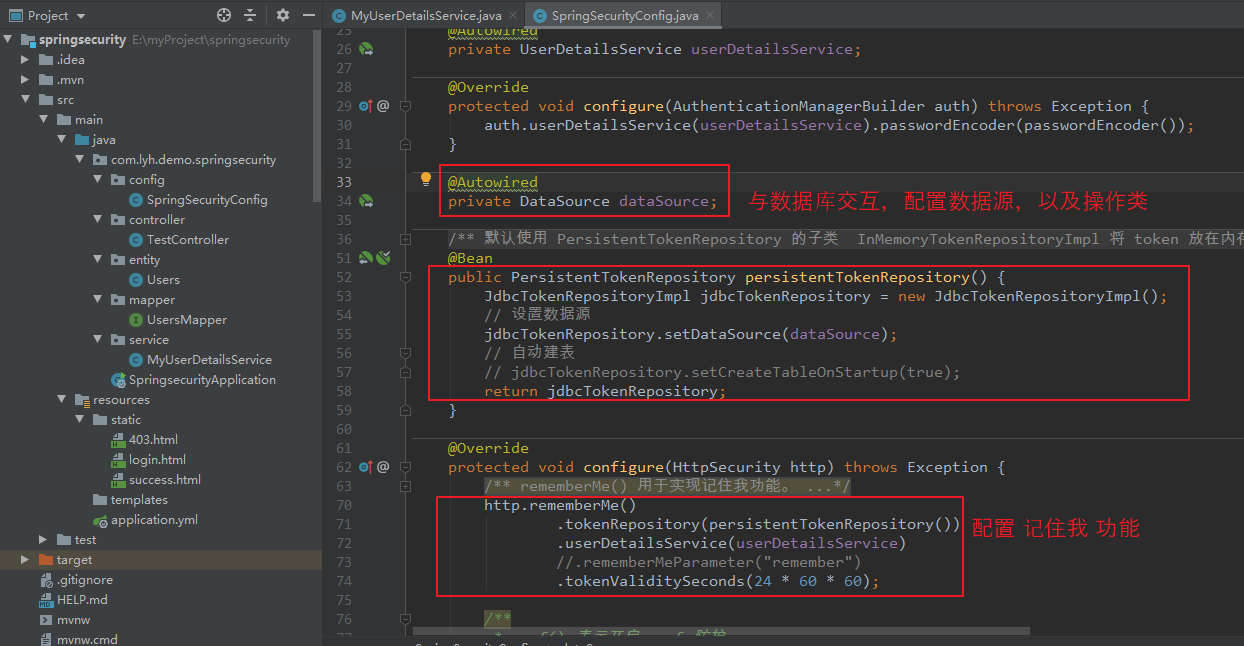
由于 token 需要存储在 数据库中,所以需要配置数据源信息,并操作,而 SpringSecurity 中已经提供了相关操作类,只需在配置类中配置即可。
【配置如下:(注入 DataSource,并配置 PersistentTokenRepository 交给 Spring 管理)】
@Autowired
private DataSource dataSource;

@Bean
public PersistentTokenRepository persistentTokenRepository() {
    JdbcTokenRepositoryImpl jdbcTokenRepository = new JdbcTokenRepositoryImpl();
    // 设置数据源
    jdbcTokenRepository.setDataSource(dataSource);
    // 自动建表
    // jdbcTokenRepository.setCreateTableOnStartup(true);
    return jdbcTokenRepository;
}


【完整配置类:(通过  http.rememberMe() 配置)】
package com.lyh.demo.springsecurity.config;

import org.springframework.beans.factory.annotation.Autowired;
import org.springframework.context.annotation.Bean;
import org.springframework.context.annotation.Configuration;
import org.springframework.security.config.annotation.authentication.builders.AuthenticationManagerBuilder;
import org.springframework.security.config.annotation.web.builders.HttpSecurity;
import org.springframework.security.config.annotation.web.configuration.EnableWebSecurity;
import org.springframework.security.config.annotation.web.configuration.WebSecurityConfigurerAdapter;
import org.springframework.security.core.userdetails.UserDetailsService;
import org.springframework.security.crypto.bcrypt.BCryptPasswordEncoder;
import org.springframework.security.crypto.password.PasswordEncoder;
import org.springframework.security.web.authentication.rememberme.JdbcTokenRepositoryImpl;
import org.springframework.security.web.authentication.rememberme.PersistentTokenRepository;

import javax.sql.DataSource;

/**
 * 配置 Spring Security
 */
@Configuration
@EnableWebSecurity
public class SpringSecurityConfig extends WebSecurityConfigurerAdapter {

    @Autowired
    private UserDetailsService userDetailsService;

    @Override
    protected void configure(AuthenticationManagerBuilder auth) throws Exception {
        auth.userDetailsService(userDetailsService).passwordEncoder(passwordEncoder());
    }

    @Autowired
    private DataSource dataSource;

    /**
     * 默认使用 PersistentTokenRepository 的子类  InMemoryTokenRepositoryImpl 将 token 放在内存中,
     * 可以使用子类 JdbcTokenRepositoryImpl 将 token 持久化到 数据库中。
     * 注:
     *
     *  jdbcTokenRepository.setCreateTableOnStartup(true); 等同于下面 SQL,
     *  若不手动创建,可以使用代码自动创建,但是执行一次后需要将其注释掉。
     *
     *  create table persistent_logins (
     *         username varchar(64) not null,
     *         series varchar(64) primary key,
     *         token varchar(64) not null,
     *         last_used timestamp not null
     *  )
     */
    @Bean
    public PersistentTokenRepository persistentTokenRepository() {
        JdbcTokenRepositoryImpl jdbcTokenRepository = new JdbcTokenRepositoryImpl();
        // 设置数据源
        jdbcTokenRepository.setDataSource(dataSource);
        // 自动建表
        // jdbcTokenRepository.setCreateTableOnStartup(true);
        return jdbcTokenRepository;
    }

    @Override
    protected void configure(HttpSecurity http) throws Exception {
        /**
         * rememberMe() 用于实现记住我功能。
         * tokenRepository() 设置数据访问层。
         * userDetailsService() 设置 userDetailsService。
         * tokenValiditySeconds() 设置过期时间。
         * rememberMeParameter() 自定义参数名,默认为 remember-me
         */
        http.rememberMe()
                .tokenRepository(persistentTokenRepository())
                .userDetailsService(userDetailsService)
                //.rememberMeParameter("remember")
                .tokenValiditySeconds(24 * 60 * 60);

        /**
         * csrf() 表示开启 csrf 防护。
         * disable() 表示关闭 csrf 防护。
         */
        http.csrf().disable();

        /**
         * formLogin() 用于自定义表单登录。
         * loginPage() 用于自定义登录页面。
         * defaultSuccessUrl() 登录成功后 跳转的路径。
         * loginProcessingUrl() 表单提交的 action 地址(默认为 /login,修改后,对应的表单 action 也要修改),由系统提供 UsernamePasswordAuthenticationFilter 过滤器拦截并处理。
         * usernameParameter() 用于自定义表单提交的用户参数名,默认为 username,修改后,对应的表单参数也要修改。
         * passwordParameter() 用于自定义表单提交的用户密码名,默认为 password,修改后,对应的表单参数也要修改。
         * failureForwardUrl() 用于自定义表单提交失败后 重定向地址,可用于前后端分离中,指向某个 controller。
         */
        http.formLogin()
            .loginPage("/login.html")
            .loginProcessingUrl("/login")
            .defaultSuccessUrl("/success.html")
            //.usernameParameter("name")
            //.passwordParameter("pwd")
            .failureForwardUrl("/test/error")
        ;

        /**
         * logout() 用于自定义退出逻辑。
         * logoutUrl() 用于拦截退出请求,默认为 /logout。
         * logoutSuccessUrl() 用于自定义退出成功后,跳转的页面。
         */
        http.logout()
            .logoutUrl("/logout")
            .logoutSuccessUrl("/login.html")
        ;

        /**
         * authorizeRequests()  用于 开启认证,基于 HttpServletRequest 对 url 进行身份控制并授权访问。
         * antMatchers() 用于匹配 url。
         * permitAll() 用于允许任何人访问该 url。
         * hasAuthority() 用于指定 具有某种权限的 人才能访问 url。
         * hasAnyAuthority() 用于指定 多个权限 进行访问,多个权限间使用逗号分隔。
         *
         * hasRole() 写法与 hasAuthority() 类似,但是其会在 角色前 拼接上 ROLE_,使用时需要注意。
         * hasAnyRole() 写法与 hasAnyAuthority() 类似,同样会在 角色前 拼接上 ROLE_。
         *
         * 使用时 hasAuthority()、hasAnyAuthority() 或者 hasAnyRole()、hasAnyAuthority() 任选一对即可,同时使用四种可能会出现问题。
         */
        http.authorizeRequests()
                .antMatchers("/test/hello").hasAuthority("user")
                //.antMatchers("/test/hello").hasAnyRole("USER,GOD")
                //.antMatchers("/test/hello").hasRole("GOD")
                .antMatchers("/test/hello").hasAnyAuthority("user,admin")
                .antMatchers("/login", "/test/error").permitAll();

        /**
         * 自定义 403 页面
         */
        http.exceptionHandling().accessDeniedPage("/403.html");
    }

    @Bean
    PasswordEncoder passwordEncoder() {
        return new BCryptPasswordEncoder();
    }
}
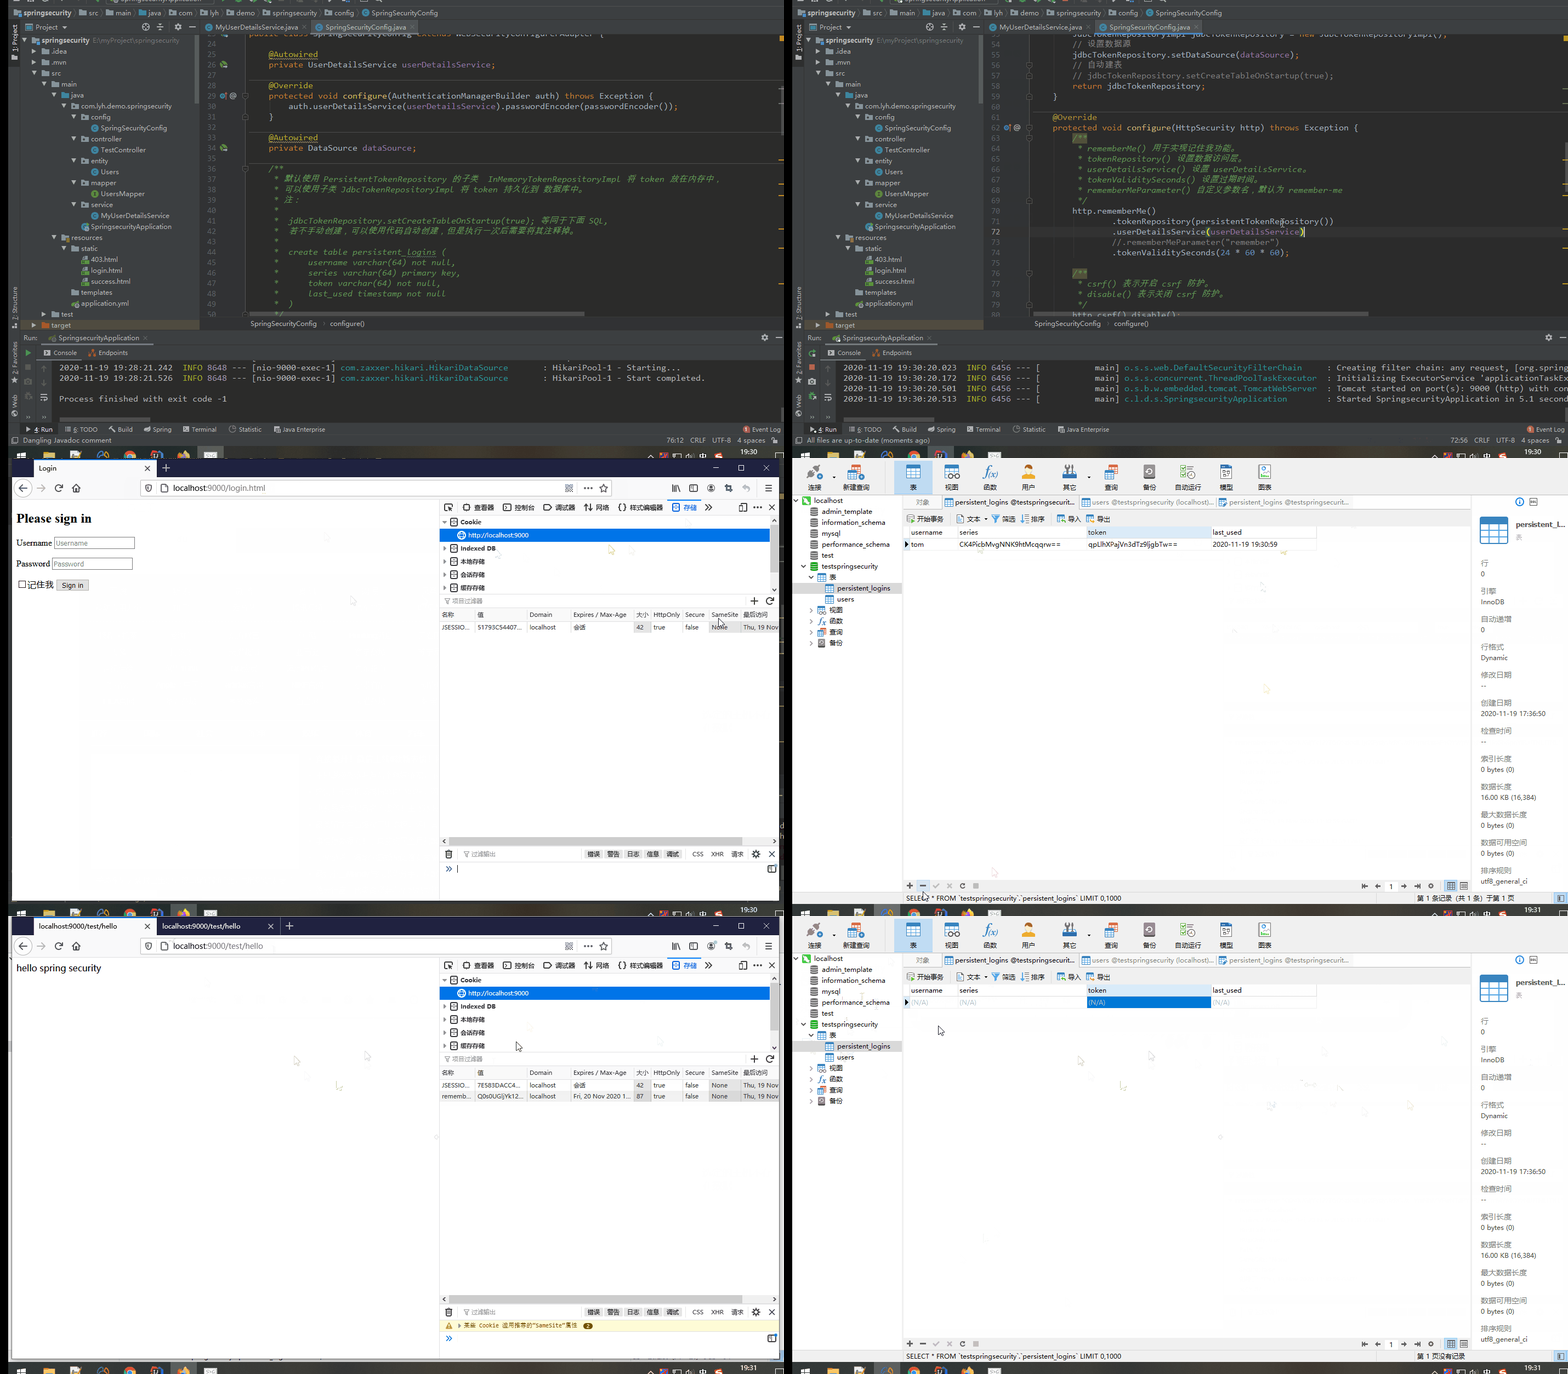
如下图所示,点击 记住我,并登陆后,会在浏览器 cookie 以及 数据库中 各存放一份 token,关闭浏览器并再次登录时,无需重新登录,会自动检测 cookie 中的 token 值是否正确,若相同则可以正常登陆。注销时,浏览器 token 以及 数据库的 token 会一起注销。
(3)源码分析:
Step1:
第一次通过浏览器登录系统时,首先会被 UsernamePasswordAuthenticationFilter 过滤器拦截,认证通过后,会在 AbstractAuthenticationProcessingFilter 抽象类的 successfulAuthentication() 方法中 进行 token 的处理
【UsernamePasswordAuthenticationFilter 继承 AbstractAuthenticationProcessingFilter:】
    public class UsernamePasswordAuthenticationFilter extends AbstractAuthenticationProcessingFilter {}

【AbstractAuthenticationProcessingFilter 的 doFilter() 中 调用了 successfulAuthentication() 方法:】
public abstract class AbstractAuthenticationProcessingFilter extends GenericFilterBean
      implements ApplicationEventPublisherAware, MessageSourceAware {
    public void doFilter(ServletRequest req, ServletResponse res, FilterChain chain)
      throws IOException, ServletException {
      ...
      successfulAuthentication(request, response, chain, authResult);
  }
}

Step2:
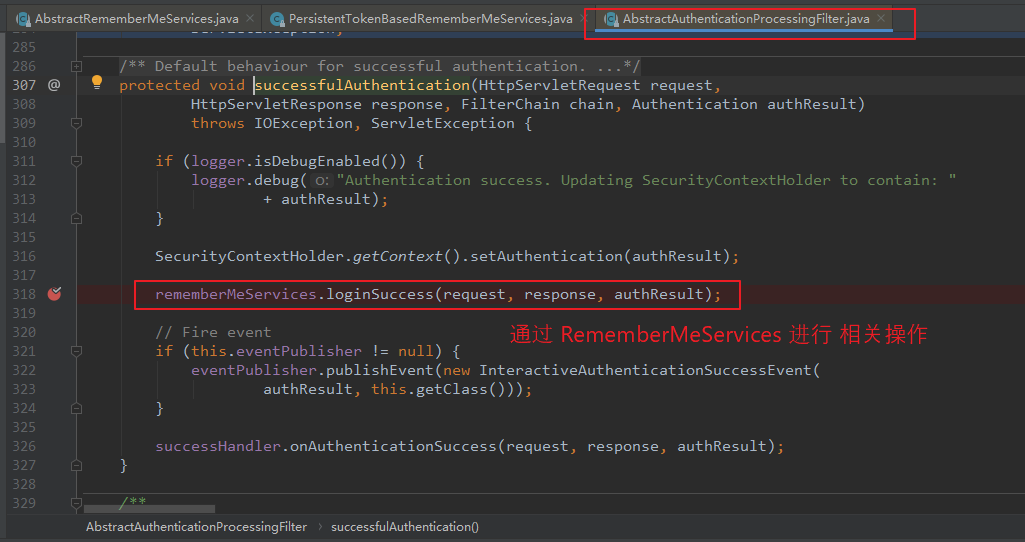
AbstractAuthenticationProcessingFilter 中定义了 RememberMeServices 接口,在 successfulAuthentication() 方法中 会调用 RememberMeServices 接口的 loginSuccess() 方法。
【调用 RememberMeServices 的 loginSuccess() 方法:】
private RememberMeServices rememberMeServices = new NullRememberMeServices();
protected void successfulAuthentication(HttpServletRequest request,
      HttpServletResponse response, FilterChain chain, Authentication authResult)
      throws IOException, ServletException {
      ...
      rememberMeServices.loginSuccess(request, response, authResult);
}
Step3:
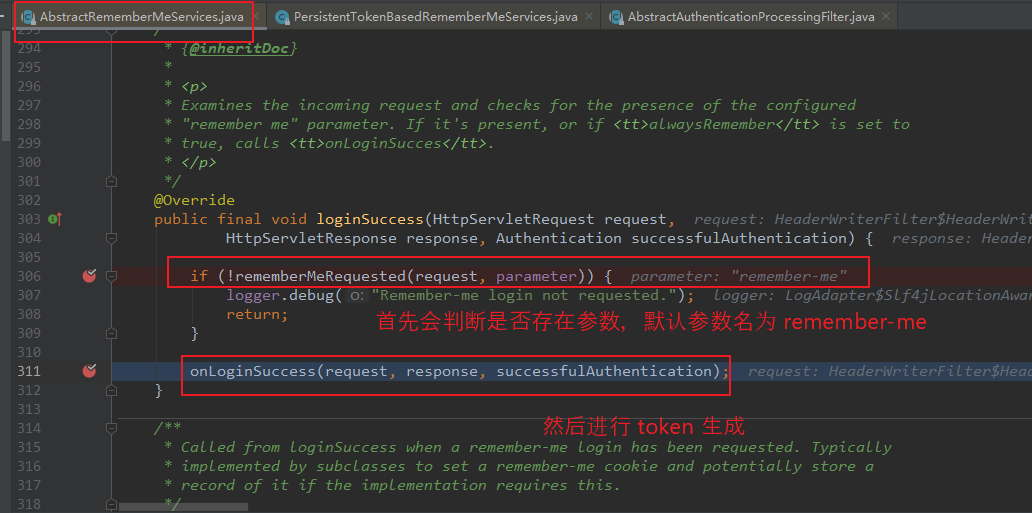
RememberMeServices 接口的 loginSuccess() 方法 由子类 AbstractRememberMeServices 实现,loginSuccess() 会先检测是否存在 记住我 的功能,默认参数名为 remember-me,若表单中不存在 或者 为 false 时,会直接返回。为 true 时,会执行 onLoginSuccess() 方法。
【调用 AbstractRememberMeServices 的 loginSuccess() 方法:】
public final void loginSuccess(HttpServletRequest request,
      HttpServletResponse response, Authentication successfulAuthentication) {

   if (!rememberMeRequested(request, parameter)) {
      logger.debug("Remember-me login not requested.");
      return;
   }

   onLoginSuccess(request, response, successfulAuthentication);
}
Step4:
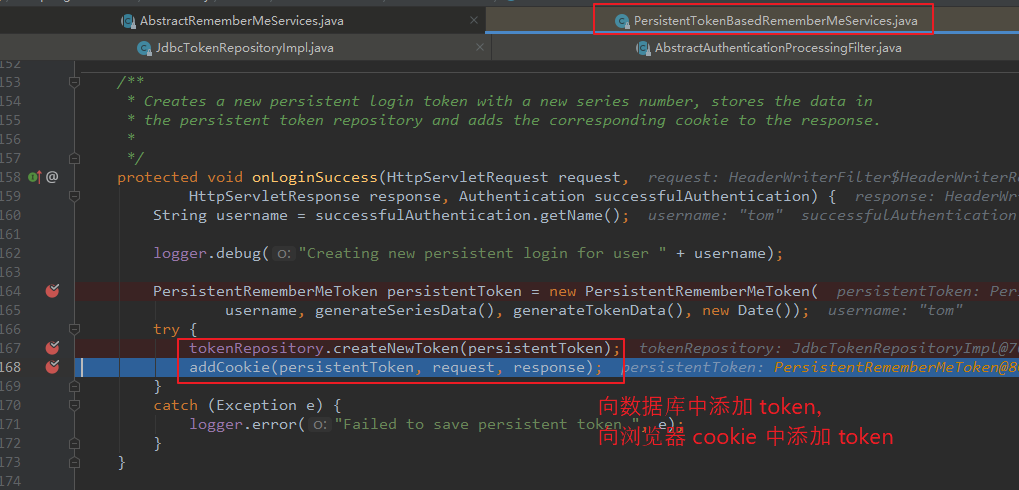
onLoginSuccess() 方法由 AbstractRememberMeServices 的子类 PersistentTokenBasedRememberMeServices 去实现。向数据库中 添加 token 以及 向 cookie 中添加 token。
【调用 PersistentTokenBasedRememberMeServices 的 onLoginSuccess() 方法:】
protected void onLoginSuccess(HttpServletRequest request,
      HttpServletResponse response, Authentication successfulAuthentication) {
   String username = successfulAuthentication.getName();

   logger.debug("Creating new persistent login for user " + username);

   PersistentRememberMeToken persistentToken = new PersistentRememberMeToken(
         username, generateSeriesData(), generateTokenData(), new Date());
   try {
      tokenRepository.createNewToken(persistentToken);
      addCookie(persistentToken, request, response);
   }
   catch (Exception e) {
      logger.error("Failed to save persistent token ", e);
   }
}
Step5:
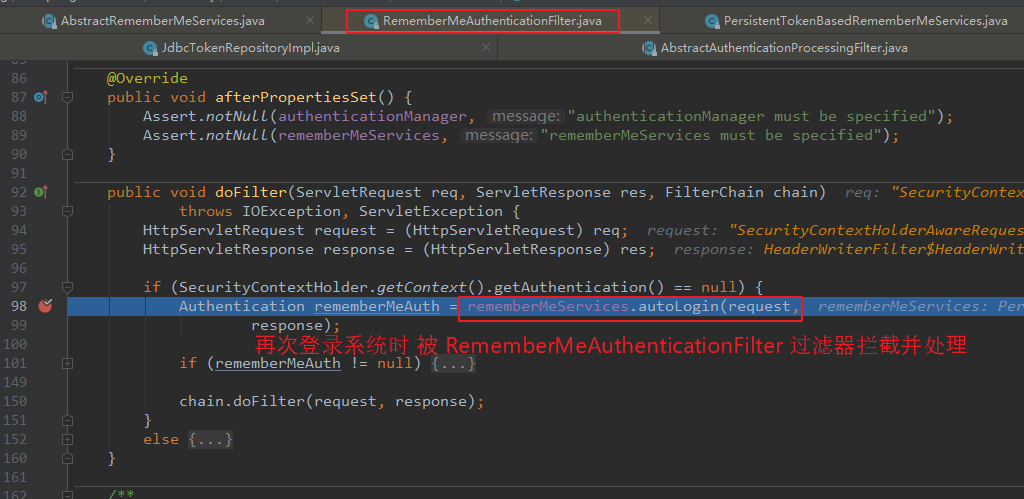
关闭浏览器,再次登录时,由 RememberMeAuthenticationFilter 过滤器拦截请求,在其 doFilter() 方法中 调用 RememberMeServices 接口的 autoLogin() 方法进行处理。
【RememberMeAuthenticationFilter 的 】
public class RememberMeAuthenticationFilter extends GenericFilterBean implements
      ApplicationEventPublisherAware {
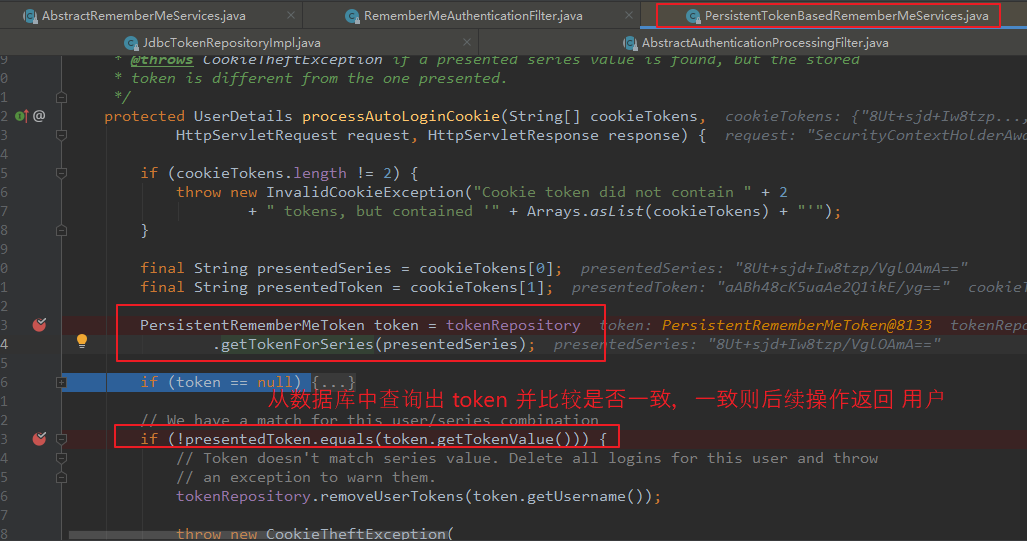
    private RememberMeServices rememberMeServices;
    public void doFilter(ServletRequest req, ServletResponse res, FilterChain chain)
      throws IOException, ServletException {
          ...
          Authentication rememberMeAuth = rememberMeServices.autoLogin(request,response);
          ...
      }
}
Step6:
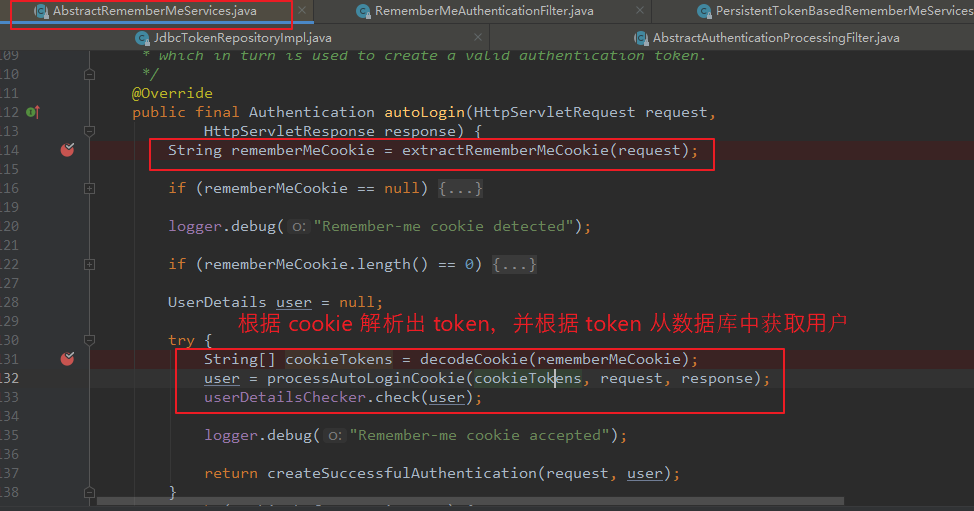
RememberMeServices 接口的 autoLogin() 方法由 AbstractRememberMeServices 子类实现,其根据 cookie 值解析出相应的 token。并根据 token 从数据库中查询用户,并验证用户是否合法。
public final Authentication autoLogin(HttpServletRequest request,
      HttpServletResponse response) {
    String rememberMeCookie = extractRememberMeCookie(request);
    ...
    String[] cookieTokens = decodeCookie(rememberMeCookie);
    user = processAutoLoginCookie(cookieTokens, request, response);
    userDetailsChecker.check(user);
}
Step7:
调用 processAutoLoginCookie() 方法根据 token 从数据库中查询出用户。
protected UserDetails processAutoLoginCookie(String[] cookieTokens,
      HttpServletRequest request, HttpServletResponse response) {
    final String presentedSeries = cookieTokens[0];
    final String presentedToken = cookieTokens[1];

    PersistentRememberMeToken token = tokenRepository.getTokenForSeries(presentedSeries);
    if (!presentedToken.equals(token.getTokenValue())) {
    }
    ...
    return getUserDetailsService().loadUserByUsername(token.getUsername());
}
