caffe虽然已经安装了快一个月了,但是caffe使用进展比较缓慢,果然如刘老师说的那样,搭建起来caffe框架环境比较简单,但是完整的从数据准备->模型训练->调参数->合理结果需要一个比较长的过程,这个过程中你需要对caffe中很多东西,细节进行深入的理解,这样才可以知道为什么能有这样的结果,在训练或者fine-tuning时知道针对调整的方法。下面针对caffe中的使用进行讲解。
在使用过程中,caffe官网上提供了详细的使用说明,如果感觉仍然存在一些困难,可以使用谷歌或百度搜索自己遇到的问题和想要了解的过程进行搜索学习。
一、Caffe模型基本组成
想要训练一个caffe模型,需要配置两个文件,包含两个部分:网络模型,参数配置,分别对应***.prototxt , ****_solver.prototxt文件
Caffe模型文件讲解:
- 预处理图像的leveldb构建
输入:一批图像和label (2和3)
输出:leveldb (4)
指令里包含如下信息:- conver_imageset (构建leveldb的可运行程序)
- train/ (此目录放处理的jpg或者其他格式的图像)
- label.txt (图像文件名及其label信息)
- 输出的leveldb文件夹的名字
- CPU/GPU (指定是在cpu上还是在gpu上运行code)
-
CNN网络配置文件
- Imagenet_solver.prototxt (包含全局参数的配置的文件)
- Imagenet.prototxt (包含训练网络的配置的文件)
- Imagenet_val.prototxt (包含测试网络的配置文件)
网络模型:即定义你网络的每一层,下图是用caffe中 /python/draw_net.py画出的的siamese的模型,非常清晰
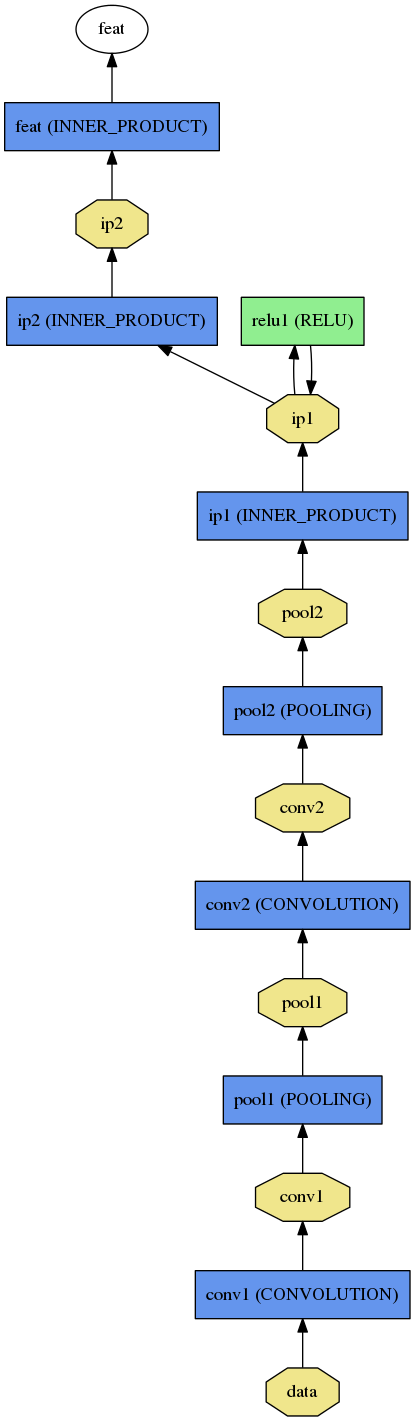
层包含:(以LeNet为例)
DATA:一般包括训练数据和测试数据层两种类型。 一般指输入层,包含source:数据路径,批处理数据大小batch_size,scale表示数据表示在[0,1],0.00390625即 1/255
训练数据层:

layer {
  name: "mnist"
  type: "Data"
  top: "data"
  top: "label"
  include {
    phase: TRAIN
  }
  transform_param {
    scale: 0.00390625
  }
  data_param {
    source: "examples/mnist/mnist_train_lmdb"
    batch_size: 64
    backend: LMDB
  }
}
测试数据层:
layer {
  name: "mnist"
  type: "Data"
  top: "data"
  top: "label"
  include {
    phase: TEST
  }
  transform_param {
    scale: 0.00390625
  }
  data_param {
    source: "examples/mnist/mnist_test_lmdb"
    batch_size: 100
    backend: LMDB
  }
}
CONVOLUATION:卷积层,blobs_lr:1 , blobs_lr:2分别表示weight 及bias更新时的学习率,这里权重的学习率为solver.prototxt文件中定义的学习率真,bias的学习率真是权重学习率的2倍,这样一般会得到很好的收敛速度。
num_output表示滤波的个数,kernelsize表示滤波的大小,stride表示步长,weight_filter表示滤波的类型
layer {
  name: "conv1"
  type: "Convolution"
  bottom: "data"
  top: "conv1"
  param {
    lr_mult: 1 //weight学习率
  }
  param {
    lr_mult: 2 //bias学习率,一般为weight的两倍
  }
  convolution_param {
    num_output: 20  //滤波器个数
    kernel_size: 5
    stride: 1  //步长
    weight_filler {
      type: "xavier"
    }
    bias_filler {
      type: "constant"
    }
  }
}
POOLING: 池化层
layer {
  name: "pool1"
  type: "Pooling"
  bottom: "conv1"
  top: "pool1"
  pooling_param {
    pool: MAX
    kernel_size: 2
    stride: 2
  }
}
INNER_PRODUCT: 其实表示全连接,不要被名字误导
layer {
  name: "ip1"
  type: "InnerProduct"
  bottom: "pool2"
  top: "ip1"
  param {
    lr_mult: 1
  }
  param {
    lr_mult: 2
  }
  inner_product_param {
    num_output: 500
    weight_filler {
      type: "xavier"
    }
    bias_filler {
      type: "constant"
    }
  }
}
RELU:激活函数,非线性变化层 max( 0 ,x ),一般与CONVOLUTION层成对出现
layer {
  name: "relu1"
  type: "ReLU"
  bottom: "ip1"
  top: "ip1"
}
SOFTMAX:
layer {
  name: "loss"
  type: "SoftmaxWithLoss"
  bottom: "ip2"
  bottom: "label"
  top: "loss"
}
参数配置文件:
***_solver.prototxt文件定义一些模型训练过程中需要到的参数,比较学习率,权重衰减系数,迭代次数,使用GPU还是CPU等等
# The train/test net protocol buffer definition
net: "examples/mnist/lenet_train_test.prototxt"

# test_iter specifies how many forward passes the test should carry out.
# In the case of MNIST, we have test batch size 100 and 100 test iterations,
# covering the full 10,000 testing images.
test_iter: 100

# Carry out testing every 500 training iterations.
test_interval: 500

# The base learning rate, momentum and the weight decay of the network.
base_lr: 0.01
momentum: 0.9
weight_decay: 0.0005

# The learning rate policy
lr_policy: "inv"
gamma: 0.0001
power: 0.75

# Display every 100 iterations
display: 100

# The maximum number of iterations
max_iter: 10000

# snapshot intermediate results
snapshot: 5000
snapshot_prefix: "examples/mnist/lenet"

# solver mode: CPU or GPU
solver_mode: GPU
device_id: 0  #在cmdcaffe接口下,GPU序号从0开始,如果有一个GPU,则device_id:0
训练出的模型被存为***.caffemodel,可供以后使用。
二、使用caffe训练模型包含以下几个步骤:
- 准备数据
在caffe中使用数据来对机器学习算法进行训练时,首先需要了解基本数据组成。不论使用何种框架进行CNNs训练,共有3种数据集:
- Training Set:用于训练网络
- Validation Set:用于训练时测试网络准确率
- Test Set:用于测试网络训练完成后的最终正确率
- 重建lmdb/leveldb文件,caffe支持三种数据格式输入:images, levelda, lmdb
Caffe生成的数据分为2种格式:Lmdb和Leveldb
- 它们都是键/值对(Key/Value Pair)嵌入式数据库管理系统编程库。
- 虽然lmdb的内存消耗是leveldb的1.1倍,但是lmdb的速度比leveldb快10%至15%,更重要的是lmdb允许多种训练模型同时读取同一组数据集。
- 因此lmdb取代了leveldb成为Caffe默认的数据集生成格式。
- 定义name.prototxt , name_solver.prototxt文件
- 训练模型
三、caffe中比较有用且基础的接口(cmdcaffe)
注:在使用cmdcaffe时,需要默认切换到Caffe_Root文件夹下
1、训练模型,以mnist为例子
./build/tools/caffe train --solver=examples/mnist/lenet_solver.prototxt
注:caffe官网上给的例子不能直接执行,需要使用上述命令才可以使用tools下的caffe接口,因为caffe默认都需要从根目录下面执行文件。
2、观察各个阶段的运行时间可以使用
./build/tools/caffe time --model=models/bvlc_reference_caffenet/train_val.prototxt
3、使用已有模型提取特征
./build/tools/extract_features.bin models/bvlc_reference_caffenet/bvlc_reference_caffenet.caffemodel examples/_temp/imagenet_val.prototxt conv5 examples/_temp/features 10
conv5表示提取第五个卷积层的特征, examples/_temp/feaures表示存放结果的目录(这里的目录需要提前构建好)
4、对已有模型进行find-tuning,比如我们现在有一个1000类的分类模型,但目前我们的需求仅是20类,此时我们不需要重新训练一个模型,只需要将最后一层换成20类的softmax层,然后使用已有数据对原模型进行fine-tuning即可
在很多时候,使用Caffe框架学习深度学习模型时,从ImageNet或者其他大型数据集从头开始训练获得一个fine-tuing合适的模型难度太大,这时候最好的情况,就是在已经训练好的模型上面来进行fine-tuning,通过这些过程可以加深自己对深度学习,以及对caffe使用的了解和熟悉,以方便自己在后续提出自己的模型,自己进行模型训练和fine-tuning的过程。
已经训练好的caffe模型可以在git的caffe项目中下载,比较经典的模型有:AlexNet.caffemodel , LeNet.caffemodel , RCnn.caffemodel,其他的大家可以在caffe的git官网上面下载。
使用自己的数据集对已经训练好的模型进行fine-tuning的操作(使用cmdcaffe接口来进行):
 ./build/tools/caffe train -solver models/finetune_flickr_style/solver.prototxt -weights models/bvlc_reference_caffenet/bvlc_reference_caffenet.caffemodel -gpu 0
[option] 2>&1 | tee log.txt
第一个参数:选择好caffe模块
train:选取train函数
后面接具体的参数,分别为配置命令,配置文件路径,fine-tuning命令,fine-tuning依赖的基准模型文件目录,选用的训练方式:gpu或者cpu,使用cpu时可以默认不写
注:fine-tuning的过程与训练过程类似,只是在调用caffe接口时的命令不同,因此在fine-tuning之前,仍然需要按照训练流程准备数据。
下载数据->生成trainset和testset->生成db->设置好路径->fine-tuning。
5、还有一个是python下面的接口,draw_net.py可以根据.prototxt文件将模式用图示的方法表示出来,博文开始的模型图即用该接口所绘
./python/draw_net.py ./examples/siamese/mnist_siamese.prototxt ./examples/siamese/mnist_siamese.png
使用该接口进行网络的绘制示例化
第一个参数为模型文件,第二个参数为所绘模型图的保存地址
深度学习中batch_size的作用:
在深度学习训练过程中,有两种训练方法,一种意识batch ,一种是stochastic训练方法
solver:使用forward和backward接口来更新参数,并迭代对loss进行降低(定义的优化方法,有stochastic gradient descent,SGD;Adaptive gradient ,NAG和Scaffolding)
solver作用:(指定优化方法)
1.可以逐步对网络寻优,创建训练得到的网络,并对测试网络进行评价;
2.通过调用forward和backward来对网络参数进行迭代寻优;
3.周期性更新网络;
4.记录网络训练中间过程,寻优过程中记录状态
Caffe网络模型文件分析:
一个完整的基于caffe的网络模型,应该包含以下几个文件:

其中,deploy.prototxt是用来在网络完成训练之后进行部署的(其他深度学习框架导入caffemodel文件时,也是以此为原型),solver.prototxt用于设定网络训练时的参数,train_val.prototxt用于对网络进行训练的模型定义,*.caffemodel是预训练好的网络模型,存储网络中的参数。
caffe和theano以及lasagne转化过程中的一些基础知识:
在caffe结构中,在convLayer层中有group这样一个参数,该参数来自于经典的ImageNet论文,关于group参数,yangqing给的解释为:
It was there to implement the grouped convolution in Alex Krizhevsky's paper: when group=2, the first half of the filters are only connected to the first half of the input channels, and the second half only connected to the second half.
即当group=2时,filter的前半部分同输入连接,后半部分同后半部分的filter连接,而在lasagne中并没有对应的该参数,因此需要使用官方给定的函数接口来进行实现。
具体见:地址