这一节我们一起看下分配过程
1     PooledByteBuf<T> allocate(PoolThreadCache cache, int reqCapacity, int maxCapacity) {
2         PooledByteBuf<T> buf = newByteBuf(maxCapacity); // 初始化一块容量为 2^31 - 1的ByteBuf
3         allocate(cache, buf, reqCapacity); // reqCapacity = 1024  进入分配逻辑
4         return buf;
5     }
 1     private void allocate(PoolThreadCache cache, PooledByteBuf<T> buf, final int reqCapacity) {
 2         final int normCapacity = normalizeCapacity(reqCapacity); // 对请求的大小进行校准,一会具体看
 3         if (isTinyOrSmall(normCapacity)) { // capacity < pageSize 判断校准之后的请求大小 是否小于 8k
 4             int tableIdx;
 5             PoolSubpage<T>[] table;
 6             boolean tiny = isTiny(normCapacity); // 判断请求大小是否小于512B
 7             if (tiny) { // < 512
 8                 if (cache.allocateTiny(this, buf, reqCapacity, normCapacity)) { // 从缓存中进行分配,如果是第一次这里肯定是没有对应大小缓存的,除非之前有过释放,然后内存空间被缓存起来了。
 9                     // was able to allocate out of the cache so move on
10                     return;
11                 }
12                 tableIdx = tinyIdx(normCapacity); // tiny数组中获取对应的下标
13                 table = tinySubpagePools; // tiny subPage数组
14             } else { // 512 <=  normCapacity  < 8K
15                 if (cache.allocateSmall(this, buf, reqCapacity, normCapacity)) { // 一样从缓存中进行分配,这个上一节详细的介绍过
16                     // was able to allocate out of the cache so move on
17                     return;
18                 }
19                 tableIdx = smallIdx(normCapacity); // 获取small subPage数组下标
20                 table = smallSubpagePools; // subPage 数组
21             }
22
23             final PoolSubpage<T> head = table[tableIdx];// 取得对应下标的subPage
24
25             /**
26              * Synchronize on the head. This is needed as {@link PoolChunk#allocateSubpage(int)} and
27              * {@link PoolChunk#free(long)} may modify the doubly linked list as well.
28              */
29             synchronized (head) { // 锁定防止其他操作修改head结点
30                 final PoolSubpage<T> s = head.next;
31                 if (s != head) {// 如果双向链表已经初始化,那么从subpage中进行分配
32                     assert s.doNotDestroy && s.elemSize == normCapacity; // 断言确保 当前的这个subPage中的elemSize大小必须和校对后的请求大小一样
33                     long handle = s.allocate(); // 从subPage中进行分配
34                     assert handle >= 0;
35                     s.chunk.initBufWithSubpage(buf, handle, reqCapacity);
36                     incTinySmallAllocation(tiny);
37                     return;
38                 }
39             }
40             synchronized (this) {
41                 allocateNormal(buf, reqCapacity, normCapacity); // 双向循环链表还没初始化,使用normal分配
42             }
43
44             incTinySmallAllocation(tiny);
45             return;
46         }
47         if (normCapacity <= chunkSize) {
48             if (cache.allocateNormal(this, buf, reqCapacity, normCapacity)) {
49                 // was able to allocate out of the cache so move on
50                 return;
51             }
52             synchronized (this) {
53                 allocateNormal(buf, reqCapacity, normCapacity);
54                 ++allocationsNormal;
55             }
56         } else {
57             // Huge allocations are never served via the cache so just call allocateHuge
58             allocateHuge(buf, reqCapacity);
59         }
60     }
    int normalizeCapacity(int reqCapacity) {
        if (reqCapacity < 0) {
            throw new IllegalArgumentException("capacity: " + reqCapacity + " (expected: 0+)");
        }

        if (reqCapacity >= chunkSize) {
            return directMemoryCacheAlignment == 0 ? reqCapacity : alignCapacity(reqCapacity);
        }

        if (!isTiny(reqCapacity)) { //  如果是 >=512 的内存申请,那么就规范到2的次方大小 ,比如 1000 就会 变成 1024,自己可以把这段位操作,自己main方法试一下。
            // Doubled

            int normalizedCapacity = reqCapacity;
            normalizedCapacity --;
            normalizedCapacity |= normalizedCapacity >>>  1;
            normalizedCapacity |= normalizedCapacity >>>  2;
            normalizedCapacity |= normalizedCapacity >>>  4;
            normalizedCapacity |= normalizedCapacity >>>  8;
            normalizedCapacity |= normalizedCapacity >>> 16;
            normalizedCapacity ++;

            if (normalizedCapacity < 0) {
                normalizedCapacity >>>= 1;
            }
            assert directMemoryCacheAlignment == 0 || (normalizedCapacity & directMemoryCacheAlignmentMask) == 0;

            return normalizedCapacity;
        }

        if (directMemoryCacheAlignment > 0) {
            return alignCapacity(reqCapacity);
        }

        // Quantum-spaced
        if ((reqCapacity & 15) == 0) { // 如果 < 512 判断如果是16的倍数,那么直接返回
            return reqCapacity;
        }

        return (reqCapacity & ~15) + 16; // 如果不是则对齐成16的倍数
    }
 private void allocateNormal(PooledByteBuf<T> buf, int reqCapacity, int normCapacity) {
     if (q050.allocate(buf, reqCapacity, normCapacity) || q025.allocate(buf, reqCapacity, normCapacity) ||
         q000.allocate(buf, reqCapacity, normCapacity) || qInit.allocate(buf, reqCapacity, normCapacity) ||
         q075.allocate(buf, reqCapacity, normCapacity)) {
         return;
     }  // 先尝试从chunk链表中进行分配, 这里有一个需要注意的地方
     // 分配顺序 先分配 q50 也就是 50% ~ 100% 的,然后是 q25 也就是 25% ~ 75% 的, 然后是 q000 0%~50% 、 qInit 0%~25% 、 q75 75% ~ 100%

     // Add a new chunk.
     PoolChunk<T> c = newChunk(pageSize, maxOrder, pageShifts, chunkSize); // 新建一个Chunk
     long handle = c.allocate(normCapacity); // 内存分配
     assert handle > 0;
     c.initBuf(buf, handle, reqCapacity);
     qInit.add(c); // 添加到初始化的chunk链表
 }
上面的分配顺序,大家想一下为什么不是从q000开始分配呢?我找了一段分析的很好的。
在分析PoolChunkList的时候,我们知道一个chunk随着内存的不停释放,它本身会不停的往其所在的chunk list的prev list移动,直到其完全释放后被回收。 如果这里是从q000开始尝试分配,虽然分配的速度可能更快了(因为分配成功的几率更大),但一个chunk在使用率为25%以内时有更大几率再分配,也就是一个chunk被回收的几率大大降低了。这样就带来了一个问题,我们的应用在实际运行过程中会存在一个访问高峰期,这个时候内存的占用量会是平时的几倍,因此会多分配几倍的chunk出来,而等高峰期过去以后,由于chunk被回收的几率降低,内存回收的进度就会很慢(因为没被完全释放,所以无法回收),内存就存在很大的浪费。
为什么是从q050开始尝试分配呢,q050是内存占用50%~100%的chunk,猜测是希望能够提高整个应用的内存使用率,因为这样大部分情况下会使用q050的内存,这样在内存使用不是很多的情况下一些利用率低(<50%)的chunk慢慢就会淘汰出去,最终被回收。然而为什么不是从qinit中开始呢,这里的chunk利用率低,但又不会被回收,岂不是浪费?q075,q100由于使用率高,分配成功的几率也会更小,因此放到最后。
上面也有提到新建一个chunk,这里我想特殊说明两个byte数组,数组的大小是4096
        memoryMap = new byte[maxSubpageAllocs << 1];
        depthMap = new byte[memoryMap.length];
        int memoryMapIndex = 1;
        for (int d = 0; d <= maxOrder; ++ d) { // move down the tree one level at a time
            int depth = 1 << d;
            for (int p = 0; p < depth; ++ p) {
                // in each level traverse left to right and set value to the depth of subtree
                memoryMap[memoryMapIndex] = (byte) d;
                depthMap[memoryMapIndex] = (byte) d;
                memoryMapIndex ++;
            }
        }
循环之后的数组是怎么样子的呢?

MemoryMap存放分配信息,depthMap存放节点的高度信息 ;初始状态时,memoryMap和depthMap相等,depthMap的值初始化后不再改变,memoryMap的值则随着节点分配而改变。
下标代表了平衡二叉树的节点序号,值代表该节点的高度值。
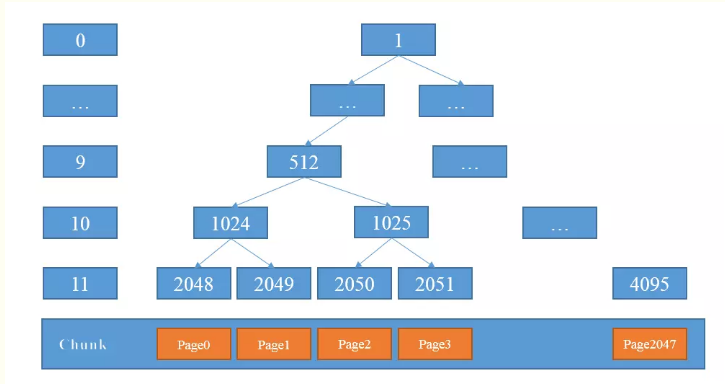
比如MemoryMap[1024] = 10, MemoryMap[2048] = 11. 好了,这个说完了,我们继续看:
1     long allocate(int normCapacity) {
2         if ((normCapacity & subpageOverflowMask) != 0) { // >= pageSize  >= 8K
3             return allocateRun(normCapacity);
4         } else {
5             return allocateSubpage(normCapacity); // < 8K
6         }
7     }
 1     private long allocateSubpage(int normCapacity) {
 2         // Obtain the head of the PoolSubPage pool that is owned by the PoolArena and synchronize on it.
 3         // This is need as we may add it back and so alter the linked-list structure.
 4         PoolSubpage<T> head = arena.findSubpagePoolHead(normCapacity); // 根据请求内存大小,获取下标,然后获取对应的subPage
 5         synchronized (head) {
 6             int d = maxOrder; // 最大层数 11
 7             int id = allocateNode(d);  // 分配节点,修改涉及节点层数, 具体看下面的分析
 8             if (id < 0) { // 无可分配节点
 9                 return id;
10             }
11
12             final PoolSubpage<T>[] subpages = this.subpages;
13             final int pageSize = this.pageSize;
14
15             freeBytes -= pageSize;// 16M(初始化值,后面会逐渐减少) - 8K
16
17             int subpageIdx = subpageIdx(id); // 2048 对应的偏移量是 0 , 2049 对应的偏移量是 1 。。。4095 对应偏移量是 2047
18             PoolSubpage<T> subpage = subpages[subpageIdx]; // 取对应下标的 subpage
19             if (subpage == null) {
20                 subpage = new PoolSubpage<T>(head, this, id, runOffset(id), pageSize, normCapacity); // 创建PoolSubpage
21                 subpages[subpageIdx] = subpage;
                   // 新建或初始化subpage并加入到chunk的subpages数组,同时将subpage加入到arena的subpage双向链表中,最后完成分配请求的内存。
                   // 代码中,subpage != null的情况产生的原因是:subpage初始化后分配了内存,但一段时间后该subpage分配的内存释放并从arena的双向链表中删除,
                   // 此时subpage不为null,当再次请求分配时,只需要调用init()将其加入到areana的双向链表中即可。

22             } else {
23                 subpage.init(head, normCapacity);
24             }
25             return subpage.allocate(); // 最后结果是一个long整数,其中低32位表示二叉树中的分配的节点,高32位表示subPage中分配的具体位置
26         }
27     }
修改节点对应的层数,底下这个方法涉及了很多的位运算,这里大家要仔细琢磨。
 1     private int allocateNode(int d) { // d = 11
 2         int id = 1;
 3         int initial = - (1 << d); // -2048
 4         byte val = value(id); // memoryMap[id] , 一般1对应的层数是 0 ,当第一个节点被分配完成后,这个节点的值会变成12
 5         if (val > d) { // unusable // 如果分配完成,那么无法进行分配,那么就是 12 > 11 ,直接返回 -1
 6             return -1;
 7         }
 8         while (val < d || (id & initial) == 0) { // id & initial == 1 << d for all ids at depth d, for < d it is 0
 9             id <<= 1; // 左移1位
10             val = value(id); // 取到节点对应的层数
11             if (val > d) { // 如果当前的值大于层数,也就是说左子节点用完了
12                 id ^= 1; // 当前节点值 +1 ,取右节点
13                 val = value(id); // 取右子节点
14             }
15         }
16         byte value = value(id);
17         assert value == d && (id & initial) == 1 << d : String.format("val = %d, id & initial = %d, d = %d",
18                 value, id & initial, d);
19         setValue(id, unusable); // mark as unusable //将该节点的值设置为12,不可用
20         updateParentsAlloc(id); // 将该节点对应的所有父节点,层数全部 + 1
21         return id;
22     }
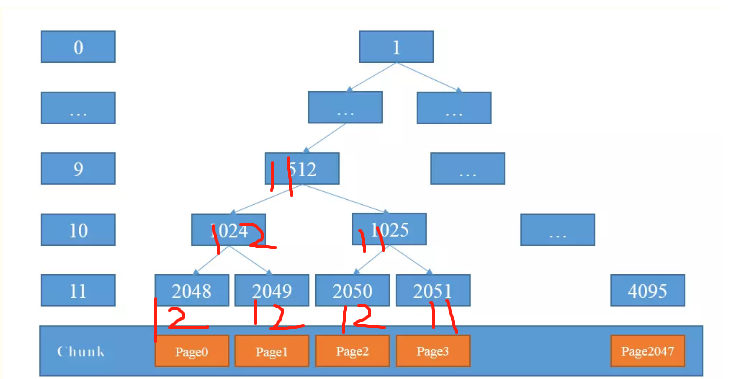
 1     private void updateParentsAlloc(int id) {
 2         while (id > 1) {
 3             int parentId = id >>> 1; // 取父级节点
 4             byte val1 = value(id); //
 5             byte val2 = value(id ^ 1); // 如果 id = 2048 那么 id ^ 1 = 2049 ,  如果 id = 2049 这里  id ^ 1 = 2048 这里一定要注意!!!
 6             byte val = val1 < val2 ? val1 : val2;
 7             setValue(parentId, val);  // 修改父级对应层数
 8             id = parentId;
 9         }
10     }
上面这个方法很有意思,大家要仔细体会,我举个例子
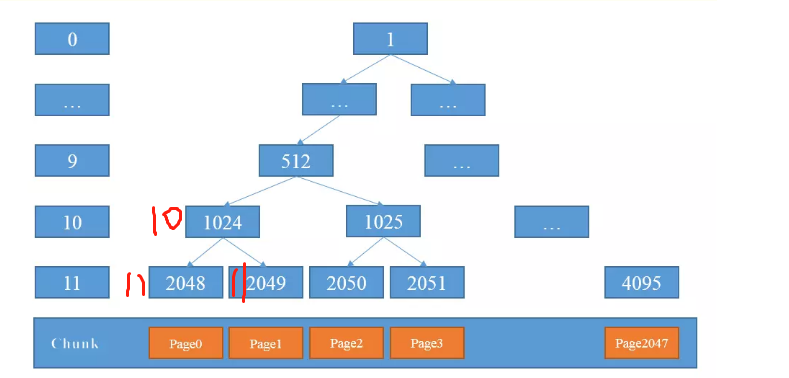
最开始是这样的,我们开始第一次分配,那么就是2048号节点,分配完成后会变成

这时候由于2048变成了12,不可用状态,那么取右节点进行分配
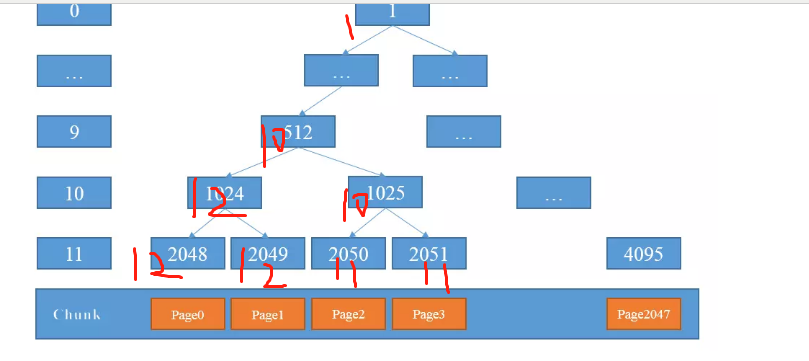
下一次再进行分配的时候, 发现 1024 是 12 ,那么取右子节点, 是 1025 = 10 ,因为 10 < 11 所以再次进入循环,找到2050节点,对应层数是 11 < 12 ,则分配 2050节点分配后变成
然后依次类推。
1     private long allocateRun(int normCapacity) {
2         int d = maxOrder - (log2(normCapacity) - pageShifts); // 计算满足需求的节点的高度 比如 16K , 那么 就是 d= 11 - (14 - 13) = 10
3         int id = allocateNode(d); // 从第十层找空闲节点, 原理跟上面相同,就不说了
4         if (id < 0) {
5             return id;
6         }
7         freeBytes -= runLength(id); // 分配后剩余的字节数
8         return id;
9     }
说到这里,内存模型的重点部分算是说完了。如果整个Netty系列有任何不对的地方,欢迎大家指出,我会虚心改正。
后面呢,我将打算将Spring的源码的关键部分进行分析,期间也会穿插着对Redis的底层数据结构等重要内容进行分析。有需要的童鞋们,记得关注我,随时可以获取最新的消息。
谢谢。