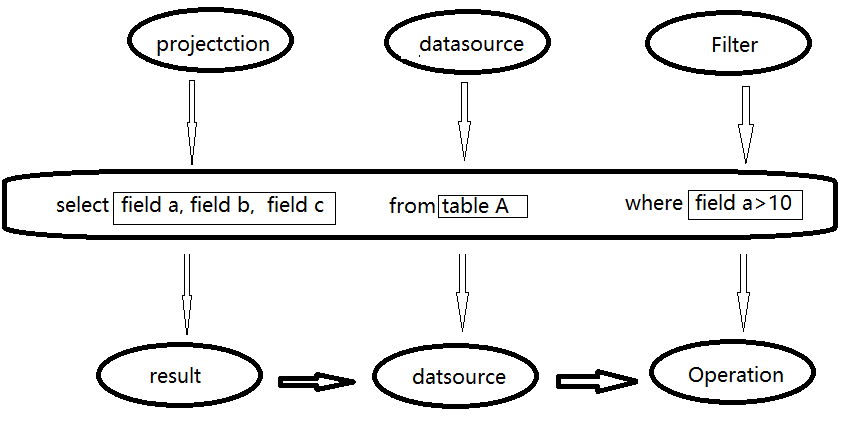
传统关系型数据库中 ,最基本的sql查询语句由projecttion (field a,field b,field c) , datasource (table A) 和 fieter (field a >10) 三部分组成。 分别对应了sql查询过程中的result , datasource和operation ,也就是按照result ——> datasource ——> operation 的顺序来描述,如下图所示:
但是sql实际执行过程是按照operation——> datasource——>result 的顺序来执行的这与sql语法正好相反,具体的执行过程如下:
1 . 语法和词法解析:对写入的sql语句进行词法和语法解析(parse),分辨出sql语句在哪些是关键词(如select ,from 和where),哪些是表达式,哪些是projection ,哪些是datasource等,判断SQL语法是否规范,并形成逻辑计划。
2 .绑定:将SQL语句和数据库的数据字典(列,表,视图等)进行绑定(bind),如果相关的projection和datasource等都在的话,则表示这个SQL语句是可以执行的。
3 .优化(optimize):一般的数据库会提供几个执行计划,这些计划一般都有运行统计数据,数据库会在这些计划中选择一个最优计划。
4 .执行(execute):执行前面的步骤获取最有执行计划,返回查询的数据集。
SparkSQL的运行架构:
Spark SQL对SQL语句的处理和关系型数据库采用了类似的方法,sparksql先会将SQL语句进行解析(parse)形成一个Tree,然后使用Rule对Tree进行绑定,优化等处理过程,通过模式匹配对不同类型的节点采用不同操作。而sparksql的查询优化器是catalyst,它负责处理查询语句的解析,绑定,优化和生成物理执行计划等过程,catalyst是sparksql最核心部分。
Spark SQL由core,catalyst,hive和hive-thriftserver4个部分组成。
- core: 负责处理数据的输入/输出,从不同的数据源获取数据(如RDD,Parquet文件和JSON文件等),然后将结果查询结果输出成Data Frame。
- catalyst: 负责处理查询语句的整个处理过程,包括解析,绑定,优化,生成物理计划等。
- hive: 负责对hive数据的处理。
- hive-thriftserver:提供client和JDBC/ODBC等接口。
运行原理原理分析:
1.使用SesstionCatalog保存元数据
在解析sql语句前需要初始化sqlcontext,它定义sparksql上下文,在输入sql语句前会加载SesstionCatalog,初始化sqlcontext时会把元数据保存在SesstionCatalog中,包括库名,表名,字段,字段类型等。这些数据将在解析未绑定的逻辑计划上使用。
2.使用Antlr生成未绑定的逻辑计划
Spark2.0版本起使用Antlr进行词法和语法解析,Antlr会构建一个按照关键字生成的语法树,也就是生成的未绑定的逻辑计划。
3.使用Analyzer绑定逻辑计划
在这个阶段Analyzer 使用Analysis Rules,结合SessionCatalog元数据,对未绑定的逻辑计划进行解析,生成已绑定的逻辑计划。
4.使用Optimizer优化逻辑计划
Opetimize(优化器)的实现和处理方式同Analyzer类似,在该类中定义一系列Rule,利用这些Rule对逻辑计划和Expression进行迭代处理,达到树的节点的合并和优化。
5.使用SparkPlanner生成可执行计划的物理计划
SparkPlanner使用Planning Strategies对优化的逻辑计划进行转化,生成可执行的物理计划。
6.使用QueryExecution执行物理计划
主要是通过sqlContext.sql() 这个方法作为一个入口。
在这之前先得知道一句SQL传到 sql()这个方法里面后要经历好几次转换, 最终生成一个executedPlan去执行。
总的过程分下面几步:
1.通过Sqlparse 转成unresolvedLogicplan
2.通过Analyzer转成 resolvedLogicplan
3.通过optimizer转成 optimzedLogicplan
4.通过sparkplanner转成physicalLogicplan
5.通过prepareForExecution 转成executable logicplan
6.通过toRDD等方法执行executedplan去调用tree的doExecute
借用一个图, 懒得自己画了:

现在那么先从sqlContext.sql进来看到:
  def sql(sqlText: String): DataFrame = {
    DataFrame(this, parseSql(sqlText))
  }
构造了一个DF, 点进去看到里面new 了一个DF:
private[sql] object DataFrame {
  def apply(sqlContext: SQLContext, logicalPlan: LogicalPlan): DataFrame = {
    new DataFrame(sqlContext, logicalPlan)
  }
}
传入的Logicalplan是在DF object里面执行parseSql(sqlText)而获取的, 那么这里是怎么拿到这个logicalplan的呢, 点进去看一下其实他调的是sqlContext里面的parseSql
protected[sql] def parseSql(sql: String): LogicalPlan = ddlParser.parse(sql, false)
这里就拿一个select语句来看一下最终的executable plan是怎么生成的:
parseSql 是 ddlParser.parse(sql, false), ddlParser其实就是:
protected[sql] val ddlParser = new DDLParser(sqlParser.parse(_))
所以调用的是DDLParser类里面的parse 方法, 看一下这个方法是怎么写的:
  def parse(input: String, exceptionOnError: Boolean): LogicalPlan = {
    try {
      parse(input)
    } catch {
      case ddlException: DDLException => throw ddlException
      case _ if !exceptionOnError => parseQuery(input)
      case x: Throwable => throw x
    }
  }
其实是调用了父类AbstractSparkSQLParser 的parse方法, 看一下这个方法是怎么写的:
def parse(input: String): LogicalPlan = synchronized {
    // Initialize the Keywords.
    initLexical
    phrase(start)(new lexical.Scanner(input)) match {
      case Success(plan, _) => plan
      case failureOrError => sys.error(failureOrError.toString)
    }
  }
里面主要做了两件事:
1.执行 start方法
2.通过lexical.Scanner(input) 来对input进行解析, 符合query模式就返回success
这个start方法是在DDLParser类里面定义的, 看一下:
  protected lazy val ddl: Parser[LogicalPlan] = createTable | describeTable | refreshTable

  protected def start: Parser[LogicalPlan] = ddl
可以看到start其实就是去判断是不是 这三种语句createTable describeTable refreshTable, 方法里面怎么写的就自己进去看一下了, 反正我们用select语句的话, 明显不是上面三种类型之一, 那么不是上面三种类型的话 #2步就不会返回success, 所以是会去执行 case failureOrError => sys.error(failureOrError.toString), 抛出一个异常, 那么在DDLParser里面接收到异常, 就会跑到catch里面 去执行:
case _ if !exceptionOnError => parseQuery(input)
看一下DDLParser里面parseQuery是怎么来的:
class DDLParser(parseQuery: String => LogicalPlan)
  extends AbstractSparkSQLParser with DataTypeParser with Logging {
...
}
可以看到是在创建DDLParser的时候传入的, 那么在sqlContext里面DDLParser是怎么声明的呢:
protected[sql] val ddlParser = new DDLParser(sqlParser.parse(_))
传入的是一个sqlParser.parse(_)
所以回去调用sqlParser的parse方法, sqlParser是这样创建的:
protected[sql] val sqlParser = new SparkSQLParser(getSQLDialect().parse(_))
所以会去调用SparkSQLParser里面定义的parse方法, 但是看这个类里面没有重写parser的方法, 所以一样还是调用父类AbstractSparkSQLParser的parse方法:
  def parse(input: String): LogicalPlan = synchronized {
    // Initialize the Keywords.
    initLexical
    phrase(start)(new lexical.Scanner(input)) match {
      case Success(plan, _) => plan
      case failureOrError => sys.error(failureOrError.toString)
    }
  }
那样的话还是会去执行start, 这个start就是在SparkSQLParser里面定义的:
override protected lazy val start: Parser[LogicalPlan] =
    cache | uncache | set | show | desc | others
看到start里面会去判断是不是cache uncache set show desc , 如果不是就会去调用others, select语句明显不是上面的任意一种, 所以 直接去看others怎么定义的:
  private lazy val others: Parser[LogicalPlan] =
    wholeInput ^^ {
      case input => fallback(input)
    }
注意这个是lazy, 所以只有在job被提交后才会真正执行
会直接去调用fallback, fallback是在创建SparkSQLParser的时候传入的:
class SparkSQLParser(fallback: String => LogicalPlan) extends AbstractSparkSQLParser {...}
那么就要到SQLContext里面去看这个fallback到底是什么了:
protected[sql] val sqlParser = new SparkSQLParser(getSQLDialect().parse(_))
好了 select语句又被传到了getSQLDialect().parse(_)去执行, getSQLDialect:
  protected[sql] def dialectClassName = if (conf.dialect == "sql") {
    classOf[DefaultParserDialect].getCanonicalName
  } else {
    conf.dialect
  }

protected[sql] def getSQLDialect(): ParserDialect = {
    try {
      val clazz = Utils.classForName(dialectClassName)
      clazz.newInstance().asInstanceOf[ParserDialect]
    } catch {
      case NonFatal(e) =>
        // Since we didn't find the available SQL Dialect, it will fail even for SET command:
        // SET spark.sql.dialect=sql; Let's reset as default dialect automatically.
        val dialect = conf.dialect
        // reset the sql dialect
        conf.unsetConf(SQLConf.DIALECT)
        // throw out the exception, and the default sql dialect will take effect for next query.
        throw new DialectException(
          s"""Instantiating dialect '$dialect' failed.
             |Reverting to default dialect '${conf.dialect}'""".stripMargin, e)
    }
  }
实际是执行DefaultParserDialect的parser方法:
private[spark] class DefaultParserDialect extends ParserDialect {
  @transient
  protected val sqlParser = SqlParser

  override def parse(sqlText: String): LogicalPlan = {
    sqlParser.parse(sqlText)
  }
}
可以看到他实际是执行SqlParser的parse方法, 那么SqlParser里面parse是怎么写的, 可以看到里面没有重写parse方法, 那么继续调用start, start的定义如下:
  protected lazy val start: Parser[LogicalPlan] =
    start1 | insert | cte

  protected lazy val start1: Parser[LogicalPlan] =
    (select | ("(" ~> select <~ ")")) *
    ( UNION ~ ALL        ^^^ { (q1: LogicalPlan, q2: LogicalPlan) => Union(q1, q2) }
    | INTERSECT          ^^^ { (q1: LogicalPlan, q2: LogicalPlan) => Intersect(q1, q2) }
    | EXCEPT             ^^^ { (q1: LogicalPlan, q2: LogicalPlan) => Except(q1, q2)}
    | UNION ~ DISTINCT.? ^^^ { (q1: LogicalPlan, q2: LogicalPlan) => Distinct(Union(q1, q2)) }
    )
可以看到里面的start1其实就是匹配到了select语句, 那么我们的select最后会通过start1的方法去生成一个unresolvedlogicalplan
那么有了unresolvedlogicalplan后我们去看DataFrame是怎么被构造出来的:
class DataFrame private[sql](
    @transient override val sqlContext: SQLContext,
    @DeveloperApi @transient override val queryExecution: QueryExecution)
  extends Queryable with Serializable {

  // Note for Spark contributors: if adding or updating any action in `DataFrame`, please make sure
  // you wrap it with `withNewExecutionId` if this actions doesn't call other action.

  /**
   * A constructor that automatically analyzes the logical plan.
   *
   * This reports error eagerly as the [[DataFrame]] is constructed, unless
   * [[SQLConf.dataFrameEagerAnalysis]] is turned off.
   */
  def this(sqlContext: SQLContext, logicalPlan: LogicalPlan) = {
    this(sqlContext, {
      val qe = sqlContext.executePlan(logicalPlan)
      if (sqlContext.conf.dataFrameEagerAnalysis) {
        qe.assertAnalyzed()  // This should force analysis and throw errors if there are any
      }
      qe
    })
  }

....
}
new出来DataFrame后回去调用def this(sqlContext: SQLContext, logicalPlan: LogicalPlan)这个构造函数, 这个构造函数其实是创建了返回了DataFrame本身, 但是传入参数为sqlContext, 和一个queryexecution (qe), qe的传入参数为unresolvedlogicplan
这个queryexecution就是这部分代码:
val qe = sqlContext.executePlan(logicalPlan)
      if (sqlContext.conf.dataFrameEagerAnalysis) {
        qe.assertAnalyzed()  // This should force analysis and throw errors if there are any
      }
      qe
我们看一下queryExecution是怎么写的:
class QueryExecution(val sqlContext: SQLContext, val logical: LogicalPlan) {

  def assertAnalyzed(): Unit = sqlContext.analyzer.checkAnalysis(analyzed)

  lazy val analyzed: LogicalPlan = sqlContext.analyzer.execute(logical)

  lazy val withCachedData: LogicalPlan = {
    assertAnalyzed()
    sqlContext.cacheManager.useCachedData(analyzed)
  }

  lazy val optimizedPlan: LogicalPlan = sqlContext.optimizer.execute(withCachedData)

  lazy val sparkPlan: SparkPlan = {
    SQLContext.setActive(sqlContext)
    sqlContext.planner.plan(optimizedPlan).next()
  }

  // executedPlan should not be used to initialize any SparkPlan. It should be
  // only used for execution.
  lazy val executedPlan: SparkPlan = sqlContext.prepareForExecution.execute(sparkPlan)

  /** Internal version of the RDD. Avoids copies and has no schema */
  lazy val toRdd: RDD[InternalRow] = executedPlan.execute()

  protected def stringOrError[A](f: => A): String =
    try f.toString catch { case e: Throwable => e.toString }

  def simpleString: String = {
    s"""== Physical Plan ==
       |${stringOrError(executedPlan)}
      """.stripMargin.trim
  }

  override def toString: String = {
    def output =
      analyzed.output.map(o => s"${o.name}: ${o.dataType.simpleString}").mkString(", ")

    s"""== Parsed Logical Plan ==
       |${stringOrError(logical)}
       |== Analyzed Logical Plan ==
       |${stringOrError(output)}
       |${stringOrError(analyzed)}
       |== Optimized Logical Plan ==
       |${stringOrError(optimizedPlan)}
       |== Physical Plan ==
       |${stringOrError(executedPlan)}
    """.stripMargin.trim
  }
}
这个类是理解整个sql解析过程的关键, 传入对象是一个unresolvedlogicplan, 首先他会去调用sqlContext的analyzer去生成一个resolvedlogicplan:
lazy val analyzed: LogicalPlan = sqlContext.analyzer.execute(logical)
也是lazy的, 会在job提交后执行。 我们看一下analyzer是怎么定义的:
  protected[sql] lazy val analyzer: Analyzer =
    new Analyzer(catalog, functionRegistry, conf) {
      override val extendedResolutionRules =
        ExtractPythonUDFs ::
        PreInsertCastAndRename ::
        (if (conf.runSQLOnFile) new ResolveDataSource(self) :: Nil else Nil)

      override val extendedCheckRules = Seq(
        datasources.PreWriteCheck(catalog)
      )
    }
new了一个Analyzer, 然后重写了extendedResolutionRules , analyzer里面主要定义了一个batches, 这个batches其实就是一些对传入的tree(logicplan)进行解析的各种rule, 在analyzer里面的rule是这样的:
  val extendedResolutionRules: Seq[Rule[LogicalPlan]] = Nil

  lazy val batches: Seq[Batch] = Seq(
    Batch("Substitution", fixedPoint,
      CTESubstitution,
      WindowsSubstitution),
    Batch("Resolution", fixedPoint,
      ResolveRelations ::
      ResolveReferences ::
      ResolveGroupingAnalytics ::
      ResolvePivot ::
      ResolveUpCast ::
      ResolveSortReferences ::
      ResolveGenerate ::
      ResolveFunctions ::
      ResolveAliases ::
      ExtractWindowExpressions ::
      GlobalAggregates ::
      ResolveAggregateFunctions ::
      HiveTypeCoercion.typeCoercionRules ++
      extendedResolutionRules : _*),
    Batch("Nondeterministic", Once,
      PullOutNondeterministic,
      ComputeCurrentTime),
    Batch("UDF", Once,
      HandleNullInputsForUDF),
    Batch("Cleanup", fixedPoint,
      CleanupAliases)
  )
里面有一个ResolveRelations , 看一下这个rule就会明白为什么网上好多资料会说analyzer是吧unresolvedlogicplan和catalog绑定生成resolvedlogicplan:
object ResolveRelations extends Rule[LogicalPlan] {
    def getTable(u: UnresolvedRelation): LogicalPlan = {
      try {
        catalog.lookupRelation(u.tableIdentifier, u.alias)
      } catch {
        case _: NoSuchTableException =>
          u.failAnalysis(s"Table not found: ${u.tableName}")
      }
    }
那么这些batches是怎么被调用的呢, 得看anzlyer的execute方法了:
def execute(plan: TreeType): TreeType = {
    var curPlan = plan

    batches.foreach { batch =>
      val batchStartPlan = curPlan
      var iteration = 1
      var lastPlan = curPlan
      var continue = true

      // Run until fix point (or the max number of iterations as specified in the strategy.
      while (continue) {
        curPlan = batch.rules.foldLeft(curPlan) {
          case (plan, rule) =>
            val startTime = System.nanoTime()
            val result = rule(plan)
            val runTime = System.nanoTime() - startTime
            RuleExecutor.timeMap.addAndGet(rule.ruleName, runTime)

            if (!result.fastEquals(plan)) {
              logTrace(
                s"""
                  |=== Applying Rule ${rule.ruleName} ===
                  |${sideBySide(plan.treeString, result.treeString).mkString("
")}
                """.stripMargin)
            }

            result
        }
        iteration += 1
        if (iteration > batch.strategy.maxIterations) {
          // Only log if this is a rule that is supposed to run more than once.
          if (iteration != 2) {
            logInfo(s"Max iterations (${iteration - 1}) reached for batch ${batch.name}")
          }
          continue = false
        }

        if (curPlan.fastEquals(lastPlan)) {
          logTrace(
            s"Fixed point reached for batch ${batch.name} after ${iteration - 1} iterations.")
          continue = false
        }
        lastPlan = curPlan
      }

      if (!batchStartPlan.fastEquals(curPlan)) {
        logDebug(
          s"""
          |=== Result of Batch ${batch.name} ===
          |${sideBySide(plan.treeString, curPlan.treeString).mkString("
")}
        """.stripMargin)
      } else {
        logTrace(s"Batch ${batch.name} has no effect.")
      }
    }

    curPlan
  }
这个比较复杂, 传入的是unresolvedLogicplan, 然后会对上面定义的batches进行遍历, 确保每个rule都做一遍:
batches.foreach { ...}
再每个batch里面执行foldLeft(curPlan)
所以第一次的时候 case里面的(plan, rule)其实就是(curPlan, 第一个rule)
通过val result = rule(plan) 对当前的plan 做rule, 返回的结果当成下一次的curplan执行直到所有的rule都做完, 得到最总的curPlan
然后会去判断是否还要执行一遍, 以保证所有的node都执行到了这些rule, 有个iteration来记录执行了多少次, 然后和strategy来做对比:
strategy主要有这几种:
Once
FixedPoint(maxIterations: Int)
初始化maxIterations = 1
strategy实在batch创建的时候传入的, 列子:
Batch("UDF", Once,
      HandleNullInputsForUDF)
当所有的rule都执行了strategy规定的次数后, 就返回一个新的sparkplan。
analyzer这边执行完后, 传入的unresolvedlogicplan就变成了resolvedlogicplan。
然后会看一下这个resolvedlogicplan是不是可以用cachedata, 如果其中有在cache里面的就直接替换掉:
lazy val withCachedData: LogicalPlan = {
    assertAnalyzed()
    sqlContext.cacheManager.useCachedData(analyzed)
  }
然后再通过optimizer把resolvedlogicplan变成一个optimzedLogicplan:
具体调用过程和analyzer一样, 就不重复了:
lazy val optimizedPlan: LogicalPlan = sqlContext.optimizer.execute(withCachedData)
再通过sparkplaner转成physicalplan:
  lazy val sparkPlan: SparkPlan = {
    SQLContext.setActive(sqlContext)
    sqlContext.planner.plan(optimizedPlan).next()
  }
然后通过通过prepareForExecution转成executebleplan:
lazy val executedPlan: SparkPlan = sqlContext.prepareForExecution.execute(sparkPlan)
到这里为止就生成了一个可以执行的物理计划, 这个物理计划会在toRdd的时候执行:
lazy val toRdd: RDD[InternalRow] = executedPlan.execute()
可以看到一路下来都是lazy的, 所以只有在job真正提交后才会交由spark 去做这些事,
execute方法里面其实就是调用了物理计划的toexecute方法:
protected def doExecute(): RDD[InternalRow]

  final def execute(): RDD[InternalRow] = {
    if (children.nonEmpty) {
      val hasUnsafeInputs = children.exists(_.outputsUnsafeRows)
      val hasSafeInputs = children.exists(!_.outputsUnsafeRows)
      assert(!(hasSafeInputs && hasUnsafeInputs),
        "Child operators should output rows in the same format")
      assert(canProcessSafeRows || canProcessUnsafeRows,
        "Operator must be able to process at least one row format")
      assert(!hasSafeInputs || canProcessSafeRows,
        "Operator will receive safe rows as input but cannot process safe rows")
      assert(!hasUnsafeInputs || canProcessUnsafeRows,
        "Operator will receive unsafe rows as input but cannot process unsafe rows")
    }
    RDDOperationScope.withScope(sparkContext, nodeName, false, true) {
      prepare()
      doExecute()
    }
  }
里面的doExecute方法只是一个声明, 其实现实在所有的sparkplan中实现的, 比如说实在所有的LeafNode UnaryNode BinaryNode的实现类里面实现的, 随便找一个列子:
case class Limit(limit: Int, child: SparkPlan)
  extends UnaryNode {
  // TODO: Implement a partition local limit, and use a strategy to generate the proper limit plan:
  // partition local limit -> exchange into one partition -> partition local limit again

  /** We must copy rows when sort based shuffle is on */
  private def sortBasedShuffleOn = SparkEnv.get.shuffleManager.isInstanceOf[SortShuffleManager]

  override def output: Seq[Attribute] = child.output
  override def outputPartitioning: Partitioning = SinglePartition

  override def executeCollect(): Array[InternalRow] = child.executeTake(limit)

  protected override def doExecute(): RDD[InternalRow] = {
    val rdd: RDD[_ <: Product2[Boolean, InternalRow]] = if (sortBasedShuffleOn) {
      child.execute().mapPartitionsInternal { iter =>
        iter.take(limit).map(row => (false, row.copy()))
      }
    } else {
      child.execute().mapPartitionsInternal { iter =>
        val mutablePair = new MutablePair[Boolean, InternalRow]()
        iter.take(limit).map(row => mutablePair.update(false, row))
      }
    }
    val part = new HashPartitioner(1)
    val shuffled = new ShuffledRDD[Boolean, InternalRow, InternalRow](rdd, part)
    shuffled.setSerializer(new SparkSqlSerializer(child.sqlContext.sparkContext.getConf))
    shuffled.mapPartitionsInternal(_.take(limit).map(_._2))
  }
}
这里的doExecute就返回了一个RDD
原文地址:https://www.iteye.com/blog/humingminghz-2311549
原文地址:https://www.cnblogs.com/db-record/p/11832285.html