1. 介绍
Zygote是Android系统创建新进程的核心进程,负责启动Dalvik虚拟机,加载一些必要的系统资源和系统类,启动system_server进程,随后进入等待处理app应用请求
Zygote涉及的主要代码如下
frameworks/base/cmds/app_process/App_main.cpp
frameworks/base/core/jni/AndroidRuntime.cpp

frameworks/base/core/java/com/android/internal/os/
  - Zygote.java
  - ZygoteInit.java
  - ZygoteServer.java
  - ZygoteConnection.java
2. 启动
Zygote进程由init启动,在笔者开发板上是以app_process64为主模式,app_process为辅
# /vendor/default.prop
ro.zygote=zygote64_32

# /init.rc
import /init.${ro.zygote}.rc
on zygote-start && property:ro.crypto.state=...
    # A/B update verifier that marks a successful boot.
    exec_start update_verifier_nonencrypted
    start netd
    start zygote
    start zygote_secondary

# /init.zygote64_32.rc
service zygote /system/bin/app_process64 -Xzygote /system/bin --zygote --start-system-server --socket-name=zygote
    class main
    priority -20
    user root
    group root readproc reserved_disk
    socket zygote stream 660 root system
    onrestart write /sys/android_power/request_state wake
    onrestart write /sys/power/state on
    onrestart restart audioserver
    onrestart restart cameraserver
    onrestart restart media
    onrestart restart netd
    onrestart restart wificond
    writepid /dev/cpuset/foreground/tasks

service zygote_secondary /system/bin/app_process32 -Xzygote /system/bin --zygote --socket-name=zygote_secondary --enable-lazy-preload
    class main
    priority -20
    user root
    group root readproc reserved_disk
    socket zygote_secondary stream 660 root system
    onrestart restart zygote
    writepid /dev/cpuset/foreground/tasks
属性 ro.zygote 的值包括zygote32、zygote64、zygote32_64、zygote64_32,对应区别如下:
- init.zygote32.rc:zygote进程对应的执行程序是app_process(纯32bit模式)
- init.zygote64.rc:zygote进程对应的执行程序是app_process64(纯64bit模式)
- init.zygote32_64.rc:启动两个zygote进程,对应的执行程序分别是app_process32(主模式)、app_process64
- init.zygote64_32.rc:启动两个zygote进程,对应的执行程序分别是app_process64(主模式)、app_process32
3. app_process
zygote和zygote_secondary其实大同小异,都是执行/system/bin/app_process,其执行的的应用及参数如下
app_process64 -Xzygote /system/bin --zygote --start-system-server --socket-name=zygote
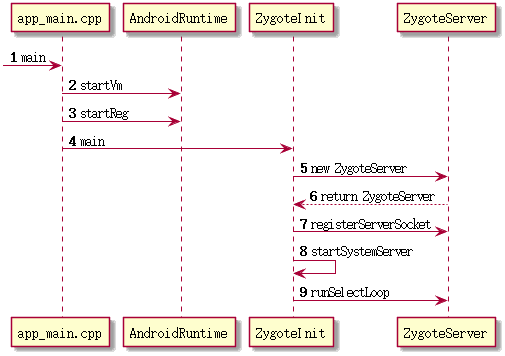
这里以app_process作为切入点来看看其主要流程

main()
    AppRuntime::AppRuntime()
        AndroidRuntime::AndroidRuntime()
            SkGraphics::Init()
    // 创建Dalvik缓存
    maybeCreateDalvikCache()
    AndroidRuntime::start("com.android.internal.os.ZygoteInit", args, )
        // JniInvocation位于libnativehelper
        JniInvocation::JniInvocation()
        /*
         * 初始化虚拟机环境
         * - 加载libart.so, 由art/runtime生成
         * - 导出JNI_GetDefaultJavaVMInitArgs
         * - 导出JNI_CreateJavaVM
         * - 导出JNI_GetCreatedJavaVMs
         */
        JniInvocation::Init(NULL)
        AndroidRuntime::startVm(JavaVM, JNIEnv,)
            // 获取虚拟机参数
            AndroidRuntime::parseRuntimeOption()
            // 位于libnativehelper ???
            JNI_CreateJavaVM()
                JniInvocation::JNI_CreateJavaVM()
        AppRuntime::onVmCreated()
        // 向VM注册native函数
        AndroidRuntime::startReg()
            /*
             * 依次注册预定义的gRegJNI列表, 包括
             *   frameworks/base/core/jni/android_xxx.cpp
             *   frameworks/base/core/jni/com_xxx.cpp
             * 下面以android_util_Process.cpp为例
             */
            register_jni_procs(gRegJNI)
                register_android_os_Process()
                    /*
                     * 注册 android.os.Process 类
                     * 注册 android.os.Process.setUid 方法
                     * ...
                     *
                     * static const JNINativeMethod methods[] = {
                     *     ...
                     *     {"setUid", "(I)I", (void*)android_os_Process_setUid},
                     *     ...
                     * };
                     */
                    RegisterMethodsOrDie(env, "android/os/Process", methods,)
                        AndroidRuntime::registerNativeMethods(env, className, methods, )
                            jniRegisterNativeMethods()
                                JNINativeInterface::RegisterNatives()
        /*
         * 找到入口com.android.internal.os.ZygoteInit(在register_jni_procs中注册)
         */
        JNIEnv::FindClass("com/android/internal/os/ZygoteInit")
        // 找到入口类的main函数
        JNIEnv::GetStaticMethodID(jclass, "main")
        // 执行com.android.internal.os.ZygoteInit.main()
        JNIEnv::CallStaticVoidMethod(jclass, jmethodID, jobjectArray)
接下来就是ZygoteInit的执行过程
ZygoteInit.main()
    /*
     * 在init.zygote*.rc中注册了zygote套接字
     * init进程在启动service时会添加环境变量
     * 环境变量: "ANDROID_SOCKET_zygote"
     *
     * 从环境变量中获取socket的fd
     * 通过LocalServerSocket()创建服务端
     */
    ZygoteServer::registerServerSocketFromEnv("zygote")
    // FIXME: Add More
    ZygoteInit::preload()
    // 主动进行GC操作
    ZygoteInit::gcAndFinalize()
    Zygote::nativeSecurityInit()
        com_android_internal_os_Zygote_nativeSecurityInit()
    Zygote::nativeUnmountStorageOnInit()
        com_android_internal_os_Zygote_nativeUnmountStorageOnInit()
    /*
     * 启动SystemServer, 重命名为system_server
     */
    ZygoteInit::forkSystemServer()
        Zygote::forkSystemServer()
            Zygote::nativeForkSystemServer()
                com_android_internal_os_Zygote_nativeForkSystemServer()
                    ForkAndSpecializeCommon()
                        fork()
                        // 子进程: com.android.internal.os.Zygote
                        JNIENV::CallStaticVoidMethod("com/android/internal/os/Zygote")
        // 子进程: FIXME: Add More
        ZygoteInit::handleSystemServerProcess()
            ZygoteInit::zygoteInit(, "com.android.server.SystemServer", )
                RuntimeInit::commonInit()
                ZygoteInit::nativeZygoteInit()
                    com_android_internal_os_ZygoteInit_nativeZygoteInit()
                        AppRuntime::onZygoteInit()
                RuntimeInit::applicationInit()
                    RuntimeInit::findStaticMain("com.android.server.SystemServer", , )
        // 执行com.android.server.SystemServer.main()
        MethodAndArgsCaller.run()
    /*
     * 监听zygote socket
     * 等待客户端消息并处理
     * ZygoteConnection用于表示和客户端的连接
     */
    ZygoteServer::runSelectLoop()
        ZygoteConnection::processOneCommand()
TIP: app_process有两种启动模式,都是调用AppRuntime::start(),加载ZygoteInit或RuntimeInit两个Java类
- Zygote模式: 即初始化zygote进程,也即上面分析的流程
- Application模式: 即启动普通应用程序,传递的参数有class名字以及class带的参数
4. SystemServer
Zygote启动过程中fork了一个新进程用于启动com.android.server.SystemServer,即SystemServer,文件路径如下
frameworks/base/services/java/com/android/server/SystemServer.javaSystemServer(进程名为system_server)是android服务的提供者,所有service运行在该进程中,主要流程如下
SystemServer::main()
    SystemServer::run()
        /*
         * 一些准备工作
         */
        Looper.prepareMainLooper()
        /*
         * 初始化native服务
         *  libandroid_servers
         *    <- libservices.core
         *  由[frameworks/base/services/core/jni/*]编译生成
         */
        System::loadLibrary("android_servers");
            // 位于frameworks/base/services/core/jni/onload.cpp
            JNI_OnLoad()
                register_android_server_broadcastradio_BroadcastRadioService()
                register_android_server_broadcastradio_Tuner()
                register_android_server_PowerManagerService()
                    /*
                     * 向com.android.server.power.PowerManagerService注册native方法
                     *   2rd参数: "com/android/server/power/PowerManagerService"
                     *   3rd参数: gPowerManagerServiceMethods
                     *   4rd参数: NELEM(gPowerManagerServiceMethods)
                     */
                    jniRegisterNativeMethods(JNIEnv, , ,)
                register_android_server_SerialService()
                ...
        // FIXME
        SystemServer::performPendingShutdown()
        // 初始化系统上下文
        SystemServer::createSystemContext()
            ActivityThread::systemMain()
                new ActivityThread()
                // FIXME: a lot thing seems done
                ActivityThread::attach(true, 0)
            ActivityThread::getSystemContext()
        mSystemServiceManager = new SystemServiceManager()
        /*
         * 区别于BinderService, Localservice只在本进程使用
         */
        LocalServices.addService(SystemServiceManager.class, mSystemServiceManager)

        /*
         * 启动关键服务
         */
        startBootstrapServices();
            // FIXME: 读取系统配置
            SystemServerInitThreadPool.get().submit(SystemConfig::getInstance, )
            /*
             * 启动[Installer]服务并连接至installd
             * installd为native服务, 位于frameworks/native/cmds/installd/
             */
            SystemServiceManager::startService(Installer.class)
                new Installer() && Installer::onStart()
// 启动[设备标识符]服务 SystemServiceManager::startService(DeviceIdentifiersPolicyService.class)
new DeviceIdentifiersPolicyService()
DeviceIdentifiersPolicyService::onStart()
// 启动[AMS]服务 // 启动[电源管理服务]SystemServiceManager::startService(PowerManagerService.class) new PowerManagerService() PowerManagerService::onStart() publishBinderService(Context.POWER_SERVICE, new BinderService()); // 向servicemanager注册服务 ServiceManager.addService( , , , ) publishLocalService(PowerManagerInternal.class, new LocalService()); LocalServices.addService( , )
// 初始化电源管理功能ActivityManagerService::initPowerManagement() SystemServiceManager::startService(RecoverySystemService.class) SystemServiceManager::startService(LightsService.class)
// 启动[显示管理服务]// 启动[PackageManagerService, PMS]服务
            PackageManagerService::main(mSystemContext, installer, , )
            ActivityManagerService::setSystemProcess()
            new OverlayManagerService(mSystemContext, installer)
            SystemServiceManager::startService(mOverlayManagerService)
            startSensorService()
        /*
         * 启动必要服务
         */
        startCoreServices();
            SystemServiceManager::startService(BatteryService.class)
            SystemServiceManager::startService(UsageStatsService.class)
            BinderCallsStatsService.start();
/** 启动其他服务, 太多了, 这里不一一列举
*/
        startOtherServices();

        /*
         * 进入循环
         */
        Looper.loop();
最后,就是启动Launcher,可以参考<Android源码解析-Launcher启动流程>
参考:
<Android操作系统架构开篇>