原文链接-https://github.com/AlloyTeam/omi/blob/master/tutorial
omi-router
omi-router是Omi框架专属的router插件,文件尺寸轻量,使用简便,功能强大。用于Omi制作Web单页应用的首选解决方案。
单页的好处也是非常明显:
- 无刷新加载页面内容
- 无刷新前进和后退页面
- 路由中的某个链接的传播和分享(别人看到的和你一样的状态)
- 转场动画(a标签跳转不仅要白屏,而且没有转场动画)
- 资源复用(单页中的许多资源一定是可以共用的,最典型的比如omi.js,如果不是单页的话,你需要加载多次)
好了,好处这么多,看看怎么安装使用吧~~
安装
CDN
可以直接通过Unpkg.com下载或引用cdn: https://unpkg.com/omi-router/dist/omi-router.js
<script src="https://unpkg.com/omi/dist/omi.js"></script>
<script src="https://unpkg.com/omi-router/dist/omi-router.js"></script>
NPM
npm install omi-router
import Omi from 'omi'
import OmiRouter from 'omi-router'
如果使用全局的 script 标签,则无须如此import便可使用。
开始
import Omi from 'omi'
import OmiRouter from 'omi-router'

import Home from './home.js'
import About from './about.js'
import User from './user.js'
import UserList from './user-list.js'

class App extends Omi.Component {
    install() {
        OmiRouter.init({
            routes: [
                {path: '/', component: Home},
                {path: '/about', component: About},
                {path: '/user-list', component: UserList},
                {path: '/user/:name/category/:category', component: User}
            ],
            renderTo: "#view",
            defaultRoute: '/'
        })
    }

    render() {
        return  `
        <div>
            <ul>
                <li><a omi-router to="/" >Home</a></li>
                <li><a omi-router to="/about" >About</a></li>
                <li><a omi-router to="/user-list" >UserList</a></li>
            </ul>
            <div id="view"> </div>
        </div>
        `
    }
}

Omi.render(new App(),"#__omi")
这里详细说下 OmiRouter.init 传递的配置参数的意义:
| 参数名 | 意义 | 是否必须 |
|---|---|---|
| routes | 路由配置。其中每一项中的path代表匹配规则,component代表渲染的组件 | 必须 |
| renderTo | 组件渲染的容器 | 必须 |
| defaultRoute | 如果第一次打开页面没携带hash,默认使用的地址 | 必须 |
再看下UserList:
import Omi from 'omi';

class UserList extends Omi.Component {

    render() {
        return  `
      	 <ul>
      	    <li><a omi-router to="/user/yanagao/category/js" >yanagao</a></li>
            <li><a omi-router to="/user/vorshen/category/html" >vorshen</a></li>
            <li><a omi-router to="/user/dntzhang/category/css" >dntzhang</a></li>
        </ul>
  		`;
    }
}

Omi.tag('UserList',UserList)

export default  UserList
动态匹配
| 模式 | 匹配路径 | $route.params |
|---|---|---|
| /user/:name | /user/dntzhang | { username: 'dntzhang' } |
| /user/:name/category/:category | /user/dntzhang/category/js | { username: 'dntzhang', category: js } |
注意: $route 会被挂载在$store下,$store会在根组件中注入,在组件树中的任何组件都可以通过 this.$store.$route.params 访问hash传递的数据。
接着上面例子
import Omi from 'omi'

class User extends Omi.Component {

    beforeRender(){
        let params =  this.$store.$route.params
        this.data.name = params.name
        this.data.category = params.category
        this.info = this.queryInfo(this.data.name)
        this.data.age = this.info.age
        this.data.sex = this.info.sex
    }

    queryInfo(name) {
        this.mockData = {
            'yanagao': {age: 18, sex: 'female'},
            'vorshen': {age: 20, sex: 'male'},
            'dntzhang': {age: 22, sex: 'male'}
        }
        return this.mockData[name]
    }

    back(){
        history.back()
    }

    render() {
        return  `
      	<div >
      	    <button onclick="back">back</button>
      	    <ul>
      	        <li>name:{{name}}</li>
      	        <li>age:{{age}}</li>
      	        <li>sex:{{sex}}</li>
      	        <li>category:{{category}}</li>
      	    </ul>
      	</div>
  		`
    }
}


Omi.tag('User',User)

export default  User
上面使用了beforeRender进行store到data的转换,beforeRender是生命周期的一部分。且看下面这张图:
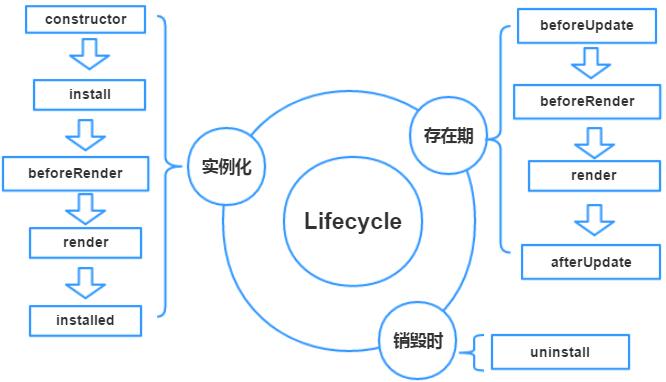
注意:除了在constructor中不能读取到 this.$store, 在声明周期的任何其他函数中都能读取到 this.$store,非常便捷。
地址
相关
- Omi官网 omijs.org
- Omi的Github地址 https://github.com/AlloyTeam/omi
- 如果想体验一下Omi框架,可以访问 Omi Playground
- 如果想使用Omi框架或者开发完善Omi框架,可以访问 Omi使用文档
- 如果你想获得更佳的阅读体验,可以访问 Docs Website
- Omi相关的使用教程和blog,可以访问 Omi Tutorial
- 如果你懒得搭建项目脚手架,可以试试 omi-cli
- 如果你有Omi相关的问题可以 New issue
- 如果想更加方便的交流关于Omi的一切可以加入QQ的Omi交流群(256426170)