世界上最小却强大的小程序框架 - 100多行代码搞定全局状态管理和跨页通讯
Github: https://github.com/dntzhang/westore
众所周知,小程序通过页面或组件各自的 setData 再加上各种父子、祖孙、姐弟、嫂子与堂兄等等组件间的通讯会把程序搞成一团浆糊,如果再加上跨页面之间的组件通讯,会让程序非常难维护和调试。虽然市面上出现了许多技术栈编译转小程序的技术,但是我觉没有戳中小程序的痛点。小程序不管从组件化、开发、调试、发布、灰度、回滚、上报、统计、监控和最近的云能力都非常完善,小程序的工程化简直就是前端的典范。而开发者工具也在持续更新,可以想象的未来,组件布局的话未必需要写代码了。所以最大的痛点只剩下状态管理和跨页通讯。
受 Omi 框架 的启发,且专门为小程序开发的 JSON Diff 库,所以有了 westore 全局状态管理和跨页通讯框架让一切尽在掌握中,且受高性能 JSON Diff 库的利好,长列表滚动加载显示变得轻松可驾驭。总结下来有如下特性和优势:
- 和 Omi 同样简洁的 Store API
- 超小的代码尺寸(包括 json diff 共100多行)
- 尊重且顺从小程序的设计(其他转译库相当于反其道行)
- this.update 比原生 setData 的性能更优,更加智能
API
Westore API 只有三个, 大道至简:
- create(store, option) 创建页面
- create(option) 创建组件
- this.update() 更新页面或组件
使用指南
定义全局 store
export default {
  data: {
    motto: 'Hello World',
    userInfo: {},
    hasUserInfo: false,
    canIUse: wx.canIUse('button.open-type.getUserInfo'),
    logs: []
  },
  logMotto: function () {
    console.log(this.data.motto)
  }
}
你不需要在页面和组件上再声明 data 属性。如果申明了也没关系,会被 Object.assign 覆盖到 store.data 上。后续只需修改 this.store.data 便可。
创建页面
import store from '../../store'
import create from '../../utils/create'

const app = getApp()

create(store, {

  onLoad: function () {
    if (app.globalData.userInfo) {
      this.store.data.userInfo = app.globalData.userInfo
      this.store.data.hasUserInfo = true
      this.update()
    } else if (this.data.canIUse) {
      app.userInfoReadyCallback = res => {
        this.store.data.userInfo = res.userInfo
        this.store.data.hasUserInfo = true
        this.update()
      }
    } else {
      wx.getUserInfo({
        success: res => {
          app.globalData.userInfo = res.userInfo
          this.store.data.userInfo = res.userInfo
          this.store.data.hasUserInfo = true
          this.update()
        }
      })
    }
  }

})
创建 Page 只需传入两个参数,store 从根节点注入,所有子组件都能通过 this.store 访问。
绑定数据
<view class="container">

  <view class="userinfo">
    <button wx:if="{{!hasUserInfo && canIUse}}" open-type="getUserInfo" bindgetuserinfo="getUserInfo"> 获取头像昵称 </button>
    <block wx:else>
      <image bindtap="bindViewTap" class="userinfo-avatar" src="{{userInfo.avatarUrl}}" mode="cover"></image>
      <text class="userinfo-nickname">{{userInfo.nickName}}</text>
    </block>
  </view>
  <view class="usermotto">
    <text class="user-motto">{{motto}}</text>
  </view>

  <hello></hello>
</view>
和以前的写法没有差别,直接把 store.data 作为绑定数据源。
更新页面
this.store.data.any_prop_you_want_to_change = 'any_thing_you_want_change_to'
this.update()
创建组件
import create from '../../utils/create'

create({
  ready: function () {
   //you can use this.store here
  },

  methods: {
    //you can use this.store here
  }
})
和创建 Page 不一样的是,创建组件只需传入一个参数,不需要传入 store,因为已经从根节点注入了。
更新组件
this.store.data.any_prop_you_want_to_change = 'any_thing_you_want_change_to'
this.update()
setData 和 update 对比
拿官方模板示例的 log 页面作为例子:
this.setData({
  logs: (wx.getStorageSync('logs') || []).map(log => {
    return util.formatTime(new Date(log))
  })
})
使用 westore 后:
this.store.data.logs = (wx.getStorageSync('logs') || []).map(log => {
  return util.formatTime(new Date(log))
})
this.update()
看似一条语句变成了两条语句,但是 this.update 调用的 setData 是 diff 后的,所以传递的数据更少。
跨页面同步数据
使用 westore 你不用关系跨页数据同步,你只需要专注 this.store.data 便可,修改完在任意地方调用 update 便可:
this.update()
调试
console.log(getApp().globalData.store.data)
超大型小程序最佳实践(两种方案)
不排除小程序被做大得可能,接触的最大的小程序有 60+ 的页面,所以怎么管理?这里给出了两个最佳实践方案。
- 第一种方案,拆分 store 的 data 为不同模块,如:
export default {
  data: {
    commonA: 'a',
    commonB: 'b',
    pageA: {
      a: 1
      xx: 'xxx'
    },
    pageB: {
      b: 2,
      c: 3
    }
  },
  xxx: function () {
    console.log(this.data)
  }
}
- 第二种方案,拆分 store 的 data 到不同文件且合并到一个 store 暴露给 create 方法,如:
a.js
export default {
  data: {
    a: 1
    xx: 'xxx'
  },
  aMethod: function (num) {
    this.data.a += num
  }
}
b.js
export default {
  data: {
    b: 2,
    c: 3
  },
  bMethod: function () {

  }
}
store.js
import a from 'a.js'
import b from 'b.js'

export default {
  data: {
    commonNum: 1,
    commonB: 'b',
    pageA: a.data
    pageB: b.data
  },
  xxx: function () {
    //you can call the methods of a or b and can pass args to them
    console.log(a.aMethod(commonNum))
  },
  xx: function(){

  }
}
当然,也可以不用按照页面拆分文件或模块,也可以按照领域来拆分,这个很自由,视情况而定。
原理
 ---------------       -------------------        -----------------------
| this.update  |  →  |     json diff     |   →  | setData()-setData()...|  →  之后就是黑盒(小程序官方实现,但是 dom/apply diff 肯定是少不了)
 ---------------       -------------------        -----------------------
虽然和 Omi 一样同为 store.updata 但是却有着本质的区别。Omi 的如下:
 ---------------       -------------------        ----------------         ------------------------------
|  this.update  |  →  |     setState      |   →  |  jsx rerender  |   →   |   vdom diff → apply diff...  |
 ---------------       -------------------        ----------------         ------------------------------
都是数据驱动视图,但本质不同,原因:
- 小程序 store 和 dom 不在同一个环境,先在 js 环境进行 json diff,然后使用 diff 结果通过 setData 通讯
- web 里使用 omi 的话 store 和 dom 在同一环境,setState 直接驱动的 vdom diff 然后把 diff 结果作用在真是 dom 上
JSON Diff
先看一下我为 westore 专门定制开发的 JSON Diff 库 的能力:
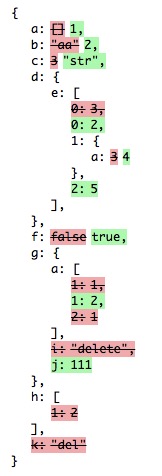
diff({
    a: 1, b: 2, c: "str", d: { e: [2, { a: 4 }, 5] }, f: true, h: [1], g: { a: [1, 2], j: 111 }
}, {
    a: [], b: "aa", c: 3, d: { e: [3, { a: 3 }] }, f: false, h: [1, 2], g: { a: [1, 1, 1], i: "delete" }, k: 'del'
})
Diff 的结果是:
{ "a": 1, "b": 2, "c": "str", "d.e[0]": 2, "d.e[1].a": 4, "d.e[2]": 5, "f": true, "h": [1], "g.a": [1, 2], "g.j": 111, "g.i": null, "k": null }
Diff 原理:
- 同步所有 key 到当前 store.data
- 携带 path 和 result 递归遍历对比所有 key value
export default function diff(current, pre) {
    const result = {}
    syncKeys(current, pre)
    _diff(current, pre, '', result)
    return result
}
同步上一轮 state.data 的 key 主要是为了检测 array 中删除的元素或者 obj 中删除的 key。
小程序 setData
setData 是小程序开发中使用最频繁的接口,也是最容易引发性能问题的接口。在介绍常见的错误用法前,先简单介绍一下 setData 背后的工作原理。setData 函数用于将数据从逻辑层发送到视图层(异步),同时改变对应的 this.data 的值(同步)。
其中 key 可以以数据路径的形式给出,支持改变数组中的某一项或对象的某个属性,如 array[2].message,a.b.c.d,并且不需要在 this.data 中预先定义。比如:
this.setData({
      'array[0].text':'changed data'
})
所以 diff 的结果可以直接传递给 setData,也就是 this.update。
setData 工作原理
小程序的视图层目前使用 WebView 作为渲染载体,而逻辑层是由独立的 JavascriptCore 作为运行环境。在架构上,WebView 和 JavascriptCore 都是独立的模块,并不具备数据直接共享的通道。当前,视图层和逻辑层的数据传输,实际上通过两边提供的 evaluateJavascript 所实现。即用户传输的数据,需要将其转换为字符串形式传递,同时把转换后的数据内容拼接成一份 JS 脚本,再通过执行 JS 脚本的形式传递到两边独立环境。
而 evaluateJavascript 的执行会受很多方面的影响,数据到达视图层并不是实时的。
常见的 setData 操作错误:
- 频繁的去 setData
- 每次 setData 都传递大量新数据
- 后台态页面进行 setData
上面是官方截取的内容。使用 webstore 的 this.update 本质是先 diff,再执行一连串的 setData,所以可以保证传递的数据每次维持在最小。既然可以使得传递数据最小,所以第一点和第三点虽有违反但可以商榷。
Update
这里区分在页面中的 update 和 组件中的 update。页面中的 update 在 onLoad 事件中进行实例收集。
const onLoad = option.onLoad
option.onLoad = function () {
    this.store = store
    rewriteUpdate(this)
    store.instances[this.route] = []
    store.instances[this.route].push(this)
    onLoad && onLoad.call(this)
}
Page(option)
组件中的 update 在 ready 事件中进行行实例收集:
const ready = store.ready
store.ready = function () {
    this.page = getCurrentPages()[getCurrentPages().length - 1]
    this.store = this.page.store;
    this.setData.call(this, this.store.data)
    rewriteUpdate(this)
    this.store.instances[this.page.route].push(this)
    ready && ready.call(this)
}
Component(store)
rewriteUpdate 的实现如下:
function rewriteUpdate(ctx){
    ctx.update = () => {
        const diffResult = diff(ctx.store.data, originData)
        for(let key in ctx.store.instances){
            ctx.store.instances[key].forEach(ins => {
                ins.setData.call(ins, diffResult)
            })
        }
        for (let key in diffResult) {
            updateOriginData(originData, key, diffResult[key])
        }
    }
}
License
MIT @dntzhang