Keras简单使用
在keras中建立模型
相对于自己写机器学习相关的函数,keras更能快速搭建模型,流程如下:
-
通过调用下面的函数创建模型
-
通过调用
model.compile(optimizer = "...", loss = "...", metrics = ["accuracy"])编译模型 -
通过调用
model.fit(x = ..., y = ..., epochs = ..., batch_size = ...) -
通过调用
model.evaluate(x = ..., y = ...)在测试集上测试模型
如果你想查阅更多有关model.compile(), model.fit(), model.evaluate() 的信息和它们的参数, 请参考官方文档 Keras documentation.
代码如下:
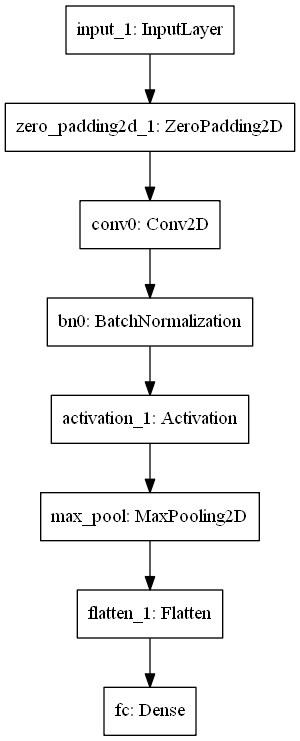
1 def model(input_shape): 2 # Define the input placeholder as a tensor with shape input_shape. Think of this as your input image! 3 X_input = Input(input_shape) 4 5 # Zero-Padding: pads the border of X_input with zeroes 6 X = ZeroPadding2D((3, 3))(X_input) 7 8 # CONV -> BN -> RELU Block applied to X 9 X = Conv2D(32, (7, 7), strides = (1, 1), name = 'conv0')(X) 10 X = BatchNormalization(axis = 3, name = 'bn0')(X) 11 X = Activation('relu')(X) 12 13 # MAXPOOL 14 X = MaxPooling2D((2, 2), name='max_pool')(X) 15 16 # FLATTEN X (means convert it to a vector) + FULLYCONNECTED 17 X = Flatten()(X) 18 X = Dense(1, activation='sigmoid', name='fc')(X) 19 20 # Create model. This creates your Keras model instance, you'll use this instance to train/test the model. 21 model = Model(inputs = X_input, outputs = X, name='HappyModel') 22 23 return model
1 step 1: 2 happyModel = HappyModel(X_train.shape[1:]) # 只保留一个例子 3 4 step 2: 5 happyModel.compile(optimizer = 'sgd', loss = 'binary_crossentropy', metrics = ['accuracy']) 6 7 step 3: 8 happyModel.fit(x = X_train,y = Y_train, epochs = 5, batch_size = 16) 9 10 step 4: 11 preds = happyModel.evaluate(x = X_test, y = Y_test) 12 # preds[0] = Loss 13 # preds[1] = Test Accuracy
此时,模型参数均已确定,可用来测试自己的图片
测试自己的图片
1 1 img_path = 'your picture path' 2 2 img = image.load_img(img_path, target_size=(64, 64)) 3 3 imshow(img) 4 4 5 5 x = image.img_to_array(img) 6 6 x = np.expand_dims(x, axis=0) 7 7 x = preprocess_input(x) 8 8 9 9 print(happyModel.predict(x))
一些有用的函数(持续更新)
-
happyModel.summary():统计并打印如下内容
-
plot_model()画出流程图1 plot_model(happyModel, to_file='HappyModel.png') 2 SVG(model_to_dot(happyModel).create(prog='dot', format='svg'))