概述
本文试图通过经典的游戏-俄罗斯方块,来演示WPF强大的图形界面编程功能。
涉及的图形方面有这几个方面:
1、不规则界面的设置
2、布局系统的使用
3、2D图形的应用
4、输入事件的响应
5、风格样式的使用
6、跨线程的调用
7、自定义控件
我们先截两张成品的图片,获取一点感性的认识。截图如下:
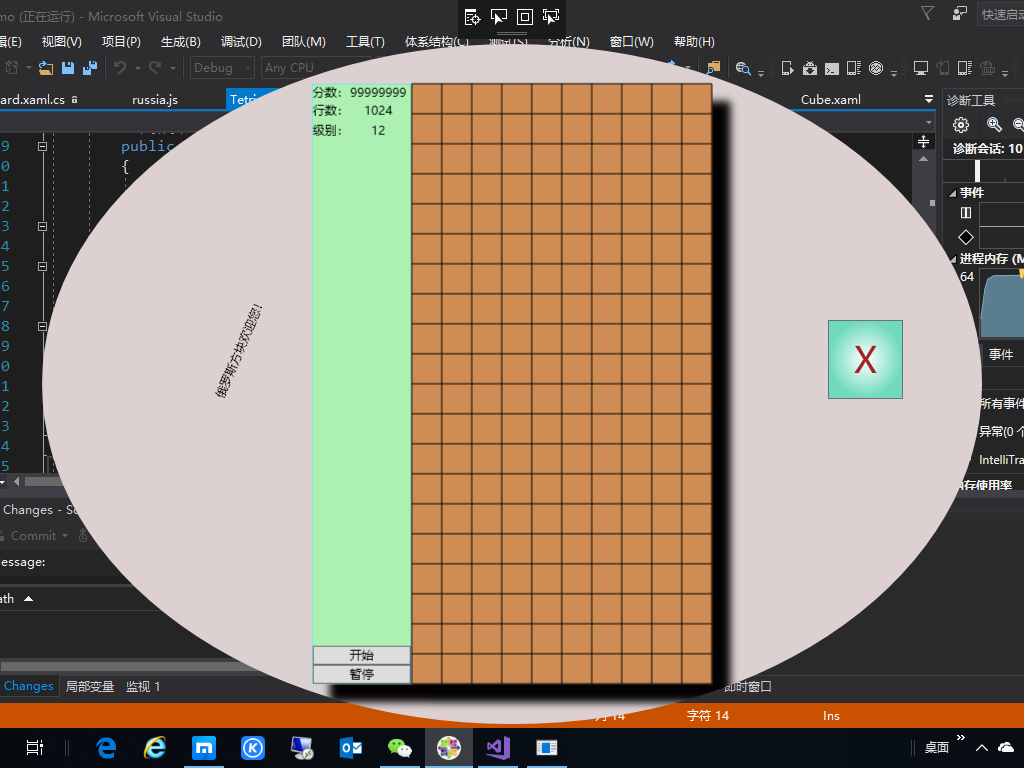
图1

图2
以上两张图中,整个程序界面已经和市场上的游戏比较接近。7种形状分别以不同的颜色进行区分,可以快速下落,一键下落,开始、暂停、算分,基本上功能全了。
实现
那这个程序究竟是怎么实现的呢?实际上,我在逻辑的层面,把它成分了两个层次,一个是图形展示层,一个是游戏算法实现层。游戏算法尽量地与图形界面分离,这样同的算法可以比较轻松地移植到别的平台上,比如用H5实现,或是用D3D实现等等,你只要关注不同平台的图形显示部分即可。
界面
界面上,除了基础的元素如分数、级别、启停按钮等,还对整体做了个性化的定制。比如使用了椭圆的程序界面,游戏主体部分使用了阴影显示,用一个动画显示欢迎信息等。
下边,我们一步一步把程序拆分开来。
1、主窗体部分
主窗体部分主要由Xaml来实现,包括其中的动画部分。
1)椭圆的实现
WPF中设置图形界面是十分的方便,整个应用程序就是一个大画布,想怎么画就怎么画。就算根窗体,一个Clip属性就可以改变它的形状。这里用的是.Net Framework里自带的
EllipseGeometry 类,只要设置两个半径和中心点即可。这里有别于Winform下边的GDI实现,不需要显式的调用图形API去画图。具体代码如下:
    <Window.Clip>
        <EllipseGeometry RadiusX="470" RadiusY="340" Center="512,384"/>
    </Window.Clip>
2)动画的实现
动画的实现,可以自己手动写代码。不过,可以通过VS Blend更方便的实现动画。这里将左边的“俄罗斯广场欢迎你!”几个字做一个随意的动画。为了提高开发效率,这里使用了Blend来制作的动画。下边的Blend的操作界面:
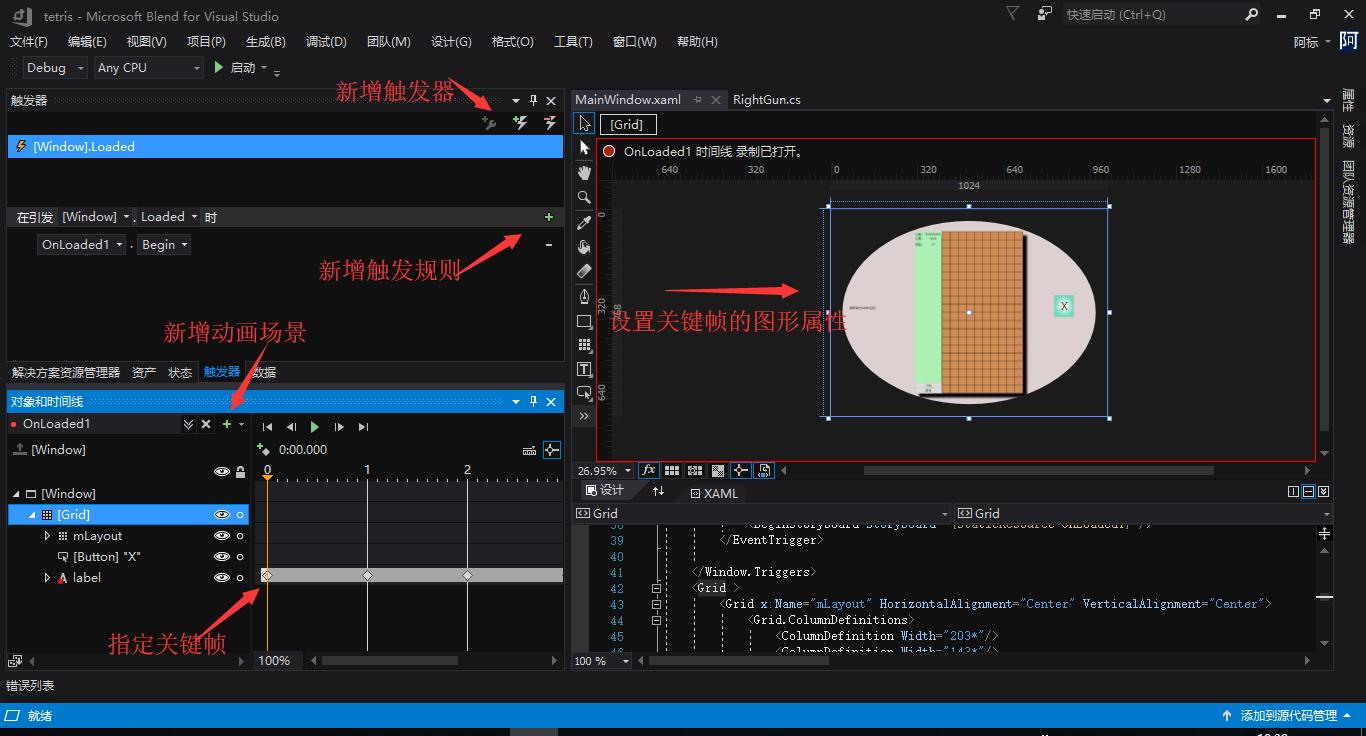
图3
以下是通过编辑器生成的代码:
-定义触发器
 <Window.Triggers>

        <EventTrigger RoutedEvent="FrameworkElement.Loaded">
            <BeginStoryboard Storyboard="{StaticResource OnLoaded1}"/>
        </EventTrigger>

    </Window.Triggers>
-定义资源
<Window.Resources>
        <Storyboard x:Key="OnLoaded1" RepeatBehavior="Forever">
            <DoubleAnimationUsingKeyFrames Storyboard.TargetProperty="(UIElement.RenderTransform).(TransformGroup.Children)[3].(TranslateTransform.Y)" Storyboard.TargetName="label">
                <EasingDoubleKeyFrame KeyTime="0" Value="-24"/>
                <EasingDoubleKeyFrame KeyTime="0:0:1" Value="69"/>
                <EasingDoubleKeyFrame KeyTime="0:0:2" Value="-9"/>
                <EasingDoubleKeyFrame KeyTime="0:0:3" Value="-115.5"/>
                <EasingDoubleKeyFrame KeyTime="0:0:4" Value="-90"/>
            </DoubleAnimationUsingKeyFrames>
            <DoubleAnimationUsingKeyFrames Storyboard.TargetProperty="(UIElement.RenderTransform).(TransformGroup.Children)[3].(TranslateTransform.X)" Storyboard.TargetName="label">
                <EasingDoubleKeyFrame KeyTime="0" Value="-21"/>
                <EasingDoubleKeyFrame KeyTime="0:0:1" Value="3"/>
                <EasingDoubleKeyFrame KeyTime="0:0:2" Value="100.5"/>
                <EasingDoubleKeyFrame KeyTime="0:0:3" Value="90"/>
                <EasingDoubleKeyFrame KeyTime="0:0:4" Value="-21"/>
            </DoubleAnimationUsingKeyFrames>
            <DoubleAnimationUsingKeyFrames Storyboard.TargetProperty="(UIElement.RenderTransform).(TransformGroup.Children)[2].(RotateTransform.Angle)" Storyboard.TargetName="label">
                <EasingDoubleKeyFrame KeyTime="0:0:1" Value="0"/>
                <EasingDoubleKeyFrame KeyTime="0:0:2" Value="-169.33"/>
                <EasingDoubleKeyFrame KeyTime="0:0:3" Value="150.377"/>
                <EasingDoubleKeyFrame KeyTime="0:0:4" Value="-3.442"/>
            </DoubleAnimationUsingKeyFrames>
        </Storyboard>
    </Window.Resources>
注:WPF任何属性定义都可以当作资源来重用。
3)花式按钮
这个比较简单,也就是设置了一下本身的样式。
编辑器窗口:

代码如下:
<Button Content="X" ToolTip="关闭" Focusable="False" HorizontalAlignment="Left" Margin="828,320,0,0" VerticalAlignment="Top" Width="75" Height="79" FontSize="36" Foreground="#FFA62121" Click="Button_Click">
            <Button.Background>
                <RadialGradientBrush>
                    <GradientStop Color="White" Offset="0"/>
                    <GradientStop Color="#FF6FDABD" Offset="1"/>
                </RadialGradientBrush>
            </Button.Background>
        </Button>
4)Grid布局
界面元素的摆放,可以通过绝对坐标的方式,但这种方式通常需要手工编码的方式去计算元素的位置,所以在复杂的应用系统中是不建议使用的。那么为了简化界面元素的排列,于是便有了布局系统。一般比较细粒度的一点的控制,多采用Grid,这里也采用了Grid。Grid主要是将界面分成若干行和列,然后将元素放入其中,类似Html中的Table,这里不赘述。
下边是一个一行两列的Grid,Grid本身铺满父容器。
 <Grid>
        <Grid.ColumnDefinitions>
            <ColumnDefinition Width="100"/>
            <ColumnDefinition Width="300*"/>
        </Grid.ColumnDefinitions>
...
</Grid>
5)容器的拖拽
这里也很简单,写一段响应MouseDown事件的代码:
 private void Window_MouseDown(object sender, MouseButtonEventArgs e)
        {
            this.DragMove();
        }
6)自定义控件
网格线的实现,及预置方块。代码如下:
private void UserControl_Initialized(object sender, EventArgs e)
        {
            for (var col = 0; col <= 10; col++)
            {
                Line line = new Line();
                line.X1 = col * 30;
                line.X2 = col * 30;
                line.Y1 = 0;
                line.Y2 = 600;
                line.Stroke = new SolidColorBrush(Color.FromArgb(0xFF, 0, 0, 1));
                grid.Children.Add(line);
            }

            for (var row = 0; row <= 20; row++)
            {
                Line line = new Line();
                line.X1 = 0;
                line.X2 = 300;
                line.Y1 = row * 30;
                line.Y2 = row * 30;
                line.Stroke = new SolidColorBrush(Color.FromArgb(0xFF, 0, 0, 1));
                grid.Children.Add(line);
            }

            for (int row = 0; row < 20; row++)
            {
                for (int col = 0; col < 10; col++)
                {
                    bool show = datas[row, col];
                    Cube cube = new Cube();
                    cube.Width = 24;
                    cube.Height = 24;
                    cube.HorizontalAlignment = HorizontalAlignment.Left;
                    cube.VerticalAlignment = VerticalAlignment.Top;
                    if (show)
                    {
                        cube.Visibility = Visibility.Visible;
                    }
                    else
                    {
                        cube.Visibility = Visibility.Hidden;
                    }
                    var m = cube.Margin;
                    cube.Margin = new Thickness(m.Left + col * 30 + 3, m.Top + row * 30 + 3, m.Right, m.Bottom);
                    cubes[row, col] = cube;
                    grid.Children.Add(cube);
                }
            }
        }
算法
本程序的算法,主要是通过两个二维数组来实现的。
具体算法略。