Eureka 注册服务中心
作为 SpringCloud 项目,里面是有很多的微服务的。 为了管理这些微服务,SpringCloud 提供了 Eureka 注册中心。
- 导入pom.xml
 pom.xml
<?xml version="1.0" encoding="UTF-8"?>

<project xmlns="http://maven.apache.org/POM/4.0.0" xmlns:xsi="http://www.w3.org/2001/XMLSchema-instance"
         xsi:schemaLocation="http://maven.apache.org/POM/4.0.0 http://maven.apache.org/xsd/maven-4.0.0.xsd">
    <parent>
        <artifactId>trendParentProject</artifactId>
        <groupId>cn.how2j.trend</groupId>
        <version>0.0.1-SNAPSHOT</version>
    </parent>
    <modelVersion>4.0.0</modelVersion>

    <artifactId>eureka-server</artifactId>

    <dependencies>
        <dependency>
            <groupId>org.springframework.cloud</groupId>
            <artifactId>spring-cloud-starter-netflix-eureka-server</artifactId>
        </dependency>
    </dependencies>

</project>
- EurekaServerApplication
添加@EnableEurekaServer 表示它是个注册中心服务器 - 端口判断功能
端口判断//8761 这个端口是默认的,就不要修改了,后面的子项目,都会访问这个端口。 int port = 8761; if(!NetUtil.isUsableLocalPort(port)) { System.err.printf("端口%d被占用了,无法启动%n", port ); System.exit(1); } new SpringApplicationBuilder(EurekaServerApplication.class).properties("server.port=" + port).run(args);
- application.yml
eureka: instance: #hostname: localhost 表示主机名称 hostname: localhost client: #registerWithEureka:false. 表示是否注册到服务器。 因为它本身就是服务器,所以就无需把自己注册到服务器了。 registerWithEureka: false #fetchRegistry: false. 表示是否获取服务器的注册信息,和上面同理,这里也设置为 false。 fetchRegistry: false serviceUrl: #defaultZone: http://${eureka.instance.hostname}:${server.port}/eureka/ #自己作为服务器,公布出来的地址。 比如后续某个微服务要把自己注册到 eureka server, 那么就要使用这个地址: http://localhost:8761/eureka/ defaultZone: http://${eureka.instance.hostname}:${server.port}/eureka/ spring: application: #name: eurka-server 表示这个微服务本身的名称是 eureka-server name: eureka-server - ThirdPartIndexDataApplication中@EnableEurekaClient表示注册为微服务
<!-- springboot web -->
        <dependency>
            <groupId>org.springframework.boot</groupId>
            <artifactId>spring-boot-starter-web</artifactId>
        </dependency>
        <!-- eureka-client -->
        <dependency>
            <groupId>org.springframework.cloud</groupId>
            <artifactId>spring-cloud-starter-netflix-eureka-client</artifactId>pom.xml
        </dependency>
eureka:
  client:
    serviceUrl:
#这段表示注册额中心的地址是 http://localhost:8761/eureka/
#与 eureka server 里的application.yml 中的 defaultZone: http://${eureka.instance.hostname}:${server.port}/eureka/ 遥相呼应。
      defaultZone: http://localhost:8761/eureka/
spring:
  application:
#表示到注册中心里,本应用的名称就是 third-part-index-data-project
    name: third-part-index-data-project

工具类RestTemplate
@Service
public class IndexService {
    private List<Index> indexes;
    @Autowired RestTemplate restTemplate;

    public List<Index> fetch_indexes_from_third_part(){
        List<Map> temp= restTemplate.getForObject("http://127.0.0.1:8090/indexes/codes.json",List.class);
        return map2Index(temp);
    }
    private List<Index> map2Index(List<Map> temp) {
        List<Index> indexes = new ArrayList<>();
        for (Map map : temp) {
            String code = map.get("code").toString();
            String name = map.get("name").toString();
            Index index= new Index();
            index.setCode(code);
            index.setName(name);
            indexes.add(index);
        }
        return indexes;
    }
}
启动类另外声明了@Bean 这样IndexService才能够使用 RestTemplate
 @Bean
    RestTemplate restTemplate() {
        return new RestTemplate();
    }
Hystrix 断路器
pom.xml
<!-- 断路器 -->
        <dependency>
            <groupId>org.springframework.cloud</groupId>
            <artifactId>spring-cloud-starter-netflix-hystrix</artifactId>
        </dependency>
- IndexGatherStoreApplication 添加 @EnableHystrix 来启动断路器
- 在方法上增加:@HystrixCommand(fallbackMethod = "third_part_not_connected")
这表示如果下面的方法获取失败了,就自动调用 third_part_not_connected 方法 并返回。
@HystrixCommand(fallbackMethod = "third_part_not_connected")
    public List<Index> fetch_indexes_from_third_part(){
        List<Map> temp= restTemplate.getForObject("http://127.0.0.1:8090/indexes/codes.json",List.class);
        return map2Index(temp);
    }

    public List<Index> third_part_not_connected(){
        System.out.println("third_part_not_connected()");
        Index index= new Index();
        index.setCode("000000");
        index.setName("无效指数代码");
        return CollectionUtil.toList(index);
    }
Redis
- pom.xml
<!-- redis -->
        <dependency>
            <groupId>org.springframework.boot</groupId>
            <artifactId>spring-boot-starter-data-redis</artifactId>
        </dependency>
- 增加 @EnableCaching 表示启动缓存 增加 redisPort, 用于判断 redis 服务器是否启动
@EnableCaching
public class IndexGatherStoreApplication {
        int redisPort = 6379;
        if(NetUtil.isUsableLocalPort(redisPort)) {
            System.err.printf("检查到端口%d 未启用,判断 redis 服务器没有启动,本服务无法使用,故退出%n", redisPort );
            System.exit(1);
        }
- IndexService 增加 @CacheConfig(cacheNames="indexes") 表示缓存的名称是 indexes. 如图所示,保存到 redis 就会以 indexes 命名

在fetch_indexes_from_third_part 方法上增加: @Cacheable(key="'all_codes'") 表示保存到 redis 用的 key 就会使 all_codes.
@CacheConfig(cacheNames="indexes")
public class IndexService {
@Cacheable(key="'all_codes'")
    public List<Index> fetch_indexes_from_third_part(){
@CacheEvict(key="'indexData-code-'+ #p0")publicvoidremove(String code){}@CachePut(key="'indexData-code-'+ #p0")publicList<IndexData> store(String code){returnindexDatas.get(code);}@Cacheable(key="'indexData-code-'+ #p0")publicList<IndexData> get(String code){returnCollUtil.toList();}
- IndexService 增加 @CacheConfig(cacheNames="indexes") 表示缓存的名称是 indexes. 如图所示,保存到 redis 就会以 indexes 命名
- 新增 RedisCacheConfig 配置类
import java.time.Duration;

import org.springframework.boot.context.properties.ConfigurationProperties;
import org.springframework.cache.CacheManager;
import org.springframework.context.annotation.Bean;
import org.springframework.context.annotation.Configuration;
import org.springframework.data.redis.cache.RedisCacheConfiguration;
import org.springframework.data.redis.cache.RedisCacheManager;
import org.springframework.data.redis.connection.RedisConnectionFactory;
import org.springframework.data.redis.serializer.Jackson2JsonRedisSerializer;
import org.springframework.data.redis.serializer.RedisSerializationContext;
import org.springframework.data.redis.serializer.RedisSerializer;
import org.springframework.data.redis.serializer.StringRedisSerializer;

import com.fasterxml.jackson.annotation.JsonAutoDetect;
import com.fasterxml.jackson.annotation.PropertyAccessor;
import com.fasterxml.jackson.databind.ObjectMapper;

@Configuration
@ConfigurationProperties(prefix = "spring.cache.redis")
public class RedisCacheConfig {

    private Duration timeToLive = Duration.ZERO;
    public void setTimeToLive(Duration timeToLive) {
        this.timeToLive = timeToLive;
    }

    @Bean
    public CacheManager cacheManager(RedisConnectionFactory factory) {
        RedisSerializer<String> redisSerializer = new StringRedisSerializer();

        Jackson2JsonRedisSerializer jackson2JsonRedisSerializer = new Jackson2JsonRedisSerializer(Object.class);

        //解决查询缓存转换异常的问题
        ObjectMapper om = new ObjectMapper();
        om.setVisibility(PropertyAccessor.ALL, JsonAutoDetect.Visibility.PUBLIC_ONLY);
        om.enableDefaultTyping(ObjectMapper.DefaultTyping.NON_FINAL);
        jackson2JsonRedisSerializer.setObjectMapper(om);

        // 配置序列化(解决乱码的问题)
        RedisCacheConfiguration config = RedisCacheConfiguration.defaultCacheConfig()
                .entryTtl(timeToLive)
                .serializeKeysWith(RedisSerializationContext.SerializationPair.fromSerializer(redisSerializer))
                .serializeValuesWith(RedisSerializationContext.SerializationPair.fromSerializer(jackson2JsonRedisSerializer))
                .disableCachingNullValues();

        RedisCacheManager cacheManager = RedisCacheManager.builder(factory)
                .cacheDefaults(config)
                .build();
        return cacheManager;
    }
}
quartz 定时器
- pom.xml
        <dependency>
            <groupId>org.springframework.boot</groupId>
            <artifactId>spring-boot-starter-quartz</artifactId>
        </dependency>
- job 任务类
import java.util.List;

import cn.hutool.core.date.DateUtil;
import org.quartz.JobExecutionContext;
import org.quartz.JobExecutionException;
import org.slf4j.Logger;
import org.slf4j.LoggerFactory;
import org.springframework.beans.factory.annotation.Autowired;
import org.springframework.scheduling.quartz.QuartzJobBean;

import cn.how2j.trend.pojo.Index;
import cn.how2j.trend.service.IndexDataService;
import cn.how2j.trend.service.IndexService;

public class IndexDataSyncJob extends QuartzJobBean {

    @Autowired
    private IndexService indexService;

    @Autowired
    private IndexDataService indexDataService;

    @Override
    protected void executeInternal(JobExecutionContext context) throws JobExecutionException {
        System.out.println("定时启动:" + DateUtil.now());
        List<Index> indexes = indexService.fresh();
        for (Index index : indexes) {
             indexDataService.fresh(index.getCode());
        }
        System.out.println("定时结束:" + DateUtil.now());

    }

}
- 定时器配置类
import org.quartz.JobBuilder;
import org.quartz.JobDetail;
import org.quartz.SimpleScheduleBuilder;
import org.quartz.Trigger;
import org.quartz.TriggerBuilder;
import org.springframework.context.annotation.Bean;
import org.springframework.context.annotation.Configuration;

import cn.how2j.trend.job.IndexDataSyncJob;

@Configuration
public class QuartzConfiguration {

    private static final int interval = 1;

    @Bean
    public JobDetail weatherDataSyncJobDetail() {
        return JobBuilder.newJob(IndexDataSyncJob.class).withIdentity("indexDataSyncJob")
        .storeDurably().build();
    }

    @Bean
    public Trigger weatherDataSyncTrigger() {
        SimpleScheduleBuilder schedBuilder = SimpleScheduleBuilder.simpleSchedule()
                .withIntervalInMinutes(interval).repeatForever();

        return TriggerBuilder.newTrigger().forJob(weatherDataSyncJobDetail())
                .withIdentity("indexDataSyncTrigger").withSchedule(schedBuilder).build();
    }
}
@CrossOrigin 允许跨域
向@RequestMapping注解处理程序方法添加一个@CrossOrigin注解,以便启用CORS(默认情况下,@CrossOrigin允许在@RequestMapping注解中指定的所有源和HTTP方法)
@GetMapping("/codes")
    @CrossOrigin
    public List<Index> codes() throws Exception {
        System.out.println("current instance's port is "+ ipConfiguration.getPort());
        return indexService.get();
    }
出于安全原因,浏览器限制从脚本内发起的跨源HTTP请求。 例如,XMLHttpRequest和Fetch API遵循同源策略。 这意味着使用这些API的Web应用程序只能从加载应用程序的同一个域请求HTTP资源,除非使用CORS头文件。
跨域的体现,在于它的域名不同或者端口不同.
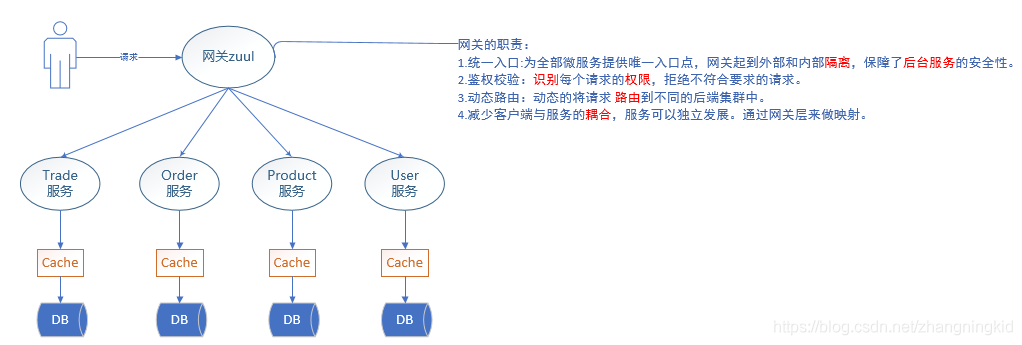
zuul 网关
- pom.xml
        <dependency>
            <groupId>org.springframework.cloud</groupId>
            <artifactId>spring-cloud-starter-netflix-zuul</artifactId>
        </dependency>
- application.yml
eureka:
  client:
    serviceUrl:
      defaultZone: http://localhost:8761/eureka/
spring:
  application:
    name: index-zuul-service
zuul:
  routes:
    api-a:
      path: /api-codes/**
#所有的访问 /api-codes/ 的请求,都会自动转到 INDEX-CODES-SERVICE 去。 而 INDEX-CODES-SERVICE 有3个,就会在这3个之间来回切换
      serviceId: INDEX-CODES-SERVICE
   api-b:
      path: /api-backtest/**
      serviceId: TREND-TRADING-BACKTEST-SERVICE
   api-c:
      path:/api-view/**
serviceId:TREND-TRADING-BACKTEST-VIEW - Application @EnableZuulProxy 就表示这是个网关
import cn.hutool.core.util.NetUtil;
import org.springframework.boot.autoconfigure.SpringBootApplication;
import org.springframework.boot.builder.SpringApplicationBuilder;
import org.springframework.cloud.client.discovery.EnableDiscoveryClient;
import org.springframework.cloud.netflix.eureka.EnableEurekaClient;
import org.springframework.cloud.netflix.zuul.EnableZuulProxy;

@SpringBootApplication
@EnableZuulProxy
@EnableEurekaClient
@EnableDiscoveryClient
public class IndexZuulServiceApplication {
//  http://127.0.0.1:8031/api-codes/codes
    public static void main(String[] args) {
        int port = 8031;
        if(!NetUtil.isUsableLocalPort(port)) {
            System.err.printf("端口%d被占用了,无法启动%n", port );
            System.exit(1);
        }
        new SpringApplicationBuilder(IndexZuulServiceApplication.class).properties("server.port=" + port).run(args);

    }

}
feign 方式访问
采用feign进行服务之间的调用,可以简化调用流程,真正感觉到是在同一个项目中调用另一个类的方法的欢快感。
- pom.xml
<!-- feign -->
        <dependency>
            <groupId>org.springframework.cloud</groupId>
            <artifactId>spring-cloud-starter-openfeign</artifactId>
        </dependency>
- application.yml
eureka: client: serviceUrl: defaultZone: http://localhost:8761/eureka/ spring: application: name: trend-trading-backtest-service #用于开启 feign 模式的断路器 feign.hystrix.enabled: true - 使用feign 模式从 INDEX-DATA-SERVICE 微服务获取数据
import java.util.List;

import org.springframework.cloud.openfeign.FeignClient;
import org.springframework.web.bind.annotation.GetMapping;
import org.springframework.web.bind.annotation.PathVariable;

import cn.how2j.trend.pojo.IndexData;

 //这句话表示访问不了的时候,就去找 IndexDataClientFeignHystrix 要数据了
@FeignClient(value = "INDEX-DATA-SERVICE",fallback = IndexDataClientFeignHystrix.class)
public interface IndexDataClient {
    @GetMapping("/data/{code}")
    public List<IndexData> getIndexData(@PathVariable("code") String code);
}
- 熔断发生的时候,此方法就会被调用
import java.util.List;

import org.springframework.stereotype.Component;

import cn.how2j.trend.pojo.IndexData;
import cn.hutool.core.collection.CollectionUtil;

@Component
public class IndexDataClientFeignHystrix implements IndexDataClient {

    @Override
    public List<IndexData> getIndexData(String code) {
        IndexData indexData = new IndexData();
        indexData.setClosePoint(0);
        indexData.setDate("0000-00-00");
        return CollectionUtil.toList(indexData);
    }

}
- Application
@EnableFeignClients 注解用于启动 Feign 方式@EnableFeignClients public class TrendTradingBackTestServiceApplication { public static void main(String[] args) {
SpringCloud 对 thymeleaf 的支持
- pom.xml
<!--thymeleaf-->
        <dependency>
            <groupId>org.springframework.boot</groupId>
            <artifactId>spring-boot-starter-thymeleaf</artifactId>
        </dependency>
- application.yml
eureka:
  client:
    serviceUrl:
      defaultZone: http://localhost:8761/eureka/
spring:
  application:
    name: trend-trading-backtest-view
  thymeleaf:
    mode: LEGACYHTML5
    encoding: UTF-8
    content-type: text/html
    cache: false