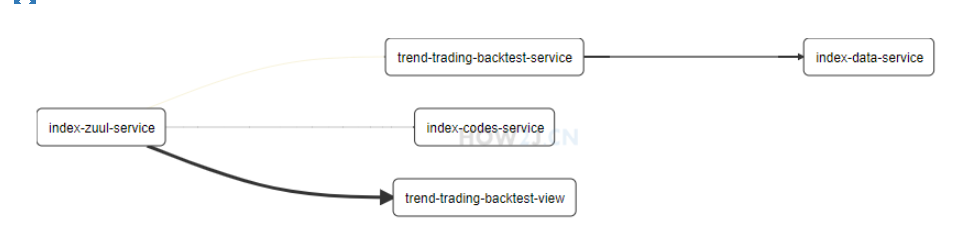
zipkin 链路追踪
越来越多的微服务存在,他们之间也会有更加复杂的调用关系。
这个调用关系,仅仅通过观察代码,会越来越难以识别,就需要通过 zipkin 服务链路追踪服务器 这个东西来用图片进行识别各个服务的调用关系
- 启动zipkin-server
java -jar zipkin-server-2.10.1-exec.jar
- pom.xml 为各个服务增加
    <!--zipkin-->
        <dependency>
            <groupId>org.springframework.cloud</groupId>
            <artifactId>spring-cloud-starter-zipkin</artifactId>
        </dependency>
- application.yml 为各个需要追踪的服务增加
spring:
  application:
    name: index-codes-service

#增加 zipkin 地址
  zipkin:
    base-url: http://localhost:9411

eureka:
  client:
    serviceUrl:
      defaultZone: http://localhost:8761/eureka/
eureka: client: serviceUrl: defaultZone: http://localhost:8761/eureka/ spring: application: name: index-data-service zipkin: base-url: http://localhost:9411 - Application增加 Sampler 的Bean
@SpringBootApplication
@EnableEurekaClient
@EnableCaching
public class IndexCodesApplication {
    public static void main(String[] args) {

    }
//增加Sampler的Bean
    @Bean
    public Sampler defaultSampler() {
        return Sampler.ALWAYS_SAMPLE;
    }
}
- 链路追踪地址
http://localhost:9411/zipkin/dependency/
配置服务器 ConfigServer
- 创建子模块index-config-server
- pom.xml
<?xml version="1.0" encoding="UTF-8"?> <project xmlns="http://maven.apache.org/POM/4.0.0" xmlns:xsi="http://www.w3.org/2001/XMLSchema-instance" xsi:schemaLocation="http://maven.apache.org/POM/4.0.0 http://maven.apache.org/xsd/maven-4.0.0.xsd"> <parent> <artifactId>trendParentProject</artifactId> <groupId>cn.how2j.trend</groupId> <version>0.0.1-SNAPSHOT</version> </parent> <modelVersion>4.0.0</modelVersion> <artifactId>index-config-server</artifactId> <dependencies> <dependency> <groupId>org.springframework.cloud</groupId> <artifactId>spring-cloud-starter-netflix-eureka-client</artifactId> </dependency> <dependency> <groupId>org.springframework.boot</groupId> <artifactId>spring-boot-starter-web</artifactId> </dependency> #spring-cloud-config-server 的依赖 <dependency> <groupId>org.springframework.cloud</groupId> <artifactId>spring-cloud-config-server</artifactId> </dependency>
</dependencies> </project> - 启动类 Application 增加 @EnableConfigServer
@SpringBootApplication
@EnableConfigServer
@EnableDiscoveryClient
@EnableEurekaClient
public class IndexConfigServerApplication {
    public static void main(String[] args) {
        new SpringApplicationBuilder(IndexConfigServerApplication.class).properties("server.port=" + port).run(args);
    }
}
- application.yml
spring:
  application:
    name: index-config-server
  cloud:
    config:
#label 表示 分支
      label: master
      server:
        git:
#uri 表示 git 地址:
          uri: https://github.com/how2j/trendConfig/
#searchPaths 表示目录
          searchPaths: respo
eureka:
  client:
    serviceUrl:
      defaultZone: http://localhost:8761/eureka/
- 更改所需要配置的服务
pom.xml 添加对spring-cloud-starter-config 的依赖
<!--config-client-->
        <dependency>
            <groupId>org.springframework.cloud</groupId>
            <artifactId>spring-cloud-starter-config</artifactId>
        </dependency>
增加bootstrap.yml 把 eureka 地址信息移动到了 bootstrap.yml 里
bootstrap.yml 和 application.yml 的区别,简单说就是前者先启动,并且一些系统方面的配置需要在 bootstrap.yml 里进行配置增加注解 @Value("${version}")spring: cloud: config: label: master profile: dev discovery: enabled: true #提供了 serviceId: index-config-server, 这个是配置服务器在 eureka server 里的服务名称,这样就可以定位 config-server了 serviceId: index-config-server eureka: client: serviceUrl: defaultZone: http://localhost:8761/eureka/@Controller public class ViewController {
#增加了个注解来获取版本信息 @Value("${version}") String version; @GetMapping("/") public String view(Model m) throws Exception { m.addAttribute("version", version); return "view"; } }
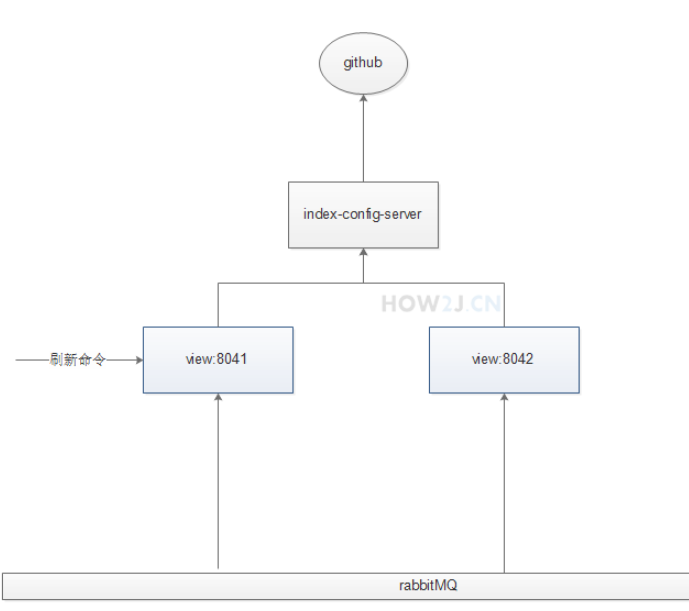
rabbitMQ 数据广播
服务业务逻辑
1. 通过运行FreshConfigUtil类, 以 post 方式访问地址 http://localhost:8041/actuator/bus-refresh,通知 view:8041 刷新配置。

2. view:8041 告诉 index-config-server 获取新的配置数据

3. index-config-server 从 git 拿到数据,返回给 view:8041

4. view:8041 拿到数据不仅自己用了,还发给了 rabbitMQ

5. rabbitMQ 拿到这个数据广播给其他的,比如 view:8042
- 启动RabbitMQ
- 为view服务添加pom.xml
<artifactId>trend-trading-backtest-view</artifactId>
    <dependencies>
#用于访问路径:/actuator/bus-refresh, 这个地址就用来通知它去更新配置服务器
        <dependency>
            <groupId>org.springframework.boot</groupId>
            <artifactId>spring-boot-starter-actuator</artifactId>
        </dependency>
#多了spring-cloud-starter-bus-amqp 用于支持 rabbitmq
        <dependency>
            <groupId>org.springframework.cloud</groupId>
            <artifactId>spring-cloud-starter-bus-amqp</artifactId>
        </dependency>
    </dependencies>
-
bootstrap.yml
spring: cloud: config: label: master profile: dev discovery: enabled: true serviceId: index-config-server #新增 but总线配置 bus: enabled: true trace: enabled: true #新增 rabbitMQ 配置 rabbitmq: host: localhost port: 5672 username: guest password: guest eureka: client: serviceUrl: defaultZone: http://localhost:8761/eureka/ -
application.yml
spring: application: name: trend-trading-backtest-view thymeleaf: mode: LEGACYHTML5 encoding: UTF-8 content-type: text/html cache: false zipkin: base-url: http://localhost:9411 #增加management #其作用是允许访问:/actuator/bus-refresh management: endpoints: web: exposure: include: "*" cors: allowed-origins: "*" allowed-methods: "*" -
增加 rabbitMQ 端口判断。5672 是 rabbitMQ 服务器的端口, 15672 是 rabbitMQ 自带的某个web工具的端口
        int rabbitMQPort = 5672;
        if(NetUtil.isUsableLocalPort(rabbitMQPort)) {
            System.err.printf("检查到端口%d 未启用,判断 rabbitMQ 服务器没有启动,本服务无法使用,故退出%n", rabbitMQPort );
            System.exit(1);
        }
-
为view增加注解 @RefreshScope 表示允许刷新
import org.springframework.beans.factory.annotation.Value;
import org.springframework.cloud.context.config.annotation.RefreshScope;
import org.springframework.stereotype.Controller;
import org.springframework.ui.Model;
import org.springframework.web.bind.annotation.GetMapping;

@Controller
@RefreshScope
public class ViewController {
    @Value("${version}")
    String version;
    @GetMapping("/")
    public String view(Model m) throws Exception {
        m.addAttribute("version", version);
        return "view";
    }
}
-
post访问工具
import java.util.HashMap;
import cn.hutool.http.HttpUtil;
public class FreshConfigUtil {
    public static void main(String[] args) {
        HashMap<String,String> headers =new HashMap<>();
        headers.put("Content-Type", "application/json; charset=utf-8");
        System.out.println("因为要去git获取,还要刷新index-config-server, 会比较卡,所以一般会要好几秒才能完成,请耐心等待");

        String result = HttpUtil.createPost("http://localhost:8041/actuator/bus-refresh").addHeaders(headers).execute().body();
        System.out.println("result:"+result);
        System.out.println("refresh 完成");
    }
}
-
对服务链路追踪的影响
因为视图服务进行了改造,支持了 rabbitMQ, 那么在默认情况下,它的信息就不会进入 Zipkin了。 在Zipkin 里看不到视图服务的资料了。
为了解决这个问题,在启动 Zipkin 的时候 带一个参数就好了:--zipkin.collector.rabbitmq.addresses=localhost
现在改成
java -jar zipkin-server-2.10.1-exec.jar --zipkin.collector.rabbitmq.addresses=localhost
断路器监控
- 新建子模块 index-hystrix-dashboard
- pom.xml
<?xml version="1.0" encoding="UTF-8"?>
<project xmlns="http://maven.apache.org/POM/4.0.0"
         xmlns:xsi="http://www.w3.org/2001/XMLSchema-instance"
         xsi:schemaLocation="http://maven.apache.org/POM/4.0.0 http://maven.apache.org/xsd/maven-4.0.0.xsd">
    <parent>
        <artifactId>trendParentProject</artifactId>
        <groupId>cn.how2j.trend</groupId>
        <version>0.0.1-SNAPSHOT</version>
    </parent>
    <modelVersion>4.0.0</modelVersion>

    <artifactId>index-hystrix-dashboard</artifactId>

    <dependencies>
        <dependency>
            <groupId>org.springframework.cloud</groupId>
            <artifactId>spring-cloud-starter-netflix-eureka-client</artifactId>
        </dependency>
        <dependency>
            <groupId>org.springframework.boot</groupId>
            <artifactId>spring-boot-starter-web</artifactId>
        </dependency>
        <dependency>
            <groupId>org.springframework.boot</groupId>
            <artifactId>spring-boot-starter-actuator</artifactId>
        </dependency>
        <dependency>
            <groupId>org.springframework.cloud</groupId>
            <artifactId>spring-cloud-starter-netflix-hystrix</artifactId>
        </dependency>
        <dependency>
            <groupId>org.springframework.cloud</groupId>
            <artifactId>spring-cloud-starter-netflix-hystrix-dashboard</artifactId>
        </dependency>

    </dependencies>

</project>
- 断路器监控启动器 IndexHystrixDashboardApplication
import org.springframework.boot.autoconfigure.SpringBootApplication; import org.springframework.boot.builder.SpringApplicationBuilder; import org.springframework.cloud.netflix.hystrix.dashboard.EnableHystrixDashboard; import cn.hutool.core.util.NetUtil;
@SpringBootApplication
//使用 @EnableHystrixDashboard 来启动断路器监控台 @EnableHystrixDashboard public class IndexHystrixDashboardApplication { public static void main(String[] args) { int port = 8070; int eurekaServerPort = 8761; if(NetUtil.isUsableLocalPort(eurekaServerPort)) { System.err.printf("检查到端口%d 未启用,判断 eureka 服务器没有启动,本服务无法使用,故退出%n", eurekaServerPort ); System.exit(1); } if(!NetUtil.isUsableLocalPort(port)) { System.err.printf("端口%d被占用了,无法启动%n", port ); System.exit(1); } new SpringApplicationBuilder(IndexHystrixDashboardApplication.class).properties("server.port=" + port).run(args); } } - application.yml
spring: application: name: index-hystrix-dashboard - 对需要进行监控的服务进行修改
pom.xml 增加监控接口
<!--监控接口-->
        <dependency>
            <groupId>org.springframework.boot</groupId>
            <artifactId>spring-boot-starter-actuator</artifactId>
        </dependency>
- 为需要监控的服务的启动类增加注解: @EnableCircuitBreaker,用于把断路信息分享出来
@EnableCircuitBreaker
public class TrendTradingBackTestServiceApplication {
    public static void main(String[] args) {
         new SpringApplicationBuilder(TrendTradingBackTestServiceApplication.class).properties("server.port=" + port).run(args);
    }
}
- 更改需要监控的服务的application.yml
spring: application: name: trend-trading-backtest-service zipkin: base-url: http://localhost:9411 feign.hystrix.enabled: true #增加如下内容,使之可以访问 management: endpoints: web: exposure: include: "*" cors: allowed-origins: "*" allowed-methods: "*" - 监控地址
http://localhost:8070/hystrix
输入参数
http://localhost:8051/actuator/hystrix.stream