问:罗列的数据是什么含义?
答:
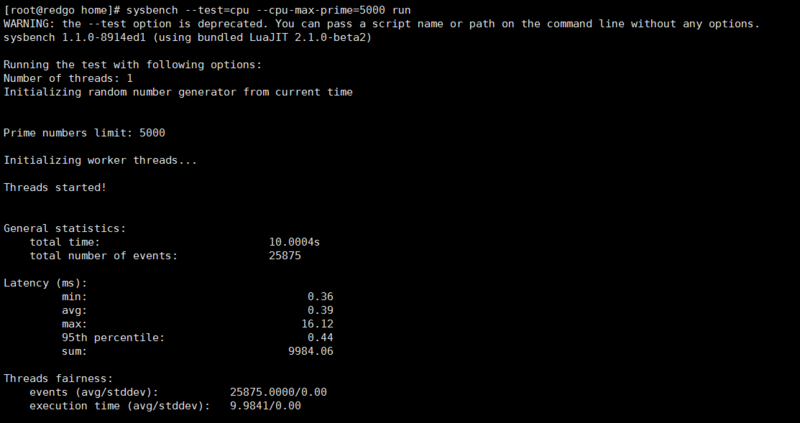
General statistics(综合统计)
    total time:                    10.0004s
    total number of events:        25875
CPU测试,在10s范围内进行素数计算这个行为一共进行了25875次,实际执行时间为10.0004s;
Latency (ms):
         min:                                  0.36
         avg:                                  0.39
         max:                                  16.12
         95th percentile:                      0.44
         sum:                               9884.06
这部分数据应该统计的是线程真正执行的时间,总共9884.06ms, 单次执行最少时间为0.36ms, 最多时间为16.12ms, 平均时间为0.39ms, 95%次的执行时间在0.44ms左右;
Threads fairness:
    events (avg/stddev):           43084.0000/0.00
    execution time (avg/stddev):   9.8626/0.00
归纳总结,线程执行时间为9.8626s, 执行平均次数为43084次;
Threads fairness:
events (avg/stddev): 9498.5000/5.50 #平均每个线程完成envet的次数,后一个值是标准差
execution time (avg/stddev): 29.9980/0.00 #平均每个线程平均耗时,后一个值是标准差
一、sysbench压力测试工具简介:
sysbench是一个开源的、模块化的、跨平台的多线程性能测试工具,可以用来进行CPU、内存、磁盘I/O、线程、数据库的性能测试。目前支持的数据库有MySQL、Oracle和PostgreSQL。以下操作都将以支持MySQL数据库为例进行。
1. sysbench工具安装:
默认支持MySQL,如果需要测试Oracle/PostgreSQL,则在configure时需要加上–with-oracle或者–with-pgsql参数.
1.1 安装环境
CentOS release 6.3 (Final)
MySQL 5.6.13
MySQL_HOME=/usr/local/mysql/
Sysbench 0.4.12
1.2 下载安装包
# wget http://sourceforge.net/projects/sysbench/sysbench-0.4.12.tar.gz
1.3 编译安装
# tar –zxvf sysbench-0.4.12.tar.gz
进入解压缩包sysbench-0.4.12,并执行脚本autogen.sh
# cd sysbench-0.4.12
# ./autogen.sh
关键的三步:configure && make && make install
首先是./configure命令,sysbench默认是支持MySQL的benchmarking的,如果不加任何选项则要求保证MySQL的安装路径都是默认的标准路径,headfile位于/usr/include目录下,libraries位于/usr/lib/目录下。因为我的MySQL是源码编译安装的,安装路径是放在/usr/local/mysql下,所以这里要添加相应的选项命令:
# ./configure --prefix=/usr/local/sysbench --with-mysql=/usr/local/mysql
--with-mysql-includes=/usr/local/mysql/include/mysql/
--with-mysql-libs=/usr/local/mysql/lib/mysql/
注意:这里在编译时要将路径写到最后的include/mysql及lib/mysql,如下所示:
–with-mysql-includes=/usr/local/mysql/include/mysql/
--with-mysql-libs=/usr/local/mysql/lib/mysql/
因为网上好多资料都没有提到这一层,在编译时总是编译不过去,这里浪费了好多精力。
接下来执行如下命令:
# make && make install
1.4 yum安装
如果觉得源码安装麻烦,也可以采用yum安装,操作如下:
# yum install -y sysbench
2. sysbench支持的功能参数
首先,看看sysbench都支持哪些功能参数:
[root@db-master sysbench]# sysbench --help
Usage:
sysbench [general-options]... --test= [test-options]... command
General options:
--num-threads=N number of threads to use [1]
--max-requests=N limit for total number of requests [10000]
--max-time=N limit for total execution time in seconds [0]
--forced-shutdown=STRING amount of time to wait after --max-time before forcing shutdown [off]
--thread-stack-size=SIZE size of stack per thread [32K]
--init-rng=[on|off] initialize random number generator [off]
--test=STRING test to run
--debug=[on|off] print more debugging info [off]
--validate=[on|off] perform validation checks where possible [off]
--help=[on|off] print help and exit
--version=[on|off] print version and exit
Compiled-in tests:
fileio - File I/O test
cpu - CPU performance test
memory - Memory functions speed test
threads - Threads subsystem performance test
mutex - Mutex performance test
oltp - OLTP test
Commands: prepare run cleanup help version
See 'sysbench --test= help' for a list of options for each test.
Sysbench的测试主要包括以下几个方面:
1、磁盘io性能
2、cpu性能
3、内存分配及传输速度
4、POSIX线程性能
5、调度程序性能
6、数据库性能(OLTP基准测试).
2.1 测试fileio命令帮助:
[root@db-master ~]# sysbench --test=fileio help
sysbench 0.4.12: multi-threaded system evaluation benchmark
fileio options:
--file-num=N number of files to create [128]
--file-block-size=N block size to use in all IO operations [16384]
--file-total-size=SIZE total size of files to create [2G]
--file-test-mode=STRING test mode {seqwr, seqrewr, seqrd, rndrd, rndwr, rndrw}
--file-io-mode=STRING file operations mode {sync,async,fastmmap,slowmmap} [sync]
--file-async-backlog=N number of asynchronous operatons to queue per thread [128]
--file-extra-flags=STRING additional flags to use on opening files {sync,dsync,direct} []
--file-fsync-freq=N do fsync() after this number of requests (0 - don't use fsync()) [100]
--file-fsync-all=[on|off] do fsync() after each write operation [off]
--file-fsync-end=[on|off] do fsync() at the end of test [on]
--file-fsync-mode=STRING which method to use for synchronization {fsync, fdatasync} [fsync]
--file-merged-requests=N merge at most this number of IO requests if possible (0 - don't merge) [0]
--file-rw-ratio=N reads/writes ratio for combined test [1.5]
参数详解:
--file-num=N 代表生成测试文件的数量,默认为128。
--file-block-size=N 测试时所使用文件块的大小,如果想磁盘针对innodb存储引擎进行测试,可以将其设置为16384,即innodb存储引擎页的大小。默认为16384。
--file-total-size=SIZE 创建测试文件的总大小,默认为2G大小。
--file-test-mode=STRING 文件测试模式,包含:seqwr(顺序写), seqrewr(顺序读写), seqrd(顺序读), rndrd(随机读), rndwr(随机写), rndrw(随机读写)。
--file-io-mode=STRING 文件操作的模式,sync(同步),async(异步),fastmmap(快速mmap),slowmmap(慢速mmap),默认为sync同步模式。
--file-async-backlog=N 对应每个线程队列的异步操作数,默认为128。
--file-extra-flags=STRING 打开文件时的选项,这是与API相关的参数。
--file-fsync-freq=N 执行fsync()函数的频率。fsync主要是同步磁盘文件,因为可能有系统和磁盘缓冲的关系。 0代表不使用fsync函数。默认值为100。
--file-fsync-all=[on|off] 每执行完一次写操作,就执行一次fsync。默认为off。
--file-fsync-end=[on|off] 在测试结束时执行fsync函数。默认为on。
--file-fsync-mode=STRING文件同步函数的选择,同样是和API相关的参数,由于多个操作系统对于fdatasync支持不同,因此不建议使用fdatasync。默认为fsync。
--file-merged-requests=N 大多情况下,合并可能的IO的请求数,默认为0。
--file-rw-ratio=N 测试时的读写比例,默认时为1.5,即可3:2。
2.2 测试cpu命令帮助:
[root@db-master ~]# sysbench --test=cpu help
sysbench 0.4.12: multi-threaded system evaluation benchmark
cpu options:
--cpu-max-prime=N upper limit for primes generator [10000]
参数详解:
--cpu-max-prime=N 用来选项指定最大的素数,具体参数可以根据CPU的性能来设置,默认为10000
2.3 测试memory命令帮助:
[root@db-master ~]# sysbench --test=memory help
sysbench 0.4.12: multi-threaded system evaluation benchmark
memory options:
--memory-block-size=SIZE size of memory block for test [1K]
--memory-total-size=SIZE total size of data to transfer [100G]
--memory-scope=STRING memory access scope {global,local} [global]
--memory-hugetlb=[on|off] allocate memory from HugeTLB pool [off]
--memory-oper=STRING type of memory operations {read, write, none} [write]
--memory-access-mode=STRING memory access mode {seq,rnd} [seq]
参数详解:
--memory-block-size=SIZE 测试内存块的大小,默认为1K
--memory-total-size=SIZE 数据传输的总大小,默认为100G
--memory-scope=STRING 内存访问的范围,包括全局和本地范围,默认为global
--memory-hugetlb=[on|off] 是否从HugeTLB池分配内存的开关,默认为off
--memory-oper=STRING 内存操作的类型,包括read, write, none,默认为write
--memory-access-mode=STRING 内存访问模式,包括seq,rnd两种模式,默认为seq
2.4 测试threads命令帮助:
[root@db-master ~]# sysbench --test=threads help
sysbench 0.4.12: multi-threaded system evaluation benchmark
threads options:
--thread-yields=N number of yields to do per request [1000]
--thread-locks=N number of locks per thread [8]
参数详解:
--thread-yields=N 指定每个请求的压力,默认为1000
--thread-locks=N 指定每个线程的锁数量,默认为8
2.5 测试mutex命令帮助:
[root@db-master ~]# sysbench --test=mutex help
sysbench 0.4.12: multi-threaded system evaluation benchmark
mutex options:
--mutex-num=N total size of mutex array [4096]
--mutex-locks=N number of mutex locks to do per thread [50000]
--mutex-loops=N number of empty loops to do inside mutex lock [10000]
参数详解:
--mutex-num=N 数组互斥的总大小。默认是4096
--mutex-locks=N 每个线程互斥锁的数量。默认是50000
--mutex-loops=N 内部互斥锁的空循环数量。默认是10000
2.6 测试oltp命令帮助:
[root@db-master ~]# sysbench --test=oltp help
sysbench 0.4.12: multi-threaded system evaluation benchmark
oltp options:
--oltp-test-mode=STRING test type to use {simple,complex,nontrx,sp} [complex]
--oltp-reconnect-mode=STRING reconnect mode {session,transaction,query,random} [session]
--oltp-sp-name=STRING name of store procedure to call in SP test mode []
--oltp-read-only=[on|off] generate only 'read' queries (do not modify database) [off]
--oltp-skip-trx=[on|off] skip BEGIN/COMMIT statements [off]
--oltp-range-size=N range size for range queries [100]
--oltp-point-selects=N number of point selects [10]
--oltp-simple-ranges=N number of simple ranges [1]
--oltp-sum-ranges=N number of sum ranges [1]
--oltp-order-ranges=N number of ordered ranges [1]
--oltp-distinct-ranges=N number of distinct ranges [1]
--oltp-index-updates=N number of index update [1]
--oltp-non-index-updates=N number of non-index updates [1]
--oltp-nontrx-mode=STRING mode for non-transactional test {select, update_key, update_nokey, insert, delete} [select]
--oltp-auto-inc=[on|off] whether AUTO_INCREMENT (or equivalent) should be used on id column [on]
--oltp-connect-delay=N time in microseconds to sleep after connection to database [10000]
--oltp-user-delay-min=N minimum time in microseconds to sleep after each request [0]
--oltp-user-delay-max=N maximum time in microseconds to sleep after each request [0]
--oltp-table-name=STRING name of test table [sbtest]
--oltp-table-size=N number of records in test table [10000]
--oltp-dist-type=STRING random numbers distribution {uniform,gaussian,special} [special]
--oltp-dist-iter=N number of iterations used for numbers generation [12]
--oltp-dist-pct=N percentage of values to be treated as 'special' (for special distribution) [1]
--oltp-dist-res=N percentage of 'special' values to use (for special distribution) [75]
General database options:
--db-driver=STRING specifies database driver to use ('help' to get list of available drivers)
--db-ps-mode=STRING prepared statements usage mode {auto, disable} [auto]
Compiled-in database drivers:
mysql - MySQL driver
pgsql - PostgreSQL driver
mysql options:
--mysql-host=[LIST,...] MySQL server host [localhost]
--mysql-port=N MySQL server port [3306]
--mysql-socket=STRING MySQL socket
--mysql-user=STRING MySQL user [sbtest]
--mysql-password=STRING MySQL password []
--mysql-db=STRING MySQL database name [sbtest]
--mysql-table-engine=STRING storage engine to use for the test table {myisam,innodb,bdb,heap,ndbcluster,federated} [innodb]
--mysql-engine-trx=STRING whether storage engine used is transactional or not {yes,no,auto} [auto]
--mysql-ssl=[on|off] use SSL connections, if available in the client library [off]
--myisam-max-rows=N max-rows parameter for MyISAM tables [1000000]
--mysql-create-options=STRING additional options passed to CREATE TABLE []
pgsql options:
--pgsql-host=STRING PostgreSQL server host [localhost]
--pgsql-port=N PostgreSQL server port [5432]
--pgsql-user=STRING PostgreSQL user [sbtest]
--pgsql-password=STRING PostgreSQL password []
--pgsql-db=STRING PostgreSQL database name [sbtest]
参数详解:
--oltp-test-mode=STRING 执行模式{simple,complex(advanced transactional),nontrx(non-transactional),sp}。默认是complex
--oltp-reconnect-mode=STRING 重新连接模式{session(不使用重新连接。每个线程断开只在测试结束),transaction(在每次事务结束后重新连接),query(在每个SQL语句执行完重新连接),random(对于每个事务随机选择以上重新连接模式)}。默认是session
--oltp-sp-name=STRING 存储过程的名称。默认为空
--oltp-read-only=[on|off] 只读模式。Update,delete,insert语句不可执行。默认是off
--oltp-skip-trx=[on|off] 省略begin/commit语句。默认是off
--oltp-range-size=N 查询范围。默认是100
--oltp-point-selects=N number of point selects [10]
--oltp-simple-ranges=N number of simple ranges [1]
--oltp-sum-ranges=N number of sum ranges [1]
--oltp-order-ranges=N number of ordered ranges [1]
--oltp-distinct-ranges=N number of distinct ranges [1]
--oltp-index-updates=N number of index update [1]
--oltp-non-index-updates=N number of non-index updates [1]
--oltp-nontrx-mode=STRING 查询类型对于非事务执行模式{select, update_key, update_nokey, insert, delete} [select]
--oltp-auto-inc=[on|off] AUTO_INCREMENT是否开启。默认是on
--oltp-connect-delay=N 在多少微秒后连接数据库。默认是10000
--oltp-user-delay-min=N 每个请求最短等待时间。单位是ms。默认是0
--oltp-user-delay-max=N 每个请求最长等待时间。单位是ms。默认是0
--oltp-table-name=STRING 测试时使用到的表名。默认是sbtest
--oltp-table-size=N 测试表的记录数。默认是10000
--oltp-dist-type=STRING 分布的随机数{uniform(均匀分布),Gaussian(高斯分布),special(空间分布)}。默认是special
--oltp-dist-iter=N 产生数的迭代次数。默认是12
--oltp-dist-pct=N 值的百分比被视为'special' (for special distribution)。默认是1
--oltp-dist-res=N ‘special’的百分比值。默认是75
3. 总结:
以上就是sysbench工具的安装配置及相关选项参数的介绍,可以根据自己的需要添加对应的参数进行压力测试即可。在下一篇文档中将会对上面的几种模式进行相应的测试。
二
2.1 测试数据库服务器的硬件配置信息如下:
CPU: 24核心线程数,Intel(R) Xeon(R) CPU E5-2620 0 @ 2.00GHz
MEM: 64G,8*8G=64G
DISK: 15000转/秒
2.2 对磁盘IO性能的测试:
2.2.1 创建fileio文件
创建初始化fileio文件:
[root@db-master sysbench]# sysbench --test=fileio --file-num=16 --file-total-size=2G prepare
sysbench 0.4.12: multi-threaded system evaluation benchmark
16 files, 131072Kb each, 2048Mb total
Creating files for the test...
2.2.1 开始fileio测试
接下来开始对这些文件进行测试,使用16个线程随机读进行测试结果如下:
[root@db-master sysbench]# sysbench --test=fileio --file-total-size=2G --file-test-mode=rndrd --max-time=180 --max-requests=100000000 --num-threads=16 --init-rng=on --file-num=16 --file-extra-flags=direct --file-fsync-freq=0 --file-block-size=16384 run
可以看到随机读取的性能为75.988Mb/sec,随机读的IOPS为4863.25 Requests/sec.说明服务器的硬件配置还不错。
2.2.3 测试完成执行cleanup
测试结束后,记得执行cleanup,以确保测试所产生的文件都已删除:
[root@db-master sysbench]# sysbench --test=fileio --file-num=16 --file-total-size=2G cleanup
sysbench 0.4.12: multi-threaded system evaluation benchmark
Removing test files...
如果需要测试seqwr(顺序写), seqrewr(顺序读写), seqrd(顺序读), rndrd(随机读), rndwr(随机写), rndrw(随机读写)等6种模式,并且还可能需要测试不同的线程和不同的文件块下磁盘的性能表现,这时,可以使用如下脚本达到测试目的。
测试脚本内容如下:
#!/bin/bash
#==============================================================================
#
# FILE: sysbench_auto.sh
#
# USAGE: ./sysbench_auto.sh
#
# DESCRIPTION: This file is sysbench_auto.sh
# AUTHOR: Kevin Lu (kevin), kevin@gmail.com
# ORGANIZATION: cmcc
# CREATED: 02/26/2014 17:35
# REVISION: v1.0.1
#==============================================================================
for size in {8G,64G}
do
for mode in {seqwr,seqrewr,seqrd,rndrd,rndwr,rndrw}
do
for blksize in {4096,16384}
do
sysbench --test=fileio --file-num=64 --file-total-size=$size prepare
for threads in {1,4,8,16,32}
do
echo "=============testing $blksize in $threads threads"
echo PARAS $size $mode $threads $blksize > sysbench-size-$size-mode-$mode-threads-$threads-blksz-$blksize
for i in {1,2,3}
do
sysbench --test=fileio --file-total-size=$size --file-test-mode=$mode --max-time=180 --max-requests=100000 --num-threads=$threads --
init-rng=on --file-num=64 --file-extra-flags=direct --file-fsync-freq=0 --file-block-size=$blksize run|tee -a sysbench-size-$size-mo
de-$mode-threads-$threads-blksz-$blksize 2>&1
done
done
sysbench --test=fileio --file-total-size=$size cleanup
done
done
done
-- 脚本运行后,在当前目录下会生成如下文件:
3.1 对mysql事务型OLTP的测试:
3.1.1 prepare准备阶段
对于mysql的OLTP测试,和file一样,同样需要经历prepare,run,cleanup三个阶段。prepare阶段会在数据库中产生一张指定行数的表,默认表在sbtest架构下,表名为
sbtest(sysbench默认生成表的存储引擎为innodb),如创建一张8000万条记录的表:
[root@db-master sysbench]# sysbench --test=oltp --oltp-table-size=80000000 --db-driver=mysql --mysql-socket=/data/mysqlsoft3307/mysql.sock --mysql-user=dba_manager --mysql-password='111111' --mysql-db=test prepare
sysbench 0.4.12: multi-threaded system evaluation benchmark
Creating table 'sbtest'...
Creating 10 records in table 'sbtest'...
3.1.2 run运行测试
接下来对上面产生的表进行oltp的测试:
[root@db-master sysbench]# sysbench --test=oltp --oltp-table-size=80000000 --oltp-read-only=off --init-rng=on --num-threads=16 --max-requests=0 --oltp-dist-type=uniform --max-time=3600 --mysql-user=dba_manager --mysql-password='111111' --db-driver=mysql --mysql-socket=/data/mysqlsoft3307/mysql.sock run > result.log
参数说明:
--max-time=3600 指定测试时长为1小时
--mysql-db=test 指定测试的数据库名
[root@db-master sysbench]# cat result.log
sysbench 0.4.12: multi-threaded system evaluation benchmark
Running the test with following options:
Number of threads: 16
Initializing random number generator from timer.
Doing OLTP test.
Running mixed OLTP test
Using Uniform distribution
Using "BEGIN" for starting transactions
Using auto_inc on the id column
Threads started!
Time limit exceeded, exiting...
(last message repeated 15 times)
Done.
OLTP test statistics:
queries performed:
read: 137346874
write: 49052449
other: 19620980
total: 206020303
transactions: 9810489 (2725.13 per sec.)
deadlocks: 2 (0.00 per sec.)
read/write requests: 186399323 (51777.50 per sec.)
other operations: 19620980 (5450.26 per sec.)
Test execution summary:
total time: 3600.0060s
total number of events: 9810489
total time taken by event execution: 57542.1464
per-request statistics:
min: 3.00ms
avg: 5.87ms
max: 212.09ms
approx. 95 percentile: 8.44ms
Threads fairness:
events (avg/stddev): 613155.5625/1486.47
execution time (avg/stddev): 3596.3842/0.01
以上测试结果显示了很多操作的详细信息,transactions代表测试结果的评判标准即TPS,上述测试结果是 2725.13 per sec.
可以对数据库进行调优后,再使用sysbench对OLTP进行测试,看看TPS是不是会有所提高。
注意:sysbench的测试只是基准测试,并不能代表实际企业环境下的性能指标。
https://www.cnblogs.com/pdlife/p/6698957.html