ug1209
1. Create a PetaLinux project using the following command:
$petalinux-create -t project -s <path to the directory that has
xilinx-zcu102-v2019.2-final.bsp>
petalinux-create -t project -s ./xilinx-zcu106-v2019.2-final.bsp
Note: xilinx-zcu102-v2019.2-final.bsp is the PetaLinux BSP for ZCU102 Production
Silicon Rev1.0 Board. Use xilinx-zcu102-ZU9-ES2-Rev1.0-v2019.2-final.bsp, if you
are using ES2 Silicon on Rev 1.0 board.
The above step creates a PetaLinux Project Directory, such as:
xilinx-zcu102-2019.2.
2. Change to the PetaLinux project directory using the following command:
$ cd xilinx-zcu102-2019.2
The ZCU102 Petalinux-BSP is the default ZCU102 Linux BSP. For this example, you
reconfigure the PetaLinux Project based on the Zynq UltraScale+ hardware platform that
you configured using Vivado Design Suite in Chapter 2.
cd xilinx-zcu106-2019.2
3. Copy the hardware platform edt_zcu102_wrapper.xsa to the Linux Host machine.
一开始以为只需要拷贝xsa文件,后来反复报错找不到硬件信息
应该将edt_zcu106.hw拷贝过来
4. Reconfigure the project using the following command:
$ petalinux-config --get-hw-description=<path containing edt_zcu102_wrapper.xsa>/
This command opens the PetaLinux Configuration window. If required, make changes in
the configuration. For this example, the default settings from the BSP are sufficient to
generate required boot images.
The following steps will verify if PetaLinux is configured to create Linux and boot images
for SD Boot.
petalinux-config --get-hw-description=./edt_zcu106.hw
5. Select Subsystem AUTO Hardware Settings.
6. Select Advanced Bootable Images Storage Settings.
a. Select boot image settings.
b. Select Image Storage Media.
c. Select primary sd as the boot device.
7. Under the Advanced Bootable Images Storage Settings submenu, do the following:
a. Select kernel image settings.
b. Select Image Storage Media.
c. Select primary sd as the storage device.
8. Under Subsystem AUTO Hardware Settings, select Memory Settings and set the
System Memory Size to 0x6FFFFFFF
9. Save the configuration settings and exit the Configuration wizard.
10. Wait until PetaLinux reconfigures the project.
The following steps will build the Linux images, verify them, and generate the boot
image.
11. Modify Device Tree to disable Heartbeat LED and SW19 push button, from the device
tree. Due to this the RPU R5-0 can use PS LED and SW19 switch for other designs in this
tutorial. This can be done by adding the following to the system-user.dtsi which
can be found in the following location:
<PetaLinux-project>/project-spec/meta-user/recipes-bsp/device-tr
ee/files/system-user.dtsi
12. Add the following to system-user.dtsi, so that it looks like:
/include/ "system-conf.dtsi"
/ {
gpio-keys {
sw19 {
status = "disabled";
};
};
leds {
heartbeat_led {
status = "disabled";
};
};
};
&uart1
{
status = "disabled";
};
13. In <PetaLinux-project>, build the Linux images using the following command:
$ petalinux-build
这一步出现了ERROR 很多类似下面的错误
ERROR: libusb-compat-1_0.1.5-r0 do_package_qa_setscene: Fetcher failure: Unable to find file file://43/sstate:libusb-compat:cortexa9hf-neon-xilinx-linux-gnueabi:0.1.5:r0:cortexa9hf-neon:3:43b1875a02abaf580308530f64665b87_package_qa.tgz;downloadfilename=43/sstate:libusb-compat:cortexa9hf-neon-xilinx-linux-gnueabi:0.1.5:r0:cortexa9hf-neon:3:43b1875a02abaf580308530f64665b87_package_qa.tgz anywhere. The paths that were searched were:
    /home/user/SDSoC-Zybo-Z7-20/linux/Zybo-Z7-20/build/sstate-cache
    /home/user/SDSoC-Zybo-Z7-20/linux/Zybo-Z7-20/build/sstate-cache
ERROR: libusb-compat-1_0.1.5-r0 do_package_qa_setscene: No suitable staging package found
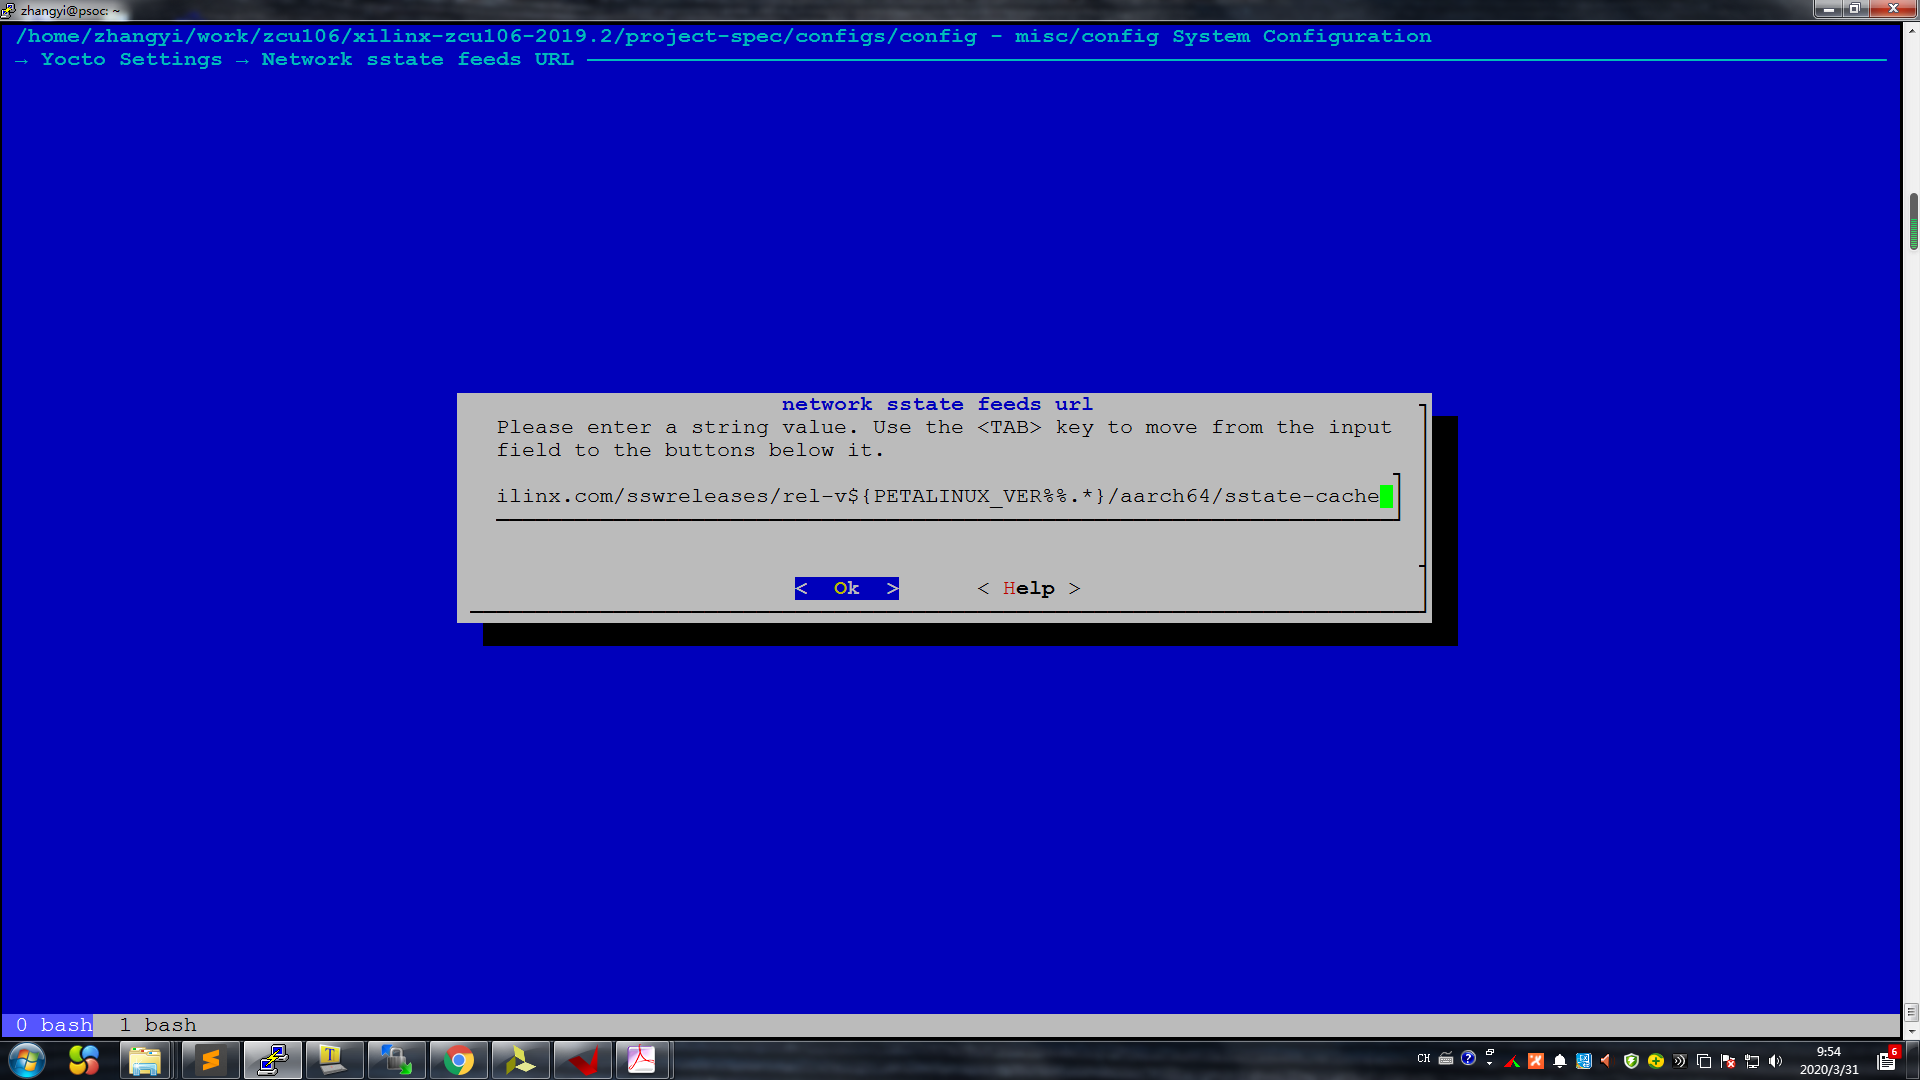
When doing a virgin clean creation with petalinux-create --template zynq and a petalinux-config
the following fields in "Yocto Settings " are automatically filled by the petalinux toolchain:
- Enable Network sstate feeds (NEW) = TRUE
- Network sstate feeds URL ---> │http://petalinux.xilinx.com/sswreleases/rel-v2016.4/arm/sstate-cache
Unfortunately, the mentioned URL no longer exists and this is presumably the root cause of my error.
By setting petalinux-config Yocto Settings Enable Network sstate feeds (NEW) = FALSE , the error disappeared.
继续petalinux-build 又出现了
device-tree-xilinx-v2019.2+gitAUTOINC+a8b39cf536-r0 do_compile: Error executing a python function in exec_python_func() autogenerated
Subprocess output:
Error: /home/zy/work/zcu106/xilinx-zcu106-2019.2/build/tmp/work/zcu106_zynqmp-xilinx-linux/device-tree/xilinx-v2019.2+gitAUTOINC+a8b39cf536-r0/system-user.dtsi:13.2-8 syntax error
FATAL ERROR: Unable to parse input tree
先暂时去掉device-tree的修改,继续往下编译试试
之后又出现了
| fatal: The remote end hung up unexpectedly
| fatal: clone of 'git://anongit.freedesktop.org/gstreamer/common' into submodule path '/home/zhangyi/work/zcu106/xilinx-zcu106-2019.2/build/tmp/work/aarch64-xilinx-linux/gst-interpipes/1.0.4-r0/git/common' failed
感觉是没找到clone的源,后来google了各种xilinx论坛的解决方案 进行了如下更改
改为

但是,最终饶了一圈下来 发现时自己修改 system-user.dtsi 有问题,不用修改petalinux-config Yocto Settings Enable Network sstate feeds的url
其中也查到一些关于预先下载package的方法,详见
https://blog.csdn.net/vacajk/article/details/77504589
包地址是 http://petalinux.xilinx.com/sswreleases/ 注意不同版本不同子文件夹
14. After the above statement executes successfully, verify the images and the timestamp in
the images directory in the PetaLinux project folder using the following commands:
$ cd images/linux/
$ ls -al
15. Generate the Boot image using the following command:
$ petalinux-package --boot --fsbl zynqmp_fsbl.elf --u-boot
This creates a BOOT.BIN image file in the following directory:
<petalinux-project>/images/linux/BOOT.BIN
The Logs indicate that the above command includes PMU_FW and ATF in BOOT.BIN. You
can also add --pmufw <PMUFW_ELF> and --atf <ATF_ELF> in the above command.
Refer $ petalinux-package --boot --help for more details.
petalinux-package --boot --fsbl zynqmp_fsbl.elf --fpga system.bit --pmufw pmufw.elf
--atf bl31.elf --u-boot u-boot.elf
To verify the image:
1. Copy files BOOT.BIN and image.ub to an SD card.
2. Load the SD card into the ZCU106 board
3. Connect a Micro USB cable from ZCU106 Board USB UART port to USB port on the
host Machine.
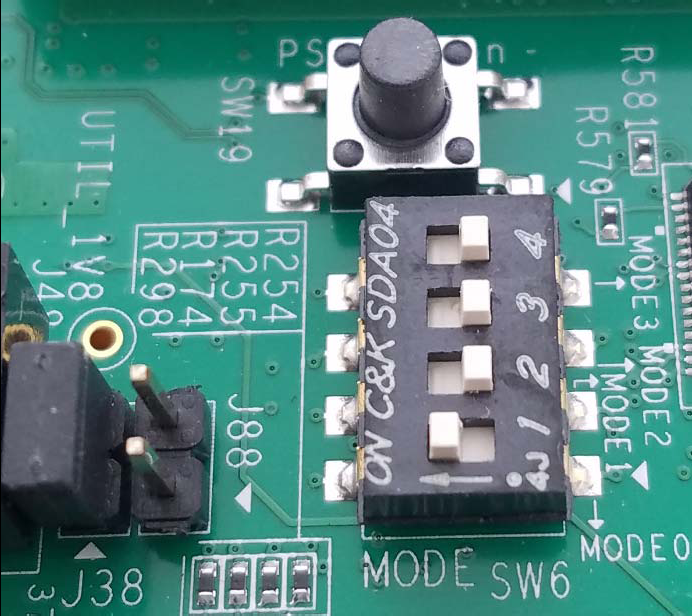
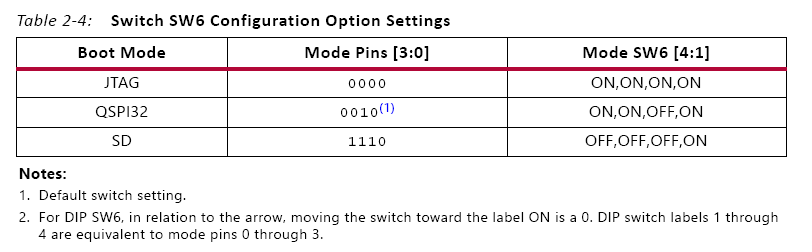
4. Configure the Board to Boot in SD-Boot mode by setting switch SW6 as shown in the
following figure.