前言
发送post的请求参考例子很简单,实际遇到的情况却是很复杂的,首先第一个post请求肯定是登录了,但登录是最难处理的。登录问题解决了,后面都简单了。
一、查看官方文档
1.学习一个新的模块,其实不用去百度什么的,直接用help函数就能查看相关注释和案例内容。
>>import requests
>>help(requests)
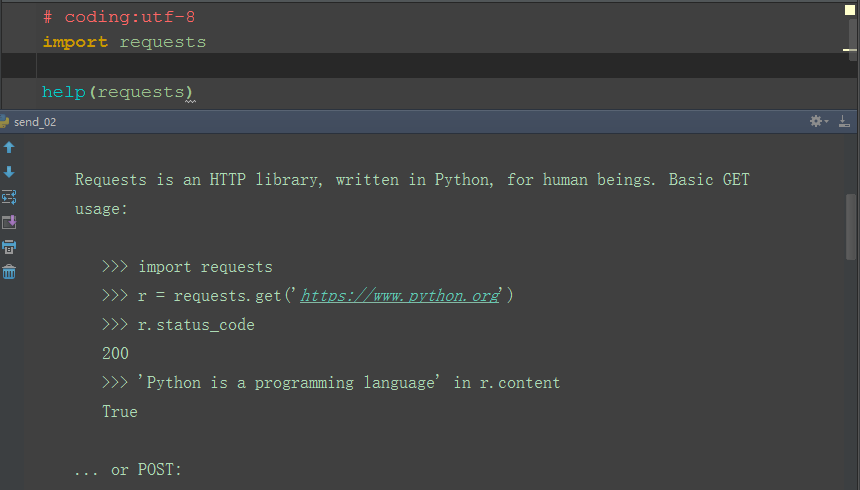
2.查看python发送get和post请求的案例
>>> import requests
>>> r = requests.get('https://www.python.org')
>>> r.status_code
200
>>> 'Python is a programming language' in r.content
True
... or POST:
>>> payload = dict(key1='value1', key2='value2')
>>> r = requests.post('http://httpbin.org/post', data=payload)
>>> print(r.text)
{
...
"form": {
"key2": "value2",
"key1": "value1"
},
...
}
二,发送post请求
♦1.用上面给的案例,做个简单修改,发个post请求
♦2.payload参数是字典类型,传到如下图的form里
实例代码:
import requests#导入request模块
import json
url = 'https://httpbin.org/post'
payload= {"pw":'1011634093@qq.com',"un":"password"}#值以字典的形式传入
response = requests.post(url=url,data=payload)
print(response.text)
运行结果:
F:Pythonpython.exe F:/Python/Interface_automation/post_requests.py
{"args":{},"data":"","files":{},
"form":{"pw":"1011634093@qq.com","un":"password"},#
  "headers":{"Accept":"*/*","Accept-Encoding":"gzip, deflate",
  "Connection":"close","Content-Length":"34",
  "Content-Type":"application/x-www-form-urlencoded",
  "Host":"httpbin.org","User-Agent":"python-requests/2.18.4"},

"json":null,"origin":"61.175.197.202","url":"https://httpbin.org/post"}


Process finished with exit code 0
三、json
♦1.post的body是json类型,也可以用json参数传入。
♦2.先导入json模块,用dumps方法转化成json格式。
♦3.返回结果,传到data里
实例代码如下:
import requests#导入request模块
import json#导入json模块
url = 'https://httpbin.org/post'body= {"pw":'1011634093@qq.com',"un":"password"}
data_json = json.dumps(body)#转化成json类型
response = requests.post(url=url,data=data_json,)
print(response.status_code)
print(response.text)
运行结果:
F:Pythonpython.exe F:/Python/Interface_automation/post_requests.py
200
b'{"args":{},
"data":"{\"pw\": \"1011634093@qq.com\",
\"un\": \"password\"}","files":{},"form":{},
"headers":{"Accept":"*/*","Accept-Encoding":"gzip, deflate",
"Connection":"close","Content-Length":"45","Host":"httpbin.org",
"User-Agent":"python-requests/2.18.4"},"json":{"pw":"1011634093@qq.com","un":"password"},#json类型
"origin":"61.175.197.202","url":"https://httpbin.org/post"}
'

Process finished with exit code 0
四、headers
♦4.1.我们在请求数据时也可以加上自定义的headers(通过headers关键字参数传递)有时候有的特殊的请求必须加上headers头信息:
实例代码:

import requests#导入request模块
import json
url = 'https://httpbin.org/post'
headers  = {"Connection":'keep-alive',"Host":"httpbin.org"}#值以字典的形式传入
response = requests.post(url=url,headers=headers)#用关键字headers传入
print(response.text)
数据结果:
F:Pythonpython.exe F:/Python/Interface_automation/post_requests.py
{"args":{},"data":"","files":{},"form":{},
"headers":{"Accept":"*/*","Accept-Encoding":"gzip, deflate","Connection":"close","Content-Length":"0","Host":"httpbin.org","User-Agent":"python-requests/2.18.4"},
"json":null,"origin":"61.175.197.202","url":"https://httpbin.org/post"}
Process finished with exit code 0
♦4.2.headers的取出方法:
我们有一下一种取出方法:
print(response.headers)#打印出响应头
print(response.headers['Connection'])#取得部分响应头以做判断:
print(response.headers.get('Connection'))#或者这样也可以
代码实例:
import requests#导入request模块
import json
url = 'https://httpbin.org/post'
headers  = {"Connection":'keep-alive',"Host":"httpbin.org"}#值以字典的形式传入
response = requests.post(url=url,headers=headers)#用关键字headers传入
print(response.headers)#打印出响应头
print(response.headers['Connection'])#取得部分响应头以做判断:
print(response.headers.get('Connection'))#或者这样也可以
print(response.text)
输出结果:
F:Pythonpython.exe F:/Python/Interface_automation/post_requests.py
{'Connection': 'keep-alive', 'Server': 'gunicorn/19.8.1', 'Date': 'Tue, 29 May 2018 08:30:55 GMT', 'Content-Type': 'application/json', 'Content-Length': '276', 'Access-Control-Allow-Origin': '*', 'Access-Control-Allow-Credentials': 'true', 'Via': '1.1 vegur'}
keep-alive#print(response.headers['Connection'])#取得部分响应头以做判断:
keep-alive#print(response.headers.get('Connection'))#或者这样也可以
{"args":{},"data":"","files":{},"form":{},"headers":{"Accept":"*/*","Accept-Encoding":"gzip, deflate","Connection":"close","Content-Length":"0","Host":"httpbin.org","User-Agent":"python-requests/2.18.4"},"json":null,"origin":"61.175.197.202","url":"https://httpbin.org/post"} Process finished with exit code 0
♦在我看来不管是get请求还是post请求我们都是发送我们想要发送的数据给服务器,然后查看服务器相应回来的数据看看这些书是否和我们想要的内容是否相符,只是get和post的请求机制不一样,但是所要做的思路是一样的。
后面我会在整理一下requests模块中的其他的东西。