最后当然还有我们的MySQL啦(遇选择请选“Y”)
root@ubuntu:/# sudo apt-get install mysql-server
漫长的等待之后,我的界面出现了非常sao的紫色,提示说输入MySQL的root用户的密码,那就输入吧,我的是**********,OK,再次输入,OK

最后我们测试一下,MySQL到底安没安上……完美
root@ubuntu:/# mysql -u root -p
Enter password:(此处输入密码)

Welcome to the MySQL monitor.  Commands end with ; or g.
Your MySQL connection id is 6
Server version: 5.7.21-0ubuntu0.16.04.1 (Ubuntu)

Copyright (c) 2000, 2018, Oracle and/or its affiliates. All rights reserved.

Oracle is a registered trademark of Oracle Corporation and/or its
affiliates. Other names may be trademarks of their respective
owners.

Type 'help;' or 'h' for help. Type 'c' to clear the current input statement.

mysql>
那就再看看有那些自带的数据库?完美,MySQL安装也到此结束了!
mysql> show databases;
+--------------------+
| Database           |
+--------------------+
| information_schema |
| mysql              |
| performance_schema |
| sys                |
+--------------------+
4 rows in set (0.01 sec)

mysql>
退出MySQL
mysql>exit
接下来就是我们的配置MySQL
1、因为MySQL的默认端口是3306,所以我们需要确认3306端口是否打开
root@ubuntu:/# ufw status

然后果然没打开,那就来打开吧
root@ubuntu:/# ufw allow 3306
Rule added
Rule added(v6)
最好检查一遍
root@ubuntu:/# ufw status
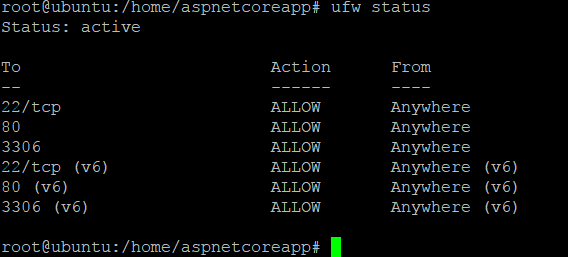
好的,那就下一步吧!
2、接着我们来看下MySQL的运行状态
root@ubuntu:/# netstat -antup
发现是127.0.0.1:3306,这可不行,因为127.0.0.1是本机IP,我们是需要开放出去的,那咱就来开放吧,进入mysql的配置文件(罪魁祸首就是红色标出来的,把这行注释掉就好了,即在这行前面加个#就可以注释了),你TM告诉我不知道怎么改??按键盘上的“insert”,还要不要我拿着你的手按方向键和删除键啊
root@ubuntu:/# cd /etc/mysql/mysql.cnf.d
root@ubuntu:/#ls
root@ubuntu:/#vi mysqld.conf
……
[mysqld]
#
# * Basic Settings
#
user            = mysql
pid-file        = /var/run/mysqld/mysqld.pid
socket          = /var/run/mysqld/mysqld.sock
port            = 3306
basedir         = /usr
datadir         = /var/lib/mysql
tmpdir          = /tmp
lc-messages-dir = /usr/share/mysql
skip-external-locking
#
# Instead of skip-networking the default is now to listen only on
# localhost which is more compatible and is not less secure.
  bind-address            = 127.0.0.1
#
# * Fine Tuning
#
……
最后应该是这样的,然后按“ESC”,输入“:wq”保存退出就好了
root@ubuntu:/# cd /etc/mysql/mysql.conf.d
root@ubuntu:/etc/mysql/mysql.conf.d#ls
mysqld.cnf   mysqld_safe_syslog.cnf
root@ubuntu:/#vi mysqld.cnf
……
[mysqld]
#
# * Basic Settings
#
user            = mysql
pid-file        = /var/run/mysqld/mysqld.pid
socket          = /var/run/mysqld/mysqld.sock
port            = 3306
basedir         = /usr
datadir         = /var/lib/mysql
tmpdir          = /tmp
lc-messages-dir = /usr/share/mysql
skip-external-locking
#
# Instead of skip-networking the default is now to listen only on
# localhost which is more compatible and is not less secure.
# bind-address            = 127.0.0.1
#
# * Fine Tuning
#
……
真的是最后一步,想要让配置生效,也要让它重启一次吧,不知道命令?这就来
root@ubuntu:/# service mysql restart
然后再来查看MySQL的运行状态,能看到:::3306我就放心了,唉,现在心有点累了
root@ubuntu:/# netstat -antup
然后再来创建所需要的数据库和简单操作一下数据库。
1、进入数据库
root@ubuntu:/#mysql -u root -p
Enter password:(输入密码)

Welcome to the MySQL monitor.  Commands end with ; or g.
Your MySQL connection id is 7
Server version: 5.7.21-0ubuntu0.16.04.1 (Ubuntu)

Copyright (c) 2000, 2018, Oracle and/or its affiliates. All rights reserved.

Oracle is a registered trademark of Oracle Corporation and/or its
affiliates. Other names may be trademarks of their respective
owners.

Type 'help;' or 'h' for help. Type 'c' to clear the current input statement.

mysql>
1、我们需要创建一个数据库,来供后面的教程使用
mysql> create database example;(注意分号)
Query OK, 1 row affected (0.00 sec)
2、进入数据库“example”
mysql> use example
Database changed
3、创建数据表
mysql> create table People(
    -> Id int,
    -> Name varchar(10),
    -> Age int,
    -> Gender varchar(5)
    -> );
Query OK, 0 rows affected (0.05 sec)
4、来看看我们的数据表的结构
mysql> desc People;
+--------+-------------+------+-----+---------+-------+
| Field  | Type        | Null | Key | Default | Extra |
+--------+-------------+------+-----+---------+-------+
| Id     | int(11)     | YES  |     | NULL    |       |
| Name   | varchar(10) | YES  |     | NULL    |       |
| Age    | int(11)     | YES  |     | NULL    |       |
| Gender | varchar(5)  | YES  |     | NULL    |       |
+--------+-------------+------+-----+---------+-------+
4 rows in set (0.01 sec)
5、来看看我们数据表的数据,嗯…没插入数据怎么会有数据呢
mysql> select * from People;
Empty set (0.00 sec)
6、那咱就来试试如何插入数据吧
mysql> insert into People value(1,'Tom',20,'male');
Query OK, 1 row affected (0.00 sec)
7、看看我们刚刚插入的数据
mysql> select * from People;
+------+------+------+--------+
| Id   | Name | Age  | Gender |
+------+------+------+--------+
|    1 | Tom  |   20 | male   |
+------+------+------+--------+
1 row in set (0.00 sec)
完美,数据库的操作就先到这了。接下来才是重头戏。—授权
只要执行下面一句,就能创建一个用户,并给该用户授予有关权限
mysql> grant all privileges on *.* to myUser@'%'identified by '123456';
Query OK, 0 rows affected, 1 warning (0.00 sec)
解释:
grant:授权关键字
all privileges:所有权限
*.*:所有数据库的所有表
myUser:被授权的用户名,即登录的用户名
%:表示所有主机都可以访问
'123456':被授权的用户名的密码,即登录的密码
最后退出MySQL
mysql>exit
Bye
至此,(一)的任务已经完成了,下面就是(二)的时间了,首页传送门