云计算openstack核心组件——keystone身份认证服务(5)
部署公共环境
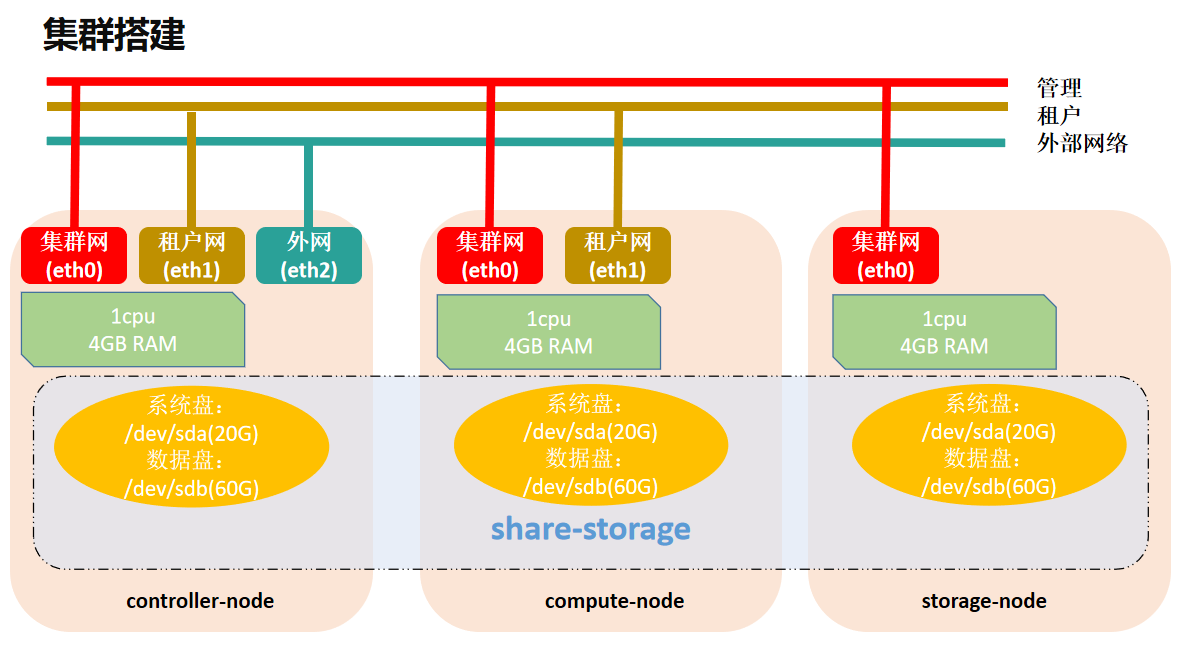
ntp openstack mariadb-server rabbitmq-server memcache
1.wget http://download2.yunwei.edu/shell/yum-repo.sh 下载源
2.bash yum-repo.sh 三台全部执行脚本 获取源
3.[root@node1 ~]# cd /etc/yum.repos.d
[root@node1 yum.repos.d]# ls
Centos7-Base-yunwei.repo epel-yunwei.repo old rdo-release-yunwei.repo
[root@node1 yum.repos.d]# 只留下这三种源
4.yum clean all
5. yum makecache
如果没有本地源下载 需要下载
Enable the OpenStack repository
- On CentOS, the extras repository provides the RPM that enables the OpenStack repository. CentOS includes the extrasrepository by default, so you can simply install the package to enable the OpenStack repository.
# yum install centos-release-openstack-ocata
- On RHEL, download and install the RDO repository RPM to enable the OpenStack repository.
# yum install https://rdoproject.org/repos/rdo-release.rpm
如果有直接下载
安装openstack 包
开始部署
6.yum install python-openstackclient 下载安装客户端
7. yum install openstack-selinux -y
systemctl stop firewalld 关闭防火墙
cat /etc/selinux/config 查看状态
[root@node1 ~]# cat /etc/selinux/config
# This file controls the state of SELinux on the system.
# SELINUX= can take one of these three values:
# enforcing - SELinux security policy is enforced.
# permissive - SELinux prints warnings instead of enforcing.
# disabled - No SELinux policy is loaded.
SELINUX=disabled
# SELINUXTYPE= can take one of three values:
# targeted - Targeted processes are protected,
# minimum - Modification of targeted policy. Only selected processes are protected.
# mls - Multi Level Security protection.
SELINUXTYPE=targeted
安装数据库 后端登录存储需要数据库
网站用主从架构 企业中云计算用galera 多主架构 只支持innodb引擎 maroadb数据库支持多种引擎 8. yum install mariadb mariadb-server python2-PyMySQL 第一个mariadb是客户端 mariadb-server是数据库服务
9.cd /etc/my.cnf.d/
[root@node1 my.cnf.d]# ls
auth_gssapi.cnf client.cnf enable_encryption.preset mariadb-server.cnf mysql-clients.cnf tokudb.cnf
10.vim openstack.cnf
输入内容
[mysqld]
bind-address = 192.168.194.7 监听地址(本机地址)
default-storage-engine = innodb 数据库引擎 支持事物 外键
innodb_file_per_table = on 开启表的锁
max_connections = 4096
collation-server = utf8_general_ci
character-set-server = utf8
11.systemctl start mariadb .service 开启
systemctl enable mariadb.service 开机自启
12.mysql_secure_installation 数据库初始化
Set root password? [Y/n] y 设置密码
New password:
Re-enter new password:
Password updated successfully!
Reloading privilege tables..
... Success!
By default, a MariaDB installation has an anonymous user, allowing anyone
to log into MariaDB without having to have a user account created for
them. This is intended only for testing, and to make the installation
go a bit smoother. You should remove them before moving into a
production environment.
Remove anonymous users? [Y/n] y 删除匿名用户
... Success!
Normally, root should only be allowed to connect from 'localhost'. This
ensures that someone cannot guess at the root password from the network.
Disallow root login remotely? [Y/n] n 是否不允许远程登录 双重否定表示肯定
... skipping.
By default, MariaDB comes with a database named 'test' that anyone can
access. This is also intended only for testing, and should be removed
before moving into a production environment.
Remove test database and access to it? [Y/n] y 删除数据库
- Dropping test database...
... Success!
- Removing privileges on test database...
... Success!
Reloading the privilege tables will ensure that all changes made so far
will take effect immediately.
Reload privilege tables now? [Y/n] y 重新加载权限
... Success!
Cleaning up...
All done! If you've completed all of the above steps, your MariaDB
installation should now be secure.
Thanks for using MariaDB!
13. mysql -uroot -p123 数据库登录 因为安装了mariadb包
Welcome to the MariaDB monitor. Commands end with ; or g.
Your MariaDB connection id is 9
Server version: 10.1.20-MariaDB MariaDB Server
Copyright (c) 2000, 2016, Oracle, MariaDB Corporation Ab and others.
Type 'help;' or 'h' for help. Type 'c' to clear the current input statement.
MariaDB [(none)]>
MariaDB [(none)]>
14.yum install rabbitmq-server 安装消息队列
分隔开集群 不需要 5672 端口号
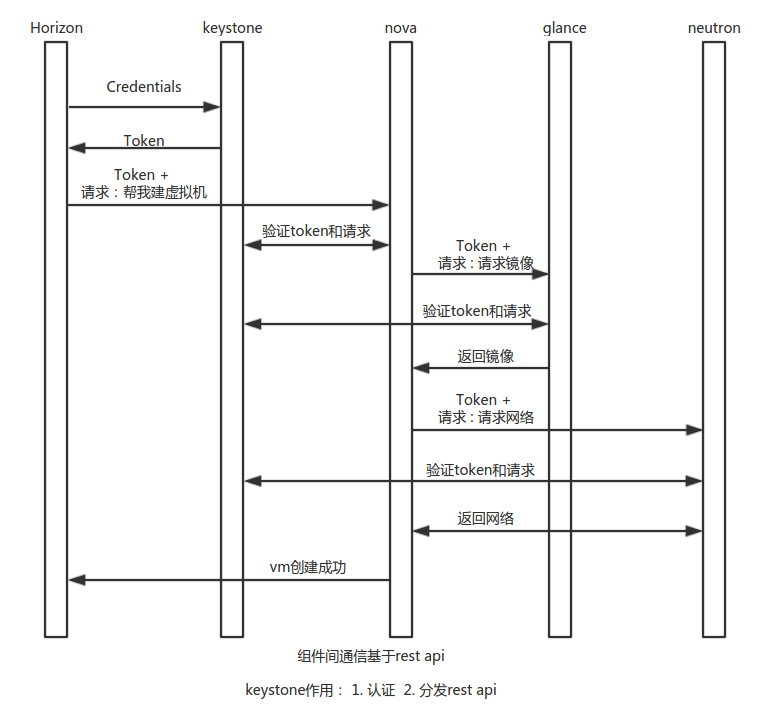
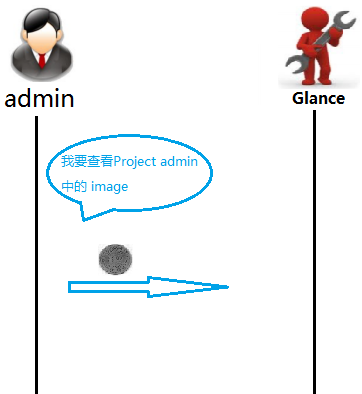
我们通过“查询可用 image”这个实际操作让大家对这些概念建立更加感性的认识。User admin 要查看 Project 中的 image
开启消息队列
15 systemctl start rabbitmq-server.service
systemctl status rabbitmq-server.service
16 创建一个opstack用户
rabbitmqctl add_user openstack 123 创建一个消息队列
17 rabbitmqctl set_permissions openstack ".*" ".*" ".*"
在网页输入192.168.194.7:15672 进入rabbitmq界面
没有tags权限 设置管理员身份adminstrator 扩展内容
18 rabbitmqctl set_user_tags openstack administrator
memcache 数据库缓存
19 yum install memcached python-memcached
20 vim /etc/sysconfig/memcached
PORT="11211"
USER="memcached"
MAXCONN="1024"
CACHESIZE="64"
OPTIONS="-l 127.0.0.1,::1,node1" 写上本地监听的地址
21 systemctl start memcached.service 开启缓存服务
systemctl status memcached.service
-
管理用户及其权限
-
维护 OpenStack Services 的 Endpoint
-
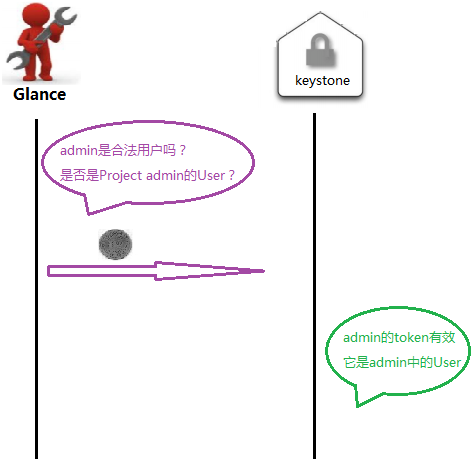
Authentication(认证)和 Authorization(鉴权)

admin:openstack平台的超级管理员,负责openstack服务的管理和访问权限
demo: 常规(非管理)任务应该使用无特权的项目和用户,所有要创建 demo 项目和 demo 用户除了 admin 和 demo,OpenStack 也为 nova、cinder、glance、neutron 服务创建了相应的 User。 admin 也可以管理这些 User。


-
Token 用做访问 Service 的 Credential
-
Service 会通过 Keystone 验证 Token 的有效性
-
Token 的有效期默认是 24 小时

-
资源的所有权是属于 Project 的,而不是 User。
-
在 OpenStack 的界面和文档中,Tenant / Project / Account 这几个术语是通用的,但长期看会倾向使用 Project
-
每个 User(包括 admin)必须挂在 Project 里才能访问该 Project 的资源。 一个User可以属于多个 Project。
-
admin 相当于 root 用户,具有最高权限


# source devstack/openrc admin admin# openstack catalog list

-
Keystone定义Role

-
可以为 User 分配一个或多个 Role,Horizon 的菜单为:Identity->Project->ManageMembers

-
Service 决定每个 Role 能做什么事情 Service 通过各自的 policy.json 文件对 Role 进行访问控制。 下面是 Nova 服务 /etc/nova/policy.json 中的示例:

一个是管理员admin
一个是租户_member_
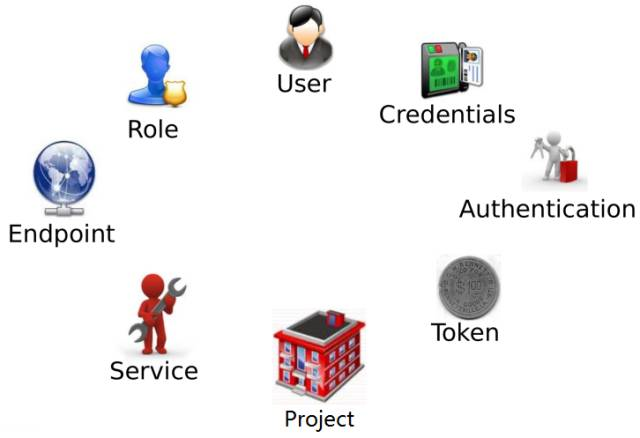
二、Keystone基本架构:

三、通过例子认识Keystone:
我们通过“查询可用 image”这个实际操作让大家对这些概念建立更加感性的认识。User admin 要查看 Project 中的 image
 时,OpenStack 内部发生了哪些事情?请看下面
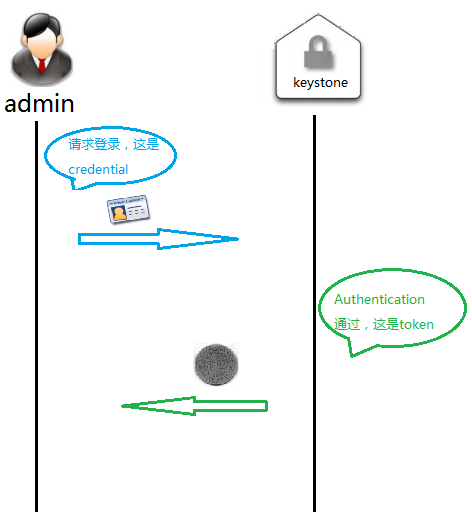


[DEFAULT]

[assignment]

[auth]

[cache]

[catalog]

[cors]

[cors.subdomain]

[credential]

[database]
connection = mysql+pymysql://keystone:KEYSTONE_DBPASS@controller/keystone

[domain_config]

[endpoint_filter]

[endpoint_policy]

[eventlet_server]

[federation]

[fernet_tokens]

[healthcheck]

[identity]

[identity_mapping]

[kvs]

[ldap]

[matchmaker_redis]

[memcache]

[oauth1]

[oslo_messaging_amqp]

[oslo_messaging_kafka]

[oslo_messaging_notifications]

[oslo_messaging_rabbit]

[oslo_messaging_zmq]

[oslo_middleware]

[oslo_policy]

[paste_deploy]

[policy]

[profiler]

[resource]

[revoke]

[role]

[saml]

[security_compliance]

[shadow_users]

[signing]

[token]
provider = fernet

[tokenless_auth]

[trust]