基本使用——OkHttp3详细使用教程
概述
OkHttp现在应该算是最火的Http第三方库,Retrofit底层也是使用OkHttp,网上很多教程都写的不错,但是有些我认为重要的知识,大多一笔带过,所以我决定写一篇入门文章
OkHttp官网地址:http://square.github.io/okhttp/
OkHttp GitHub地址:https://github.com/square/okhttp
出现背景
网络访问的高效性要求,可以说是为高效而生
解决思路
- 提供了对 HTTP/2 和 SPDY 的支持,这使得对同一个主机发出的所有请求都可以共享相同的套接字连接
- 如果 HTTP/2 和 SPDY 不可用,OkHttp 会使用连接池来复用连接以提高效率
- 提供了对 GZIP 的默认支持来降低传输内容的大小
- 提供了对 HTTP 响应的缓存机制,可以避免不必要的网络请求
- 当网络出现问题时,OkHttp 会自动重试一个主机的多个 IP 地址
OkHttp3设计思路
Requests(请求)
每一个HTTP请求中都应该包含一个URL,一个GET或POST方法以及Header或其他参数,当然还可以含特定内容类型的数据流。
Responses(响应)
响应则包含一个回复代码(200代表成功,404代表未找到),Header和定制可选的body。
二、使用教程
2.1、GRADLE引入包
compile 'com.squareup.okhttp3:okhttp:3.2.0'- 1
2.2、创建OkHttpClient实例
简单来说,通过OkHttpClient可以发送一个Http请求,并读取该Http请求的响应,它是一个生产Call的工厂。
此外,受益于一个共享的响应缓存/线程池/复用的连接等因素,绝大多数应用使用一个OkHttpClient实例,便可以满足整个应用的Http请求。
三种创建实例的方法:
- 创建一个默认配置OkHttpClient,可以使用默认的构造函数。
- 通过new OkHttpClient.Builder()方法来一步一步配置一个OkHttpClient实例。
- 如果要求使用现有的实例,可以通过newBuilder()方法来进行构造。
OkHttpClient client = new OkHttpClient();
OkHttpClient clientWith30sTimeout = client.Builder()
    .readTimeout(30, TimeUnit.SECONDS)
    .build();
OkHttpClient client  = client.newBuilder().build();
看一下OkHttpClient的源码,会发现缓存/代理等等需求,一应俱全的按照类封装到了Builder中。
Dispatcher dispatcher;          // 分发
Proxy proxy;                    // 代理
List<Protocol> protocols;
List<ConnectionSpec> connectionSpecs;
final List<Interceptor> interceptors = new ArrayList<>(); // 拦截器
final List<Interceptor> networkInterceptors = new ArrayList<>(); // 网络拦截器
ProxySelector proxySelector;
CookieJar cookieJar;
Cache cache;    // 缓存
InternalCache internalCache;
SocketFactory socketFactory;
SSLSocketFactory sslSocketFactory;
HostnameVerifier hostnameVerifier;
CertificatePinner certificatePinner;
Authenticator proxyAuthenticator;   // 代理证书
Authenticator authenticator;        // 证书
ConnectionPool connectionPool;
Dns dns;        // DNS
boolean followSslRedirects;
boolean followRedirects;
boolean retryOnConnectionFailure;
int connectTimeout;
int readTimeout;
int writeTimeout;
2.3、GET
OkHttpClient client = new OkHttpClient();

String run(String url) throws IOException {
  Request request = new Request.Builder()
      .url(url)
      .build();

  Response response = client.newCall(request).execute();
  return response.body().string();
}
Request
简单看一下Request类,可以发现它代表一个Http请求,需要注意的是Request一旦build()之后,便不可修改。
主要通过new Request.Builder()来一步一步构造的。看一下Builder的代码。
public Builder() {
  this.method = "GET";
  this.headers = new Headers.Builder();
}
默认是Get方法,
此外还创建了头信息。Headers类中是通过List<String> namesAndValues = new ArrayList<>(20),来存放头信息的,一开始我也很纳闷,头信息都是一对一对的为什么要用List,看一下源码发现,在存取的时候都是将索引+2或者-2。并且头信息可以存在多个相同的Key信息。
发起请求
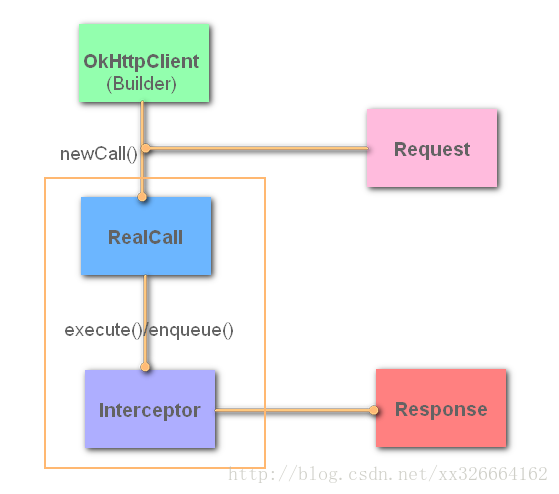
跟到newCall()方法中发现,又使用OkHttpClient实例和Request的实例,一起构造了一个RealCall的实例。
RealCall类简单做了一个托管并通过Dispather类对请求进行分发和执行,实际开启线程发起请求的方法就在这个类中。
随后又调用execute()方法,拿到了一个响应。这个execute()方法,实际上执行的就是RealCall中的execute()方法,最后调用了Dispatcher的execute()方法。
Response
Response代表一个Http的响应,这个类的实例不可修改。
一个简单的Get请求和说明就结束了
2.4、POST
2.4.1、POST提交字符串
public static final MediaType JSON
    = MediaType.parse("application/json; charset=utf-8");

OkHttpClient client = new OkHttpClient();

String post(String url, String json) throws IOException {
  RequestBody body = RequestBody.create(JSON, json);
  Request request = new Request.Builder()
      .url(url)
      .post(body)
      .build();
  Response response = client.newCall(request).execute();
  return response.body().string();
}
MediaType用于描述Http请求和响应体的内容类型,也就是Content-Type。
一次请求就是向目标服务器发送一串文本。什么样的文本?有下面结构的文本。
HTTP请求包结构(图片来自Android网络请求心路历程)
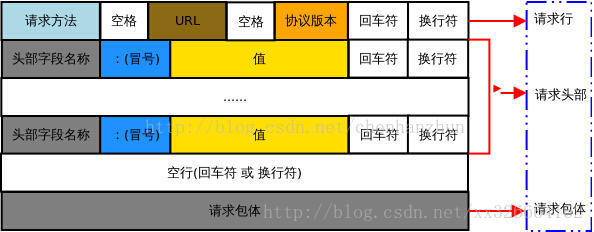
例子:
POST /meme.php/home/user/login HTTP/1.1
Host: 114.215.86.90
Cache-Control: no-cache
Postman-Token: bd243d6b-da03-902f-0a2c-8e9377f6f6ed
Content-Type: application/x-www-form-urlencoded

tel=13637829200&password=123456
例如,MediaType.parse(“application/json; charset=utf-8”);这个就带表请求体的类型为JSON格式的。
定义好数据类型,还要将其变为请求体,最后通过post()方法,随请求一并发出。
2.4.2、POST提交键值对
OkHttp也可以通过POST方式把键值对数据传送到服务器
OkHttpClient client = new OkHttpClient();
String post(String url, String json) throws IOException {
    RequestBody formBody = new FormEncodingBuilder()
    .add("platform", "android")
    .add("name", "bug")
    .add("subject", "XXXXXXXXXXXXXXX")
    .build();

    Request request = new Request.Builder()
      .url(url)
      .post(body)
      .build();

    Response response = client.newCall(request).execute();
    if (response.isSuccessful()) {
        return response.body().string();
    } else {
        throw new IOException("Unexpected code " + response);
    }
}
2.4.3、Post方式提交流
以流的方式POST提交请求体。请求体的内容由流写入产生。这个例子是流直接写入Okio的BufferedSink。你的程序可能会使用OutputStream,你可以使用BufferedSink.outputStream()来获取。.
public static final MediaType MEDIA_TYPE_MARKDOWN
      = MediaType.parse("text/x-markdown; charset=utf-8");

  private final OkHttpClient client = new OkHttpClient();

  public void run() throws Exception {
    RequestBody requestBody = new RequestBody() {
      @Override public MediaType contentType() {
        return MEDIA_TYPE_MARKDOWN;
      }

      @Override public void writeTo(BufferedSink sink) throws IOException {
        sink.writeUtf8("Numbers
");
        sink.writeUtf8("-------
");
        for (int i = 2; i <= 997; i++) {
          sink.writeUtf8(String.format(" * %s = %s
", i, factor(i)));
        }
      }

      private String factor(int n) {
        for (int i = 2; i < n; i++) {
          int x = n / i;
          if (x * i == n) return factor(x) + " × " + i;
        }
        return Integer.toString(n);
      }
    };

    Request request = new Request.Builder()
        .url("https://api.github.com/markdown/raw")
        .post(requestBody)
        .build();

    Response response = client.newCall(request).execute();
    if (!response.isSuccessful()) throw new IOException("Unexpected code " + response);

    System.out.println(response.body().string());
  }
重写RequestBody中的几个方法,将本地数据放入到Http协议的请求体中,然后发送到服务端。
2.4.4、Post方式提交表单
使用FormEncodingBuilder来构建和HTML标签相同效果的请求体。键值对将使用一种HTML兼容形式的URL编码来进行编码。
private final OkHttpClient client = new OkHttpClient();

  public void run() throws Exception {
    RequestBody formBody = new FormBody.Builder()
        .add("search", "Jurassic Park")
        .build();
    Request request = new Request.Builder()
        .url("https://en.wikipedia.org/w/index.php")
        .post(formBody)
        .build();

    Response response = client.newCall(request).execute();
    if (!response.isSuccessful()) throw new IOException("Unexpected code " + response);

    System.out.println(response.body().string());
  }
2.4.5、Post方式提交分块请求,可以上传文件
MultipartBuilder可以构建复杂的请求体,与HTML文件上传形式兼容。
多块请求体中每块请求都是一个请求体,可以定义自己的请求头。这些请求头可以用来描述这块请求,例如他的Content-Disposition。如果Content-Length和Content-Type可用的话,他们会被自动添加到请求头中。
private static final String IMGUR_CLIENT_ID = "...";
  private static final MediaType MEDIA_TYPE_PNG = MediaType.parse("image/png");

  private final OkHttpClient client = new OkHttpClient();

  public void run() throws Exception {
    // Use the imgur image upload API as documented at https://api.imgur.com/endpoints/image
    RequestBody requestBody = new MultipartBody.Builder()
        .setType(MultipartBody.FORM)
        .addFormDataPart("title", "Square Logo")
        .addFormDataPart("image", "logo-square.png",
            RequestBody.create(MEDIA_TYPE_PNG, new File("website/static/logo-square.png")))
        .build();

    Request request = new Request.Builder()
        .header("Authorization", "Client-ID " + IMGUR_CLIENT_ID)
        .url("https://api.imgur.com/3/image")
        .post(requestBody)
        .build();

    Response response = client.newCall(request).execute();
    if (!response.isSuccessful()) throw new IOException("Unexpected code " + response);

    System.out.println(response.body().string());
  }
2.5、HTTP头部的设置和读取
HTTP 头的数据结构是 Map<String, List<String>>类型。也就是说,对于每个 HTTP 头,可能有多个值。但是大部分 HTTP 头都只有一个值,只有少部分 HTTP 头允许多个值。至于name的取值说明,可以查看这个请求头大全。
OkHttp的处理方式是:
- 使用
header(name,value)来设置HTTP头的唯一值,如果请求中已经存在响应的信息那么直接替换掉。 - 使用
addHeader(name,value)来补充新值,如果请求头中已经存在name的name-value,那么还会继续添加,请求头中便会存在多个name相同而value不同的“键值对”。 - 使用
header(name)读取唯一值或多个值的最后一个值 - 使用
headers(name)获取所有值
OkHttpClient client = new OkHttpClient();

Request request = new Request.Builder()
        .url("https://github.com")
        .header("User-Agent", "My super agent")
        .addHeader("Accept", "text/html")
        .build();

Response response = client.newCall(request).execute();
if (!response.isSuccessful()) {
    throw new IOException("服务器端错误: " + response);
}

System.out.println(response.header("Server"));
System.out.println(response.headers("Set-Cookie"));
2.6、同步和异步
Synchronous Get(同步Get)
下载一个文件,打印他的响应头,以string形式打印响应体。
响应体的 string() 方法对于小文档来说十分方便、高效。但是如果响应体太大(超过1MB),应避免适应 string()方法 ,因为他会将把整个文档加载到内存中。对于超过1MB的响应body,应使用流的方式来处理body。
private final OkHttpClient client = new OkHttpClient();

  public void run() throws Exception {
    Request request = new Request.Builder()
        .url("http://publicobject.com/helloworld.txt")
        .build();

    Response response = client.newCall(request).execute();//同步
    if (!response.isSuccessful()) throw new IOException("Unexpected code " + response);

    Headers responseHeaders = response.headers();
    for (int i = 0; i < responseHeaders.size(); i++) {
      System.out.println(responseHeaders.name(i) + ": " + responseHeaders.value(i));
    }

    System.out.println(response.body().string());
  }
Asynchronous Get(异步Get)
在一个工作线程中下载文件,当响应可读时回调Callback接口。读取响应时会阻塞当前线程。OkHttp现阶段不提供异步api来接收响应体。
private final OkHttpClient client = new OkHttpClient();

  public void run() throws Exception {
    Request request = new Request.Builder()
        .url("http://publicobject.com/helloworld.txt")
        .build();

    //异步,需要设置一个回调接口
    client.newCall(request).enqueue(new Callback() {
      @Override public void onFailure(Call call, IOException e) {
        e.printStackTrace();
      }

      @Override public void onResponse(Call call, Response response) throws IOException {
        if (!response.isSuccessful()) throw new IOException("Unexpected code " + response);

        Headers responseHeaders = response.headers();
        for (int i = 0, size = responseHeaders.size(); i < size; i++) {
          System.out.println(responseHeaders.name(i) + ": " + responseHeaders.value(i));
        }

        System.out.println(response.body().string());
      }
    });
  }
参考:
OkHttp官方教程解析-彻底入门OkHttp使用
Android OkHttp完全解析 是时候来了解OkHttp了
OKHttp3.0的日常及入门
#Android#OkHttp3使用指南