一、组件方式检查
1. Master节点:
2. Node 节点:
无
1. Master 节点:
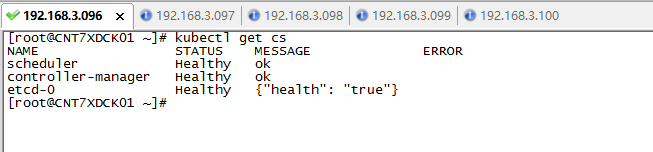
root>> systemctl status etcd
root>> systemctl status kube-apiserver
root>> systemctl status kube-controller-manager
root>> systemctl status kube-scheduler

2. Node 节点
root>> systemctl status flanneld
root>> systemctl status kube-proxy
root>> systemctl status kubelet
root>> systemctl status docker
三、进程方式检查
1. Master 节点:
root>> ps -ef | grep etcd
root>> yum list installed | grep kube

2. Node 节点:
root>> ps -ef | grep flannel
root>> ps -ef | grep kube

四、安装包方式检查
1. Master 节点:
root>> yum list installed | grep etcd
root>> yum list installed | grep kube

2. Node 节点:
root>> yum list installed | grep flannel
root>> yum list installed | grep kube

五,附上第一次安装k8s集群失败后,后面重新安装k8s的一些环境重置的命令。
5.1 Master 节点
1. 卸载之前组件
[root@CNT7XDCK01 ~]# yum list installed | grep kube #首先查询组件
kubernetes-client.x86_64 1.5.2-0.7.git269f928.el7 @extras
kubernetes-master.x86_64 1.5.2-0.7.git269f928.el7 @extras
[root@CNT7XDCK01 ~]# yum remove -y kubernetes-client.x86_64
[root@CNT7XDCK01 ~]# yum remove -y kubernetes-master.x86_64

2. 重新安装组件
[root@CNT7XDCK01 ~]# yum -y install etcd
[root@CNT7XDCK01 ~]# yum -y install kubernetes-master
3. 配置相关kube的配置文件
编辑/etc/etcd/etcd.conf文件
ETCD_NAME="default"
ETCD_DATA_DIR="/var/lib/etcd/default.etcd"
ETCD_LISTEN_CLIENT_URLS="http://0.0.0.0:2379"
ETCD_ADVERTISE_CLIENT_URLS="http://localhost:2379"
编辑/etc/kubernetes/apiserver文件
###
# kubernetes system config
#
# The following values are used to configure the kube-apiserver
#

# The address on the local server to listen to.
KUBE_API_ADDRESS="--insecure-bind-address=0.0.0.0"

# The port on the local server to listen on.
KUBE_API_PORT="--port=8080"

# Port minions listen on
KUBELET_PORT="--kubelet-port=10250"

# Comma separated list of nodes in the etcd cluster
KUBE_ETCD_SERVERS="--etcd-servers=http://127.0.0.1:2379"

# Address range to use for services
KUBE_SERVICE_ADDRESSES="--service-cluster-ip-range=10.254.0.0/16"

# default admission control policies
# KUBE_ADMISSION_CONTROL="--admission-control=NamespaceLifecycle,NamespaceExists,LimitRanger,SecurityContextDeny,ServiceAccount,ResourceQuota"
KUBE_ADMISSION_CONTROL="--admission-control=NamespaceLifecycle,NamespaceExists,LimitRanger,SecurityContextDeny,ResourceQuota"

# Add your own!
KUBE_API_ARGS=""
4. 重新注册/启动/检查:组件的系统服务
[root@CNT7XDCK01 ~]# systemctl enable etcd
[root@CNT7XDCK01 ~]# systemctl enable kube-apiserver
[root@CNT7XDCK01 ~]# systemctl enable kube-controller-manager
[root@CNT7XDCK01 ~]# systemctl enable kube-scheduler
[root@CNT7XDCK01 ~]# systemctl restart etcd
[root@CNT7XDCK01 ~]# systemctl restart kube-apiserver
[root@CNT7XDCK01 ~]# systemctl restart kube-controller-manager
[root@CNT7XDCK01 ~]# systemctl restart kube-scheduler
[root@CNT7XDCK01 ~]# systemctl status etcd
[root@CNT7XDCK01 ~]# systemctl status kube-apiserver
[root@CNT7XDCK01 ~]# systemctl status kube-controller-manager
[root@CNT7XDCK01 ~]# systemctl status kube-scheduler
====================================================================
5.2 Node 节点
1. 卸载之前组件
[root@CNT7XDCK02 ~]# yum list installed | grep kube
kubernetes-client.x86_64 1.5.2-0.7.git269f928.el7 @extras
kubernetes-node.x86_64 1.5.2-0.7.git269f928.el7 @extras
[root@CNT7XDCK02 ~]# yum remove -y kubernetes-client.x86_64
[root@CNT7XDCK02 ~]# yum remove -y kubernetes-node.x86_64

2. 重新安装组件
[root@CNT7XDCK02 ~]# yum -y install flannel
[root@CNT7XDCK02 ~]# yum -y install kubernetes-node
3. 配置相关kube的配置文件
修改/etc/sysconfig/flanneld文件
# Flanneld configuration options

# etcd url location.  Point this to the server where etcd runs
FLANNEL_ETCD_ENDPOINTS="http://192.168.3.96:2379"

# etcd config key.  This is the configuration key that flannel queries
# For address range assignment
FLANNEL_ETCD_PREFIX="/atomic.io/network"

# Any additional options that you want to pass
#FLANNEL_OPTIONS=""
修改/etc/kubernetes/config文件
###
# kubernetes system config
#
# The following values are used to configure various aspects of all
# kubernetes services, including
#
#   kube-apiserver.service
#   kube-controller-manager.service
#   kube-scheduler.service
#   kubelet.service
#   kube-proxy.service
# logging to stderr means we get it in the systemd journal
KUBE_LOGTOSTDERR="--logtostderr=true"

# journal message level, 0 is debug
KUBE_LOG_LEVEL="--v=0"

# Should this cluster be allowed to run privileged docker containers
KUBE_ALLOW_PRIV="--allow-privileged=false"

# How the controller-manager, scheduler, and proxy find the apiserver
KUBE_MASTER="--master=http://192.168.3.96:8080"
修改/etc/kubernetes/kubelet文件
###
# kubernetes kubelet (minion) config

# The address for the info server to serve on (set to 0.0.0.0 or "" for all interfaces)
KUBELET_ADDRESS="--address=0.0.0.0"

# The port for the info server to serve on
KUBELET_PORT="--port=10250"

# You may leave this blank to use the actual hostname
KUBELET_HOSTNAME="--hostname-override=192.168.3.97" # 这里是node机器的IP

# location of the api-server
KUBELET_API_SERVER="--api-servers=http://192.168.3.96:8080" # 这里是master机器的IP

# pod infrastructure container
KUBELET_POD_INFRA_CONTAINER="--pod-infra-container-image=registry.access.redhat.com/rhel7/pod-infrastructure:latest"

# Add your own!
KUBELET_ARGS=""
4. 重新注册/启动/检查:组件的系统服务
[root@CNT7XDCK02 ~]# systemctl enable flanneld
[root@CNT7XDCK02 ~]# systemctl enable kube-proxy
[root@CNT7XDCK02 ~]# systemctl enable kubelet
[root@CNT7XDCK02 ~]# systemctl enable docker
[root@CNT7XDCK02 ~]# systemctl restart flanneld
[root@CNT7XDCK02 ~]# systemctl restart kube-proxy
[root@CNT7XDCK02 ~]# systemctl restart kubelet
[root@CNT7XDCK02 ~]# systemctl restart docker
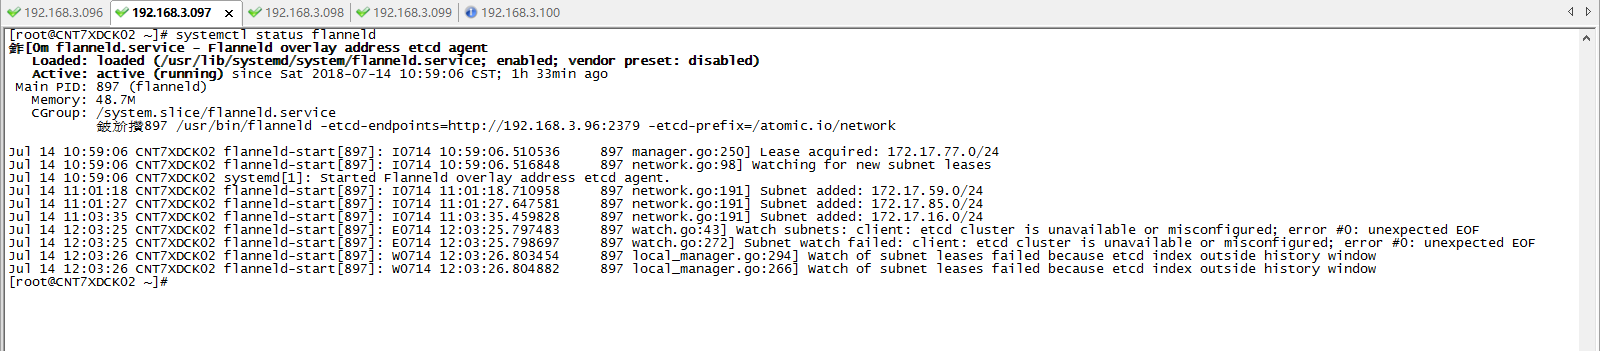
[root@CNT7XDCK02 ~]# systemctl status flanneld
[root@CNT7XDCK02 ~]# systemctl status kube-proxy
[root@CNT7XDCK02 ~]# systemctl status kubelet
[root@CNT7XDCK02 ~]# systemctl status docker
六、最后,在Master机器,查看K8s安装结果
[root@CNT7XDCK01 ~]# kubectl get nodes
NAME STATUS AGE
192.168.3.100 Ready 35d
192.168.3.97 Ready 35d
192.168.3.98 Ready 35d
192.168.3.99 Ready 35d
如下,可以看到master拥有四个node节点机器,状态是Ready正常的。