翻译自 Camilo Reyes 2020年8月26日的文章 《Build a REST API in .NET Core》 [1]
REST API 可以使用简单的动词(如 POST、PUT、PATCH 等)将大型解决方案背后的复杂性隐藏起来。在本文中,Camilo Reyes 解释了如何在 .NET Core 中创建 REST API。
扩展大型复杂解决方案的一种方法是将它们分解为 REST 微服务。微服务开启了 API 背后的业务逻辑的可测试性和可重用性。因为 REST API 可以被多个客户端重用,使得组织可以共享软件模块。客户端或许是移动端、网页端,甚至单页应用中的静态资源端,它们可以调用任意多的 API。
在本文中,我将向您展示在 .NET Core 中构建 REST API 的全过程。我将用现实工作中的需求来解释这个过程,比如版本控制、搜索、日志记录等等。REST 通常与诸如 POST、PUT 或 PATCH 的动词一起使用,因此我打算将它们全部覆盖。我希望您看到的是,使用现有工具交付价值的一个好的有效的方式。
入门介绍
本文假定您已掌握了 ASP.NET、C# 和 REST API,因此我不会涉及任何基础知识。我建议在学习本文时使用最新的 .NET Core 版本[2]。如果您想从工作代码开始学习,可以从 GitHub 下载[3]示例代码。
你可以先新建一个文件夹,比如 BuildRestApiNetCore,然后在 shell 中打开它:
dotnet new sln
dotnet new webapi --no-https
dotnet sln add .
该项目基于禁用了 HTTPS 的 Web API 模板,以简化本地开发。双击解决方案文件会在 Visual Studio 中打开它(如果已安装)。为了支持 .NET Core 3.1,请确保安装了 2019 版的 IDE。
由于 API 在客户端和数据库之间建立了一层分离,因此准备数据是一个很好的开始。为了简化数据访问,Entity Framework 提供了一个内存中的替代方案,这样我就可以只关注 API 本身。
通过 NuGet 获取内存数据库提供程序:
dotnet add package Microsoft.EntityFrameworkCore.InMemory
然后,创建以下数据模型。我将其放在 Models 文件夹中,以表示此命名空间存放原始数据。若要使用数据标注,请在 using 语句中添加 System.ComponentModel.DataAnnotations。
public class Product
{
    [Key]
    [Required]
    [Display(Name = "productNumber")]
    public string ProductNumber { get; set; }

    [Required]
    [Display(Name = "name")]
    public string Name { get; set; }

    [Required]
    [Range(10, 90)]
    [Display(Name = "price")]
    public double? Price { get; set; }

    [Required]
    [Display(Name = "department")]
    public string Department { get; set; }
}
在实际的解决方案中,这可能要根据团队的需要将其放在单独的项目中。请注意分配给该模型的属性,例如 Required、Display 和 Range,这些是 ASP.NET 中的数据标注,用于在模型绑定时验证 Product。因为我使用的是内存数据库,所以 Entity Framework 需要一个唯一的 Key。这些属性指定了验证规则,例如:价格区间或者该属性是否是必须的。
从业务的视角来看,这是一个包含产品编号、名称和价格的电子商务站点。每个产品还指定了一个部门,以便按部门进行搜索。
接下来,在 Models 命名空间中设置 Entity Framework DbContext:
public class ProductContext : DbContext
{
    public ProductContext(DbContextOptions<ProductContext> options) : base(options)
    {
    }

    public DbSet<Product> Products { get; set; }
}
该数据库上下文被依赖注入到控制器中,用于查询或更新数据。要在 ASP.NET Core 中启用依赖注入,请打开 Startup 类并将其添加到 ConfigureServices 中:
services.AddDbContext<ProductContext>(opt => opt.UseInMemoryDatabase("Products"));
这行代码完成了内存数据库。请确保在两个类的 using 语句中添加 Microsoft.EntityFrameworkCore。一个空白的后端是无趣的,因此我们来填充一些种子数据。
创建下面的扩展方法以帮助迭代生成种子数据,可以将它放在 Extensions 命名空间或文件夹中:
public static class EnumerableExtensions
{
    public static IEnumerable<T> Times<T>(this int count, Func<int, T> func)
    {
        for (var i = 1; i <= count; i++) yield return func.Invoke(i);
    }
}
在 Models 命名空间下添加一个静态类以初始化种子数据:
public static class ProductSeed
{
    public static void InitData(ProductContext context)
    {
        var rnd = new Random();

        var adjectives = new[] { "Small", "Ergonomic", "Rustic", "Smart", "Sleek" };
        var materials = new[] { "Steel", "Wooden", "Concrete", "Plastic", "Granite", "Rubber" };
        var names = new[] { "Chair", "Car", "Computer", "Pants", "Shoes" };
        var departments = new[] { "Books", "Movies", "Music", "Games", "Electronics" };

        context.Products.AddRange(900.Times(x =>
        {
            var adjective = adjectives[rnd.Next(0, 5)];
            var material = materials[rnd.Next(0, 5)];
            var name = names[rnd.Next(0, 5)];
            var department = departments[rnd.Next(0, 5)];
            var productId = $"{x,-3:000}";

            return new Product
            {
                ProductNumber = $"{department.First()}{name.First()}{productId}",
                Name = $"{adjective} {material} {name}",
                Price = (double)rnd.Next(1000, 9000) / 100,
                Department = department
            };
        }));

        context.SaveChanges();
    }
}
这段代码循环遍历一个 900 条数据的列表以生成大量的产品,这些产品的部门、价格和名称都是随机捡选的。每个产品都有一个“巧妙”的 key 作为主键,该主键由部门、名称和产品 Id 组合而成。
有了这些种子数据,您就可以得到诸如在 Electronics 部门带有标价的名为 “Smart Wooden Pants” 的产品了。
作为开始构建 Endpoints[4]的第一步,设置 API 版本是一个好主意。这使得客户端应用可以随时升级 API 功能,而无需紧密耦合。
API 版本控制来自一个 NuGet 包:
dotnet add package Microsoft.AspNetCore.Mvc.Versioning
回到 Startup 类,并将其添加到 ConfigureServices 中:
services.AddApiVersioning(opt => opt.ReportApiVersions = true);
我选择在 API 响应中包含可用的版本号,以便客户端知道何时有升级可用。我推荐使用 语义化的版本控制 [5]来传达 API 中的重大更改。让客户端知道每次升级都修改了什么,这样有助于每个客户端保持最新的功能。
REST API 中的搜索 Endpoint
要构建一个 Endpoint,请在 Controllers 文件夹中转到 ASP.NET 中的 Controller。
使用下面的代码创建一个 ProductsController,请确保在 using 语句中添加 Microsoft.AspNetCore.Mvc 命名空间:
[ApiController]
[ApiVersion("1.0")]
[Route("v{version:apiVersion}/[controller]")]
[Produces("application/json")]
public class ProductsController : ControllerBase
{
    private readonly ProductContext _context;

    public ProductsController(ProductContext context)
    {
        _context = context;

        if (_context.Products.Any()) return;

        ProductSeed.InitData(context);
    }
}
请注意,当数据库中没有任何产品时,将运行 InitData 初始化种子数据。我设置了一个带有版本控制的 Route,版本号通过 ApiVersion 设置。通过依赖注入将数据上下文 ProductContext 注入到构造函数中。在该 Controller 中,第一个 Endpoint 是返回一个产品列表的 GET:
[HttpGet]
[Route("")]
[ProducesResponseType(StatusCodes.Status200OK)]
public ActionResult<IQueryable<Product>> GetProducts()
{
    var result = _context.Products as IQueryable<Product>;

    return Ok(result.OrderBy(p => p.ProductNumber));
}
请确保在 using 语句中添加 Microsoft.AspNetCore.Http,以设置响应类型中的状态码。
我选择按照产品编号排序产品,以便更简单地显示结果。在生产系统中,可以检查这种排序是否与聚集索引相匹配,以便减轻数据库的运行压力。经常检查执行计划和统计 IO,以确认有良好的性能。
此项目已经可以进行测试了!在命令行中运行以下命令:
dotnet watch run
使用 curl 测试该 Endpoint:
curl -i -X GET "http://localhost:5000/v1/products" -H "accept: application/json"
我在两个独立的控制台窗口中运行上面这两条命令。一个以监视模式运行项目,当我更改代码文件时,会自动重新生成并刷新;另一个是我保持 curl 结果的地方。您可以使用 Postman,但是伴随 Windows 10 而来的 curl 也可以完成该工作。
结果如下:
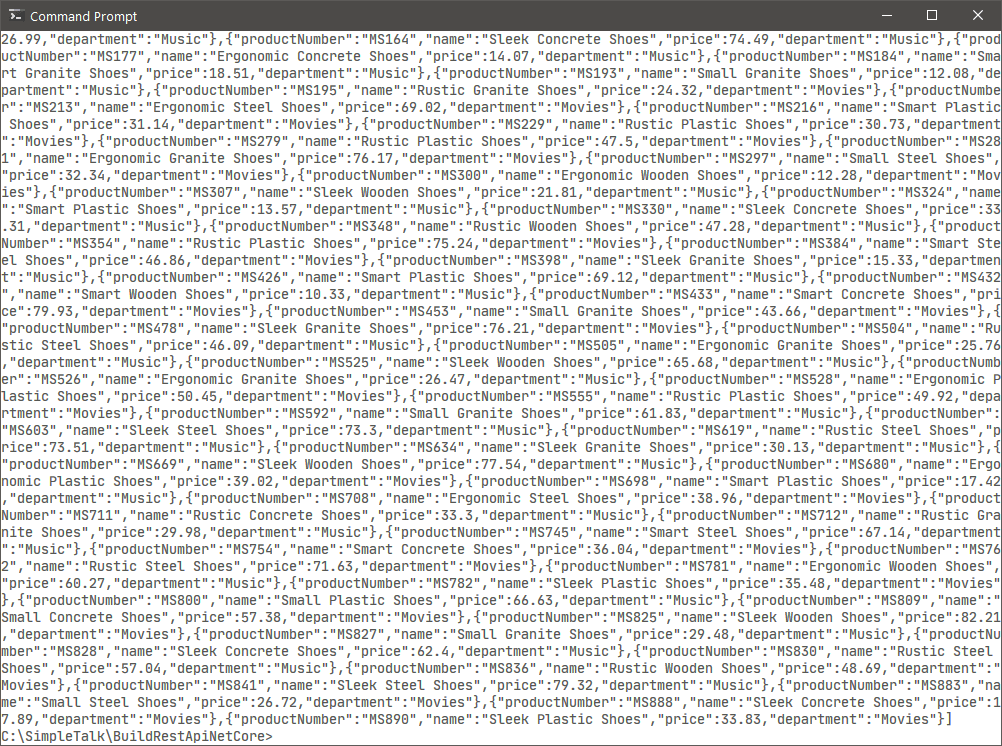
该请求返回数据库中的所有产品,但它不可扩展。随着产品列表的增加,客户端将受到未过滤数据的猛烈冲击,从而给 SQL 和网络流量带来更大的压力。
更好的方法是在一个模型中引入 limit 和 offset 请求参数:
public class ProductRequest
{
    [FromQuery(Name = "limit")]
    public int Limit { get; set; } = 15;

    [FromQuery(Name = "offset")]
    public int Offset { get; set; }
}
将此请求参数关联到 GetProducts Endpoint:
public ActionResult<IQueryable<Product>> GetProducts([FromQuery] ProductRequest request)
{
    var result = _context.Products as IQueryable<Product>;

    Response.Headers["x-total-count"] = result.Count().ToString();

    return Ok(result
        .OrderBy(p => p.ProductNumber)
        .Skip(request.Offset)
        .Take(request.Limit));
}
请注意我设置了一个值为 Count 的 HTTP header x-total-count,用于帮助想要分页浏览整个结果集的客户端。如果未指定请求参数,则该 API 默认返回前 15 条数据。
接下来,添加一个搜索参数,按部门筛选产品:
public ActionResult<IQueryable<Product>> GetProducts([FromQuery]
             string department, [FromQuery] ProductRequest request)
{
    // ...
    if (!string.IsNullOrEmpty(department))
    {
        result = result.Where(p => p.Department.StartsWith(department,
                        StringComparison.InvariantCultureIgnoreCase));
    }
    // ..
}
可以通过修改 Query,让搜索进入条件块内。请注意我用了 StartsWith 和 InvariantCultureIgnoreCase 来简化产品过滤,在实际的 SQL 中,可以使用 LIKE 运算符,还可以通过排序规则设置不区分大小写。
要测试分页和此新过滤器,请使用 curl 执行以下命令:
curl -i -X GET "http://localhost:5000/v1/products?offset=15&department=electronics" -H "accept: application/json"
检查确定包含总数和受支持版本号的 HTTP 头:
HTTP/1.1 200 OK
Date: Thu, 28 Jan 2021 11:19:09 GMT
Content-Type: application/json; charset=utf-8
Server: Kestrel
Transfer-Encoding: chunked
x-total-count: 155
api-supported-versions: 1.0
日志记录和 API 文档
当 API 成形后,如何向其他开发人员传达 Endpoints 呢?对于团队来说,在不破坏开放代码的情况下了解 API 公开的内容是有好处的。Swagger 是这里的首选工具,它能通过反射,自动生成可用的文档。
如果我告诉您,Swagger 所需的一切都已经在此 API 中设置过了呢?来吧,再看一眼:
[Produces("application/json")]
[ProducesResponseType(StatusCodes.Status200OK)]
ActionResult<IQueryable<Product>> GetProducts([FromQuery]
               string department, [FromQuery] ProductRequest request)
ASP.NET 属性对于 Endpoints 的自文档化非常有用。Swagger 通过反射,从控制器方法中获得返回类型,进而推断响应该是什么样子,并获得每个控制器方法的请求参数。因为它收集了工作代码中的所有内容,所以可以生成“活文档”,从而减少了故障的发生。
通过 NuGet 获取缺少的依赖项:
dotnet add package Swashbuckle.AspNetCore
并在 ConfigureServices 中将其关联进来:
services.AddSwaggerGen(c => c.SwaggerDoc("v1", new OpenApiInfo
{
    Title = "Products",
    Description = "The ultimate e-commerce store for all your needs",
    Version = "v1"
}));
然后,在 Configure 中启用它:
app.UseSwagger();
app.UseSwaggerUI(opt => opt.SwaggerEndpoint("/swagger/v1/swagger.json", "Products v1"));
注意 OpenApiInfo 来自 Microsoft.OpenApi.Models 命名空间。
此时,在浏览器中导航到 http://localhost:5000/swagger 就可以查看 swagger 文档了。
页面大概如下显示:
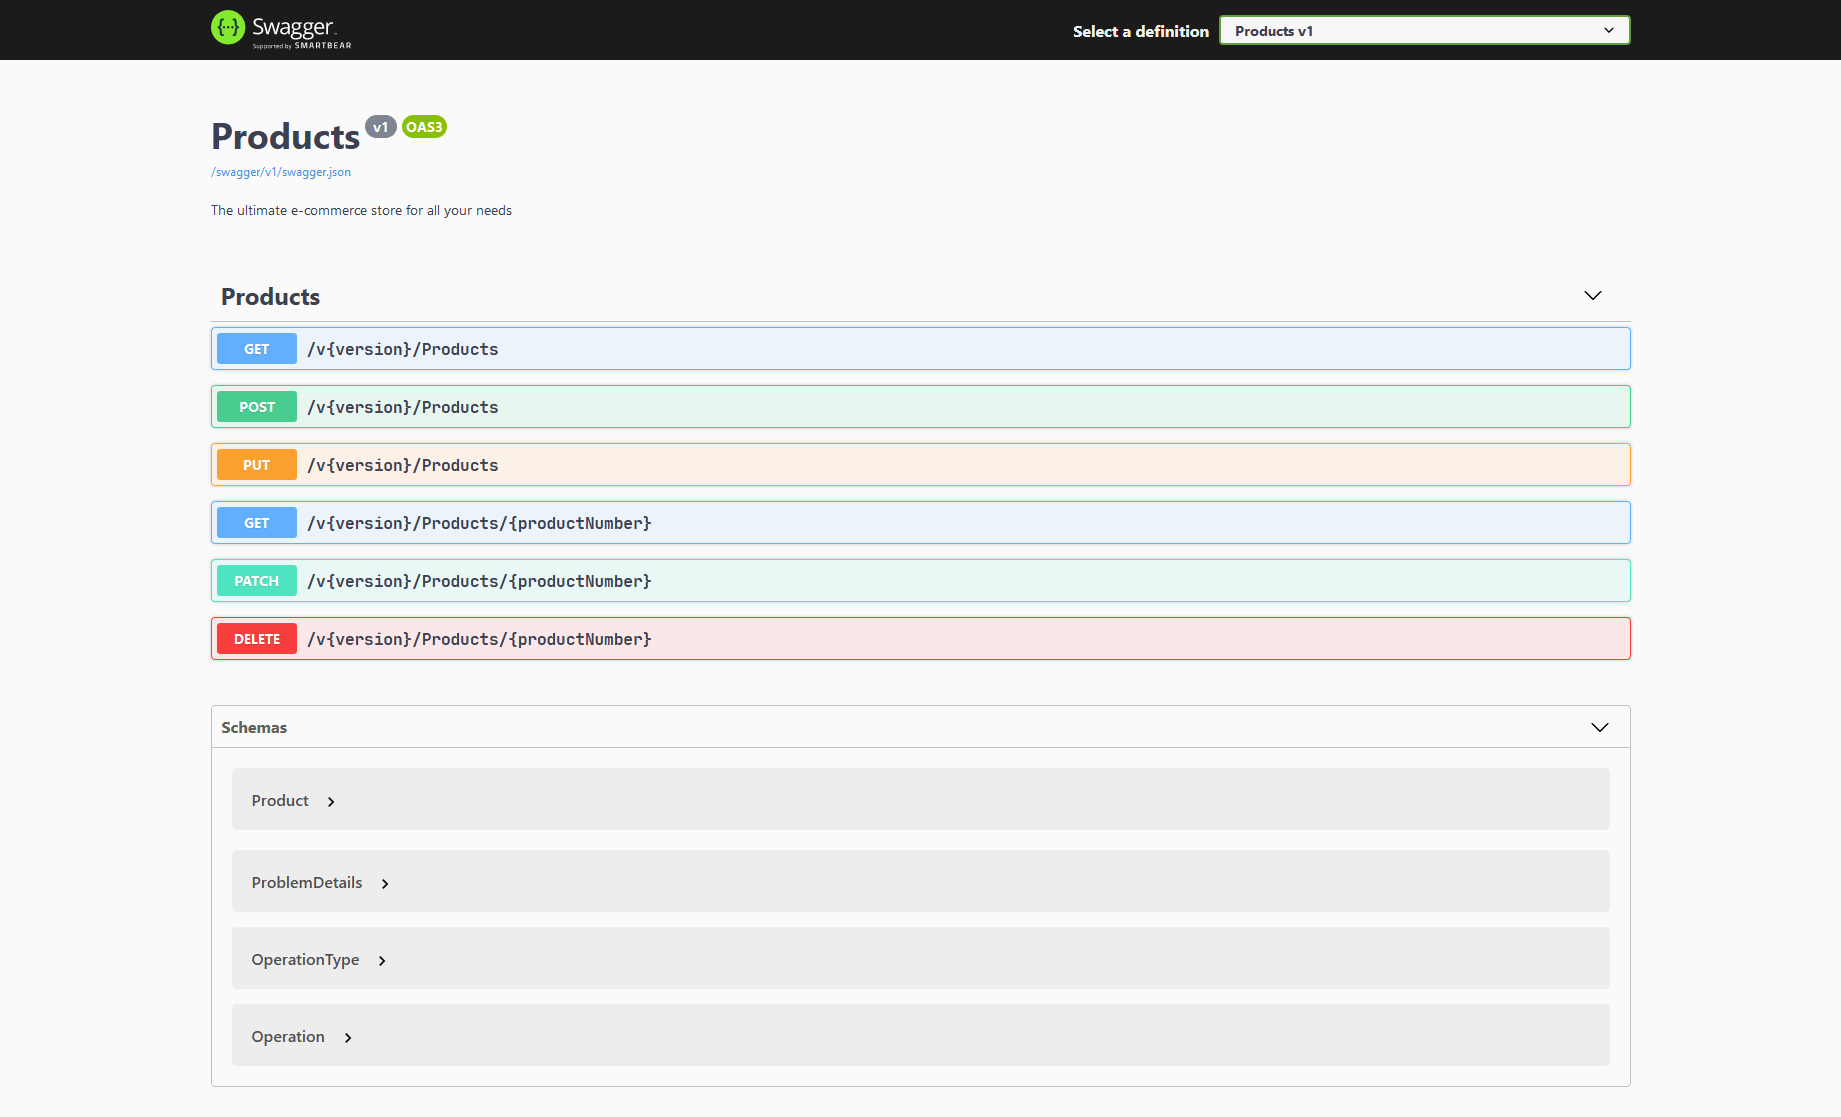
在 swagger 文档中,您可以轻松浏览 API 并通过这个工具向 API 发起请求,您所在组织的其他开发人员会因此受益而轻松愉快,他们甚至可能会请您喝杯咖啡。
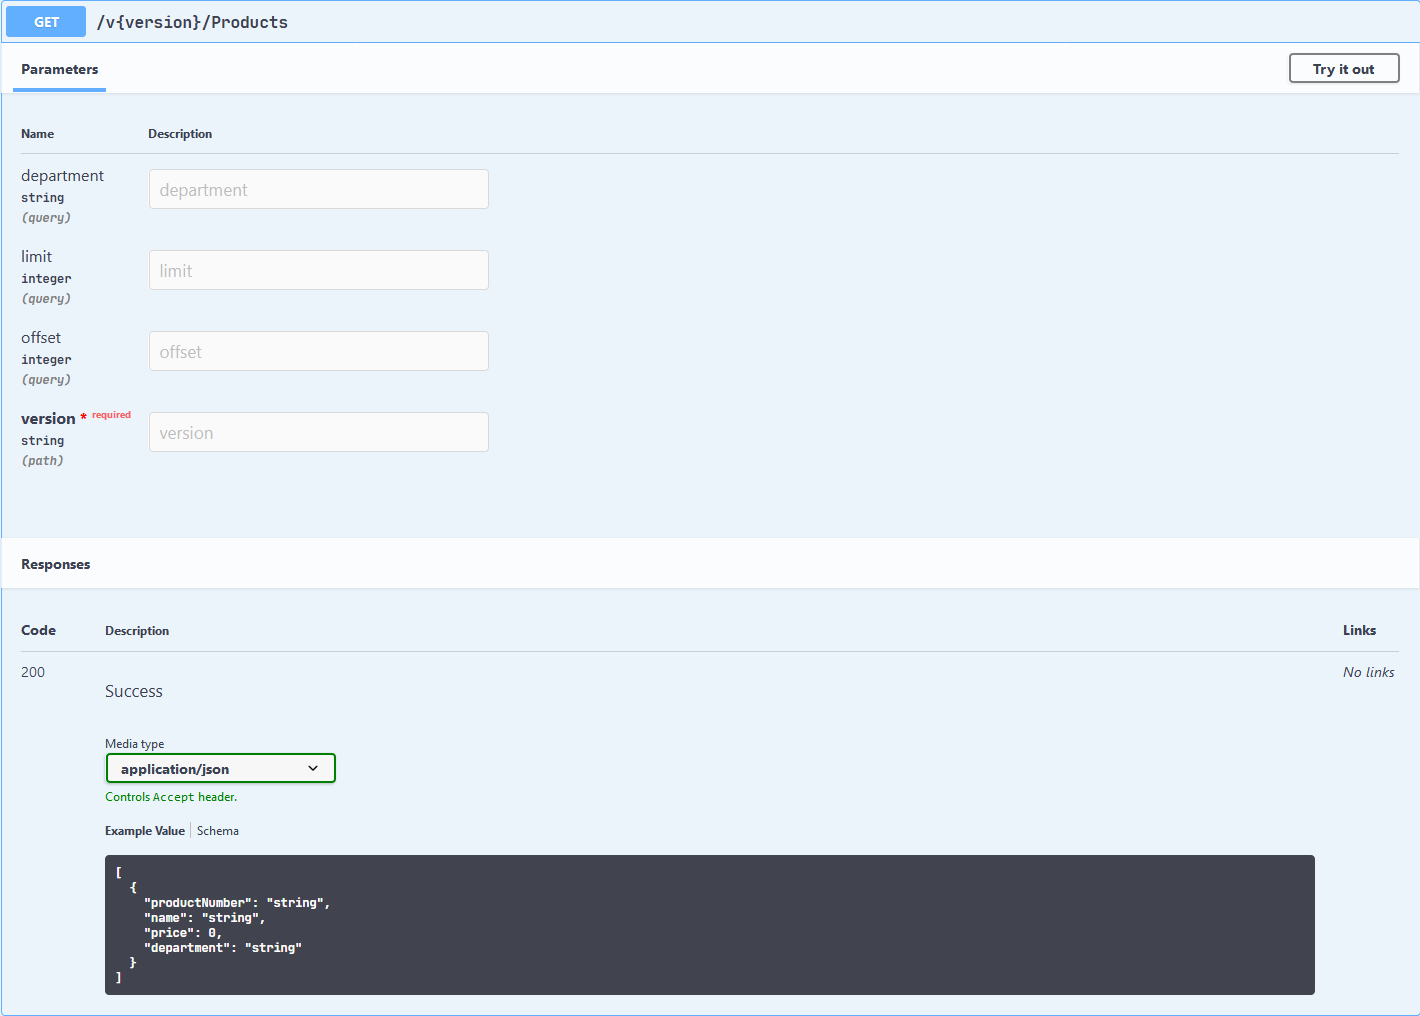
展开 GET /Products 查看从控制器方法中提取的 C# 数据类型:
下一站是日志记录。我将使用 NLog 在后端存储日志,使得 API 能够保存日志以供进一步分析。在实际环境中,日志对于故障排除非常有用;另外,它们还可以帮助收集遥测数据,以帮助了解 API 在未知状态下的使用情况。
要设置日志记录器,需要完成做以下操作:
- 一个 NuGet 包
- 一个 nlog.config 设置文件
- 修改
Program类 - 微调 appsettings.json
安装 NuGet 包:
dotnet add package NLog.Web.AspNetCore
设置的 nlog.config 文件可以如下:
<?xml version="1.0" encoding="utf-8" ?>
<nlog xmlns="http://www.nlog-project.org/schemas/NLog.xsd"
      xmlns:xsi="http://www.w3.org/2001/XMLSchema-instance"
      throwExceptions="false"
      throwConfigExceptions="false"
      autoReload="true"
      internalLogLevel="Warn"
      internalLogFile=
           "C:	empBuildRestApiNetCoreRestApi-internal-nlog.txt">

  <extensions>
    <add assembly="NLog.Web.AspNetCore"/>
  </extensions>

  <targets async="true">
    <target xsi:type="File"
            name="ownFile-web"
            fileName=
              "C:	empBuildRestApiNetCoreRestApi-${shortdate}.log">

      <layout xsi:type="JsonLayout">
        <attribute name="Timestamp" layout="${longdate}" />
        <attribute name="Level" layout="${uppercase:${level}}" />
        <attribute name="Logger" layout="${logger}" />
        <attribute name="Action" layout="${aspnet-mvc-action}" />
        <attribute name="Message" layout="${message}" />
        <attribute
           name="Exception" layout="${exception:format=tostring}" />
      </layout>
    </target>
  </targets>

  <rules>
    <logger name="Microsoft.*" maxlevel="Info" final="true" />

    <logger name="*" minlevel="Info" writeTo="ownFile-web" />
  </rules>
</nlog>
请注意 Layout,因为它设置了日志文件的类型,这里将其设置为 JsonLayout。当在不同的分析工具中使用日志文件时,JSON 格式具有最大的灵活性。为了让冗余降到最小,记录器规则不记录来自 Microsoft.* 的错误。另外,因为将 throwExceptions 设置为了 false,API 中未处理的异常会被记录,但不会被重新抛出。这里的用法可能是多变的,但通常最好是在 logger 中处理所有未处理的异常。
在 Program 类中,启用 NLog,记得添加 using NLog.Web:
Host.CreateDefaultBuilder(args)
  .ConfigureWebHostDefaults(webBuilder =>
  {
    webBuilder.UseStartup<Startup>();
  })
  .UseNLog();
最后,在 appsettings.json 中进行以下微调来配置日志记录:
"Logging": {
  "LogLevel": {
    "Default": "Information",
    "Microsoft": "None",
    "Microsoft.AspNetCore": "Error",
    "Microsoft.Hosting.Lifetime": "Information"
  }
}
这里的基本思想是减少与此 API 无关的日志条目的数量。您可以随意调整这些设置,以便恰当地记录 API 所需要的日志内容。
是时候言归正传了,在 Controller 类中,添加 using Microsoft.Extensions.Logging 并注入一个普通的旧式 ASP.NET logger:
private readonly ILogger<ProductsController> _logger;

public ProductsController(ProductContext context,
            ILogger<ProductsController> logger)
{
  _logger = logger;
  // ...
}
假设,现在您的团队决定要抓取客户端请求获取 100 条或更多条记录的频率相关的遥测数据。
将下面的代码放入 GetProducts 中:
if (request.Limit >= 100)
  _logger.LogInformation("Requesting more than 100 products.");
请确保有一个已存在的临时文件夹来核查日志,例如:C: empBuildRestApiNetCore。
一条日志记录看起来可能是这样的:
{
  "Timestamp": "2020-07-12 10:30:30.8960",
  "Level": "INFO",
  "Logger": "BuildRestApiNetCore.Controllers.ProductsController",
  "Action": "GetProducts",
  "Message": "Requesting more than 100 products."
}
带动词的 REST Endpoints
深吸一口气,然后畅快地呼出。该 API 差不多可以投入生产环境了,而且只用了很少的代码。现在,我将快速转向 POST、PUT、PATCH 和 DELETE 等 REST 特性的介绍。
POST Endpoint 接收带有新产品的 body,并将其添加到列表当中。此方法是非幂等的,因为它在调用时会创建新的资源。
将下面的代码放入 ProductsController 中:
[HttpPost]
[ProducesResponseType(StatusCodes.Status201Created)]
[ProducesResponseType(StatusCodes.Status400BadRequest)]
public ActionResult<Product> PostProduct([FromBody] Product product)
{
  try
  {
    _context.Products.Add(product);
    _context.SaveChanges();

    return new CreatedResult($"/products/{product.ProductNumber.ToLower()}", product);
  }
  catch (Exception e)
  {
    _logger.LogWarning(e, "Unable to POST product.");

    return ValidationProblem(e.Message);
  }
}
ASP.NET 通过 ValidationProblem 自动处理异常。该验证将返回一条符合 RFC 7807 规范[6]的响应,并带有一条消息。在实际的系统中,我建议确保不要暴露任何关于 API 的内部信息。将异常信息放在此处有助于客户端对代码进行故障排除,但安全性也很重要。我在这里选择包含错误信息主要是为了演示目的。此处还会将异常记录为警告,以避免记录大量的错误。当异常太多时,监控工具可能会呼叫值班人员。最佳实践是仅在可能需要人工干预的灾难性故障期间记录错误。
使用 swagger 工具,curl 命令为:
curl -i -X POST http://localhost:5000/v1/products
  -H "accept: application/json"
  -H "Content-Type: application/json"
  -d "{"productNumber":"string","name":"string","price":10,"department":"string"}"
当请求有问题时,API 会如下响应:
{
  "errors": {},
  "type": "https://tools.ietf.org/html/rfc7231#section-6.5.1",
  "title":"One or more validation errors occurred.",
  "status": 400,
  "detail": "An item with the same key has already been added. Key: string",
  "traceId":"|c445a403-43564e0626f9af50."
}
400 (Bad Request) 响应表示请求中的用户错误。因为无法信任用户发送有效数据,所以 API 会记录一个警告。
请注意,如果成功,POST 将返回带有 Location 的 201:
HTTP/1.1 201 Created
Date: Mon, 13 Jul 2020 22:52:46 GMT
Content-Type: application/json; charset=utf-8
Server: Kestrel
Content-Length: 76
Location: /products/bc916
api-supported-versions: 1.0
这将引导客户端转向新资源。此处,转向 GET Endpoint 是个好主意:
[HttpGet]
[Route("{productNumber}")]
[ProducesResponseType(StatusCodes.Status200OK)]
[ProducesResponseType(StatusCodes.Status404NotFound)]
public ActionResult<Product> GetProductByProductNumber([FromRoute]
            string productNumber)
{
  var productDb = _context.Products
    .FirstOrDefault(p => p.ProductNumber.Equals(productNumber,
              StringComparison.InvariantCultureIgnoreCase));

  if (productDb == null) return NotFound();

  return Ok(productDb);
}
404 响应表示该资源在 API 中尚不存在,但可能会在将来的某个时候变得可用。
PUT 是类似的:
[HttpPut]
[ProducesResponseType(StatusCodes.Status200OK)]
[ProducesResponseType(StatusCodes.Status404NotFound)]
[ProducesResponseType(StatusCodes.Status400BadRequest)]
public ActionResult<Product> PutProduct([FromBody] Product product)
{
  try
  {
    var productDb = _context.Products
      .FirstOrDefault(p => p.ProductNumber.Equals(product.ProductNumber,
           StringComparison.InvariantCultureIgnoreCase));

    if (productDb == null) return NotFound();

    productDb.Name = product.Name;
    productDb.Price = product.Price;
    productDb.Department = product.Department;
    _context.SaveChanges();

    return Ok(product);
  }
  catch (Exception e)
  {
    _logger.LogWarning(e, "Unable to PUT product.");

    return ValidationProblem(e.Message);
  }
}
在 REST 设计中,PUT 允许对整个资源进行更新。它是幂等的,因为多次相同的请求不会改变资源的数量。
就像 GET 404 响应一样,表示该资源不可用于更新,但这可能在稍后发生改变。另外,ASP.NET 提供现成的模型绑定验证。接下来,尝试一下使用错误的数据更新现有资源。
下面的 JSON 是您可能看到的 Bad Request 的响应:
{
  "errors": {
    "Price": ["The price field is required."]
  },
  "type": "https://tools.ietf.org/html/rfc7231#section-6.5.1",
  "title": "One or more validation errors occurred.",
  "status": 400,
  "traceId": "|c445a409-43564e0626f9af50."
}
PATCH 是所有动词中最复杂的,因为它通过 JSON Patch 文档[7]仅更新资源的一部分。
庆幸的是 .NET Core 提供了一个 NuGet 包:
dotnet add package Microsoft.AspNetCore.Mvc.NewtonsoftJson
然后,在 ConfigureServices 中启用它:
services.AddControllers().AddNewtonsoftJson();
下面是 PATCH Endpoint,记得添加 using Microsoft.AspNetCore.JsonPatch:
[HttpPatch]
[Route("{productNumber}")]
[ProducesResponseType(StatusCodes.Status200OK)]
[ProducesResponseType(StatusCodes.Status404NotFound)]
[ProducesResponseType(StatusCodes.Status400BadRequest)]
public ActionResult<Product> PatchProduct([FromRoute]
      string productNumber, [FromBody] JsonPatchDocument<Product> patch)
{
  try
  {
    var productDb = _context.Products
      .FirstOrDefault(p => p.ProductNumber.Equals(productNumber,
           StringComparison.InvariantCultureIgnoreCase));

    if (productDb == null) return NotFound();

    patch.ApplyTo(productDb, ModelState);

    if (!ModelState.IsValid || !TryValidateModel(productDb))
             return ValidationProblem(ModelState);

    _context.SaveChanges();

    return Ok(productDb);
  }
  catch (Exception e)
  {
    _logger.LogWarning(e, "Unable to PATCH product.");

    return ValidationProblem(e.Message);
  }
}
我希望您看到一种含有不同状态码响应类型的模式开始浮现。200 OK 表示成功,400 Bad Request 表示用户错误。当 patch 被应用后,将会在 ModelState 中追加所有的验证错误。仔细看一下进行模型绑定的 JsonPatchDocument 和 应用更改的 ApplyTo。这就是将 JSON Patch 文档应用到数据库中现有产品的方式。像所有其它 Endpoints 一样,异常会被记录并包含在响应中。与其它动词一样,404 (Not Found) 响应表示相同的情形。响应状态码的一致性有助于客户端处理所有可能的场景。
一个 JSON patch 请求的 body 大概如下所示:
[{
  "op": "replace",
  "path": "price",
  "value": 13.67
}]
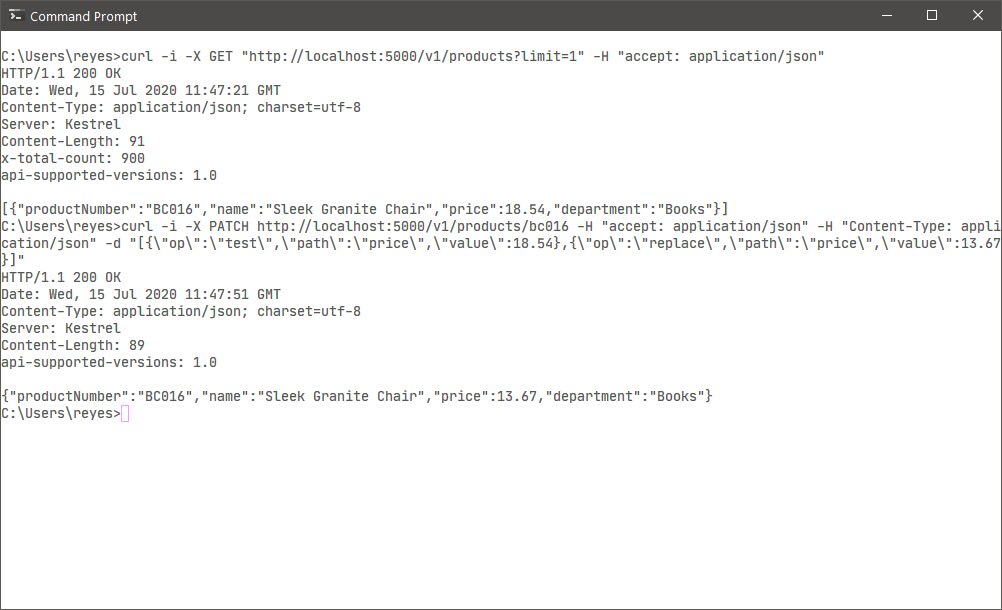
模型绑定验证规则依然适用于 patch 操作,以保持数据的完整性。请注意,patch 操作被包装在一个数组中,因此它支持任意的操作列表。
下图是 curl 中请求 PATCH 的结果:
最后一站,DELETE 方法:
[HttpDelete]
[Route("{productNumber}")]
[ProducesResponseType(StatusCodes.Status200OK)]
[ProducesResponseType(StatusCodes.Status404NotFound)]
public ActionResult<Product> DeleteProduct([FromRoute]
        string productNumber)
{
  var productDb = _context.Products
    .FirstOrDefault(p => p.ProductNumber.Equals(productNumber,
           StringComparison.InvariantCultureIgnoreCase));

  if (productDb == null) return NotFound();

  _context.Products.Remove(productDb);
  _context.SaveChanges();

  return NoContent();
}
它的状态码响应是 No Content:
HTTP/1.1 204 No Content
Date: Tue, 14 Jul 2020 22:59:20 GMT
Server: Kestrel
api-supported-versions: 1.0
此状态向客户端发出信号,表示资源不再可用,因为响应主体为空。如果需要异步后台进程来清理数据,则响应也可以为 204 (Accepted)。在实际系统中,有时最好使用软删除,以允许在审核期间进行回滚。删除数据时,请确保遵守 GPDR 或适用于该数据的任一策略。
总结
.NET Core 在您的工具袋中添加许多有用的特性,从而让使用 REST API 变得更加轻松,将诸如文档、验证、日志记录和 PATCH 请求等复杂的用例变得更易于实现。
https://www.red-gate.com/simple-talk/dotnet/c-programming/build-a-rest-api-in-net-core/ Build a REST API in .NET Core ↩︎
https://dotnet.microsoft.com/download/dotnet-core Download .NET Core ↩︎
https://github.com/beautifulcoder/BuildRestApiNetCore 示例代码 ↩︎
https://rapidapi.com/blog/api-glossary/endpoint/ API Endpoints ↩︎
https://semver.org/ Semantic Versioning ↩︎
https://tools.ietf.org/html/rfc7807 RFC 7807 规范 ↩︎
https://tools.ietf.org/html/rfc6902 JSON Patch 文档 ↩︎