layer-list
layer-list ,layer,层,层次。list,列表。根据字面意思,我们大概能够理解到:在layer-list里面可以放很多item,每一个item之间会一层一层的叠放。
废话不多说,来几个实例就懂了。
(1)简单的图片层叠
1. 编写客户端代码
activity_main.xml
 1 <RelativeLayout xmlns:android="http://schemas.android.com/apk/res/android"
 2     xmlns:tools="http://schemas.android.com/tools"
 3     android:layout_width="match_parent"
 4     android:layout_height="match_parent"
 5     tools:context="${relativePackage}.${activityClass}" >
 6
 7     <ImageView
 8         android:layout_width="wrap_content"
 9         android:layout_height="wrap_content"
10         android:text="@string/hello_world"
11         android:background="@drawable/floor_drawable" />
12
13 </RelativeLayout>
客户端主要定义了一个ImageView,其它什么也没有。
2. 定义layer-list
在定义layer-list之前,我们首先需要两张图片
 +
+  =
=
img_lev1.jpg img_lev0.jpg
下面是代码:
my_drawable.xml
 1 <?xml version="1.0" encoding="utf-8"?>
 2 <layer-list xmlns:android="http://schemas.android.com/apk/res/android" >
 3
 4     <item
 5         android:id="@+id/user_face_drawable"
 6         android:drawable="@drawable/img_lev0">
 7     </item>
 8     <item
 9         android:id="@+id/user_faceback_drawable"
10         android:bottom="35.0dip"
11         android:drawable="@drawable/img_lev1"
12         android:left="10.0dip"
13         android:right="25.0dip"
14         android:top="18.0dip">
15     </item>
16
17 </layer-list>
在layer-list中,定义了两个item,我们可以为每一个item指定id和drawable,其中left,right,top,bottom这四个属性决定了item的大小和位置。
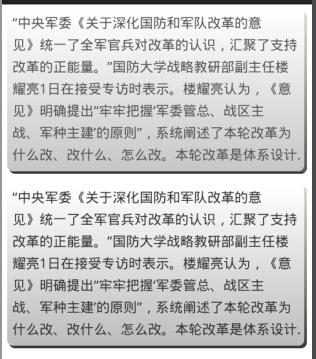
(2)用layer-list定义阴影效果
效果图
客户端代码
activity_main.xml
 1 <LinearLayout xmlns:android="http://schemas.android.com/apk/res/android"
 2     xmlns:tools="http://schemas.android.com/tools"
 3     android:layout_width="match_parent"
 4     android:layout_height="match_parent"
 5     android:orientation="vertical" >
 6
 7     <TextView
 8         android:layout_width="wrap_content"
 9         android:layout_height="wrap_content"
10         android:padding="5dp"
11         android:layout_margin="5dp"
12         android:text="@string/text"
13         android:lineSpacingMultiplier="1.3"
14         android:background="@drawable/my_drawable" />
15     <TextView
16         android:layout_width="wrap_content"
17         android:layout_height="wrap_content"
18         android:padding="5dp"
19         android:layout_margin="5dp"
20         android:text="@string/text"
21         android:lineSpacingMultiplier="1.3"
22         android:background="@drawable/my_drawable" />
23
24 </LinearLayout>
my_drawable.xml
 1 <?xml version="1.0" encoding="utf-8"?>
 2 <layer-list xmlns:android="http://schemas.android.com/apk/res/android" >
 3
 4     <!-- 阴影部分 -->
 5     <!-- 个人觉得更形象的表达:top代表下边的阴影高度,left代表右边的阴影宽度。其实也就是相对应的offset,solid中的颜色是阴影的颜色,也可以设置角度等等 -->
 6     <item
 7         android:left="2dp"
 8         android:top="2dp">
 9         <shape android:shape="rectangle" >
10
11             <gradient
12                 android:angle="270"
13                 android:endColor="#CC000000"
14                 android:startColor="#33333300" />
15
16             <corners
17                 android:bottomLeftRadius="6dip"
18                 android:bottomRightRadius="6dip"
19                 android:topLeftRadius="6dip"
20                 android:topRightRadius="6dip" />
21         </shape>
22     </item>
23
24     <!-- 背景部分 -->
25     <!-- 形象的表达:bottom代表背景部分在上边缘超出阴影的高度,right代表背景部分在左边超出阴影的宽度(相对应的offset) -->
26     <item
27         android:bottom="3dp"
28         android:right="3dp">
29         <shape android:shape="rectangle" >
30
31             <gradient
32                 android:angle="270"
33                 android:endColor="#BBBBBB"
34                 android:startColor="#FFFFFF" />
35
36             <corners
37                 android:bottomLeftRadius="6dip"
38                 android:bottomRightRadius="6dip"
39                 android:topLeftRadius="6dip"
40                 android:topRightRadius="6dip" />
41         </shape>
42     </item>
43
44 </layer-list>