ROS入门(六)——从RRBot到自建小车控制
iwehdio的博客园:https://www.cnblogs.com/iwehdio/
参考教程:https://www.generationrobots.com/blog/en/robotic-simulation-scenarios-with-gazebo-and-ros/
1、RRBot的文件结构
-
RRbot 在工作空间下主要有三个部分:
/rrbot_description /launch rrbot_rviz.launch; rrbot.rviz /meshes hokuyo.dae /urdf rrbot.gazebo; rrbot.xacro; materials.xacro /rrbot_gazebo /worlds rrbot.world /launchr rrbot_world.launch /rrbot_control /config rrbot_conrtol.yaml /launch rrbot.control; rrbot_rqt.launch -
回顾一下 launch 文件的相关命令:
- 启动 launch 文件:
roslaunch 功能包名 launch文件名。 - 节点:
<node>。pkg:节点所在的功能包名称。type:节点的可执行文件名称。name:节点运行时的名称。output 是否输出日志、respawn 意外关闭是否重启、required 是否必须启动、ns 命名空间、args 输入的参数。 - 存储 ROS 全局参数:
<param>。name:参数名。value:参数值。 - 从文件加载参数:
<rosparam file=filename command="load" ns="param">。 - 内部参数:
<arg name="arg-name" default="arg-value">。- 被调用时形式为
"$(arg arg-name)"。
- 被调用时形式为
- 重映射:
<remap>。from:原命名。to:映射之后的命名。 - 嵌套:
<include>。file:包含其他 launch 文件路径,类似头文件。
- 启动 launch 文件:
2、rrbot中各个包的分析
(1)、rrbot_description包
-
rrbot_rviz.launch 文件:
<launch> <param name="robot_description" command="$(find xacro)/xacro --inorder '$(find rrbot_description)/urdf/rrbot.xacro'" /> <!-- send fake joint values --> <node name="joint_state_publisher_gui" pkg="joint_state_publisher_gui" type="joint_state_publisher_gui"> <param name="use_gui" value="TRUE"/> </node> <!-- Combine joint values --> <node name="robot_state_publisher" pkg="robot_state_publisher" type="robot_state_publisher"/> <!-- Show in Rviz --> <node name="rviz" pkg="rviz" type="rviz" args="-d $(find rrbot_description)/launch/rrbot.rviz"/> </launch>-
第一个节点启动了关节状态发布者的GUI界面,也就是启动 Rviz 时我们能看到的手动调节关节状态的滑块。
-
第二个节点启动了机器人的状态发布者,发布关节的实时状态。通过指令
rostopic echo /joint_states可以看到发布的数据: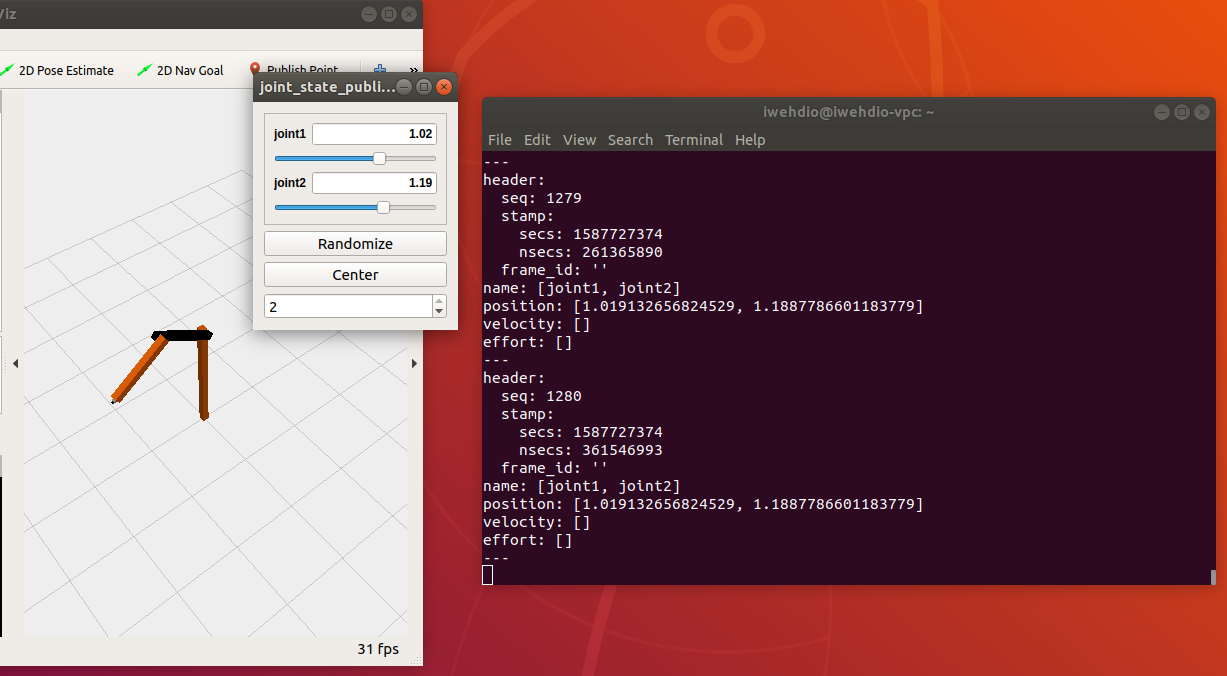
-
第三个节点启动 Rviz。
-
-
rrbot.xacro 文件:
<?xml version="1.0"?> <!-- Revolute-Revolute Manipulator --> <robot name="rrbot" xmlns:xacro="http://www.ros.org/wiki/xacro"> <!-- Constants for robot dimensions --> <xacro:property name="PI" value="3.1415926535897931"/> <xacro:property name="mass" value="1" /> <!-- arbitrary value for mass --> <xacro:property name="width" value="0.1" /> <!-- Square dimensions (widthxwidth) of beams --> <xacro:property name="height1" value="2" /> <!-- Link 1 --> <xacro:property name="height2" value="1" /> <!-- Link 2 --> <xacro:property name="height3" value="1" /> <!-- Link 3 --> <xacro:property name="camera_link" value="0.05" /> <!-- Size of square 'camera' box --> <xacro:property name="axel_offset" value="0.05" /> <!-- Space btw top of beam and the each joint --> <!-- Import all Gazebo-customization elements, including Gazebo colors --> <xacro:include filename="$(find rrbot_description)/urdf/rrbot.gazebo" /> <!-- Import Rviz colors --> <xacro:include filename="$(find rrbot_description)/urdf/materials.xacro" />- 这一部分引入了文件中的变量(类似于宏定义),并且关联了rrbot.gazebo 和 materials.xacro。
<!-- Used for fixing robot to Gazebo 'base_link' --> <link name="world"/> <joint name="fixed" type="fixed"> <parent link="world"/> <child link="link1"/> </joint> <!-- Base Link --> <link name="link1"> <collision> <origin xyz="0 0 ${height1/2}" rpy="0 0 0"/> <geometry> <box size="${width} ${width} ${height1}"/> </geometry> </collision> <visual> <origin xyz="0 0 ${height1/2}" rpy="0 0 0"/> <geometry> <box size="${width} ${width} ${height1}"/> </geometry> <material name="orange"/> </visual> <inertial> <origin xyz="0 0 ${height1/2}" rpy="0 0 0"/> <mass value="${mass}"/> <inertia ixx="${mass / 12.0 * (width*width + height1*height1)}" ixy="0.0" ixz="0.0" iyy="${mass / 12.0 * (height1*height1 + width*width)}" iyz="0.0" izz="${mass / 12.0 * (width*width + width*width)}"/> </inertial> </link> <joint name="joint1" type="continuous"> <parent link="link1"/> <child link="link2"/> <origin xyz="0 ${width} ${height1 - axel_offset}" rpy="0 0 0"/> <axis xyz="0 1 0"/> <dynamics damping="0.7"/> </joint>- 这一部分先是声明了世界是一个 link ,而且与 RRBot 最下边的一个连杆是固连的(与世界固连的 模型需要做如此声明)。
- 然后声明了最下方的连杆 link1。
<collision>标签是碰撞属性,<visual>标签是视觉属性,一般而言二者相同。其中的 origin 表示质心,geometry 指定了几何形状和尺寸。<inertila>标签是惯性属性,mass 表示质量,inertia 表示转动惯量。 - 然后声明了下方的关节 joint1。type 表示关节的连接类型。
<parent>和<child>指定连接关系中的父与子(连接时子运动父不动)。origin 表示关节的连接位置。axis 表示关节的链接方向是 x、y、z。dynamics 表示阻尼。 - 中间和上方的连杆也完全相同。
<!-- Hokuyo Laser --> <link name="hokuyo_link"> <collision> <origin xyz="0 0 0" rpy="0 0 0"/> <geometry> <box size="0.1 0.1 0.1"/> </geometry> </collision> <visual> <origin xyz="0 0 0" rpy="0 0 0"/> <geometry> <mesh filename="package://rrbot_description/meshes/hokuyo.dae"/> </geometry> </visual> <inertial> <mass value="1e-5" /> <origin xyz="0 0 0" rpy="0 0 0"/> <inertia ixx="1e-6" ixy="0" ixz="0" iyy="1e-6" iyz="0" izz="1e-6" /> </inertial> </link> <joint name="camera_joint" type="fixed"> <axis xyz="0 1 0" /> <origin xyz="${camera_link} 0 ${height3 - axel_offset*2}" rpy="0 0 0"/> <parent link="link3"/> <child link="camera_link"/> </joint>- 这一部分是对激光雷达的模型定义。其实与普通的 link 并没有区别,只不过激光雷达导的是创建好的 hokuyo.dae 模型。
- 相机的模型定义类似,在该文件中并没有体现出传感器的特殊之处。
<transmission name="tran1"> <type>transmission_interface/SimpleTransmission</type> <joint name="joint1"> <hardwareInterface>hardware_interface/EffortJointInterface</hardwareInterface> </joint> <actuator name="motor1"> <hardwareInterface>hardware_interface/EffortJointInterface</hardwareInterface> <mechanicalReduction>1</mechanicalReduction> </actuator> </transmission> <transmission name="tran2"> <type>transmission_interface/SimpleTransmission</type> <joint name="joint2"> <hardwareInterface>hardware_interface/EffortJointInterface</hardwareInterface> </joint> <actuator name="motor2"> <hardwareInterface>hardware_interface/EffortJointInterface</hardwareInterface> <mechanicalReduction>1</mechanicalReduction> </actuator> </transmission>- 这部分是关于传动的声明,每个
<transmission>中定义了一个主动传动。<type>中指定了传动类型,<joint>中指定了所要传动的关节和硬件层接口。<actuator>定义了传动的执行器,mechanicalReduction 是减速比。
-
rrbot.gazebo 文件:
<!-- ros_control plugin --> <gazebo> <plugin name="gazebo_ros_control" filename="libgazebo_ros_control.so"> <robotNamespace>/rrbot</robotNamespace> <robotSimType>gazebo_ros_control/DefaultRobotHWSim</robotSimType> </plugin> </gazebo>- 这一部分指定了 ros_control 插件。通过 gazebo 标签内包含
<plugin>标签,指定产假名、机器人的名字空间和机器人模型类型。
<!-- Link3 --> <gazebo reference="link3"> <mu1>0.2</mu1> <mu2>0.2</mu2> <material>Gazebo/Orange</material> </gazebo>- 这一部分描述了 link 的物理属性。mu 表示摩擦系数,material 表示材料,这里指定的是自己定义的材料。
<!-- hokuyo --> <gazebo reference="hokuyo_link"> <sensor type="gpu_ray" name="head_hokuyo_sensor"> <pose>0 0 0 0 0 0</pose> <visualize>false</visualize> <update_rate>40</update_rate> <ray> <scan> <horizontal> <samples>720</samples> <resolution>1</resolution> <min_angle>-1.570796</min_angle> <max_angle>1.570796</max_angle> </horizontal> </scan> <range> <min>0.10</min> <max>30.0</max> <resolution>0.01</resolution> </range> <noise> <type>gaussian</type> <!-- Noise parameters based on published spec for Hokuyo laser achieving "+-30mm" accuracy at range < 10m. A mean of 0.0m and stddev of 0.01m will put 99.7% of samples within 0.03m of the true reading. --> <mean>0.0</mean> <stddev>0.01</stddev> </noise> </ray> <plugin name="gazebo_ros_head_hokuyo_controller" filename="libgazebo_ros_gpu_laser.so"> <topicName>/rrbot/laser/scan</topicName> <frameName>hokuyo_link</frameName> </plugin> </sensor> </gazebo> </robot>- sensor 标签指定了这个 link 是一个传感器。update_rate 是刷新率。scan 标签中指定了采样率、解析度和最大最小传感角度。range 标签中设置了最大最小传感距离和解析度。noise 标签中指定了噪声。
<plugin>中指定了一个插件,使用话题向外发布激光雷达的数据。 - 相机的基本流程与之类似,但有许多不同的属性。
- 这一部分指定了 ros_control 插件。通过 gazebo 标签内包含
-
material.xacro 文件:
<?xml version="1.0"?> <robot> <material name="black"> <color rgba="0.0 0.0 0.0 1.0"/> </material> </robot>- 为材料指定 RGBA 颜色属性。
(2)、rrbot_gazebo包
-
rrbot_world 文件:
<?xml version="1.0" ?> <sdf version="1.4"> <!-- We use a custom world for the rrbot so that the camera angle is launched correctly --> <world name="default"> <include> <uri>model://ground_plane</uri> </include> <!-- Global light source --> <include> <uri>model://sun</uri> </include> <!-- Focus camera on tall pendulum --> <gui fullscreen='0'> <camera name='user_camera'> <pose>4.927360 -4.376610 3.740080 0.000000 0.275643 2.356190</pose> <view_controller>orbit</view_controller> </camera> </gui> </world> </sdf>- 创建世界,引入空地和太阳模型,并且指定视角。
-
rrobot_world.launch 文件:
<launch> <!-- these are the arguments you can pass this launch file, for example paused:=true --> <arg name="paused" default="false"/> <arg name="use_sim_time" default="true"/> <arg name="gui" default="true"/> <arg name="headless" default="false"/> <arg name="debug" default="false"/> <!-- We resume the logic in empty_world.launch, changing only the name of the world to be launched --> <include file="$(find gazebo_ros)/launch/empty_world.launch"> <arg name="world_name" value="$(find rrbot_gazebo)/worlds/rrbot.world"/> <arg name="debug" value="$(arg debug)" /> <arg name="gui" value="$(arg gui)" /> <arg name="paused" value="$(arg paused)"/> <arg name="use_sim_time" value="$(arg use_sim_time)"/> <arg name="headless" value="$(arg headless)"/> </include>- 这一部分指定了launch文件内的宏定义参数,引入了空世界launch文件。
<!-- Load the URDF into the ROS Parameter Server --> <param name="robot_description" command="$(find xacro)/xacro --inorder '$(find rrbot_description)/urdf/rrbot.xacro'" /> <!-- Run a python script to the send a service call to gazebo_ros to spawn a URDF robot --> <node name="urdf_spawner" pkg="gazebo_ros" type="spawn_model" respawn="false" output="screen" args="-urdf -model rrbot -param robot_description"/> </launch>- param 标签将 URDF 模型的路径加载到 ROS 参数服务器中。
- node 节点运行了 urdf_spawner 脚本启动了一个服务,从 ROS 参数服务器中取出 robot_description 路径指向了 URDF 文件加载到世界中。
(3)、rrbot_control 包
-
rrbot_control.launch 文件:
<launch> <!-- Load joint controller configurations from YAML file to parameter server --> <rosparam file="$(find rrbot_control)/config/rrbot_control.yaml" command="load"/> <!-- load the controllers --> <node name="controller_spawner" pkg="controller_manager" type="spawner" respawn="false" output="screen" ns="/rrbot" args="joint_state_controller joint1_position_controller joint2_position_controller"/> <!-- convert joint states to TF transforms for rviz, etc --> <node name="robot_state_publisher" pkg="robot_state_publisher" type="robot_state_publisher" respawn="false" output="screen"> <remap from="/joint_states" to="/rrbot/joint_states" /> </node> </launch>- rosparam 标签载入 yaml 配置文件。
- 第一个节点启动了 joint_state_controller、joint1_position_controller、 joint2_position_controller 三个控制器。
- 第二个节点启动了 robot_state_publisher 话题发布者。并且通过重映射重命名。
-
rrbot_rqt.launch 文件:
<launch> <!-- Load RQT with a pre-setup GUI for Baxter controls from a perspective file --> <node name="rrbot_rqt" pkg="rqt_gui" type="rqt_gui" respawn="false" output="screen" args="--perspective-file $(find rrbot_control)/launch/rrbot_rqt.perspective"/> </launch>- 通过运行 rrbot_rqt.perspective 运行 rqt 的 GUI界面。
-
rrbot_control.yaml 文件:
rrbot: # Publish all joint states ----------------------------------- joint_state_controller: type: joint_state_controller/JointStateController publish_rate: 50 # Position Controllers --------------------------------------- joint1_position_controller: type: effort_controllers/JointPositionController joint: joint1 pid: {p: 100.0, i: 0.01, d: 10.0} joint2_position_controller: type: effort_controllers/JointPositionController joint: joint2 pid: {p: 100.0, i: 0.01, d: 10.0}- 先是指定了 joint_state_controller 关节状态发布者的类型和一秒内的发布速率。
- 然后指定了 joint1_position_controller 和 joint2_position_controller 关节位置控制者的类型、所控制的关节和 PID 参数。
3、自己做一个移动小车
(1)、创建底盘
-
先创建工作空间,将移动小车命名为 mycar。创建 mycar_description、mycar_gazebo 和 mycar_control。
-
进入 mycar_gazebo 下的 worlds 目录,创建包含空地和太阳的最基本的世界文件 mycar.world。
<?xml version="1.0"?> <sdf version="1.4"> <world name="myworld"> <include> <uri>model://sun</uri> </include> <include> <uri>model://ground_plane</uri> </include> </world> </sdf> -
进入 mycar_gazebo 下的 worlds 目录,创建最基本的启动世界文件 mycar.world 的 launch 文件 mycar_world.launch。
<launch> <include file="$(find gazebo_ros)/launch/empty_world.launch"> <arg name="world_name" value="$(find mycar_gazebo)/worlds/mybot.world"/> <arg name="gui" value="true"/> </include> </launch> -
进入 mycar.descripiton 下的 urdf 目录,创建小车模型文件 mycar.urdf。
<?xml version="1.0"?> <robot name="mycar" xmlns:xacro="http://www.ros.org/wiki/xacro"> <!-- Put here the robot description --> <!-- 宏定义各个部分的尺寸 --> <xacro:property name="PI" value="3.1415926535897931"/> <xacro:property name="chassisHeight" value="0.1"/> <xacro:property name="chassisLength" value="0.4"/> <xacro:property name="chassisWidth" value="0.2"/> <xacro:property name="chassisMass" value="50"/> <xacro:property name="casterRadius" value="0.05"/> <xacro:property name="casterMass" value="5"/> <xacro:property name="wheelWidth" value="0.05"/> <xacro:property name="wheelRadius" value="0.1"/> <xacro:property name="wheelPos" value="0.2"/> <xacro:property name="wheelMass" value="5"/> <xacro:property name="cameraSize" value="0.05"/> <xacro:property name="cameraMass" value="0.1"/> <!-- 导入三个依赖文件 --> <xacro:include filename="$(find mycar_description)/urdf/mycar.gazebo" /> <xacro:include filename="$(find mycar_description)/urdf/materials.xacro" /> <xacro:include filename="$(find mycar_description)/urdf/macros.xacro" /> <link name="footprint" /> <joint name="base_joint" type="fixed"> <parent link="footprint"/> <child link="chassis"/> </joint> <!-- 添加一个矩形底座 --> <link name='chassis'> <collision> <origin xyz="0 0 ${wheelRadius}" rpy="0 0 0"/> <geometry> <box size="${chassisLength} ${chassisWidth} ${chassisHeight}"/> </geometry> </collision> <visual> <origin xyz="0 0 ${wheelRadius}" rpy="0 0 0"/> <geometry> <box size="${chassisLength} ${chassisWidth} ${chassisHeight}"/> </geometry> <material name="orange"/> </visual> <inertial> <origin xyz="0 0 ${wheelRadius}" rpy="0 0 0"/> <mass value="${chassisMass}"/> <box_inertia m="${chassisMass}" x="${chassisLength}" y="${chassisWidth}" z="${chassisHeight}"/> </inertial> </link> </robot>- 这一部分先是宏定义了小车各部分的尺寸,引入了依赖文件。
- 然后创建了小车的矩形底盘部分,小车的其他部分将在稍后添加。
-
进入 mycar.descripiton 下的 urdf 目录,创建小车在gazebo中的属性文件 mycar.gazebo。目前只指定了矩形底盘的材料。
<?xml version="1.0"?> <robot xmlns:xacro="http://www.ros.org/wiki/xacro"> <gazebo reference="chassis"> <material>Gazebo/Orange</material> </gazebo> </robot> -
进入 mycar.descripiton 下的 urdf 目录,创建小车的材料属性文件 materials.xacro。此处指定了所有小车需要用到的材料(颜色)。
<?xml version="1.0"?> <robot> <material name="black"> <color rgba="0.0 0.0 0.0 1.0"/> </material> <material name="blue"> <color rgba="0.0 0.0 0.8 1.0"/> </material> <material name="green"> <color rgba="0.0 0.8 0.0 1.0"/> </material> <material name="grey"> <color rgba="0.2 0.2 0.2 1.0"/> </material> <material name="orange"> <color rgba="${255/255} ${108/255} ${10/255} 1.0"/> </material> <material name="brown"> <color rgba="${222/255} ${207/255} ${195/255} 1.0"/> </material> <material name="red"> <color rgba="0.8 0.0 0.0 1.0"/> </material> <material name="white"> <color rgba="1.0 1.0 1.0 1.0"/> </material> </robot> -
进入 mycar.descripiton 下的 urdf 目录,创建小车的属性宏定义文件 macros.xacro。
<?xml version="1.0"?> <robot> <macro name="cylinder_inertia" params="m r h"> <inertia ixx="${m*(3*r*r+h*h)/12}" ixy = "0" ixz = "0" iyy="${m*(3*r*r+h*h)/12}" iyz = "0" izz="${m*r*r/2}" /> </macro> <macro name="box_inertia" params="m x y z"> <inertia ixx="${m*(y*y+z*z)/12}" ixy = "0" ixz = "0" iyy="${m*(x*x+z*z)/12}" iyz = "0" izz="${m*(x*x+z*z)/12}" /> </macro> <macro name="sphere_inertia" params="m r"> <inertia ixx="${2*m*r*r/5}" ixy = "0" ixz = "0" iyy="${2*m*r*r/5}" iyz = "0" izz="${2*m*r*r/5}" /> </macro> </robot>- 对一些属性的宏定义,这里是对圆柱、矩形和球形的转动惯量的宏定义,通过输入的 params 中的参数计算转动惯量,在 mycar.urdf 中有用到。
-
在 mycar.gazebo 目录下的 mybot_world.launch 文件中添加内容,使得世界启动时加载机器人模型。
<!-- urdf xml robot description loaded on the Parameter Server, converting the xacro into a proper urdf file--> <param name="robot_description" command="$(find xacro)/xacro.py '$(find mycar_description)/urdf/mycar.xacro'" /> <!-- push robot_description to factory and spawn robot in gazebo --> <node name="mycar_spawn" pkg="gazebo_ros" type="spawn_model" output="screen" args="-urdf -param robot_description -model mycar" />- 这部分首先将 robot_description 下的 mycar.xacro 路径存储到 ROS 参数服务器中,然后再加载入世界。
- 一定要注意不要将中文注释粘贴进去。
-
运行 mycar_world.launch 文件:
$ roslaunch mycar_gazebo mycar_world.launch -
运行结果为:

(2)、添加轮子
-
在 mycar.xacro 文件中添加以添加球形脚轮:
<joint name="fixed" type="fixed"> <parent link="chassis"/> <child link="caster_wheel"/> </joint> <link name="caster_wheel"> <collision> <origin xyz="${casterRadius-chassisLength/2} 0 ${casterRadius-chassisHeight+wheelRadius}" rpy="0 0 0"/> <geometry> <sphere radius="${casterRadius}"/> </geometry> </collision> <visual> <origin xyz="${casterRadius-chassisLength/2} 0 ${casterRadius-chassisHeight+wheelRadius}" rpy="0 0 0"/> <geometry> <sphere radius="${casterRadius}"/> </geometry> <material name="red"/> </visual> <inertial> <origin xyz="${casterRadius-chassisLength/2} 0 ${casterRadius-chassisHeight+wheelRadius}" rpy="0 0 0"/> <mass value="${casterMass}"/> <sphere_inertia m="${casterMass}" r="${casterRadius}"/> </inertial> </link> -
在 materilas.xacro 文件中添加脚轮的属性:
<gazebo reference="caster_wheel"> <mu1>0.0</mu1> <mu2>0.0</mu2> <material>Gazebo/Red</material> </gazebo> -
在 macro.xacro 宏定义文件中,为两个轮子使用宏定义简化书写。
<macro name="wheel" params="lr tY"> <link name="${lr}_wheel"> <collision> <origin xyz="0 0 0" rpy="0 ${PI/2} ${PI/2}" /> <geometry> <cylinder length="${wheelWidth}" radius="${wheelRadius}"/> </geometry> </collision> <visual> <origin xyz="0 0 0" rpy="0 ${PI/2} ${PI/2}" /> <geometry> <cylinder length="${wheelWidth}" radius="${wheelRadius}"/> </geometry> <material name="black"/> </visual> <inertial> <origin xyz="0 0 0" rpy="0 ${PI/2} ${PI/2}" /> <mass value="${wheelMass}"/> <cylinder_inertia m="${wheelMass}" r="${wheelRadius}" h="${wheelWidth}"/> </inertial> </link> <gazebo reference="${lr}_wheel"> <mu1 value="1.0"/> <mu2 value="1.0"/> <kp value="10000000.0" /> <kd value="1.0" /> <fdir1 value="1 0 0"/> <material>Gazebo/Black</material> </gazebo> <joint name="${lr}_wheel_hinge" type="continuous"> <parent link="chassis"/> <child link="${lr}_wheel"/> <origin xyz="${-wheelPos+chassisLength/2} ${tY*wheelWidth/2+tY*chassisWidth/2} ${wheelRadius}" rpy="0 0 0" /> <axis xyz="0 1 0" rpy="0 0 0" /> <limit effort="100" velocity="100"/> <joint_properties damping="0.0" friction="0.0"/> </joint> <transmission name="${lr}_trans"> <type>transmission_interface/SimpleTransmission</type> <joint name="${lr}_wheel_hinge"> <hardwareInterface>hardware_interface/ffortJointInterface</hardwareInterface> </joint> <actuator name="${lr}Motor"> <hardwareInterface>hardware_interface/EffortJointInterface</hardwareInterface> <mechanicalReduction>10</mechanicalReduction> </actuator> </transmission> </macro>- 宏定义的标签是
<wheel>,指定了 link 链接和 joint 关节,以及其属性。最后定义了传动。输入的参数为左右轮和沿Y轴的正反方向。
- 宏定义的标签是
-
将宏定义运用于 mycar.xacro 文件中。
<wheel lr="left" tY="1"/> <wheel lr="right" tY="-1"/> -
运行 mycar_world.launch 文件:
$ roslaunch mycar_gazebo mycar_world.launch -
运行结果为:

(3)、将小车连接到ROS
-
在 mybot.gazebo 中添加插件访问车轮的关节。
<gazebo> <plugin name="gazebo_ros_control" filename="libgazebo_ros_control.so"> <robotNamespace>/mycar</robotNamespace> </plugin> </gazebo> -
在 mycar_control 包下的 config 目录创建 mycar_control.yaml 配置文件。该文件将定义三个控制器:每个车轮一个控制权,通过变速箱标签与关节的连接表示;一个用于发布关节状态的控制器。它还定义了用于此控制器的PID增益:
mycar: # Publish all joint states ----------------------------------- joint_state_controller: type: joint_state_controller/JointStateController publish_rate: 50 # Effort Controllers --------------------------------------- leftWheel_effort_controller: type: effort_controllers/JointEffortController joint: left_wheel_hinge pid: {p: 100.0, i: 0.1, d: 10.0} rightWheel_effort_controller: type: effort_controllers/JointEffortController joint: right_wheel_hinge pid: {p: 100.0, i: 0.1, d: 10.0} -
在 mycar_control 包下的 launch 目录创建 mycar_control.launch 文件用于启动控制器。
<launch> <!-- Load joint controller configurations from YAML file to parameter server --> <rosparam file="$(find mycar_control)/config/mycar_control.yaml" command="load"/> <!-- load the controllers --> <node name="controller_spawner" pkg="controller_manager" type="spawner" respawn="false" output="screen" ns="/mycar" args="joint_state_controller rightWheel_effort_controller leftWheel_effort_controller" /> <!-- convert joint states to TF transforms for rviz, etc --> <node name="robot_state_publisher" pkg="robot_state_publisher" type="robot_state_publisher" respawn="false" output="screen"> <param name="robot_description" command="$(find xacro)/xacro.py '$(find mycar_description)/urdf/mycar.xacro'" /> <remap from="/joint_states" to="/mycar/joint_states" /> </node> </launch>- 加载配置和控制器。
- 启动一个节点,该节点发布机器人状态信息。
-
在 mybot_world.launch 中添加一行来启动控制器:
<!-- ros_control mybot launch file --> <include file="$(find mycar_control)/launch/mycar_control.launch" /> -
启动世界:
$ roslaunch mycar_gazebo mycar_world.launch -
查看话题列表,可以看到三个相关的话题话题:/mycar/joint_states、
/mycar/leftWheel_effort_controller/command和
/mycar/rightWheel_effort_controller/command。查看第一个话题的数据和第二个话题的信息如下图。
-
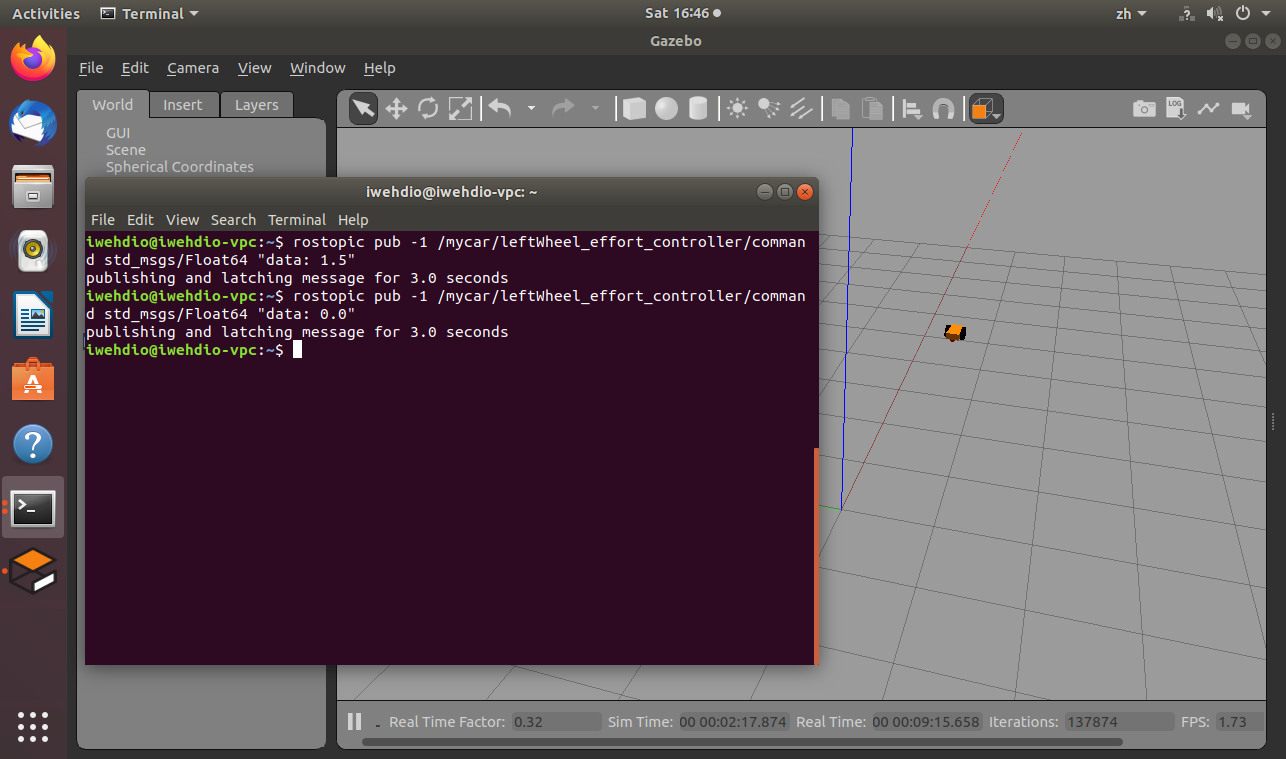
发布运动指令与停止指令:
$ rostopic pub -1 /mycar/leftWheel_effort_controller/command std_msgs/Float64 "data: 1.5" $ rostopic pub -1 /mycar/rightWheel_effort_controller/command std_msgs/Float64 "data: 1.0" $ rostopic pub -1 /mycar/leftWheel_effort_controller/command std_msgs/Float64 "data: 0.0" $ rostopic pub -1 /mycar/rightWheel_effort_controller/command std_msgs/Float64 "data: 0.0" -
小车开始运动:
(4)、机器人的遥控
-
之前的配置允许我们可以单独控制关节,但是当想让移动机器人四处移动时,这样做并不方便。使用另一个称为差分驱动器的插件来简化,在 mycar.gazebo 中添加:
<gazebo> <plugin name="differential_drive_controller" filename="libgazebo_ros_diff_drive.so"> <alwaysOn>true</alwaysOn> <updateRate>100</updateRate> <leftJoint>left_wheel_hinge</leftJoint> <rightJoint>right_wheel_hinge</rightJoint> <wheelSeparation>${chassisWidth+wheelWidth}</wheelSeparation> <wheelDiameter>${2*wheelRadius}</wheelDiameter> <torque>20</torque> <commandTopic>mycar/cmd_vel</commandTopic> <odometryTopic>mycar/odom_diffdrive</odometryTopic> <odometryFrame>odom</odometryFrame> <robotBaseFrame>footprint</robotBaseFrame> </plugin> </gazebo>- 此插件将订阅由
<commandTopic>标记指定的cmd_vel主题。
- 此插件将订阅由
-
要使用键盘对机器人进行遥控,可以使用turtlesim或turtlebot软件包中提供的遥控节点。我们只需要重新映射主题名称即可将其连接到我们的机器人:
$ rosrun turtlesim turtle_teleop_key /turtle1/cmd_vel:=/mycar/cmd_vel -
用键盘控制机器人:

(5)、添加相机
-
在 mycar.xacro 中添加照相机:
<joint name="camera_fix" type="fixed"> <parent link="chassis"/> <child link="camera"/> <origin xyz="${chassisLength/2} 0 ${chassisHeight}" rpy="0 0 0" /> <axis xyz="1 0 0" rpy="0 0 0" /> </joint> <link name="camera"> <collision> <origin xyz="0 0 0" rpy="0 0 0"/> <geometry> <box size="${cameraSize} ${cameraSize} ${cameraSize}"/> </geometry> </collision> <visual> <origin xyz="0 0 0" rpy="0 0 0"/> <geometry> <box size="${cameraSize} ${cameraSize} ${cameraSize}"/> </geometry> <material name="blue"/> </visual> <inertial> <mass value="${cameraMass}" /> <origin xyz="0 0 0" rpy="0 0 0"/> <box_inertia m="${cameraMass}" x="${cameraSize}" y="${cameraSize}" z="${cameraSize}" /> </inertial> </link> -
在 mycar.gazebo 文件中添加相机插件:
<gazebo reference="camera"> <material>Gazebo/Blue</material> <sensor type="camera" name="camera1"> <update_rate>30.0</update_rate> <camera name="head"> <horizontal_fov>1.3962634</horizontal_fov> <image> <width>800</width> <height>800</height> <format>R8G8B8</format> </image> <clip> <near>0.02</near> <far>300</far> </clip> </camera> <plugin name="camera_controller" filename="libgazebo_ros_camera.so"> <alwaysOn>true</alwaysOn> <updateRate>0.0</updateRate> <cameraName>mycar/camera1</cameraName> <imageTopicName>image_raw</imageTopicName> <cameraInfoTopicName>camera_info</cameraInfoTopicName> <frameName>camera_link</frameName> <hackBaseline>0.07</hackBaseline> <distortionK1>0.0</distortionK1> <distortionK2>0.0</distortionK2> <distortionK3>0.0</distortionK3> <distortionT1>0.0</distortionT1> <distortionT2>0.0</distortionT2> </plugin> </sensor> </gazebo> -
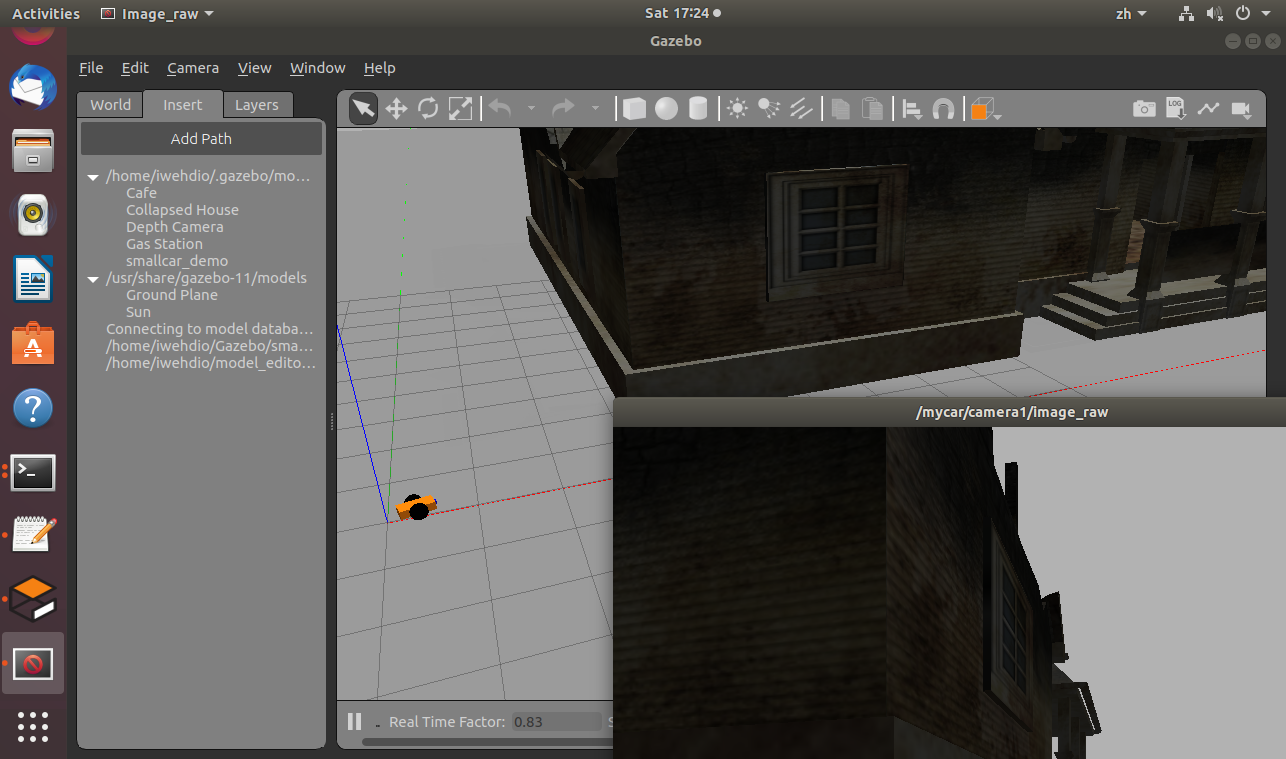
使用image_view工具直接对相机图像进行可视化:
$ rosrun image_view image_view image:=/mycar/camera1/image_raw -
结果为:
iwehdio的博客园:https://www.cnblogs.com/iwehdio/