从项目中截出的代码
HTML部分:
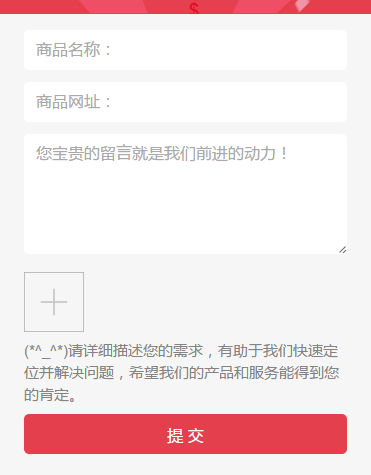
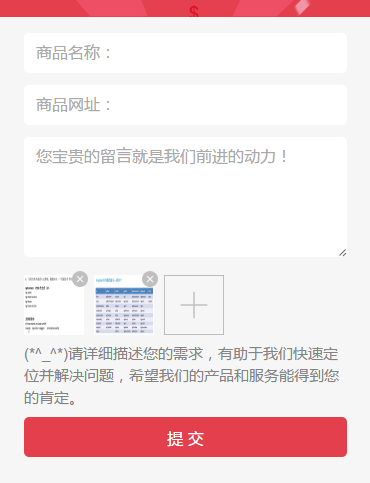
<section>
    <img src="image/user-tuijian/tuijian_banner.png" />
    <div>
        <form ng-submit="submit_form()">
            <input type="text" name="aaa" placeholder="商品名称:" ng-model="form.goods_name" />
            <input type="text" name="bbb" placeholder="商品网址:" ng-model="form.goods_url" />
            <textarea placeholder="您宝贵的留言就是我们前进的动力!" ng-model="form.user_msg"></textarea>
            <div>
                <div ng-repeat="item in thumb">
                <!-- 采用angular循环的方式,对存入thumb的图片进行展示 -->
                    <label>
                        <img ng-src="{{item.imgSrc}}"/>
                    </label>
                    <span ng-if="item.imgSrc" ng-click="img_del($index)"></span>
                </div>
                <div ng-repeat="item in thumb_default">
                <!-- 这里之所以写个循环,是为了后期万一需要多个‘加号’框 -->
                    <label>
                        <input type="file" id="one-input" accept="image/*" file-model="images" onchange="angular.element(this).scope().img_upload(this.files)"/>
                    </label>
                </div>
            </div>
            <p>(*^_^*)请详细描述您的需求,有助于我们快速定位并解决问题,希望我们的产品和服务能得到您的肯定。</p>
            <input type="submit" name="" value="提 交" />
        </form>
    </div>
</section>
JS部分:
Module.controller('controlName', ['$scope', '$http', function($scope, $http) {
    $scope.reader = new FileReader();   //创建一个FileReader接口
    $scope.form = {     //用于绑定提交内容,图片或其他数据
        image:{},
    };
    $scope.thumb = {};      //用于存放图片的base64
    $scope.thumb_default = {    //用于循环默认的‘加号’添加图片的框
        1111:{}
    };

    $scope.img_upload = function(files) {       //单次提交图片的函数
        $scope.guid = (new Date()).valueOf();   //通过时间戳创建一个随机数,作为键名使用
        $scope.reader.readAsDataURL(files[0]);  //FileReader的方法,把图片转成base64
        $scope.reader.onload = function(ev) {
            $scope.$apply(function(){
                $scope.thumb[$scope.guid] = {
                    imgSrc : ev.target.result,  //接收base64
                }
            });
        };

        var data = new FormData();      //以下为像后台提交图片数据
        data.append('image', files[0]);
        data.append('guid',$scope.guid);
        $http({
            method: 'post',
            url: '/comm/test-upload.php?action=success',
            data:data,
            headers: {'Content-Type': undefined},
            transformRequest: angular.identity
        }).success(function(data) {
            if (data.result_code == 'SUCCESS') {
                $scope.form.image[data.guid] = data.result_value;
                $scope.thumb[data.guid].status = 'SUCCESS';
                console.log($scope.form)
            }
            if(data.result_code == 'FAIL'){
                console.log(data)
            }
        })
    };

    $scope.img_del = function(key) {    //删除,删除的时候thumb和form里面的图片数据都要删除,避免提交不必要的
        var guidArr = [];
        for(var p in $scope.thumb){
            guidArr.push(p);
        }
        delete $scope.thumb[guidArr[key]];
        delete $scope.form.image[guidArr[key]];
    };
    $scope.submit_form = function(){    //图片选择完毕后的提交,这个提交并没有提交前面的图片数据,只是提交用户操作完毕后,
                        到底要上传哪些,通过提交键名或者链接,后台来判断最终用户的选择,整个思路也是如此
        $http({
            method: 'post',
            url: '/comm/test.php',
            data:$scope.form,
        }).success(function(data) {
            console.log(data);
        })
    };
}]);
最后的效果如图: