MyBatis 在Spring Boot应用非常广,非常强大的一个半自动的ORM框架。
- 代码下载:https://github.com/Jackson0714/study-spring-boot.git
- 05. 深入浅出 Spring Boot - 数据访问之JDBC(源码分析+代码下载)
- 06. 深入浅出 Spring Boot - 数据访问之Druid(附代码下载)
- 07. 深入浅出 Spring Boot - 数据访问之Mybatis(附代码下载)
一、什么是MyBatis
-
支持定制化 SQL、存储过程以及高级映射的优秀的持久层框架
-
避免了几乎所有的 JDBC 代码和手动设置参数以及获取结果集
-
可以对配置和原生Map使用简单的 XML 或注解
-
将接口和 Java 的 POJOs(Plain Old Java Objects,普通的 Java对象)映射成数据库中的记录
-
数据库、数据源、数据库连接池、JDBC、JDBC实现是什么关系?
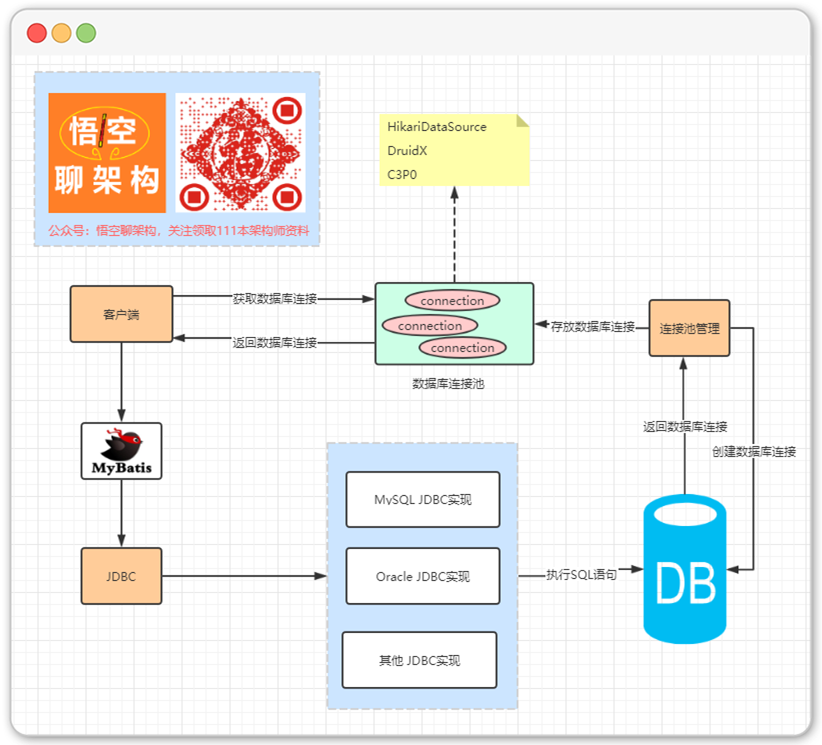
- JDBC:Java和关系型数据库的桥梁,是一个规范,不是实现。不同类型的数据库需要有自己的JDBC实现
- 数据源:包含数据库连接池,连接池管理。常见的有C3P0、HikariDataSoiurce、Druid等
- 连接池:预先创建一些数据库连接,放到连接池里面,用的时候从连接池里面取,用完后放回连接池
- 连接池管理:创建数据库连接,管理数据库连接
- JDBC实现:MySQL JDBC实现、Oracle JDBC实现等其他实现
- MyBatis对JDBC进行了封装
二、整合MyBatis
我们基于之前创建的项目spring-boot-06-data-druid 来创建spring-boot-07-data-mybatis项目
1)引入MyBatis依赖
<!-- mybatis -->
<dependency>
  <groupId>org.mybatis.spring.boot</groupId>
  <artifactId>mybatis-spring-boot-starter</artifactId>
  <version>2.1.1</version>
</dependency>
2)引入其他依赖
<dependencies>
  <!-- web -->
  <dependency>
    <groupId>org.springframework.boot</groupId>
    <artifactId>spring-boot-starter-web</artifactId>
  </dependency>

  <!-- mysql -->
  <dependency>
    <groupId>mysql</groupId>
    <artifactId>mysql-connector-java</artifactId>
    <scope>runtime</scope>
  </dependency>

  <!-- swagger -->
  <dependency>
    <groupId>io.springfox</groupId>
    <artifactId>springfox-swagger2</artifactId>
    <version>2.9.2</version>
  </dependency>
  <dependency>
    <groupId>io.springfox</groupId>
    <artifactId>springfox-swagger-ui</artifactId>
    <version>2.9.2</version>
  </dependency>

  <!-- Druid -->
  <dependency>
    <groupId>com.alibaba</groupId>
    <artifactId>druid</artifactId>
    <version>1.1.21</version>
  </dependency>
3)依赖图

三、用注解方式使用 MyBatis
1.准备创建department表的脚本
DROP TABLE IF EXISTS `department`;
CREATE TABLE `department` (
  `id` int(11) NOT NULL AUTO_INCREMENT,
  `department_name` varchar(255) DEFAULT NULL,
  PRIMARY KEY (`id`)
) ENGINE=InnoDB AUTO_INCREMENT=1 DEFAULT CHARSET=utf8;
2.application.yml 自动执行脚本
initialization-mode: always
schema:
  - classpath:department.sql
执行一次后,注释 initialization-mode
# initialization-mode: always
3.创建department 实体类
package com.jackson0714.springboot.entity;

public class Department {
    private Long id;
    private String departmentName;

    public void setId(Long id) {
        this.id = id;
    }

    public Long getId() {
        return id;
    }

    public void setDepartmentName(String departmentName) {
        this.departmentName = departmentName;
    }

    public String getDepartmentName() {
        return departmentName;
    }
}
4.创建Mapper映射类,并将SQL注解到方法上
增删改查,你要的都在这里:
@Mapper
public interface DepartmentMapper {

    @Select("select * from department")
    List<Map<String, Object>> getAllDepartment();

    @Select("select * from department where id=#{id}")
    Department getDepartmentById(Long id);

    @Delete("delete from department where id=#{id}")
    int deleteDepartment(Long id);

    @Insert("insert into department(department_name) values(#{departmentName})")
    int createDepartment(String departmentName);

    @Update("update department set department_name=#{departmentName} where id=#{id}")
    int updateDepartmentById(Long id, String departmentName);
}
5.创建MyBatis 配置类
增加自定义配置:如果表的字段名有下划线格式的,转为驼峰命名格式
@org.springframework.context.annotation.Configuration
public class MyBatisConfig {
    @Bean
    public ConfigurationCustomizer configurationCustomizer() {
        return new ConfigurationCustomizer() {
            @Override
            public void customize(Configuration configuration) {
                // 如果表的字段名有下划线格式的,转为驼峰命名格式
                configuration.setMapUnderscoreToCamelCase(true);
            }
        };
    }
}
6.创建DepartmentController
@Api(value = "DepartmentController", description = "部门controller")
@RequestMapping("/v1/client")
@RestController
public class DepartmentController {

    @Autowired
    DepartmentMapper departmentMapper;

    @ApiOperation(value = "1.查询所有部门")
    @GetMapping("/dept/getAllDepartment")
    public List<Map<String, Object>> getAllDepartment() {
        return departmentMapper.getAllDepartment();
    }

    @ApiOperation(value = "2.根据id查询某个部门")
    @ApiImplicitParams({
            @ApiImplicitParam(name = "id", value = "需要查询的部门id")
    })
    @GetMapping("/dept/{id}")
    public Department getDepartmentById(@PathVariable Long id) {
        return departmentMapper.getDepartmentById(id);
    }

    @ApiOperation(value = "3.新增部门")
    @ApiImplicitParams({
            @ApiImplicitParam(name = "name", value = "部门名称")
    })
    @PostMapping("/dept/create")
    public int createDepartment(@RequestParam String name) {
        return departmentMapper.createDepartment(name);
    }

    @ApiOperation(value = "4.根据id删除部门")
    @ApiImplicitParams({
            @ApiImplicitParam(name = "id", value = "需要删除的部门id")
    })
    @PostMapping("/dept/delete")
    public int deleteDepartment(@RequestParam Long id) {
        return departmentMapper.deleteDepartment(id);
    }

    @ApiOperation(value = "5.根据id更新部门名称")
    @ApiImplicitParams({
            @ApiImplicitParam(name = "id", value = "需要更新的部门id"),
            @ApiImplicitParam(name = "name", value = "需要更新的部门名称")
    })
    @PostMapping("/dept/update")
    public int updateDepartmentById(@RequestParam Long id, @RequestParam String name) {
        return departmentMapper.updateDepartmentById(id, name);
    }
}
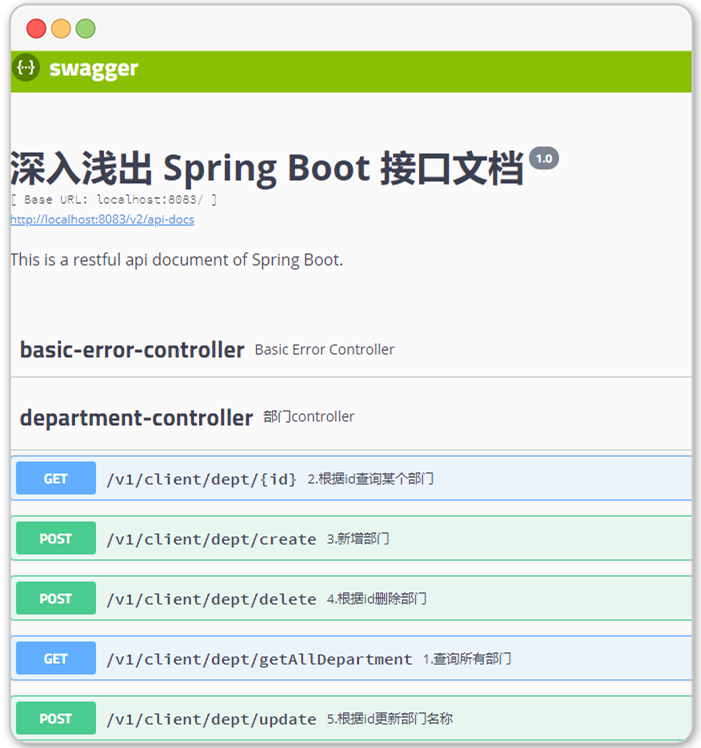
使用Swagger来测试
四、用配置方式使用 MyBatis
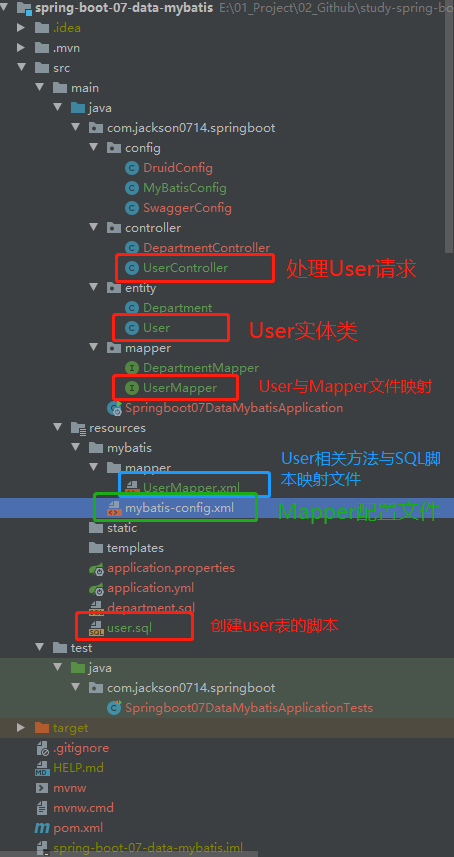
1. 文件结构
2. 创建user表的脚本
SET FOREIGN_KEY_CHECKS=0;

-- ----------------------------
-- Table structure for user
-- ----------------------------
DROP TABLE IF EXISTS `user`;
CREATE TABLE `user` (
  `user_id` int(11) NOT NULL AUTO_INCREMENT COMMENT '主键ID',
  `user_name` varchar(255) COLLATE utf8mb4_bin NOT NULL COMMENT '用户名',
  `password` varchar(255) COLLATE utf8mb4_bin NOT NULL,
  `salt` varchar(255) COLLATE utf8mb4_bin DEFAULT NULL COMMENT '随机盐',
  `nickName` varchar(255) COLLATE utf8mb4_bin NOT NULL COMMENT '用户名',
  `phone` varchar(20) COLLATE utf8mb4_bin DEFAULT NULL COMMENT '手机号',
  `avatar` varchar(255) COLLATE utf8mb4_bin DEFAULT NULL COMMENT '头像',
  `mini_openId`  varchar(32) COLLATE utf8mb4_bin DEFAULT NULL COMMENT '小程序OpenId',
  `lock_flag` char(1) COLLATE utf8mb4_bin DEFAULT '0' COMMENT '0-正常,9-锁定',
  `del_flag` char(1) COLLATE utf8mb4_bin DEFAULT '0' COMMENT '0-正常,1-删除',
  `create_time` timestamp NOT NULL DEFAULT CURRENT_TIMESTAMP COMMENT '创建时间',
  `update_time` timestamp NOT NULL DEFAULT CURRENT_TIMESTAMP ON UPDATE CURRENT_TIMESTAMP COMMENT '更新时间',
  PRIMARY KEY (`user_id`),
  KEY `user_wx_openid` (`mini_openId`),
  KEY `user_idx1_username` (`user_name`)
) ENGINE=InnoDB AUTO_INCREMENT=4 DEFAULT CHARSET=utf8mb4 COLLATE=utf8mb4_unicode_ci ROW_FORMAT=DYNAMIC COMMENT='用户表';
3. 插入一条User数据
INSERT INTO user(user_name, password, nick_name, phone) values ("jackson0714", "123", "悟空聊架构", "123456")
4. 创建User实体类
package com.jackson0714.springboot.entity;

import lombok.Data;

import java.sql.Timestamp;

@Data
public class User {

    private Long userId;
    private String userName;
    private String password;
    private String salt;
    private String nickName;
    private String phone;
    private String avatar;
    private String miniOpenId;
    private String openId;
    private Boolean lockFlag;
    private Boolean delFlag;
    private Timestamp createTime;
    private Timestamp updateTime;
}
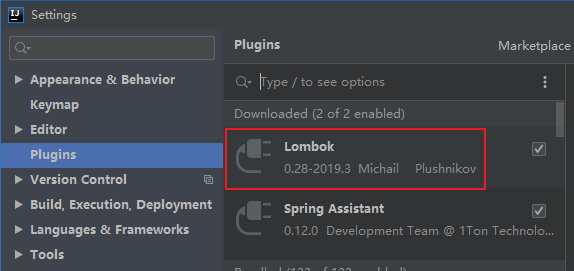
需要安装Lombok插件
需要引入Lombok依赖
<!-- https://mvnrepository.com/artifact/org.projectlombok/lombok -->
<dependency>
  <groupId>org.projectlombok</groupId>
  <artifactId>lombok</artifactId>
  <version>1.18.12</version>
  <scope>provided</scope>
</dependency>
5. 创建调用User方法的 UserMapper 接口
// @Mapper 或MapperScan 将接口扫描装配到装配容器中
public interface UserMapper {
    User getUserById(Long userId);
}
6. 创建接口方法与SQL脚本的映射文件
<?xml version="1.0" encoding="UTF-8" ?>
<!DOCTYPE mapper
        PUBLIC "-//mybatis.org//DTD Mapper 3.0//EN"
        "http://mybatis.org/dtd/mybatis-3-mapper.dtd">
<mapper namespace="com.jackson0714.springboot.mapper.UserMapper">
    <select id="getUserById" resultType="com.jackson0714.springboot.entity.User">
        SELECT * FROM user WHERE user_id=#{userId}
    </select>
</mapper>
7. 创建UserController文件
@Api(value = "UserController", description = "用户controller")
@RequestMapping("/v1/client")
@RestController
public class UserController {
@Autowired
UserMapper userMapper;
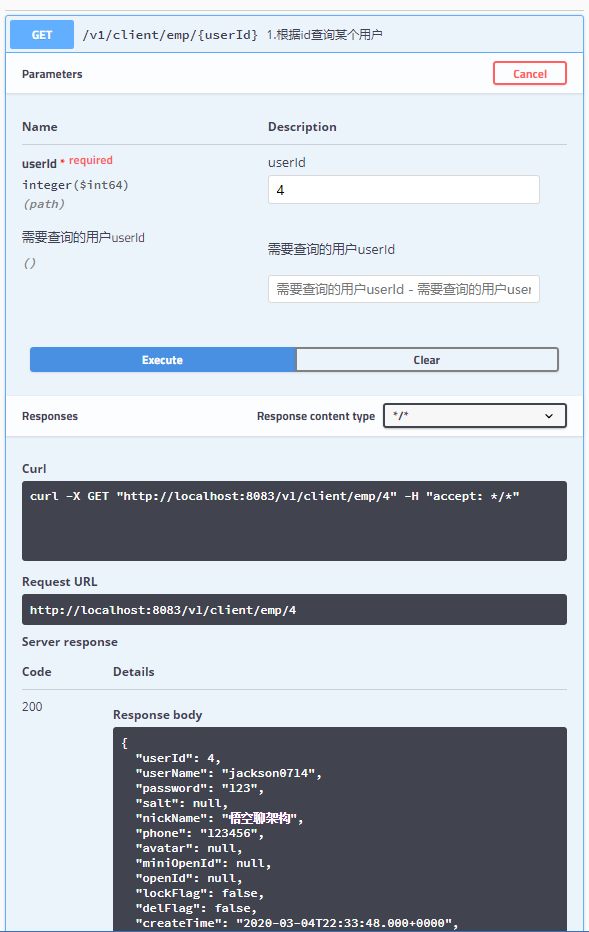
@ApiOperation(value = "1.根据id查询某个用户")
@ApiImplicitParams({
@ApiImplicitParam(name = "需要查询的用户userId", value = "需要查询的用户userId")
})
@GetMapping("/emp/{userId}")
public User getUser(@PathVariable("userId") Long userId) {
return userMapper.getUserById(userId);
}
}
8. 添加MapperScan注解
@MapperScan(value = "com.jackson0714.springboot.mapper")
@SpringBootApplication
public class Springboot07DataMybatisApplication {
    public static void main(String[] args) {
        SpringApplication.run(Springboot07DataMybatisApplication.class, args);
    }
}
9.在Swagger上测试
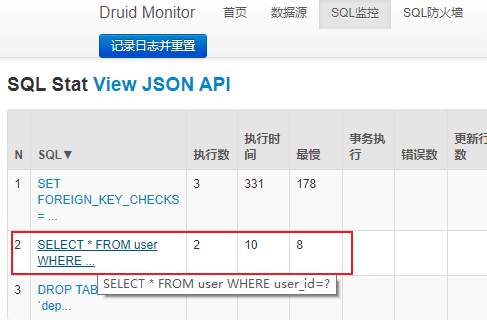
10. 查看Druid监控
Spring Boot 整合MyBatis 讲完了,持续更新 《深入浅出 Spring Boot 系列》
- 代码下载:https://github.com/Jackson0714/study-spring-boot.git
- 05. 深入浅出 Spring Boot - 数据访问之JDBC(源码分析+代码下载)
- 06. 深入浅出 Spring Boot - 数据访问之Druid(附代码下载)
- 07. 深入浅出 Spring Boot - 数据访问之Mybatis(附代码下载)
关注公众号:悟空聊架构,
回复pmp,领取pmp资料!
回复悟空,领取架构师资料!

关注我,带你每天进步一点点!