代码生成器作用
中国有句古语叫做“工欲善其事,必先利其器”,用通俗的话来说就是“磨刀不误砍柴功”,古人的这些话告诉我们:要把事情做好,事先应该准备合适的工具。工具不仅仅包括器具,
还包括思想、理论、经验、道德、法律等一切能解决问题的有形和无形的东西。
CodeSmith介绍
CodeSmith是一个代码生成器,可以用来大量生成代码的。用起来其实也很简单,可是许多人都不能入门。大部分的代码生成工具都是需要模板的,这个很好理解,模板就是一段代码,
里面留几个洞,这个洞会被数据库的字段名或表名等填充,CodeSmith的最多的用法就是连接数据库,然后把数据库信息取出来去替换用户提供的模板中关键字,这就是代码生成的原理。
为了生成更灵活,模板和关键字可以混合在一起写,这个蛮怪异的,不过你看懂了也就无所谓了。
当生成应用程序时,无论是编写数据访问代码还是生成自定义集合,你会发现经常需要重复完成某些特定的任务。这时 CodeSmith 就显得特别有用,因为你可以编写模板自动完成
这些任务,从而不仅提高你的工作效率,而且能够自动完成那些最为乏味的任务。
CodeSmith界面
CodeSmith 的代码编写界面跟常见的开发IDE很类似。常用的就是Bulid Templete, Generate,以及Output VIEW。
CodeSmith 语法介绍
1.注释

<%-- 这是一个C#语言的模板 --%>

2.加载使用访问数据库的组件SchemaExplorer,并声明其使用的命名空间

<%@ Assembly Name="SchemaExplorer" %>
<%@ Import Namespace="SchemaExplorer" %>

3.声明表对象

<%@ Property Name="TargetTable" Type="SchemaExplorer.TableSchema" Category="Context" Description="TargetTable that the object is based on." %>

3.声明视图对象

<%@ Property Name="TargetView" Type="SchemaExplorer.ViewSchema" Category="Context" Description="TargetView that the object is based on." %>

4.设置输入信息框
<%@ Property Name="Author" Type="String" Category="Context" Description="作者" %>

5.编写C# 语言块

     5.1  <%           %>
     5.2  <script runat="template">
               private string GetDesc(string name)
               {
                  string temp=string.Empty;
                  temp+="//作者:"+name+" Create Date:"+System.DateTime.Now.ToString();
                return temp;
               }
            </script>
     5.3  创建.cs文件,声明中src 引用
            <%@ CodeTemplate Language="C#" TargetLanguage="C#" Src="Common.cs" Description="指明是一个C#语言版本" Inherits="Common" %>

6.赋值<%=    %>

7.相关的数据库对象
   7.1 表名:TargetTable.Name
   7.2 表列结合:TargetTable.Columns
   7.3 列描述:column.Description
CodeSmith 生成实体类模板
有了上述的语法知识,我们开始编写一个简单的实体对象(Model),最终结果是
//============================================================
///Create By:QingQing
//============================================================

using System;
using System.Collections.Generic;
using System.Text;

namespace POP.Domain
{
    [Serializable()]
    public class Area
    {
            /// <summary>
            ///
            /// </summary>
            public long  Areaid {get;set;}
            /// <summary>
            ///
            /// </summary>
            public string  Areaname {get;set;}
            /// <summary>
            ///
            /// </summary>
            public string  Aliasname {get;set;}
            /// <summary>
            ///
            /// </summary>
            public long?  Parentid {get;set;}
            /// <summary>
            ///
            /// </summary>
            public long?  Sortno {get;set;}
            /// <summary>
            /// T:有效,F:无效
            /// </summary>
            public string  Valid {get;set;}
    }
}
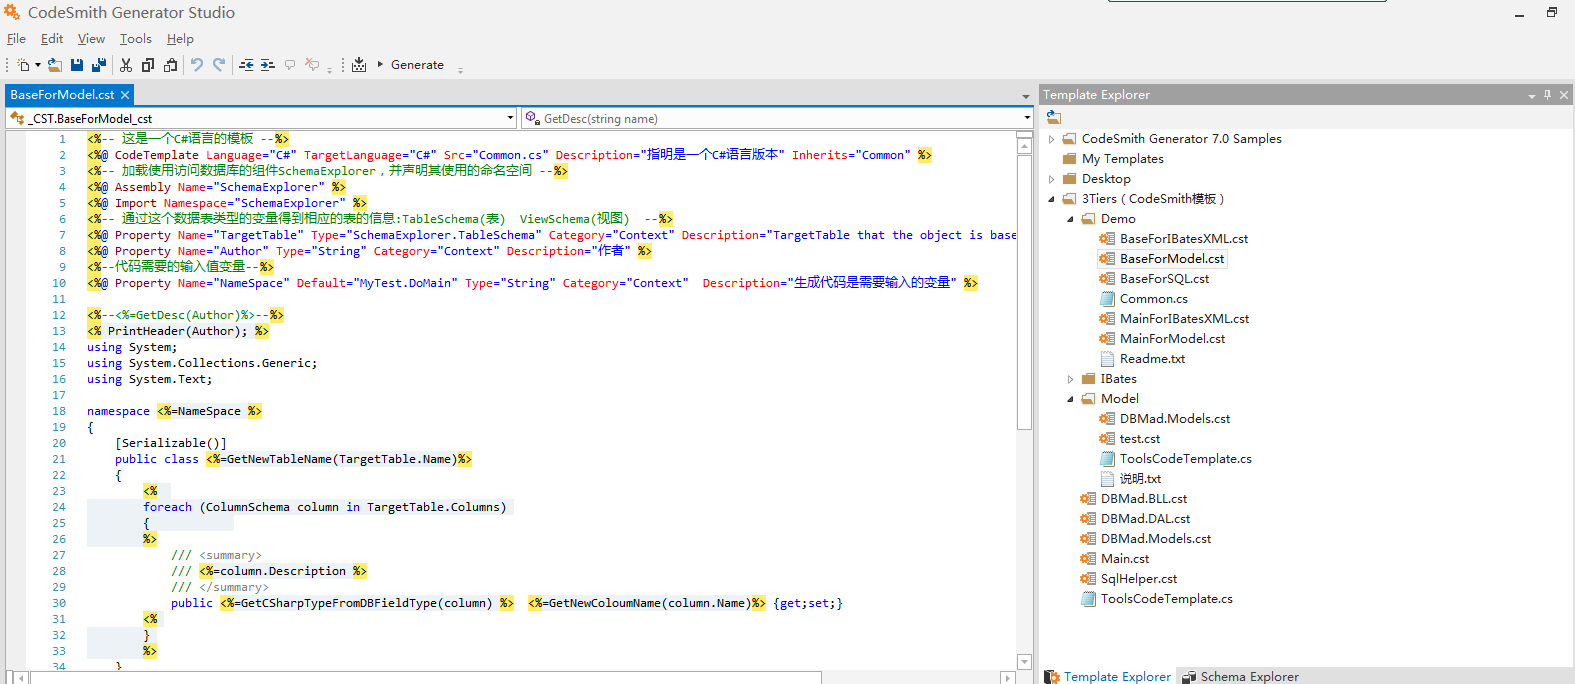
思考一下,using 引用的命名空间是固定的,get set熟悉是固定的,剩下的就是要从数据库里获取表对象进行填充了,上模板。
<%-- 这是一个C#语言的模板 --%>
<%@ CodeTemplate Language="C#" TargetLanguage="C#" Src="Common.cs" Description="指明是一个C#语言版本" Inherits="Common" %>
<%-- 加载使用访问数据库的组件SchemaExplorer,并声明其使用的命名空间 --%>
<%@ Assembly Name="SchemaExplorer" %>
<%@ Import Namespace="SchemaExplorer" %>
<%-- 通过这个数据表类型的变量得到相应的表的信息:TableSchema(表)  ViewSchema(视图)  --%>
<%@ Property Name="TargetTable" Type="SchemaExplorer.TableSchema" Category="Context" Description="TargetTable that the object is based on." %>
<%@ Property Name="Author" Type="String" Category="Context" Description="作者" %>
<%--代码需要的输入值变量--%>
<%@ Property Name="NameSpace" Default="MyTest.DoMain" Type="String" Category="Context"  Description="生成代码是需要输入的变量" %>

<%--<%=GetDesc(Author)%>--%>
<% PrintHeader(Author); %>
using System;
using System.Collections.Generic;
using System.Text;

namespace <%=NameSpace %>
{
    [Serializable()]
    public class <%=GetNewTableName(TargetTable.Name)%>
    {
        <%
        foreach (ColumnSchema column in TargetTable.Columns)
         {
        %>
            /// <summary>
            /// <%=column.Description %>
            /// </summary>
            public <%=GetCSharpTypeFromDBFieldType(column) %>  <%=GetNewColoumName(column.Name)%> {get;set;}
        <%
        }
        %>
    }
}

<script runat="template">
/// <summary>
///// 设置文件描述
/// </summary>
/// <param name="name"></param>
/// <returns></returns>
private string GetDesc(string name)
{
    string temp=string.Empty;
    temp+="//作者:"+name+" Create Date:" +System.DateTime.Now.ToString();
    return temp;
}

/// <summary>
/// 设置文件名称,后缀名
/// </summary>
/// <returns></returns>
public override string GetFileName()
{
    return this.TargetTable + ".cs";
}
</script>
编译模板
模板编写完成,要进行编译,确认语法是否通过。输出日志框,错误列表都是我们的好帮手。

使用模板生成文件
OK,模板编译通过我们就要见证奇迹的时刻了。
批量生成文件
单个文件能够生成了,是不是很方便呢,但是聪明的你肯定发现,怎没有提供批量生成的按钮呢?对的,这就需要我们继续编写模板来进行实现了。
批量生成要注意一下几点:
- 注册生成单个模板的文件
- 添加单个文件需要使用的文本框
- 注册获取数据库的对象
- 编写方法遍历数据库的表对象
- 编写获取输出文件的路径
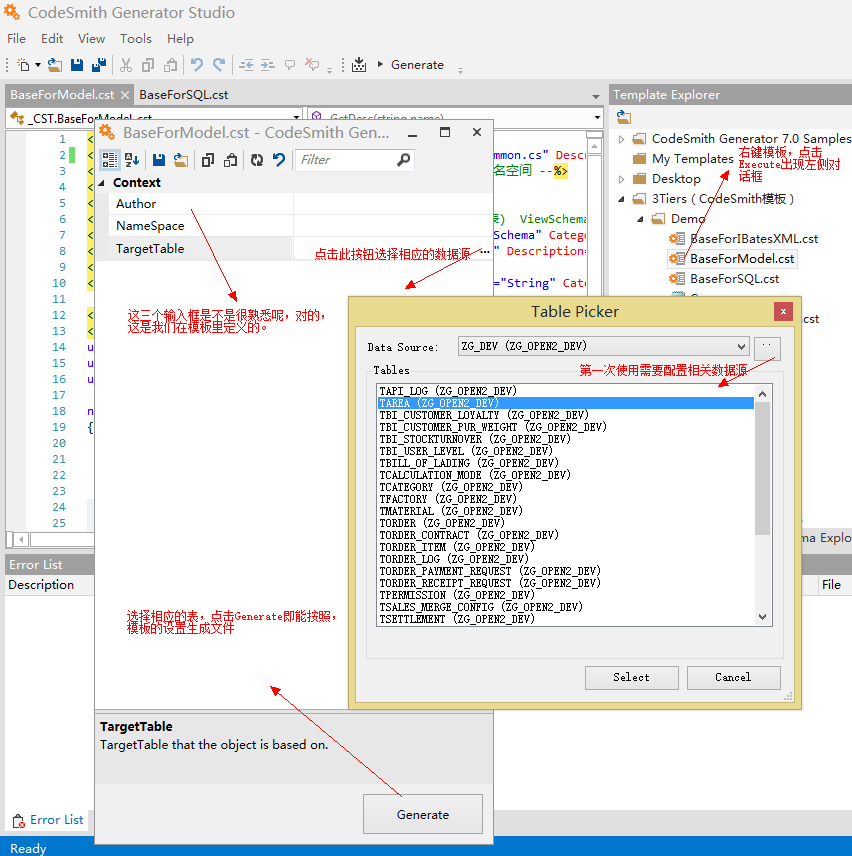
以下就是模板,同样的右键点击模板,Execute,填写相关参数,选择数据库,Generate,生成的文件就会出现在选择的文件夹中
<%@ CodeTemplate Inherits="CodeTemplate" Language="C#" TargetLanguage="Text" Description="生成整个表" Debug="True" ResponseEncoding="UTF-8"%>

<%-- 注册实体层Entity模板 --%>
<%@ Register Name="EntityTemplate" Template="BaseForModel.cst" MergeProperties="Flase" ExcludeProperties=""%>
<%@ Property Name="Author" Type="String" Category="02.作者" Description="作者" %>
<%-- 获取整个数据库对象 --%>
<%@ Property Name="SourceDatabase" Type="SchemaExplorer.DatabaseSchema" DeepLoad="True" Optional="False" Category="01. 获取数据库对象" Description="获取整个数据库对象"%>


<%
//创建实体层Entity类
this.GenerateEntityClasses();
//Debug模式下的信息[Debug="True"]
Debug.WriteLine("Success");
%>

<script runat="template">
    //生成实体Entity类
private void GenerateEntityClasses()
{
        //获取模板对象
        CodeTemplate Template =new EntityTemplate();
        foreach(TableSchema table in this.SourceDatabase.Tables)
        {
            string FileDirectory = OutputDirectory +"\"+ GetNewTableName(table.Name)  +".cs";
            //设置模板的相关内容(Table名称 ,作者名称)
            Template.SetProperty("TargetTable",table);
             Template.SetProperty("Author",Author);
            //文件输出
            Template.RenderToFile(FileDirectory,true);
            Debug.WriteLine(FileDirectory +" 创建成功.");
        }
}

/// <summary>
/// 获取新的TableName(首字母大写,去掉下划线)
/// </summary>
/// <param name="name"></param>
/// <returns></returns>
public string GetNewTableName(string name)
{
      string table=name.Substring(1).ToLower();
      string tempTableName=string.Empty;
      if(table.IndexOf('_')>0)
      {
            string[] temp=table.Split('_');
            for (int i = 0; i < temp.Length; i++)
            {
               tempTableName+=System.Threading.Thread.CurrentThread.CurrentCulture.TextInfo.ToTitleCase(temp[i]); //设置首字母大写
            }
      }
      else
      {
          tempTableName=System.Threading.Thread.CurrentThread.CurrentCulture.TextInfo.ToTitleCase(table); //设置首字母大写
      }
    return tempTableName;
}

    //解决方案输出路径
    private string Directory = String.Empty;

    [Editor(typeof(System.Windows.Forms.Design.FolderNameEditor), typeof(System.Drawing.Design.UITypeEditor))]
    [Optional, NotChecked]
    [DefaultValue("")]
    public string OutputDirectory
    {
        get
        {
            return Directory;
        }
        set
        {
            if (value.EndsWith("\")) value = value.Substring(0, value.Length -1);
            Directory = value;
        }
    }
</script>
总结
CodeSmith 最大的优势就是编写模板生成符合条件的代码。其IDE自身提供了很多相关的模板,里面有很多好用的语法糖。附件提供自己编写的几个模板,供大家学习参考。
小伙伴们快快动手编写属于自己的模板吧,从繁琐的任务重脱离出来,我们的编程更加的愉快。