转自:图像处理:曝光、霓虹(照亮边缘)效果
Posted on 2008-10-31 15:49 parker 阅读(770) 评论(2) 编辑 收藏1.效果图:
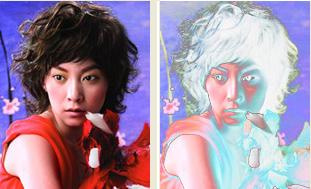
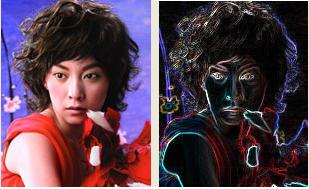
(曝光效果) (霓虹效果)
2.实现原理:
曝光效果:逆转值小于128的R、G、B分量值,产生正片和负片混合的效果。
霓虹效果:用来描绘图像的轮廓,勾画颜色变化的边缘,加强其过度效果,产生轮廓发光的效果。
主要是根据当前像素与其右方和下方像素的梯度运算,然后将结果值作为当前像素值,
即将原图像当前像素的R、G、B分量与其右方和下方像素做梯度运算(差的平方和的平方根),
然后将梯度值作为处理后像素的R、G、B的三个分量。
[ result = Math.Sqrt( (src-right)*(src-right) + (src-bottom)*(src-bottom) ) ]
3.实现代码:
1
 public static Image Solarize(Image img)
2
 {
{3
 int width = img.Width;
4
int height = img.Height;5
Bitmap bmp = new Bitmap(img);6
7
Rectangle rect = new Rectangle(0, 0, width, height);8
ImageLockMode flag = ImageLockMode.ReadWrite;9
PixelFormat format = PixelFormat.Format32bppArgb;10
BitmapData data = bmp.LockBits(rect, flag, format);11
12
IntPtr ptr = data.Scan0;13
14
int numBytes = width * height * 4;15
byte[] rgbValues = new byte[numBytes];16
Marshal.Copy(ptr, rgbValues, 0, numBytes);17
18
for (int i = 0; i < rgbValues.Length; i += 4)19
 {
{20
if (rgbValues[i] < 128)21
rgbValues[i] = (byte)(255 - rgbValues[i]);22
if (rgbValues[i + 1] < 128)23
rgbValues[i + 1] = (byte)(255 - rgbValues[i + 1]);24
if (rgbValues[i + 2] < 128)25
rgbValues[i + 2] = (byte)(255 - rgbValues[i + 2]);26
 }
}27
28
Marshal.Copy(rgbValues, 0, ptr, numBytes);29
bmp.UnlockBits(data);30
31
return (Image)bmp;32
 }
}1
public static Image GlowingEdge(Image img)2
{3
int width = img.Width;4
int height = img.Height;5
6
Bitmap oldImg = (Bitmap)img;7
Bitmap newImg = new Bitmap(width, height);8
9
Color c1, c2, c3;10
int rr, gg, bb;11
for (int i = 0; i < width - 1; i++)12
{13
for (int j = 0; j < height - 1; j++)14
{15
int r = 0, g = 0, b = 0;16
17
c1 = oldImg.GetPixel(i, j);18
c2 = oldImg.GetPixel(i + 1, j);19
c3 = oldImg.GetPixel(i, j + 1);20
21
rr = (c1.R - c2.R) * (c1.R - c2.R) + (c1.R - c3.R) * (c1.R - c3.R);22
gg = (c1.G - c2.G) * (c1.G - c2.G) + (c1.G - c3.G) * (c1.G - c3.G);23
bb = (c1.B - c2.B) * (c1.B - c2.B) + (c1.B - c3.B) * (c1.B - c3.B);24
25
r = (int)(3 * Math.Sqrt(rr));26
g = (int)(3 * Math.Sqrt(gg));27
b = (int)(3 * Math.Sqrt(bb));28
29
r = r < 0 ? 0 : r;30
r = r > 255 ? 255 : r;31
g = g < 0 ? 0 : g;32
g = g > 255 ? 255 : g;33
b = b < 0 ? 0 : b;34
b = b > 255 ? 255 : b;35
36
newImg.SetPixel(i, j, Color.FromArgb(r, g, b));37
}38
}39
return newImg;40
}4.说明:
曝光效果采用的是LockBits方法,霓虹效果采用的是GetPixel、SetPixel方法。
可比较这两种方法在处理图像上的效率问题。