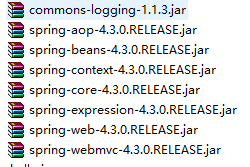
1、新建一个Java Web项目
2、导入jar包

3、在WEB-INF下面建一个hello.jsp页面。
 1 <%@ page language="java" import="java.util.*" pageEncoding="ISO-8859-1"%>
 2
 3 <!DOCTYPE HTML PUBLIC "-//W3C//DTD HTML 4.01 Transitional//EN">
 4 <html>
 5   <head>
 6     <title>My JSP 'hello.jsp' starting page</title>
 7   </head>
 8
 9   <body>
10     hello springmvc
11   </body>
12 </html>
4、配置web.xml文件
 1 <?xml version="1.0" encoding="UTF-8"?>
 2 <web-app xmlns:xsi="http://www.w3.org/2001/XMLSchema-instance" xmlns="http://java.sun.com/xml/ns/javaee" xsi:schemaLocation="http://java.sun.com/xml/ns/javaee http://java.sun.com/xml/ns/javaee/web-app_3_0.xsd" id="WebApp_ID" version="3.0">
 3
 4     <servlet>
 5         <servlet-name>dispatcherServlet</servlet-name>
 6         <servlet-class>org.springframework.web.servlet.DispatcherServlet</servlet-class>
 7         <init-param>
 8             <param-name>contextConfigLocation</param-name>
 9             <param-value>classpath:spring-mvc.xml</param-value>
10         </init-param>
11         <load-on-startup>1</load-on-startup>
12     </servlet>
13
14     <servlet-mapping>
15         <servlet-name>dispatcherServlet</servlet-name>
16         <url-pattern>/</url-pattern>
17     </servlet-mapping>
18
19     <welcome-file-list>
20         <welcome-file>index.jsp</welcome-file>
21     </welcome-file-list>
22 </web-app>
5、配置spring-mvc.xml文件
 1 <?xml version="1.0" encoding="UTF-8"?>
 2 <beans xmlns="http://www.springframework.org/schema/beans"
 3     xmlns:xsi="http://www.w3.org/2001/XMLSchema-instance"
 4     xmlns:context="http://www.springframework.org/schema/context"
 5     xsi:schemaLocation="http://www.springframework.org/schema/beans http://www.springframework.org/schema/beans/spring-beans-4.3.xsd
 6         http://www.springframework.org/schema/context http://www.springframework.org/schema/context/spring-context-4.3.xsd">
 7
 8     <context:component-scan base-package="com.proc"></context:component-scan>
 9
10     <bean class="org.springframework.web.servlet.view.InternalResourceViewResolver">
11         <property name="prefix" value="/WEB-INF/"/>
12         <property name="suffix" value=".jsp"></property>
13     </bean>
14 </beans>
InternalResourceViewResolver:视图解析器。根据Url地址遭到找到文件资源
prefix:前缀
suffix:后缀
6、配置控制器
 1 package com.proc;
 2
 3 import org.springframework.stereotype.Controller;
 4 import org.springframework.web.bind.annotation.RequestMapping;
 5
 6 @Controller
 7 public class Hello {
 8
 9     @RequestMapping("/hello")
10     public String hello(){
11         System.out.println("hello springmvc");
12         return "hello";
13     }
14 }
@RequetMapping注解作用是url映射
测试访问

本文转自:http://www.cnblogs.com/caoyc/p/5635101.html
