1、Nginx 虚拟主机
所谓的虚拟主机,在Web服务里就是一个独立的网站站点,这个站点对应独立的域名(也可能是IP或端口),具有独立的程序及资源目录,可以独立地对外提供服务供用户访问。
在Nginx中则使用一个server{} 标签来标识一个虚拟主机,一个Web服务里可以有多个虚拟主机标签对。
虚拟主机类型
1)基于域名的虚拟主机
通过不同的域名区分不同的虚拟主机
应用:外部网站

2)基于端口的虚拟主机
通过不同的端口区分不同的虚拟主机
应用:公司内部网站,网站的后台

3)基于IP的虚拟主机
通过不同的IP区分不同的虚拟主机
应用:几乎不用
1.1、基于域名的虚拟主机
域名1:www.hhjy.com
域名2:bbs.hhjy.org
1.修改nginx配置文件,创建两个虚拟主机
$ cat /etc/nginx/nginx.conf
user  nginx;
worker_processes  1;
error_log  /var/log/nginx/error.log warn;
pid        /var/run/nginx.pid;
events {
    worker_connections  1024;
}
http {
    include       /etc/nginx/mime.types;
    default_type  application/octet-stream;
    log_format  main  '$remote_addr - $remote_user [$time_local] "$request" '
                      '$status $body_bytes_sent "$http_referer" '
                      '"$http_user_agent" "$http_x_forwarded_for"';
    access_log  /var/log/nginx/access.log  main;
    sendfile        on;
    keepalive_timeout  65;
    include /etc/nginx/conf.d/*.conf;

    server {
        listen 80;								# 监听端口
        server_name www.hhjy.com; # 域名:www.hhjy.com
        location / {							# 匹配url请求为根目录
            root /data/www;       # 匹配到url请求后会在该站点目录下查找对应的文件
            index index.html index.htm; # 默认主页文件名
        }
    }
    server {
        listen 80;
        server_name bbs.hhjy.com; # 域名:bbs.hhjy.com
        location / {
            root /data/bbs;
            index index.html index.htm;
        }
    }
}
2.为各自站点创建目录,并各自创建index.html
$ mkdir -p /data/{www,bbs}
$ echo "domain from in www" >/data/www/index.html
$ echo "domain from in bbs" >/data/bbs/index.html
3.校验nginx配置文件语法并平滑重启
$ nginx -t
nginx: the configuration file /etc/nginx/nginx.conf syntax is ok
nginx: configuration file /etc/nginx/nginx.conf test is successful
$ nginx -s reload
4.客户端添加hosts(因为域名只在测试环境使用,并没有备案,那就直接修改hosts文件)
$ vim /etc/hosts
10.4.7.7 www.hhjy.com bbs.hhjy.com
5.访问两个虚拟主机/域名
$ curl www.hhjy.com
domain from in www

$ curl bbs.hhjy.com
domain from in bbs
注意事项:
1、当服务器存在多个虚拟主机,客户端用IP地址访问网站的时候,因为HTTP请求头没有携带host字段,所以服务器只会用nginx.conf中的第一个server的location回应
2、当服务器存在多个虚拟主机,客户端用域名访问网站的时候,因为HTTP请求头有携带host字段,所以服务器会根据host里的域名查找nginx.conf中对应的location回应
1.2、基于端口的虚拟主机
域名:www.hhjy.com ,端口:81
域名:bbs.hhjy.com ,端口:82
1.修改nginx配置文件,添加基于端口虚拟主机配置
$ cat /etc/nginx/nginx.conf
user  nginx;
worker_processes  1;
error_log  /var/log/nginx/error.log warn;
pid        /var/run/nginx.pid;
events {
    worker_connections  1024;
}
http {
    include       /etc/nginx/mime.types;
    default_type  application/octet-stream;
    log_format  main  '$remote_addr - $remote_user [$time_local] "$request" '
                      '$status $body_bytes_sent "$http_referer" '
                      '"$http_user_agent" "$http_x_forwarded_for"';
    access_log  /var/log/nginx/access.log  main;
    sendfile        on;
    keepalive_timeout  65;
    include /etc/nginx/conf.d/*.conf;

    server {
        listen 81;
        server_name www.hhjy.com;
        location / {
            root /data/www;
            index index.html index.htm;
        }
    }
    server {
        listen 82;
        server_name bbs.hhjy.com;
        location / {
            root /data/bbs;
            index index.html index.htm;
        }
    }
}
2.修改各站点目录下index.html的内容
$ echo "port from in www" >/data/www/index.html
$ echo "port from in bbs" >/data/bbs/index.html
3.校验nginx配置文件语法并平滑重启
$ nginx -t
nginx: the configuration file /etc/nginx/nginx.conf syntax is ok
nginx: configuration file /etc/nginx/nginx.conf test is successful
$ nginx -s reload
4.检查nginx端口发现多了81、82端口
$ netstat -lntup | grep  -E "81|82"
tcp        0      0 0.0.0.0:81              0.0.0.0:*               LISTEN      1573/nginx: master
tcp        0      0 0.0.0.0:82              0.0.0.0:*               LISTEN      1573/nginx: master
5.访问nginx,以不同端口方式访问(前面已经做hosts域名绑定IP)
$ curl www.hhjy.com:81
port from in www

$ curl bbs.hhjy.com:82
port from in bbs
1.3、基于IP的虚拟主机
我们在上面都是使用域名或者域名+端口方式访问,但是它们都是指向监听一个IP地址,下面我们让nginx监听多个IP来实现虚拟主机
1.修改nginx配置文件,添加基于端口虚拟主机配置
$ cat /etc/nginx/nginx.conf
user  nginx;
worker_processes  1;
error_log  /var/log/nginx/error.log warn;
pid        /var/run/nginx.pid;
events {
    worker_connections  1024;
}
http {
    include       /etc/nginx/mime.types;
    default_type  application/octet-stream;
    log_format  main  '$remote_addr - $remote_user [$time_local] "$request" '
                      '$status $body_bytes_sent "$http_referer" '
                      '"$http_user_agent" "$http_x_forwarded_for"';
    access_log  /var/log/nginx/access.log  main;
    sendfile        on;
    keepalive_timeout  65;
    include /etc/nginx/conf.d/*.conf;

    server {
        listen 10.4.7.101:80;
        server_name www.hhjy.com;
        location / {
            root /data/www;
            index index.html index.htm;
        }
    }
    server {
        listen 10.4.7.102:80;
        server_name bbs.hhjy.com;
        location / {
            root /data/bbs;
            index index.html index.htm;
        }
    }
}
2.修改各站点目录下index.html的内容
$ echo "ip from in www" >/data/www/index.html
$ echo "ip from in bbs" >/data/bbs/index.html
3.配置两个辅助IP 10.4.7.101和10.4.7.102
$ ip addr add 10.4.7.101/24 dev eth0 label eth0:1
$ ip addr add 10.4.7.102/24 dev eth0 label eth0:2

// 检查是否配置成功
$ ip add | grep -E "101|102"
    inet 10.4.7.101/24 scope global secondary eth0:1
    inet 10.4.7.102/24 scope global secondary eth0:2
4.先停止nginx(reload可能会不生效),在启动
$ nginx -s stop
$ nginx -t
nginx: the configuration file /etc/nginx/nginx.conf syntax is ok
nginx: configuration file /etc/nginx/nginx.conf test is successful

$ nginx
提示:nginx服务中只要涉及到IP地址的修改,都需要重启nginx服务,而不能采用平滑重启
5.访问nginx,以不同IP方式访问
$ curl 10.4.7.101
ip from in www

$ curl 10.4.7.102
ip from in bbs
2、Nginx include
有时候,虚拟主机配置特别多,总不可能把所有配置都塞到nginx主配置文件中,而是将每个虚拟主机放到一个nginx配置文件中,然后统一存放在一个目录下,但是nginx主进程如何加载这些目录下的nginx配置文件,这就要用到include参数,只需要指定某个目录下的*即可,使用方法如下:
直接在nginx主配置文件下http区块中使用:
include 文件目录/*;       # 匹配所有文件
include 文件目录/*.conf;  # 匹配以.conf结尾的文件
include 文件目录/*.proxy; # 匹配以.proxy结尾的文件
现在版本的nginx的主配置文件都默认添加了include /etc/nginx/conf.d/*.conf; 参数
3、Nginx 日志配置
3.1、访问日志
Nginx会把每个访问到虚拟主机的用户信息记录到指定的日志文件中,供运维/开发分析用户浏览行为、流量等
此功能由ngx_http_log_module模块负责
访问日志参数(http/server区块):
log_format # 用来定义记录日志的格式(可以定义多种日志格式,取不同名字即可)
access_log # 用来制定日志文件的路径及使用的何种日志格式记录日志
Nginx访问日志默认格式配置如下:
log_format  main  '$remote_addr - $remote_user [$time_local] "$request" '
                  '$status $body_bytes_sent "$http_referer" '
                  '"$http_user_agent" "$http_x_forwarded_for"';
其实访问日志记录格式就是从http请求头部获取到指定变量名的值而已
Nginx访问日志格式引用配置如下:
access_log /var/log/nginx/access.log main;
Nginx 日志变量说明:
$remote_addr:记录访问网站的客户端源地址信息
$remote_user:访问客户端认证用户信息
$time_local:记录访问时间与时区
$request:用户的http请求行信息
$status:http状态码,记录请求返回的状态码,例如:200、301、404等
$http_referer:记录此次请求是从哪个连接访问过来的,可以根据该参数进行防盗链设置。
$body_bytes_sent:服务器发送给客户端的响应body字节数
$http_user_agent:记录客户端访问信息,例如:浏览器、手机客户端等
$http_x_forwarded_for:当前端有代理服务器时,设置web节点记录客户端地址的配置,此参数生效的前提是代理服务器也要进行相关的x_forwarded_for设置
3.2、错误日志
Nginx会将自身运行时的故障信息以及用户访问时产生的错误信息都记录到指定日志文件里,配置记录nginx错误日志信息是调试nginx的重要手段,属于核心功能模块http_core_module的参数,该参数名为error_log,可以放在Main区块中全局配置,也可以放置在Server区块中单独记录虚拟主机的错误信息。
nginx错误日志记录级别:
日志记录级别:debug, info, notice, warn, error, crit
Nginx错误日志定义语法:
Syntax:	error_log file [level];
Default:	error_log  /var/log/nginx/error.log warn;
Context:	main, http, mail, stream, server, location
关键字不能变,日志文件可以指定任意存放日志的目录,错误日志级别越高记录的信息越少,一般只记录error,不要配置info等较低的级别,会带来巨大磁盘I/O消耗。
3.3、日志轮训切割
如果不对日志进行切割,那么当访问量大和时间久了之后会发现一个日志文件会超过100M,那么大量的日志信息保存在一个日志文件里,也不方便查找,就需要每天将日志进行切割,切割的日志文件以日期为命名。
1.编写脚本文件,为访问/错误日志做轮训切割
$ cat /server/scripts/cut_nginx_log.sh
#!/bin/bash
LogPath="/var/log"
AccessLogFile="${LogPath}/nginx/access.log"
ErrorLogFile="${LogPath}/nginx/error.log"
NginxCmd=$(which nginx)

if [ ! ${NginxCmd} ];then
   echo "nginx 命令不存在,退出日志切割..."
   exit 1
fi

/bin/mv  ${AccessLogFile} ${LogPath}/nginx/access_$(date +%F -d '-1day').log
/bin/mv  ${ErrorLogFile} ${LogPath}/nginx/error_$(date +%F -d '-1day').log

${NginxCmd} -s reload
2.执行脚本
$ sh /server/scripts/cut_nginx_log.sh
3.查看日志切割效果
$ ls -lh /var/log/nginx/
total 8.0K
-rw-r--r-- 1 root root  0 Mar 13 22:59 access_2020-03-12.log
-rw-r--r-- 1 root root  0 Mar 13 23:00 access.log
-rw-r--r-- 1 root root 63 Mar 13 22:59 error_2020-03-12.log
-rw-r--r-- 1 root root 63 Mar 13 23:00 error.log
4.将日志切割脚本添加到定时任务,每天凌晨执行
// 给脚本赋予可执行权限
$ chmod +x /server/scripts/cut_nginx_log.sh

// 添加定时任务
$ crontab  -e
### Cut Nginx access and error logs at 00:00 each day
00 00 * * * /bin/sh /server/scripts/cut_nginx_log.sh  >/dev/null 2>&1
4、Nginx Location
Location在前面的文章里我们已经接触到了,那么它到底是干啥的?
Location的作用是可以根据用户请求的URI来执行不同的应用(URI=URL),location支持很多语法,这些语法可以认为是正则匹配,根据用户访问的URI来匹配到对应的location正则
location语法:
location[=|~|~*|^~|@]uri {
	...
}

// 语法解释:
location      # 关键字
[=|~|~*|^~|@] # 正则匹配规则
uri  					# 匹配的URI路径
{...}         # 匹配URI后要执行的配置段
location正则匹配:
=      # 精确匹配网站url资源信息
~      # 区分大小写匹配网站url资源信息
~*     # 不区分大小写匹配网站url资源信息
/mp3/  # 指定匹配网站资源目录信息
/      # 默认匹配网站资源信息
!      # 对匹配的内容进行取反
^~     # 普通字符匹配,使用前缀匹配

// 正则优先级
优先级1:=
优先级2:^~
优先级3:~
优先级3:~*
官方的location举例:**
location = / {
    [ configuration A ]     # 优先级最高①
}

location / {
    [ configuration B ]     # 所有匹配都不满足时候,匹配默认location ④
}

location /documents/ {      # 根据资源目录进行匹配  ③
    [ configuration C ]
}

location ^~ /images/ {      # 优先匹配②
    [ configuration D ]
}

location ~* .(gif|jpg|jpeg)$ {  # 不区分大小写匹配网站资源 ③
    [ configuration E ]
}
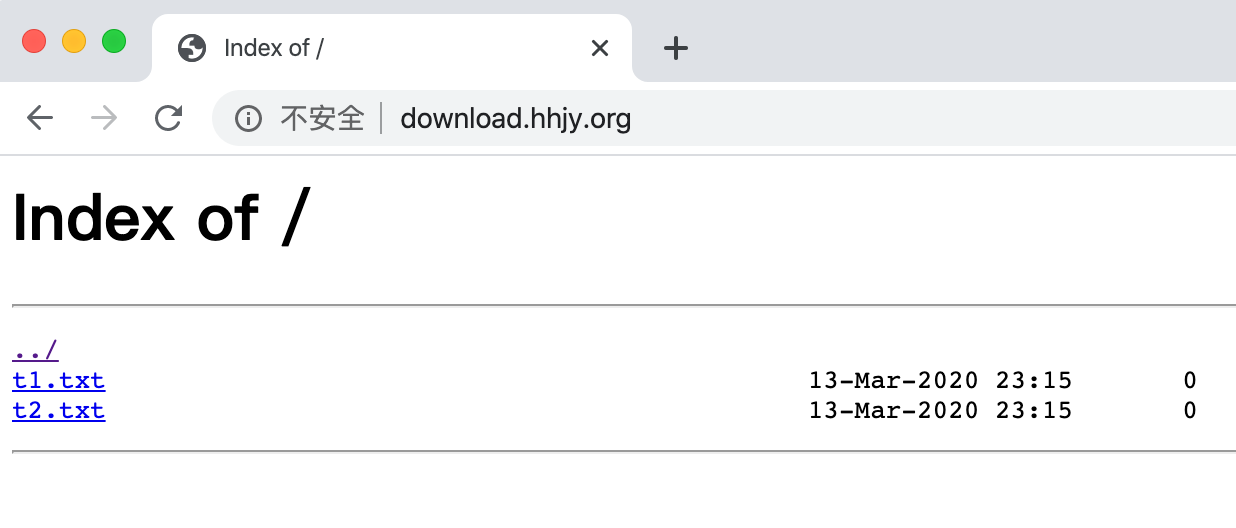
5、Nginx 下载站点
Nginx默认是不允许列出整个目录浏览下载,通过autoindex关键字可实现目录浏览下载
autoindex语法:
Syntax: autoindex on | off; Default:
autoindex off; Context: http, server, location

// autoindex常⽤参数
autoindex_exact_size off;
默认为on, 显示出⽂件的确切⼤⼩,单位是bytes。
修改为off,显示出⽂件的⼤概⼤⼩,单位是kB或者MB或者GB。

autoindex_localtime on;
默认为off,显示的⽂件时间为GMT时间。
修改为on, 显示的⽂件时间为⽂件的服务器时间。

charset utf-8,gbk;
默认中⽂⽬录乱码,添加上解决乱码。
配置目录浏览功能
1.添加nginx配置,开启目录浏览
$ vim /etc/nginx/conf.d/web_dir.conf
server {
    listen 80;
    server_name download.hhjy.org;
    location / {
        root /data/file;
        autoindex on;
        autoindex_localtime on;
        autoindex_exact_size off;
      }
}
2.创建站点目录,并新建几个测试文件
$ mkdir /data/file
$ touch /data/file/t1.txt
$ touch /data/file/t2.txt
3.平滑重启nginx
$ nginx -s reload
4.客户端修改hosts文件,绑定域名对应的nginx服务器ip
$ vim /etc/hosts
10.4.7.7 download.hhjy.org
5.浏览器访问:download.hhjy.org
6、Nginx 用户登录认证
很多时候我们登录内部网站不想做太复杂的用户登录认证,那么可以使用Nginx自带的认证,基于auth_basic关键字来实现basic auth。
auth_basic语法:
// 配置语法
Syntax: auth_basic string| off;
Default: auth_basic off;
Context: http, server, location, limit_except

// ⽤户密码记录配置⽂件
Syntax: auth_basic_user_file file;
Default:
Context: http, server, location, limit_except
basic认证实现:
1.安装httpd-tools工具
$ yum install httpd-tools

// 使用该工具下的htpasswd命令创建用户名和密码
$ htpasswd -bc /etc/nginx/conf.d/auth_conf admin 123456
Adding password for user admin
2.添加nginx配置,配置auth
$ vim /etc/nginx/conf.d/basic_auth.conf
server {
    listen 80;
    server_name auth.hhjy.org;
    location / {
        auth_basic "Auth access Input your Passwd!";
			auth_basic_user_file /etc/nginx/conf.d/auth_conf;
      }
}
3.平滑重启nginx
$ nginx -s reload
4.客户端修改hosts文件,绑定域名对应的nginx服务器ip
$ vim /etc/hosts
10.4.7.7 auth.hhjy.org
5.浏览器访问:auth.hhjy.org,输入设置好的用户名和密码即可访问
