JS续
1、序列化
- JSON.stringify(obj) 序列化
- JSON.parse(str) 反序列化
2、转义
- decodeURI( ) URl中未转义的字符
- decodeURIComponent( ) URI组件中的未转义字符
- encodeURI( ) URI中的转义字符
- encodeURIComponent( ) 转义URI组件中的字符
- escape( ) 对字符串转义
- unescape( ) 给转义字符串解码
- URIError 由URl的编码和解码方法抛出
    <script>
        var url = "http://www.baidu.com?n=宝强";
        var ret = encodeURI(url);
        //alert(ret);
        console.log(ret);
//        http://www.baidu.com?n=%E5%AE%9D%E5%BC%BA
        var u = decodeURI(ret);
        //alert(u);
        console.log(u);
//        http://www.baidu.com?n=宝强


        var r2 = encodeURIComponent(url);
        console.log(r2);
//        http%3A%2F%2Fwww.baidu.com%3Fn%3D%E5%AE%9D%E5%BC%BA
    </script>
3、eval
JavaScript中的eval是Python中eval和exec的合集,既可以编译代码也可以获取返回值。
- eval()
<script>
        eval('alert("eval")')
    </script>
- EvalError 执行字符串中的JavaScript代码
4、正则表达式
JavaScript中支持正则表达式,其主要提供了两个功能:
- test(string) 用于检测正则是否匹配
- exec(string) 用于获取正则匹配的内容
注:定义正则表达式时,“g”、“i”、“m”分别表示全局匹配,忽略大小写、多行匹配。
5、时间处理
JavaScript中提供了时间相关的操作,时间操作中分为两种时间:
- 时间统一时间
- 本地时间(东8区)
    <script>
        d = new Date
//        Mon Aug 15 2016 20:12:57 GMT+0800 (CST)
        d.getUTCHours()
//12
        d.getFullYear()
//2016
        d.setMinutes(d.getMinutes(200) +2)
//1471263297229
        d
//Mon Aug 15 2016 20:14:57 GMT+0800 (CST)
    </script>
更多操作参见:http://www.shouce.ren/api/javascript/main.htm
JS跑马灯实例
<!DOCTYPE html>
<html lang="en">
<head>
    <meta charset="UTF-8">
    <title>Title</title>
</head>
<body>
    <div id="i1" style="display: inline-block;background-color: green;color: white">欢迎宝强莅临指导</div>
    <!--<div id="i2" style="display: inline-block;background-color: green;color: white">欢迎宝强莅临指导</div>-->
    <script>
//        1000单位为毫秒,相当于一秒
        setInterval("f1()",1000)
        function f1(){
//            js获取某个标签 id=i1
            var tag = document.getElementById("i1");
//            获取标签内容
            var text = tag.innerText;

            var a = text.charAt(0);
            var sub = text.substring(1,text.length);

            var new_str = sub + a;
            tag.innerText = new_str;
        }
    </script>
</body>
</html>
DOM编程
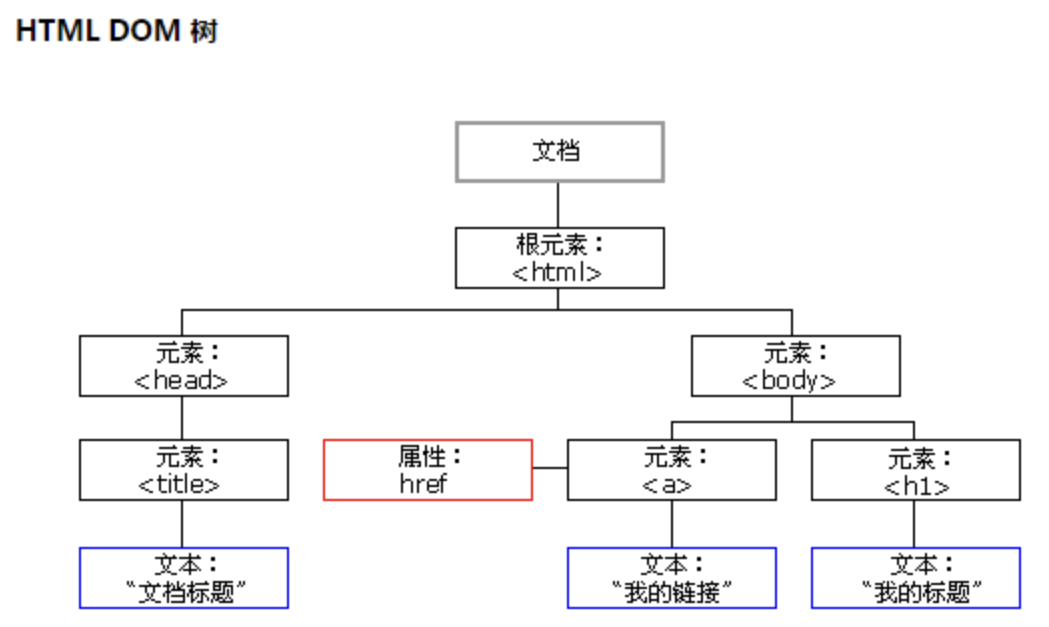
文件对象模型(Document Object Model,简称DOM),是W3C组织推荐的处理可扩展标志语言的标准编程接口。
DOM编程:可以操作html所有的标签,进行找、操作!他也是javascript的一部分
一.查找元素
1、直接查找
document.getElementById             根据ID获取一个标签
document.getElementsByName          根据name属性获取标签集合
document.getElementsByClassName     根据class属性获取标签集合
document.getElementsByTagName       根据标签名获取标签集合
document.getElementById('id') 查找指定的id,然后我们可以进行操作
<!DOCTYPE html>
<html lang="en">
<head>
    <meta charset="UTF-8">
    <title>Title</title>
</head>
<body>
    <div id="i1">
        Jason
    </div>
    <script>
        var temp = document.getElementById('i1');//查找指定的id
        temp.innerText = 'Jason wang';//innerText修改指定的字符串
    </script>
</body>
</html>
document.getElementsByTagName('tagname')
<!DOCTYPE html>
<html lang="en">
<head>
    <meta charset="UTF-8">
    <title>Title</title>
</head>
<body>
    <div>
        123
    </div>
    <div>
        456
    </div>
    <script>
        var all = document.getElementsByTagName('div');//查找指定的标签类型,这里同样和ID不一样标签比如<div>标签可以有多个
        for (var item in all) {
            all[item].innerText = '888' ;//innerText修改指定的字符串
        }
    </script>
</body>
</html>
2、间接查找
parentNode          // 父节点
childNodes          // 所有子节点
firstChild          // 第一个子节点
lastChild           // 最后一个子节点
nextSibling         // 下一个兄弟节点
previousSibling     // 上一个兄弟节点

parentElement           // 父节点标签元素
children                // 所有子标签
firstElementChild       // 第一个子标签元素
lastElementChild        // 最后一个子标签元素
nextElementtSibling     // 下一个兄弟标签元素
previousElementSibling  // 上一个兄弟标签元素
二、操作
1、内容
innerText   文本
outerText
innerHTML   HTML内容
innerHTML
value       值
2、属性
attributes                // 获取所有标签属性
setAttribute(key,value)   // 设置标签属性
getAttribute(key)         // 获取指定标签属性

/*
var atr = document.createAttribute("class");
atr.nodeValue="democlass";
document.getElementById('n1').setAttributeNode(atr);
*/


<!DOCTYPE html>
<html>
<head lang="en">
    <meta charset="UTF-8">
    <title></title>
</head>
<body>
    <input type="button" value="全选"  onclick="CheckAll();"/>
    <input type="button" value="取消" onclick="CancelAll();"/>
    <input type="button" value="反选" onclick="ReverseCheck();"/>

    <table border="1" >
        <thead>

        </thead>
        <tbody id="tb">
            <tr>
                <td><input type="checkbox" /></td>
                <td>111</td>
                <td>222</td>
            </tr>
            <tr>
                <td><input type="checkbox" /></td>
                <td>111</td>
                <td>222</td>
            </tr>
            <tr>
                <td><input type="checkbox" /></td>
                <td>111</td>
                <td>222</td>
            </tr>
            <tr>
                <td><input type="checkbox" /></td>
                <td>111</td>
                <td>222</td>
            </tr>
        </tbody>
    </table>
    <script>
        function CheckAll(ths){
            var tb = document.getElementById('tb');
            var trs = tb.childNodes;
            for(var i =0; i<trs.length; i++){

                var current_tr = trs[i];
                if(current_tr.nodeType==1){
                    var inp = current_tr.firstElementChild.getElementsByTagName('input')[0];
                    inp.checked = true;
                }
            }
        }

        function CancelAll(ths){
            var tb = document.getElementById('tb');
            var trs = tb.childNodes;
            for(var i =0; i<trs.length; i++){

                var current_tr = trs[i];
                if(current_tr.nodeType==1){
                    var inp = current_tr.firstElementChild.getElementsByTagName('input')[0];
                    inp.checked = false;
                }
            }
        }

        function ReverseCheck(ths){
            var tb = document.getElementById('tb');
            var trs = tb.childNodes;
            for(var i =0; i<trs.length; i++){
                var current_tr = trs[i];
                if(current_tr.nodeType==1){
                    var inp = current_tr.firstElementChild.getElementsByTagName('input')[0];
                    if(inp.checked){
                        inp.checked = false;
                    }else{
                        inp.checked = true;
                    }
                }
            }
        }

    </script>
</body>
</html>
3、class操作
className                // 获取所有类名
classList.remove(cls)    // 删除指定类
classList.add(cls)       // 添加类
4、标签操作
a.创建标签
    <script>
//        方式一
        var tag = document.createElement('span')
        tag.innerText = "JasonWang"
        tag.className = "c1"
        tag.href = "http://www.baidu.com/"
//        方式二
        var tag = "<span class='c1' href='http://www.baidu.com/'>JasonWang</span>"
    </script>
b.操作标签
// 方式一
var obj = "<input type='text' />";
xxx.insertAdjacentHTML("beforeEnd",obj);
xxx.insertAdjacentElement('afterBegin',document.createElement('p'))

//注意:第一个参数只能是'beforeBegin'、 'afterBegin'、 'beforeEnd'、 'afterEnd'

// 方式二
var tag = document.createElement('a')
xxx.appendChild(tag)
xxx.insertBefore(tag,xxx[1])
5、样式操作
var obj = document.getElementById('i1')

obj.style.fontSize = "32px";
obj.style.backgroundColor = "red";
<input onfocus="Focus(this);" onblur="Blur(this);" id="search" value="请输入关键字" style="color: gray;" />

    <script>
        function Focus(ths){
            ths.style.color = "black";
            if(ths.value == '请输入关键字' || ths.value.trim() == ""){

                ths.value = "";
            }
        }

        function Blur(ths){
            if(ths.value.trim() == ""){
                ths.value = '请输入关键字';
                ths.style.color = 'gray';
            }else{
                ths.style.color = "black";
            }
        }
    </script>
6、位置操作
总文档高度
document.documentElement.offsetHeight

当前文档占屏幕高度
document.documentElement.clientHeight

自身高度
tag.offsetHeight

距离上级定位高度
tag.offsetTop

父定位标签
tag.offsetParent

滚动高度
tag.scrollTop

/*
    clientHeight -> 可见区域:height + padding
    clientTop    -> border高度
    offsetHeight -> 可见区域:height + padding + border
    offsetTop    -> 上级定位标签的高度
    scrollHeight -> 全文高:height + padding
    scrollTop    -> 滚动高度
    特别的:
        document.documentElement代指文档根节点
*/
<!DOCTYPE html>
<html>
<head lang="en">
    <meta charset="UTF-8">
    <title></title>
</head>
<body style="margin: 0;">
    <div style="height: 900px;">

    </div>
    <div style="padding: 10px;">
        <div id="i1" style="height:190px;padding: 2px;border: 1px solid red;margin: 8px;">
                <p>asdf</p>
                <p>asdf</p>
                <p>asdf</p>
                <p>asdf</p>
                <p>asdf</p>
        </div>
    </div>

    <script>
        var i1 = document.getElementById('i1');

        console.log(i1.clientHeight); // 可见区域:height + padding
        console.log(i1.clientTop);    // border高度
        console.log('=====');
        console.log(i1.offsetHeight); // 可见区域:height + padding + border
        console.log(i1.offsetTop);    // 上级定位标签的高度
        console.log('=====');
        console.log(i1.scrollHeight);   //全文高:height + padding
        console.log(i1.scrollTop);      // 滚动高度
        console.log('=====');

    </script>
</body>
</html>
<!DOCTYPE html>
<html>
<head lang="en">
    <meta charset="UTF-8">
    <title></title>
</head>
<style>

    body{
        margin: 0px;
    }
    img {
        border: 0;
    }
    ul{
        padding: 0;
        margin: 0;
        list-style: none;
    }
    .clearfix:after {
        content: ".";
        display: block;
        height: 0;
        clear: both;
        visibility: hidden;
    }

    .wrap{
        width: 980px;
        margin: 0 auto;
    }

    .pg-header{
        background-color: #303a40;
        -webkit-box-shadow: 0 2px 5px rgba(0,0,0,.2);
        -moz-box-shadow: 0 2px 5px rgba(0,0,0,.2);
        box-shadow: 0 2px 5px rgba(0,0,0,.2);
    }
    .pg-header .logo{
        float: left;
        padding:5px 10px 5px 0px;
    }
    .pg-header .logo img{
        vertical-align: middle;
        width: 110px;
        height: 40px;

    }
    .pg-header .nav{
        line-height: 50px;
    }
    .pg-header .nav ul li{
        float: left;
    }
    .pg-header .nav ul li a{
        display: block;
        color: #ccc;
        padding: 0 20px;
        text-decoration: none;
        font-size: 14px;
    }
    .pg-header .nav ul li a:hover{
        color: #fff;
        background-color: #425a66;
    }
    .pg-body{

    }
    .pg-body .catalog{
        position: absolute;
        top:60px;
        width: 200px;
        background-color: #fafafa;
        bottom: 0px;
    }
    .pg-body .catalog.fixed{
        position: fixed;
        top:10px;
    }

    .pg-body .catalog .catalog-item.active{
        color: #fff;
        background-color: #425a66;
    }

    .pg-body .content{
        position: absolute;
        top:60px;
        width: 700px;
        margin-left: 210px;
        background-color: #fafafa;
        overflow: auto;
    }
    .pg-body .content .section{
        height: 500px;
    }
</style>
<body onscroll="ScrollEvent();">
<div class="pg-header">
    <div class="wrap clearfix">
        <div class="logo">
            <a href="#">
                <img src="http://core.pc.lietou-static.com/revs/images/common/logo_7012c4a4.pn">
            </a>
        </div>
        <div class="nav">
            <ul>
                <li>
                    <a  href="#">首页</a>
                </li>
                <li>
                    <a  href="#">功能一</a>
                </li>
                <li>
                    <a  href="#">功能二</a>
                </li>
            </ul>
        </div>

    </div>
</div>
<div class="pg-body">
    <div class="wrap">
        <div class="catalog">
            <div class="catalog-item" auto-to="function1"><a>第1张</a></div>
            <div class="catalog-item" auto-to="function2"><a>第2张</a></div>
            <div class="catalog-item" auto-to="function3"><a>第3张</a></div>
        </div>
        <div class="content">
            <div menu="function1" class="section">
                <h1>第一章</h1>
            </div>
            <div menu="function2" class="section">
                <h1>第二章</h1>
            </div>
            <div menu="function3" class="section">
                <h1>第三章</h1>
            </div>
        </div>
    </div>

</div>
    <script>
        function ScrollEvent(){
            var bodyScrollTop = document.body.scrollTop;
            if(bodyScrollTop>50){
                document.getElementsByClassName('catalog')[0].classList.add('fixed');
            }else{
                document.getElementsByClassName('catalog')[0].classList.remove('fixed');
            }

        }
    </script>
</body>
</html>
<!DOCTYPE html>
<html>
<head lang="en">
    <meta charset="UTF-8">
    <title></title>
</head>
<style>

    body{
        margin: 0px;
    }
    img {
        border: 0;
    }
    ul{
        padding: 0;
        margin: 0;
        list-style: none;
    }
    h1{
        padding: 0;
        margin: 0;
    }
    .clearfix:after {
        content: ".";
        display: block;
        height: 0;
        clear: both;
        visibility: hidden;
    }

    .wrap{
        width: 980px;
        margin: 0 auto;
    }

    .pg-header{
        background-color: #303a40;
        -webkit-box-shadow: 0 2px 5px rgba(0,0,0,.2);
        -moz-box-shadow: 0 2px 5px rgba(0,0,0,.2);
        box-shadow: 0 2px 5px rgba(0,0,0,.2);
    }
    .pg-header .logo{
        float: left;
        padding:5px 10px 5px 0px;
    }
    .pg-header .logo img{
        vertical-align: middle;
        width: 110px;
        height: 40px;

    }
    .pg-header .nav{
        line-height: 50px;
    }
    .pg-header .nav ul li{
        float: left;
    }
    .pg-header .nav ul li a{
        display: block;
        color: #ccc;
        padding: 0 20px;
        text-decoration: none;
        font-size: 14px;
    }
    .pg-header .nav ul li a:hover{
        color: #fff;
        background-color: #425a66;
    }
    .pg-body{

    }
    .pg-body .catalog{
        position: absolute;
        top:60px;
        width: 200px;
        background-color: #fafafa;
        bottom: 0px;
    }
    .pg-body .catalog.fixed{
        position: fixed;
        top:10px;
    }

    .pg-body .catalog .catalog-item.active{
        color: #fff;
        background-color: #425a66;
    }

    .pg-body .content{
        position: absolute;
        top:60px;
        width: 700px;
        margin-left: 210px;
        background-color: #fafafa;
        overflow: auto;
    }
    .pg-body .content .section{
        height: 500px;
        border: 1px solid red;
    }
</style>
<body onscroll="ScrollEvent();">
<div class="pg-header">
    <div class="wrap clearfix">
        <div class="logo">
            <a href="#">
                <img src="http://core.pc.lietou-static.com/revs/images/common/logo_7012c4a4.pn">
            </a>
        </div>
        <div class="nav">
            <ul>
                <li>
                    <a  href="#">首页</a>
                </li>
                <li>
                    <a  href="#">功能一</a>
                </li>
                <li>
                    <a  href="#">功能二</a>
                </li>
            </ul>
        </div>

    </div>
</div>
<div class="pg-body">
    <div class="wrap">
        <div class="catalog" id="catalog">
            <div class="catalog-item" auto-to="function1"><a>第1张</a></div>
            <div class="catalog-item" auto-to="function2"><a>第2张</a></div>
            <div class="catalog-item" auto-to="function3"><a>第3张</a></div>
        </div>
        <div class="content" id="content">
            <div menu="function1" class="section">
                <h1>第一章</h1>
            </div>
            <div menu="function2" class="section">
                <h1>第二章</h1>
            </div>
            <div menu="function3" class="section" style="height: 200px;">
                <h1>第三章</h1>
            </div>
        </div>
    </div>

</div>
    <script>
        function ScrollEvent(){
            var bodyScrollTop = document.body.scrollTop;
            if(bodyScrollTop>50){
                document.getElementsByClassName('catalog')[0].classList.add('fixed');
            }else{
                document.getElementsByClassName('catalog')[0].classList.remove('fixed');
            }

            var content = document.getElementById('content');
            var sections = content.children;
            for(var i=0;i<sections.length;i++){
                var current_section = sections[i];

                // 当前标签距离顶部绝对高度
                var scOffTop = current_section.offsetTop + 60;

                // 当前标签距离顶部,相对高度
                var offTop = scOffTop - bodyScrollTop;

                // 当前标签高度
                var height = current_section.scrollHeight;

                if(offTop<0 && -offTop < height){
                    // 当前标签添加active
                    // 其他移除 active

                    // 如果已经到底部,现实第三个菜单
                    // 文档高度 = 滚动高度 + 视口高度

                    var a = document.getElementsByClassName('content')[0].offsetHeight + 60;
                    var b = bodyScrollTop + document.documentElement.clientHeight;
                    console.log(a+60,b);
                    if(a == b){
                        var menus = document.getElementById('catalog').children;
                        var current_menu = document.getElementById('catalog').lastElementChild;
                        current_menu.classList.add('active');
                        for(var j=0;j<menus.length;j++){
                            if(menus[j] == current_menu){

                            }else{
                                menus[j].classList.remove('active');
                            }
                        }
                    }else{
                        var menus = document.getElementById('catalog').children;
                        var current_menu = menus[i];
                        current_menu.classList.add('active');
                        for(var j=0;j<menus.length;j++){
                            if(menus[j] == current_menu){

                            }else{
                                menus[j].classList.remove('active');
                            }
                        }
                    }


                    break;
                }

            }


        }
    </script>
</body>
</html>
7、提交表单
document.geElementById('form').submit()
8、其他操作
console.log                 输出框
alert                       弹出框
confirm                     确认框

// URL和刷新
location.href               获取URL
location.href = "url"       重定向
location.reload()           重新加载

// 定时器
setInterval                 多次定时器
clearInterval               清除多次定时器
setTimeout                  单次定时器
clearTimeout                清除单次定时器
2、注册 事件
首先了解下面的意思:
事件:比如有一个“按钮”,当你点击的时候发生什么,双击的时候发生什么,这个就叫做事件!
注册:首先这个按钮,当你点击的时候发生的动作,上面的事件要使他出现我们想要的效果,首先得把事件和函数进行绑定,然后把他们注册到指定标签上。
常用事件:
- onclick
- onblur
- onfocus
- ..................
举例代码如下:
写一个input的标签,首先把事件和函数进行绑定,当你一点这个按钮的时候就会自动执行,绑定的函数:
属性 |
此事件什么时候发生(什么时候被触发 |
| onabort | 图象的加载被中断 |
| onblur | 元素失去焦点 |
| onchange | 区域的内容被修改 |
| onclick | 当用户点击某个对象时调用的事件句柄(比点击input标签时执行上面的代码例子) |
| ondblclick | 当用户双击某个对象时调用的事件句柄 |
| onerror | 在加载文档或图像时发生错误 |
| onfocus | 元素获得焦点 |
| onkeydown | 某个键盘按键被按下 |
| onkeypress | 某个键盘按键被按下并松开 |
| onkeyup | 某个键盘被松开 |
| onload | 一张页面或一副图片完成加载 |
| onmousedown | 鼠标按钮被按下 |
| onmousemove | 鼠标移动过来后 |
| onmouseout | 鼠标从某个元素移开 |
| onmouseover | 鼠标移动到某个元素之上 |
| onmouseup | 鼠标按键被松开 |
| onreset | 重置按钮被点击 |
| onresize | 窗口或框架被重新调整大小 |
| onselect | 文本被选中 |
| onsubmit | 确认按钮被点击 |
| onunload | 用户退出页面 |
对于事件需要注意的要点:
- this
- event
- 事件链以及跳出
this标签当前正在操作的标签,event封装了当前事件的内容。
实例:
<!DOCTYPE html>
<html>
    <head>
        <meta charset='utf-8' />
        <title></title>

        <style>
            .gray{
                color:gray;
            }
            .black{
                color:black;
            }
        </style>
        <script type="text/javascript">
            function Enter(){
               var id= document.getElementById("tip")
               id.className = 'black';
               if(id.value=='请输入关键字'||id.value.trim()==''){
                    id.value = ''
               }
            }
            function Leave(){
                var id= document.getElementById("tip")
                var val = id.value;
                if(val.length==0||id.value.trim()==''){
                    id.value = '请输入关键字'
                    id.className = 'gray';
                }else{
                    id.className = 'black';
                }
            }
        </script>
    </head>
    <body>
        <input type='text' class='gray' id='tip' value='请输入关键字' onfocus='Enter();'  onblur='Leave();'/>
    </body>
</html>
作业:登录悬浮窗口
需求:
当点击登录按钮,悬浮窗弹出,当点击取消按钮时悬浮框退出
代码如下:
<!DOCTYPE html>
<html lang="en">
<head>
    <meta charset="UTF-8">
    <title>Title</title>
    <style>
        .hide {
            display: none;
        }
        .modal {
            height: 300px;
            width: 400px;
            background-color: rgba(126, 255, 104, 0.6);
            position: fixed;
            top: 50%;
            left: 50%;
            margin-left: -200px;
            margin-top: -150px;
            z-index: 11;
        }
        .shadow{
            position: fixed;
            top: 0;
            right: 0;
            bottom: 0;
            left: 0;
            /*background-color: black;*/
            /*opacity: 0.4;*/
            background-color: rgba(98, 103, 107, 1);
            z-index: 9;
        }
        .left{
            float: left;
        }
    </style>
</head>
<body>
    <!--默认登录悬浮窗口添加隐藏属性,当点击登录按钮后,出发登录函数,取消隐藏样式-->
    <input type="button" value="登录" id="i1" onclick="Login(this)" />
    <div class="shadow hide" ></div>
    <div class="modal hide">
        <div style=" float:left">
            <input name="usr" value="用户名"  style=" 210px;margin-left: 100px;margin-top: 2px"/>
        </div>
        <div style="display: inline-block;float: left ">
            <input name="pwd" value="密码"  style=" 210px;margin-left: 100px;margin-top: 2px"/>
        </div>
        <!--<div>-->
            <!--<input name="email" value="邮箱地址" class="left" style=" 210px"/>-->
        <!--</div>-->

        <input type="button" value="登录" style="margin-bottom: 2px;margin-right: 2px;padding-right: 2px; 215px;margin-left: 100px;margin-top: 2px;">
        <!--当点击取消按钮时,触发Cancel函数,添加隐藏样式,恢复最开始登录的效果-->
        <input type="button" value="取消" style="margin-bottom: 2px;margin-right: 2px;padding-right: 2px; 215px;margin-left: 100px;margin-bottom:200px;" onclick="Cancel(this)">
    </div>
    <!--<div class="hide"></div>-->
    <script>
        function Login(ths){
//            通过getElementsByClassName找到类
//            通过classList.remove删除属性
            document.getElementsByClassName('shadow')[0].classList.remove('hide');
            document.getElementsByClassName('modal')[0].classList.remove('hide');
//            shadow.add('hide') ;
//            modal.add('hide')
        }
        function Cancel(ths){
            //            通过getElementsByClassName找到类
//            通过classList.add添加属性
            document.getElementsByClassName('shadow')[0].classList.add('hide');
            document.getElementsByClassName('modal')[0].classList.add('hide');
        }
    </script>

</body>
</html>