Flask
Flask是一个基于Python开发并且依赖jinja2模板和Werkzeug WSGI服务的一个微型框架,对于Werkzeug本质是Socket服务端,其用于接收http请求并对请求进行预处理,然后触发Flask框架,开发人员基于Flask框架提供的功能对请求进行相应的处理,并返回给用户,如果要返回给用户复杂的内容时,需要借助jinja2模板来实现对模板的处理,即:将模板和数据进行渲染,将渲染后的字符串返回给用户浏览器。
默认情况下,Flask 不包含数据库抽象层、表单验证,或是其它任何已有多种库可以胜任的功能。然而,Flask 支持用扩展来给应用添加这些功能,如同是 Flask 本身实现的一样。众多的扩展提供了数据库集成、表单验证、上传处理、各种各样的开放认证技术等功能。Flask 也许是“微小”的,但它已准备好在需求繁杂的生产环境中投入使用。
pip3 install flask
django与flask都是基于wsgi,但是django是wsgiref,flask是werkzeug
from werkzeug.wrappers import Request,Response
from werkzeug.serving import run_simple

@Request.application
def hello(request):
    return Response('Hello World!')

if __name__ == '__main__':
    # 请求一旦进来,执行第三个参数   参数()
    run_simple('localhost',4000,hello)
扩展
加括号
类加括号,走init
对象,走call
函数
基本使用
from flask import Flask

app = Flask(__name__)  # 一个flask的类对象
@app.route('/index')
def index():
    return 'Hello World'
if __name__ =='__main__':
    app.run()   # ---> run_simple(host,post,app)
问题:run_simple与app.run()之间的联系
app.run(),会将我们创建的app对象当做第一个参数,传值
.
源码里面:
        from werkzeug.serving import run_simple
        try:
            run_simple(host, port, self, **options)
        finally:
            self._got_first_request = False

所以app.run()  本质也是调用了 run_simple, **options就是我们创建的app对象
app请求进来,既是对象加()  执行call 方法 ---> 入口
flask没有自己的模板渲染---> jinja2
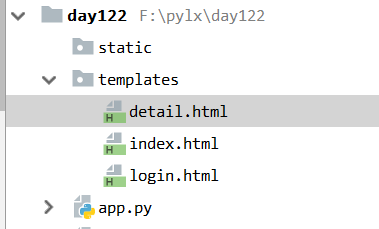
flask的文件名确定
由app = Flask(__name__)进源码

    def __init__(
        self,
        import_name,
        static_url_path=None,
        static_folder='static',
        static_host=None,
        host_matching=False,
        subdomain_matching=False,
        template_folder='templates',
        instance_path=None,
        instance_relative_config=False,
        root_path=None
    ):
添加请求方式
@app.route('/login',methods=['GET','POST'])
取数据
视图函数默认没有参数,flask的一大特点:请求相关数据不是用参数传递,

请求进来数据会将放在空调(request),
request.args  # 获取GET传来的值
request.form  # 获取POST传过来的值
返回提醒信息加**
方式一:return render_template('login.html',msg = '用户名或密码错误')
方式二:return render_template('login.html',**{'msg':'用户名或密码错误'})
将信息放入session
session['user_info'] = user
默认放到浏览器的cookie

需加个签名(加密)不加会报错
app.secret_key = 'zxvbmfas'   # 自定制加盐

注意:用户刚进来session里面没有值,但会为其生成一个字典,session---> 字典,
  字典先序列化为字符串,再加密,再写到cookie
所有从session取值可以通过get

app = Flask(__name__)
app.secret_key = 'zxvbmfas'   # 自定制加盐

用户登录及显示用户具体信息


from flask import Flask,render_template,request,redirect,session

app = Flask(__name__)
app.secret_key = 'zxvbmfas'   # 自定制加盐
app.debug = True  # 自动重启

USER_DICT = {
    '1':{'name':'vzh','age':18},
    '2':{'name':'lishi','age':28},
    '3':{'name':'jassin','age':38},
}


@app.route('/login',methods=['GET','POST'])
def login():
    if request.method == 'GET':
        return render_template('login.html')
    user = request.form.get('user')
    pwd = request.form.get('pwd')
    if user == 'jassin' and pwd == '123':
        # 用户信息放入session
        session['user_info'] = user
        return redirect('/index')
    else:
        return render_template('login.html',msg = '用户名或密码错误')
        # return render_template('login.html',**{'msg':'用户名或密码错误'})

@app.route('/index')
def index():
    user_info = session.get('user_info')
    if not user_info:
        return redirect('/login')

    # 展示列表信息
    return render_template('index.html',user_dict = USER_DICT)

@app.route('/detail')
def detail():
    user_info = session.get('user_info')
    if not user_info:
        return redirect('/login')
    # 获取get请求的uid
    uid = request.args.get('uid')
    info = USER_DICT.get(uid)
    print('用户信息',info)
    # 展示列表信息
    return render_template('detail.html', info=info)

@app.route('/logout')
def logout():
    del session['user_info']
    return redirect('/login')

if __name__ == '__main__':
    app.run()

<!DOCTYPE html>
<html lang="en">
<head>
    <meta charset="UTF-8">
    <meta http-equiv="X-UA-Compatible" content="IE=edge">
    <meta name="viewport" content="width=device-width, initial-scale=1">
    <title>Title</title>
</head>
<body>
    <ul>
        {% for k,v in user_dict.items() %}
            <li>{{v.name}} <a href="/detail?uid={{k}}">查看详细</a></li>
        {% endfor %}
    </ul>
</body>
</html>

<!DOCTYPE html>
<html lang="en">
<head>
    <meta charset="UTF-8">
    <meta http-equiv="X-UA-Compatible" content="IE=edge">
    <meta name="viewport" content="width=device-width, initial-scale=1">
    <title>用户登录</title>
</head>
<body>
    <h1>登录</h1>
    <form method="post">
        <input type="text" name="user">
        <input type="password" name="pwd">
        <input type="submit" value="提交">{{ msg }}

    </form>
</body>
</html>

<!DOCTYPE html>
<html lang="en">
<head>
    <meta charset="UTF-8">
    <meta http-equiv="X-UA-Compatible" content="IE=edge">
    <meta name="viewport" content="width=device-width, initial-scale=1">
    <title>Title</title>
</head>
<body>
    <h1>详细信息页面</h1>
    <div>用户名:{{info.name}}</div>
    <div>年龄:{{info.age}}</div>
</body>
</html>
