SpringMVC作为MVC框架近年来被广泛地使用,其与Mybatis和Spring的组合,也成为许多公司开发web的套装。SpringMVC继承了Spring的优点,对业务代码的非侵入性,配置的便捷和灵活,再加上注解方式的简便与流行,SpringMVC自然成为web开发中MVC框架的首选。
SpringMVC的设计理念,简单来说,就是将Spring的IOC容器与Servlet结合起来,从而在IOC容器中维护Servlet相关对象的生命周期,同时将Spring的上下文注入到Servlet的上下文中。依靠Servlet的事件和监听机制来操作和维护外部请求,以及组装和执行请求对应的响应。
XML配置
SpringMVC想与Servlet相结合,首先得在Servlet容器中进行配置。以Tomcat为例,通常在web.xml文件中配置一个监听器和SpringMVC的核心Servlet。
监听器
<context-param>
    <param-name>contextConfigLocation</param-name>
    <param-value>classpath:spring.xml</param-value>
</context-param>

<listener>
    <listener-class>org.springframework.web.context.ContextLoaderListener</listener-class>
</listener>
核心Servlet
<servlet>
    <servlet-name>dispatcher</servlet-name>
    <servlet-class>org.springframework.web.servlet.DispatcherServlet</servlet-class>
    <init-param>
        <param-name>contextConfigLocation</param-name>
        <param-value>classpath:spring-mvc.xml</param-value>
    </init-param>
    <load-on-startup>1</load-on-startup>
</servlet>
<servlet-mapping>
    <servlet-name>dispatcher</servlet-name>
    <url-pattern>/</url-pattern>
</servlet-mapping>
当我准备研究SpringMVC源码时,我问出了一个早应该问的问题:为什么配置了DispatcherServlet,还需要一个监听器,而且都能加载配置文件?在context-param中的配置文件要不要在DispatcherServlet中的init-param再加上?相信很多刚用SpringMVC的人都闪现过这样的问题。翻阅过源码后,明白了SpringMVC通过这种方式实现了父子上下文容器结构。
Tomcat启动时,监听器ContextLoaderListener创建一个XMLWebApplicationContext上下文容器,并加载context-param中的配置文件,完成容器的刷新后将上下文设置到ServletContext。当DispatcherServlet创建时,先进行初始化操作,从ServletContext中查询出监听器中创建的上下文对象,作为父类上下文来创建servlet的上下文容器,并加载Servlet配置中的init-param的配置文件(默认加载/WEB-INF/servletName-servlet.xml,servletName为DispatcherServlet配置的servlet-name),然后完成容器的刷新。子上下文可以访问父上下文中的bean,反之则不行。
父子上下文容器结构如下
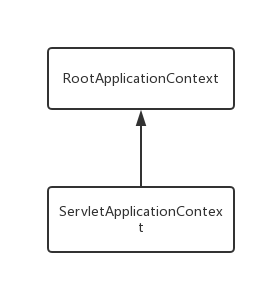
通常是将业务操作及数据库相关的bean维护在Listener的父容器中,而在Servlet的子容器中只加载Controller相关的业务实现的bean。从而将业务实现和业务的具体操作分隔在两个上下文容器中,业务实现bean可以调用业务具体操作的bean。
ServletContext启动监听
ServletContextListener监听ServletContext的生命周期。每个web application对应一个ServletContext,用于servlet与servlet容器沟通的中介。它定义两个方法,context初始化和context销毁。
public interface ServletContextListener extends EventListener {

    public void contextInitialized(ServletContextEvent sce);


    public void contextDestroyed(ServletContextEvent sce);
}
SpringMVC的ContextLoaderListener实现了此接口,在web application启动时创建一个Spring的ROOT上下文。
根上下文的创建
SpringMVC根上下文是通过ServletContext的监听器进行创建,默认的监听器为ContextLoaderListener。当web应用启动时,会调用监听器的contextInitialized方法。
public void contextInitialized(ServletContextEvent event) {
    initWebApplicationContext(event.getServletContext());
}
contextInitialized方法接受参数ServletContext,实际的web上下文的创建交给了子类ContextLoader。
public WebApplicationContext initWebApplicationContext(ServletContext servletContext) {
    // 判断ServletContext是否已存在SpringMVC根上下文,存在则报错
    if (servletContext.getAttribute(WebApplicationContext.ROOT_WEB_APPLICATION_CONTEXT_ATTRIBUTE) != null) {
        throw new IllegalStateException(
                "Cannot initialize context because there is already a root application context present - " +
                "check whether you have multiple ContextLoader* definitions in your web.xml!");
    }

    // Store context in local instance variable, to guarantee that
    // it is available on ServletContext shutdown.
    if (this.context == null) {
        // 创建上下文根容器
        this.context = createWebApplicationContext(servletContext);
    }
    if (this.context instanceof ConfigurableWebApplicationContext) {
        ConfigurableWebApplicationContext cwac = (ConfigurableWebApplicationContext) this.context;
        if (!cwac.isActive()) {
            // The context has not yet been refreshed -> provide services such as
            // setting the parent context, setting the application context id, etc
            if (cwac.getParent() == null) {
                // The context instance was injected without an explicit parent ->
                // determine parent for root web application context, if any.
                ApplicationContext parent = loadParentContext(servletContext);
                cwac.setParent(parent);
            }
            // 加载并刷新上下文环境,也就是初始化Spring容器
            // 绑定ServletContext到Spring根上下文
            configureAndRefreshWebApplicationContext(cwac, servletContext);
        }
    }

    // 将创建完的根上下文绑定到ServletContext
    servletContext.setAttribute(WebApplicationContext.ROOT_WEB_APPLICATION_CONTEXT_ATTRIBUTE, this.context);

    return this.context;
}
我们来看看创建根容器 createWebApplicationContext
protected WebApplicationContext createWebApplicationContext(ServletContext sc) {
    Class<?> contextClass = this.determineContextClass(sc);
    if (!ConfigurableWebApplicationContext.class.isAssignableFrom(contextClass)) {
        throw new ApplicationContextException("Custom context class [" + contextClass.getName() + "] is not of type [" + ConfigurableWebApplicationContext.class.getName() + "]");
    } else {
        return (ConfigurableWebApplicationContext)BeanUtils.instantiateClass(contextClass);
    }
}
先是获取Class对象,然后利用反射实例化对象
protected Class<?> determineContextClass(ServletContext servletContext) {
    //可以手动在web.xml中配置contextClass参数
    String contextClassName = servletContext.getInitParameter("contextClass");
    if (contextClassName != null) {
        try {
            return ClassUtils.forName(contextClassName, ClassUtils.getDefaultClassLoader());
        } catch (ClassNotFoundException var4) {
            throw new ApplicationContextException("Failed to load custom context class [" + contextClassName + "]", var4);
        }
    } else {
        //在配置文件中有如下配置
        //org.springframework.web.context.WebApplicationContext=org.springframework.web.context.support.XmlWebApplicationContext
        contextClassName = defaultStrategies.getProperty(WebApplicationContext.class.getName());

        try {
            //利用反射加载类
            return ClassUtils.forName(contextClassName, ContextLoader.class.getClassLoader());
        } catch (ClassNotFoundException var5) {
            throw new ApplicationContextException("Failed to load default context class [" + contextClassName + "]", var5);
        }
    }
}
最后再调用 BeanUtils.instantiateClass 实例化对象
public static <T> T instantiateClass(Class<T> clazz) throws BeanInstantiationException {
    Assert.notNull(clazz, "Class must not be null");
    if (clazz.isInterface()) {
        throw new BeanInstantiationException(clazz, "Specified class is an interface");
    } else {
        try {
            //获取构造器并实例化
            return instantiateClass(clazz.getDeclaredConstructor());
        } catch (NoSuchMethodException var2) {
            throw new BeanInstantiationException(clazz, "No default constructor found", var2);
        }
    }
}
最后我们来看看容器的初始化 configureAndRefreshWebApplicationContext(cwac, servletContext);
protected void configureAndRefreshWebApplicationContext(ConfigurableWebApplicationContext wac, ServletContext sc) {
    String configLocationParam;
    if (ObjectUtils.identityToString(wac).equals(wac.getId())) {
        configLocationParam = sc.getInitParameter("contextId");
        if (configLocationParam != null) {
            wac.setId(configLocationParam);
        } else {
            wac.setId(ConfigurableWebApplicationContext.APPLICATION_CONTEXT_ID_PREFIX + ObjectUtils.getDisplayString(sc.getContextPath()));
        }
    }

    wac.setServletContext(sc);
   //从配置文件中获取全局init参数“contextConfigLocation”,也就是spring.xml,并设置到父容器中
    configLocationParam = sc.getInitParameter("contextConfigLocation");
  if (configLocationParam != null) {
        wac.setConfigLocation(configLocationParam);
    }

    ConfigurableEnvironment env = wac.getEnvironment();
    if (env instanceof ConfigurableWebEnvironment) {
        ((ConfigurableWebEnvironment)env).initPropertySources(sc, (ServletConfig)null);
    }

    this.customizeContext(sc, wac);
  //刷新父容器
    wac.refresh();
}
其实是调用 ConfigurableWebApplicationContext 的 refresh() 对容器的初始化。
public void refresh() throws BeansException, IllegalStateException {
    synchronized (this.startupShutdownMonitor) {
        // Prepare this context for refreshing.
        //准备刷新的上下文 环境
        /*
         * 初始化前的准备工作,例如对系统属性或者环境变量进行准备及验证。
         * 在某种情况下项目的使用需要读取某些系统变量,而这个变量的设置很可能会影响着系统
         * 的正确性,那么ClassPathXmlApplicationContext为我们提供的这个准备函数就显得非常必要,
         * 它可以在Spring启动的时候提前对必须的变量进行存在性验证。
         */
        prepareRefresh();
        // Tell the subclass to refresh the internal bean factory.
        //初始化BeanFactory,并进行XML文件读取
        /*
         * ClassPathXMLApplicationContext包含着BeanFactory所提供的一切特征,在这一步骤中将会复用
         * BeanFactory中的配置文件读取解析及其他功能,这一步之后,ClassPathXmlApplicationContext
         * 实际上就已经包含了BeanFactory所提供的功能,也就是可以进行Bean的提取等基础操作了。
         */
        ConfigurableListableBeanFactory beanFactory = obtainFreshBeanFactory();
        // Prepare the bean factory for use in this context.
        //对beanFactory进行各种功能填充
        /*
         * @Qualifier与@Autowired等注解正是在这一步骤中增加的支持
         */
        prepareBeanFactory(beanFactory);
        try {
            // Allows post-processing of the bean factory in context subclasses.
            //子类覆盖方法做额外处理
            /*
             * Spring之所以强大,为世人所推崇,除了它功能上为大家提供了便利外,还有一方面是它的
             * 完美架构,开放式的架构让使用它的程序员很容易根据业务需要扩展已经存在的功能。这种开放式
             * 的设计在Spring中随处可见,例如在本例中就提供了一个空的函数实现postProcessBeanFactory来
             * 方便程序猿在业务上做进一步扩展
             */
            postProcessBeanFactory(beanFactory);
            // Invoke factory processors registered as beans in the context.
            //激活各种beanFactory处理器
            invokeBeanFactoryPostProcessors(beanFactory);
            // Register bean processors that intercept bean creation.
            //注册拦截Bean创建的Bean处理器,这里只是注册,真正的调用实在getBean时候
            registerBeanPostProcessors(beanFactory);
            // Initialize message source for this context.
            //为上下文初始化Message源,即不同语言的消息体,国际化处理
            initMessageSource();
            // Initialize event multicaster for this context.
            //初始化应用消息广播器,并放入“applicationEventMulticaster”bean中
            initApplicationEventMulticaster();
            // Initialize other special beans in specific context subclasses.
            //留给子类来初始化其它的Bean
            onRefresh();
            // Check for listener beans and register them.
            //在所有注册的bean中查找Listener bean,注册到消息广播器中
            registerListeners();
            // Instantiate all remaining (non-lazy-init) singletons.
            //初始化剩下的单实例(非惰性的)
            finishBeanFactoryInitialization(beanFactory);
            // Last step: publish corresponding event.
            //完成刷新过程,通知生命周期处理器lifecycleProcessor刷新过程,同时发出ContextRefreshEvent通知别人
            finishRefresh();
        }
        catch (BeansException ex) {
            destroyBeans();
            // Reset 'active' flag.
            cancelRefresh(ex);
            // Propagate exception to caller.
            throw ex;
        }
        finally {
            resetCommonCaches();
        }
    }
}
当SpringMVC上下文创建完成后,以固定的属性名称将其绑定到Servlet上下文上,用以在servlet子上下文创建时从Servlet上下文获取,并设置为其父上下文,从而完成父子上下文的构成。
servletContext.setAttribute(WebApplicationContext.ROOT_WEB_APPLICATION_CONTEXT_ATTRIBUTE, this.context);
Servlet的初始化
Servlet的生命周期从第一次访问Servlet开始,Servlet对象被创建并执行初始化操作。而每次请求则由servlet容器交给Servlet的service方法执行,最后在web application停止时调用destroy方法完成销毁前处理。
public interface Servlet {

    public void init(ServletConfig config) throws ServletException;

    public void service(ServletRequest req, ServletResponse res) throws ServletException, IOException;

    public void destroy();
}
在web.xml的servlet配置选项中有一个load-on-startup,其值为整数,标识此Servlet是否在容器启动时的加载优先级。若值大于0,按从小到大的顺序被依次加载;若为0,则标识最大整数,最后被加载;若值小于0,表示不加载。默认load-on-startup的值为-1。servlet的加载是在加载完所有ServletContextListener后才执行。
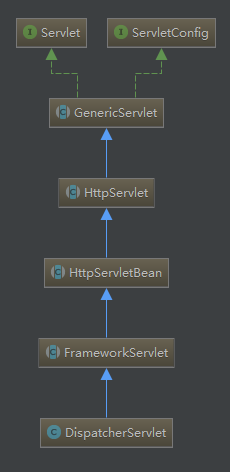
先来看下DispatcherServlet的类图
servlet子上下文的创建是在servlet的初始化方法init中。而SpringMVC的核心Servlet-DispatcherServlet的初始化操作则是在其父类HttpServletBean中。
public final void init() throws ServletException {
    if (logger.isDebugEnabled()) {
        logger.debug("Initializing servlet '" + getServletName() + "'");
    }

    // Set bean properties from init parameters.
    //从初始化参数设置bean属性。例如init-param的contextConfigLocation  classpath*:spring-mvc.xml
    PropertyValues pvs = new ServletConfigPropertyValues(getServletConfig(), this.requiredProperties);
    if (!pvs.isEmpty()) {
        try {
            //将DispatcherServlet转化成Spring里面的Bean,
            BeanWrapper bw = PropertyAccessorFactory.forBeanPropertyAccess(this);
            //加载配置信息
            ResourceLoader resourceLoader = new ServletContextResourceLoader(getServletContext());
            bw.registerCustomEditor(Resource.class, new ResourceEditor(resourceLoader, getEnvironment()));
            initBeanWrapper(bw);
            //通过Spring的Bean赋值方式给DispatcherServlet初始化属性值
            bw.setPropertyValues(pvs, true);
        }
        catch (BeansException ex) {
            if (logger.isErrorEnabled()) {
                logger.error("Failed to set bean properties on servlet '" + getServletName() + "'", ex);
            }
            throw ex;
        }
    }

    // Let subclasses do whatever initialization they like.
    //模板方法,子类可以去自定义
    initServletBean();

    if (logger.isDebugEnabled()) {
        logger.debug("Servlet '" + getServletName() + "' configured successfully");
    }
}
initServletBean的实现在子类FrameworkServlet中
protected final void initServletBean() throws ServletException {

    // 创建servlet子上下文
    this.webApplicationContext = initWebApplicationContext();
    // 可扩展方法
    initFrameworkServlet();
}
此处的initWebApplicationContext方法同ContextLoader步骤相似
protected WebApplicationContext initWebApplicationContext() {
    // 从ServletContext获取SpringMVC根上下文
    WebApplicationContext rootContext =
            WebApplicationContextUtils.getWebApplicationContext(getServletContext());
    WebApplicationContext wac = null;

    // 如果SpringMVC的servlet子上下文对象不为空,则设置根上下文为其父类上下文,然后刷新
    if (this.webApplicationContext != null) {
        // A context instance was injected at construction time -> use it
        wac = this.webApplicationContext;
        if (wac instanceof ConfigurableWebApplicationContext) {
            ConfigurableWebApplicationContext cwac = (ConfigurableWebApplicationContext) wac;
            if (!cwac.isActive()) {
                // The context has not yet been refreshed -> provide services such as
                // setting the parent context, setting the application context id, etc
                if (cwac.getParent() == null) {
                    // The context instance was injected without an explicit parent -> set
                    // the root application context (if any; may be null) as the parent
                    cwac.setParent(rootContext);
                }
                configureAndRefreshWebApplicationContext(cwac);
            }
        }
    }
    if (wac == null) {
        // 根据init-param配置的属性名称从ServletContext查找SpringMVC的servlet子上下文
        wac = findWebApplicationContext();
    }
    if (wac == null) {
        // 若还为空,则创建一个新的上下文对象并刷新
        wac = createWebApplicationContext(rootContext);
    }

    // 子类自定义对servlet子上下文后续操作,在DispatcherServlet中实现
    if (!this.refreshEventReceived) {
        onRefresh(wac);
    }

    // 发布servlet子上下文到ServletContext
    if (this.publishContext) {
        // Publish the context as a servlet context attribute.
        String attrName = getServletContextAttributeName();
        getServletContext().setAttribute(attrName, wac);
        if (this.logger.isDebugEnabled()) {
            this.logger.debug("Published WebApplicationContext of servlet '" + getServletName() +
                    "' as ServletContext attribute with name [" + attrName + "]");
        }
    }

    return wac;
}
servlet子上下文的创建也有几个关键点
- 从ServletContext中获取第一步中创建的SpringMVC根上下文,为下面做准备
- 根据init-param中的contextAttribute属性值从ServletContext查找是否存在上下文对象
- 以XmlWebApplicationContext作为Class类型创建上下文对象,设置父类上下文,并完成刷新
- 执行子类扩展方法onRefresh,在DispatcherServlet内初始化所有web相关组件
- 将servlet子上下文对象发布到ServletContext
实例化上下文对象时使用默认的ContextClass,即XmlWebApplicationContext,子类也可以重写此方法来支持其他上下文类型。
protected WebApplicationContext createWebApplicationContext(ApplicationContext parent) {
    //this.contextClass = DEFAULT_CONTEXT_CLASS;
    //DEFAULT_CONTEXT_CLASS = XmlWebApplicationContext.class;
    Class<?> contextClass = this.getContextClass();
    if (this.logger.isDebugEnabled()) {
        this.logger.debug("Servlet with name '" + this.getServletName() + "' will try to create custom WebApplicationContext context of class '" + contextClass.getName() + "', using parent context [" + parent + "]");
    }

    if (!ConfigurableWebApplicationContext.class.isAssignableFrom(contextClass)) {
        throw new ApplicationContextException("Fatal initialization error in servlet with name '" + this.getServletName() + "': custom WebApplicationContext class [" + contextClass.getName() + "] is not of type ConfigurableWebApplicationContext");
    } else {
        //反射创建实例
        ConfigurableWebApplicationContext wac = (ConfigurableWebApplicationContext)BeanUtils.instantiateClass(contextClass);
        wac.setEnvironment(this.getEnvironment());
        //设置父容器
        wac.setParent(parent);
    //设置容器启动XML:例如init-param的contextConfigLocation  classpath*:spring-mvc.xml
        wac.setConfigLocation(this.getContextConfigLocation());
        //初始化新创建的子容器
        this.configureAndRefreshWebApplicationContext(wac);
        return wac;
    }
}
在上下文的配置刷新方法configureAndRefreshWebApplicationContext中,将ServletContext和ServletConfig都绑定到servlet子上下文对象中。另外设置了默认的namespace,即servletName-servlet。
protected void configureAndRefreshWebApplicationContext(ConfigurableWebApplicationContext wac) {
    if (ObjectUtils.identityToString(wac).equals(wac.getId())) {
        if (this.contextId != null) {
            wac.setId(this.contextId);
        } else {
            wac.setId(ConfigurableWebApplicationContext.APPLICATION_CONTEXT_ID_PREFIX + ObjectUtils.getDisplayString(this.getServletContext().getContextPath()) + '/' + this.getServletName());
        }
    }
    //将ServletContext和ServletConfig都绑定到servlet子上下文对象中
    wac.setServletContext(this.getServletContext());
    wac.setServletConfig(this.getServletConfig());
    wac.setNamespace(this.getNamespace());
    wac.addApplicationListener(new SourceFilteringListener(wac, new FrameworkServlet.ContextRefreshListener(null)));
    ConfigurableEnvironment env = wac.getEnvironment();
    if (env instanceof ConfigurableWebEnvironment) {
        ((ConfigurableWebEnvironment)env).initPropertySources(this.getServletContext(), this.getServletConfig());
    }

    this.postProcessWebApplicationContext(wac);
    this.applyInitializers(wac);
    //最后初始化子容器,和上面根容器初始化一样
    wac.refresh();
}
当所有操作完成后,将servlet子上下文以org.springframework.web.servlet.FrameworkServlet.CONTEXT. + servletName的属性名称注册到ServletContext中,完成和ServletContext的双向绑定。
SpringMVC在DispatcherServlet的初始化过程中,同样会初始化一个WebApplicationContext的实现类,作为自己独有的上下文,这个独有的上下文,会将上面的根上下文作为自己的父上下文,来存放SpringMVC的配置元素,然后同样作为ServletContext的一个属性,被设置到ServletContext中,只不过它的key就稍微有点不同,key和具体的DispatcherServlet注册在web.xml文件中的名字有关,从这一点也决定了,我们可以在web.xml文件中注册多个DispatcherServlet,因为Servlet容器中注册的Servlet名字肯定不一样,设置到Servlet环境中的key也肯定不同。
组件初始化
在servlet子上下文完成创建,调用了模板扩展方法OnRefresh,它在FrameworkServlet中仅仅只是个空方法,但在其子类DispatcherServlet中则至关重要,它是一切组件的起源。
DispatcherServlet.java

protected void onRefresh(ApplicationContext context) {
    initStrategies(context);
}
初始化所有策略,其实是指各个组件可以通过策略动态地进行配置。
protected void initStrategies(ApplicationContext context) {
    // 文件上传解析器
    initMultipartResolver(context);
    // 本地化解析器
    initLocaleResolver(context);
    // 主题解析器
    initThemeResolver(context);
    // 处理器映射器(url和Controller方法的映射)
    initHandlerMappings(context);
    // 处理器适配器(实际执行Controller方法)
    initHandlerAdapters(context);
    // 处理器异常解析器
    initHandlerExceptionResolvers(context);
    // RequestToViewName解析器
    initRequestToViewNameTranslator(context);
    // 视图解析器(视图的匹配和渲染)
    initViewResolvers(context);
    // FlashMap管理者
    initFlashMapManager(context);
}
以上基本将SpringMVC中的主要组件都罗列出来了,其中最重要的当是HandlerMapping,HandlerAdapter和ViewResolver。由于各组件的初始化策略方式相似,我们以HandlerMapping来介绍。
private void initHandlerMappings(ApplicationContext context) {
    this.handlerMappings = null;

    // 是否查找所有HandlerMapping标识
    if (this.detectAllHandlerMappings) {
        // 从上下文(包含所有父上下文)中查找HandlerMapping类型的Bean,是下文中的RequestMappingHandlerMapping,其中包含URL和Mapping的映射Map
        Map<String, HandlerMapping> matchingBeans =
                BeanFactoryUtils.beansOfTypeIncludingAncestors(context, HandlerMapping.class, true, false);
        if (!matchingBeans.isEmpty()) {
        //将从容器中查找出来的HandlerMapping加入到DispatcherServlet的handlerMappings属性中
            this.handlerMappings = new ArrayList<HandlerMapping>(matchingBeans.values());
            // We keep HandlerMappings in sorted order.
            AnnotationAwareOrderComparator.sort(this.handlerMappings);
        }
    }
    else {
        try {
            // 根据指定名称获取HandlerMapping对象
            HandlerMapping hm = context.getBean(HANDLER_MAPPING_BEAN_NAME, HandlerMapping.class);
            this.handlerMappings = Collections.singletonList(hm);
        }
        catch (NoSuchBeanDefinitionException ex) {
            // Ignore, we'll add a default HandlerMapping later.
        }
    }

    // 确保至少有一个HandlerMapping,如果没能找到,注册一个默认的
    if (this.handlerMappings == null) {
        this.handlerMappings = getDefaultStrategies(context, HandlerMapping.class);
        if (logger.isDebugEnabled()) {
            logger.debug("No HandlerMappings found in servlet '" + getServletName() + "': using default");
        }
    }
}
策略的逻辑很简单:有一个标识,是否查找所有HandlerMapping(默认为true)。如果为是,则从上下文(包括所有父上下文)中查询类型为HandlerMapping的Bean,并进行排序。如果为否,则从上下文中按指定名称去寻找。如果都没有找到,提供一个默认的实现。这个默认实现从DispatcherServlet同级目录的DispatcherServlet.properties中加载得

org.springframework.web.servlet.LocaleResolver=org.springframework.web.servlet.i18n.AcceptHeaderLocaleResolver

org.springframework.web.servlet.ThemeResolver=org.springframework.web.servlet.theme.FixedThemeResolver

org.springframework.web.servlet.HandlerMapping=org.springframework.web.servlet.handler.BeanNameUrlHandlerMapping,
    org.springframework.web.servlet.mvc.annotation.DefaultAnnotationHandlerMapping

org.springframework.web.servlet.HandlerAdapter=org.springframework.web.servlet.mvc.HttpRequestHandlerAdapter,
    org.springframework.web.servlet.mvc.SimpleControllerHandlerAdapter,
    org.springframework.web.servlet.mvc.annotation.AnnotationMethodHandlerAdapter

org.springframework.web.servlet.HandlerExceptionResolver=org.springframework.web.servlet.mvc.annotation.AnnotationMethodHandlerExceptionResolver,
    org.springframework.web.servlet.mvc.annotation.ResponseStatusExceptionResolver,
    org.springframework.web.servlet.mvc.support.DefaultHandlerExceptionResolver

org.springframework.web.servlet.RequestToViewNameTranslator=org.springframework.web.servlet.view.DefaultRequestToViewNameTranslator

org.springframework.web.servlet.ViewResolver=org.springframework.web.servlet.view.InternalResourceViewResolver

org.springframework.web.servlet.FlashMapManager=org.springframework.web.servlet.support.SessionFlashMapManager
可以看到SpringMVC为每个组件都提供了默认的实现,通常情况下都能够满足需求。如果你想对某个组件进行定制,可以通过spring的xml文件或者@Configuration类中的@Bean来实现。比如常配置的视图解析器:
xml方式
<bean class="org.springframework.web.servlet.view.InternalResourceViewResolver">
    <property name="prefix" value="/WEB-INF/"></property>
    <property name="suffix" value=".jsp"></property>
</bean>
由于其他组件的初始化方式完全一致,这里就不赘述了。需要关注的一点是,当匹配到合适的组件时,都会通过Spring的方式实例化组件。而有些组件在实例化时也会对自身运行环境进行初始化。
initHandlerAdapters(context);

URL-Controller方法映射初始化
在使用SpringMVC时,需要在xml文件中添加一行注解
<mvc:annotation-driven />
或者在配置类上增加注解@EnableWebMvc,才能使SpringMVC的功能完全开启。我们以xml的配置为例,看看它都做了什么。根据spring对namespace的解析策略找到MvcNamespaceHandler类,在其init方法中
registerBeanDefinitionParser("annotation-driven", new AnnotationDrivenBeanDefinitionParser());
直接看AnnotationDrivenBeanDefinitionParser的parse方法,上下有一百多行,浏览一遍,主要就是注册各种组件和内部需要的解析器和转换器。找到HandlerMapping组件的实现
RootBeanDefinition handlerMappingDef = new RootBeanDefinition(RequestMappingHandlerMapping.class);
因而实际用的HandlerMapping实现即为RequestMappingHandlerMapping。其抽象基类AbstractHandlerMethodMapping实现了InitializingBean接口。
public abstract class AbstractHandlerMethodMapping<T> extends AbstractHandlerMapping implements InitializingBean
当RequestMappingHandlerMapping对象初始化时,会调用InitializingBean接口的afterPropertiesSet方法。在此方法中完成了Controller方法同请求url的映射表。
public void afterPropertiesSet() {
    initHandlerMethods();
}

protected void initHandlerMethods() {
    if (logger.isDebugEnabled()) {
        logger.debug("Looking for request mappings in application context: " + getApplicationContext());
    }
    // 默认只从当前上下文中查询所有beanName
    String[] beanNames = (this.detectHandlerMethodsInAncestorContexts ?
            BeanFactoryUtils.beanNamesForTypeIncludingAncestors(getApplicationContext(), Object.class) :
            getApplicationContext().getBeanNamesForType(Object.class));

    for (String beanName : beanNames) {
        if (!beanName.startsWith(SCOPED_TARGET_NAME_PREFIX)) {
            Class<?> beanType = null;
            try {
                beanType = getApplicationContext().getType(beanName);
            }
            catch (Throwable ex) {
                // An unresolvable bean type, probably from a lazy bean - let's ignore it.
                if (logger.isDebugEnabled()) {
                    logger.debug("Could not resolve target class for bean with name '" + beanName + "'", ex);
                }
            }
            // 如果类上有@Controller或@RequestMapping注解,则进行解析
            if (beanType != null && isHandler(beanType)) {
                detectHandlerMethods(beanName);
            }
        }
    }
    handlerMethodsInitialized(getHandlerMethods());
}
isHandler通过反射工具类判断类上是否有 Controller.class 或者 RequestMapping.class 注解
protected boolean isHandler(Class<?> beanType) {
    return AnnotatedElementUtils.hasAnnotation(beanType, Controller.class) || AnnotatedElementUtils.hasAnnotation(beanType, RequestMapping.class);
}
对于类上有@Controller或@RequestMapping注解,都进行了detect。
protected void detectHandlerMethods(final Object handler) {
    Class<?> handlerType = (handler instanceof String ?
            getApplicationContext().getType((String) handler) : handler.getClass());
    final Class<?> userType = ClassUtils.getUserClass(handlerType);

    // 方法内省器,用于发现@RequestMapping注解的方法
    Map<Method, T> methods = MethodIntrospector.selectMethods(userType,
            new MethodIntrospector.MetadataLookup<T>() {
                @Override
                public T inspect(Method method) {
                    try {
                        return getMappingForMethod(method, userType);
                    }
                    catch (Throwable ex) {
                        throw new IllegalStateException("Invalid mapping on handler class [" +
                                userType.getName() + "]: " + method, ex);
                    }
                }
            });

    if (logger.isDebugEnabled()) {
        logger.debug(methods.size() + " request handler methods found on " + userType + ": " + methods);
    }

    // 遍历所有有效方法,封装方法为可执行的Method,注册到URL-Controller方法映射表
    for (Map.Entry<Method, T> entry : methods.entrySet()) {
        Method invocableMethod = AopUtils.selectInvocableMethod(entry.getKey(), userType);
        T mapping = entry.getValue();
        registerHandlerMethod(handler, invocableMethod, mapping);
    }
}
方法内省器中的内部类调用的getMappingForMethod方法为抽象方法,实现在RequestMappingHandlerMapping中。
protected RequestMappingInfo getMappingForMethod(Method method, Class<?> handlerType) {
    RequestMappingInfo info = createRequestMappingInfo(method);
    if (info != null) {
        RequestMappingInfo typeInfo = createRequestMappingInfo(handlerType);
        if (typeInfo != null) {
            info = typeInfo.combine(info);
        }
    }
    return info;
}

private RequestMappingInfo createRequestMappingInfo(AnnotatedElement element) {
    RequestMapping requestMapping = AnnotatedElementUtils.findMergedAnnotation(element, RequestMapping.class);
    RequestCondition<?> condition = (element instanceof Class ?
            getCustomTypeCondition((Class<?>) element) : getCustomMethodCondition((Method) element));
    return (requestMapping != null ? createRequestMappingInfo(requestMapping, condition) : null);
}
解析方法上的@RequestMapping注解返回RequestMappingInfo,其实就是请求映射信息。
    protected RequestMappingInfo createRequestMappingInfo(RequestMapping requestMapping, RequestCondition<?> customCondition) {
        return RequestMappingInfo.paths(this.resolveEmbeddedValuesInPatterns(requestMapping.path())).methods(requestMapping.method()).params(requestMapping.params()).headers(requestMapping.headers()).consumes(requestMapping.consumes()).produces(requestMapping.produces()).mappingName(requestMapping.name()).customCondition(customCondition).options(this.config).build();
    }
而在上面的detect方法最后,注册URL-Controller方法映射表由registerHandlerMethod方法完成。
protected void registerHandlerMethod(Object handler, Method method, T mapping) {
    this.mappingRegistry.register(mapping, handler, method);
}
mappingRegistry是AbstractHandlerMethodMapping的核心构成,主要作用就是维护HandlerMethod的映射关系,以及提供映射的查询方法。其register方法的实现如下:
public void register(T mapping, Object handler, Method method) {
    // 加锁,保证一致性
    this.readWriteLock.writeLock().lock();
    try {
        HandlerMethod handlerMethod = createHandlerMethod(handler, method);
        assertUniqueMethodMapping(handlerMethod, mapping);

        if (logger.isInfoEnabled()) {
            logger.info("Mapped "" + mapping + "" onto " + handlerMethod);
        }
        // 添加mapping->HandlerMethod的映射
        this.mappingLookup.put(mapping, handlerMethod);

        List<String> directUrls = getDirectUrls(mapping);
        for (String url : directUrls) {
            // 添加url->mapping的映射
            this.urlLookup.add(url, mapping);
        }

        String name = null;
        if (getNamingStrategy() != null) {
            name = getNamingStrategy().getName(handlerMethod, mapping);
            addMappingName(name, handlerMethod);
        }

        CorsConfiguration corsConfig = initCorsConfiguration(handler, method, mapping);
        if (corsConfig != null) {
            this.corsLookup.put(handlerMethod, corsConfig);
        }

        // 添加mapping->MappingRegistration的映射
        this.registry.put(mapping, new MappingRegistration<T>(mapping, handlerMethod, directUrls, name));
    }
    finally {
        this.readWriteLock.writeLock().unlock();
    }
}
注册过程增加了三个个映射关系,一个是mapping->HandlerMethod的映射,一个是url->mapping的映射,一个是mapping->MappingRegistration的映射。通过前两个映射,可以将请求定位到确定的Controller的方法上,最后一个映射保留所有Mapping注册信息,用于unregister。而方法加锁则是保证所有映射的一致性。
至此,请求URL和Controller方法之间的关系就初始化完成了。上面 initHandlerMappings 就能从容器中拿到所有的HandlerMapping。
对应的关系是:SpringMvc子容器中有RequestMappingHandlerMapping对象,这个对象中有一个mappingRegistry内部类,这个内部类中有URL和Mapping的映射的Map,还有MappingInfo和方法的映射的Map
class MappingRegistry {
    private final Map<T, AbstractHandlerMethodMapping.MappingRegistration<T>> registry = new HashMap();
    private final Map<T, HandlerMethod> mappingLookup = new LinkedHashMap();
    private final MultiValueMap<String, T> urlLookup = new LinkedMultiValueMap();
    private final Map<String, List<HandlerMethod>> nameLookup = new ConcurrentHashMap();
    private final Map<HandlerMethod, CorsConfiguration> corsLookup = new ConcurrentHashMap();
    private final ReentrantReadWriteLock readWriteLock = new ReentrantReadWriteLock();

    MappingRegistry() {
    }

    public Map<T, HandlerMethod> getMappings() {
        return this.mappingLookup;
    }

    public List<T> getMappingsByUrl(String urlPath) {
        return (List)this.urlLookup.get(urlPath);
    }
}
参数解析器和返回值解析器的初始化
在使用SpringMVC时,对Controller中方法的参数和返回值的处理都非常的方便。我们知道,常用类型的参数不需要任何额外配置,SpringMVC即可完美转换,而返回值既可以是ModelAndView, 也可以是String,或者是HashMap,或者是ResponseEntity,多种方式简单配置,完美兼容。它是怎么做到的呢,通过一系列的转换器来完成的。而这些转换器也是需要初始化到运行环境中的, 谁的运行环境, HandlerAdapter的。
同样SpringMVC提供了一个默认的强大实现,RequestMappingHandlerAdapter,同样在<mvc:annotation-driven />中定义。它也实现了InitializingBean接口。
public void afterPropertiesSet() {
    // Do this first, it may add ResponseBody advice beans
    // 初始化Controller通用切面
    initControllerAdviceCache();

    // 初始化参数解析器
    if (this.argumentResolvers == null) {
        List<HandlerMethodArgumentResolver> resolvers = getDefaultArgumentResolvers();
        this.argumentResolvers = new HandlerMethodArgumentResolverComposite().addResolvers(resolvers);
    }
    // 初始化InitBinder解析器
    if (this.initBinderArgumentResolvers == null) {
        List<HandlerMethodArgumentResolver> resolvers = getDefaultInitBinderArgumentResolvers();
        this.initBinderArgumentResolvers = new HandlerMethodArgumentResolverComposite().addResolvers(resolvers);
    }
    // 初始化返回值处理器
    if (this.returnValueHandlers == null) {
        List<HandlerMethodReturnValueHandler> handlers = getDefaultReturnValueHandlers();
        this.returnValueHandlers = new HandlerMethodReturnValueHandlerComposite().addHandlers(handlers);
    }
}
每个组件都通过内置默认的实现,我们主要来看参数解析器和返回值处理器两个。
参数解析器
private List<HandlerMethodArgumentResolver> getDefaultArgumentResolvers() {
    List<HandlerMethodArgumentResolver> resolvers = new ArrayList<HandlerMethodArgumentResolver>();

    // Annotation-based argument resolution
    resolvers.add(new RequestParamMethodArgumentResolver(getBeanFactory(), false));
    resolvers.add(new RequestParamMapMethodArgumentResolver());
    resolvers.add(new PathVariableMethodArgumentResolver());
    resolvers.add(new PathVariableMapMethodArgumentResolver());
    resolvers.add(new MatrixVariableMethodArgumentResolver());
    resolvers.add(new MatrixVariableMapMethodArgumentResolver());
    resolvers.add(new ServletModelAttributeMethodProcessor(false));
    resolvers.add(new RequestResponseBodyMethodProcessor(getMessageConverters(), this.requestResponseBodyAdvice));
    resolvers.add(new RequestPartMethodArgumentResolver(getMessageConverters(), this.requestResponseBodyAdvice));
    resolvers.add(new RequestHeaderMethodArgumentResolver(getBeanFactory()));
    resolvers.add(new RequestHeaderMapMethodArgumentResolver());
    resolvers.add(new ServletCookieValueMethodArgumentResolver(getBeanFactory()));
    resolvers.add(new ExpressionValueMethodArgumentResolver(getBeanFactory()));
    resolvers.add(new SessionAttributeMethodArgumentResolver());
    resolvers.add(new RequestAttributeMethodArgumentResolver());

    // Type-based argument resolution
    resolvers.add(new ServletRequestMethodArgumentResolver());
    resolvers.add(new ServletResponseMethodArgumentResolver());
    resolvers.add(new HttpEntityMethodProcessor(getMessageConverters(), this.requestResponseBodyAdvice));
    resolvers.add(new RedirectAttributesMethodArgumentResolver());
    resolvers.add(new ModelMethodProcessor());
    resolvers.add(new MapMethodProcessor());
    resolvers.add(new ErrorsMethodArgumentResolver());
    resolvers.add(new SessionStatusMethodArgumentResolver());
    resolvers.add(new UriComponentsBuilderMethodArgumentResolver());

    // Custom arguments
    if (getCustomArgumentResolvers() != null) {
        resolvers.addAll(getCustomArgumentResolvers());
    }

    // Catch-all
    resolvers.add(new RequestParamMethodArgumentResolver(getBeanFactory(), true));
    resolvers.add(new ServletModelAttributeMethodProcessor(true));

    return resolvers;
}
大家根据解析器名称大概可以推测出其作用,比如@RequestParam解析器,@PathVariable解析器,及@RequestBody和@ResponseBody解析器等等。SpringMVC强大的参数解析能力其实来源于丰富的内置解析器。
另一个返回值处理器的初始化
private List<HandlerMethodReturnValueHandler> getDefaultReturnValueHandlers() {
    List<HandlerMethodReturnValueHandler> handlers = new ArrayList<HandlerMethodReturnValueHandler>();

    // Single-purpose return value types
    handlers.add(new ModelAndViewMethodReturnValueHandler());
    handlers.add(new ModelMethodProcessor());
    handlers.add(new ViewMethodReturnValueHandler());
    handlers.add(new ResponseBodyEmitterReturnValueHandler(getMessageConverters()));
    handlers.add(new StreamingResponseBodyReturnValueHandler());
    handlers.add(new HttpEntityMethodProcessor(getMessageConverters(),
            this.contentNegotiationManager, this.requestResponseBodyAdvice));
    handlers.add(new HttpHeadersReturnValueHandler());
    handlers.add(new CallableMethodReturnValueHandler());
    handlers.add(new DeferredResultMethodReturnValueHandler());
    handlers.add(new AsyncTaskMethodReturnValueHandler(this.beanFactory));

    // Annotation-based return value types
    handlers.add(new ModelAttributeMethodProcessor(false));
    handlers.add(new RequestResponseBodyMethodProcessor(getMessageConverters(),
            this.contentNegotiationManager, this.requestResponseBodyAdvice));

    // Multi-purpose return value types
    handlers.add(new ViewNameMethodReturnValueHandler());
    handlers.add(new MapMethodProcessor());

    // Custom return value types
    if (getCustomReturnValueHandlers() != null) {
        handlers.addAll(getCustomReturnValueHandlers());
    }

    // Catch-all
    if (!CollectionUtils.isEmpty(getModelAndViewResolvers())) {
        handlers.add(new ModelAndViewResolverMethodReturnValueHandler(getModelAndViewResolvers()));
    }
    else {
        handlers.add(new ModelAttributeMethodProcessor(true));
    }

    return handlers;
}
同样内置了对多种返回类型,返回方式的处理器, 如处理@ResponseBody 的处理器 RequestResponseBodyMethodProcessor,才支撑起丰富便捷的使用。
同RequestMappingHandlerMapping,RequestMappingHandlerAdapter会被注册到SpringMvc的容器中,此对象中有所有的处理器,也就是List或者Map,最后在DispatcherServlet的init方法中的initHandlerAdapters方法中会找到这个RequestMappingHandlerAdapter并放到DispatcherServlet的handlerAdapters中
private void initHandlerAdapters(ApplicationContext context) {
    this.handlerAdapters = null;
    if (this.detectAllHandlerAdapters) {
        Map<String, HandlerAdapter> matchingBeans = BeanFactoryUtils.beansOfTypeIncludingAncestors(context, HandlerAdapter.class, true, false);
        if (!matchingBeans.isEmpty()) {
            this.handlerAdapters = new ArrayList(matchingBeans.values());
            AnnotationAwareOrderComparator.sort(this.handlerAdapters);
        }
    } else {
        try {
            HandlerAdapter ha = (HandlerAdapter)context.getBean("handlerAdapter", HandlerAdapter.class);
            this.handlerAdapters = Collections.singletonList(ha);
        } catch (NoSuchBeanDefinitionException var3) {
            ;
        }
    }

    if (this.handlerAdapters == null) {
        this.handlerAdapters = this.getDefaultStrategies(context, HandlerAdapter.class);
        if (this.logger.isDebugEnabled()) {
            this.logger.debug("No HandlerAdapters found in servlet '" + this.getServletName() + "': using default");
        }
    }

}
下一章我们去探究一个请求如何在SpringMVC各组件中进行流转。