终于进行到Connector的分析阶段了,这也是Tomcat里面最复杂的一块功能了。Connector中文名为连接器,既然是连接器,它肯定会连接某些东西,连接些什么呢?
Connector用于接受请求并将请求封装成Request和Response,然后交给Container进行处理,Container处理完之后再交给Connector返回给客户端。
要理解Connector,我们需要问自己4个问题。
- (1)
Connector如何接受请求的? - (2)如何将请求封装成Request和Response的?
- (3)封装完之后的Request和Response如何交给
Container进行处理的? - (4)
Container处理完之后如何交给Connector并返回给客户端的?
先来一张Connector的整体结构图
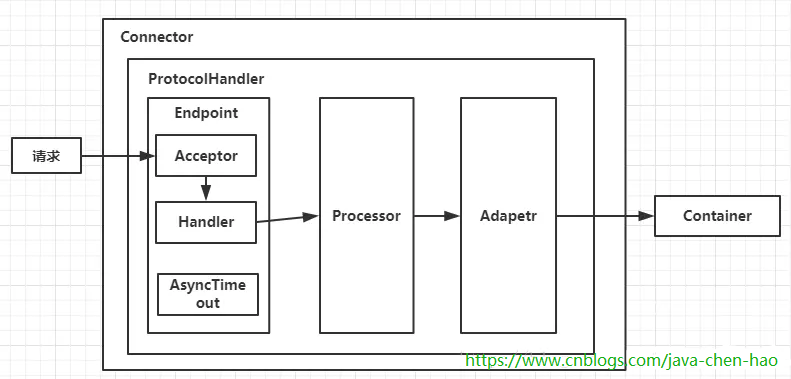
【注意】:不同的协议、不同的通信方式,ProtocolHandler会有不同的实现。在Tomcat8.5中,ProtocolHandler的类继承层级如下图所示。

针对上述的类继承层级图,我们做如下说明:
- ajp和http11是两种不同的协议
- nio、nio2和apr是不同的通信方式
- 协议和通信方式可以相互组合。
ProtocolHandler包含三个部件:Endpoint、Processor、Adapter。
Endpoint用来处理底层Socket的网络连接,Processor用于将Endpoint接收到的Socket封装成Request,Adapter用于将Request交给Container进行具体的处理。Endpoint由于是处理底层的Socket网络连接,因此Endpoint是用来实现TCP/IP协议的,而Processor用来实现HTTP协议的,Adapter将请求适配到Servlet容器进行具体的处理。Endpoint的抽象实现类AbstractEndpoint里面定义了Acceptor和AsyncTimeout两个内部类和一个Handler接口。Acceptor用于监听请求,AsyncTimeout用于检查异步Request的超时,Handler用于处理接收到的Socket,在内部调用Processor进行处理。
至此,我们已经明白了问题(1)、(2)和(3)。至于(4),当我们了解了Container自然就明白了,前面章节内容已经详细分析过了。
Connector源码分析入口
我们在Service标准实现StandardService的源码中发现,其init()、start()、stop()和destroy()方法分别会对Connectors的同名方法进行调用。而一个Service对应着多个Connector。
Service.init()
@Override
protected void initInternal() throws LifecycleException {
    super.initInternal();

    if (engine != null) {
        engine.init();
    }

    // Initialize any Executors
    for (Executor executor : findExecutors()) {
        if (executor instanceof JmxEnabled) {
            ((JmxEnabled) executor).setDomain(getDomain());
        }
        executor.init();
    }

    // Initialize mapper listener
    mapperListener.init();

    // Initialize our defined Connectors
    synchronized (connectorsLock) {
        for (Connector connector : connectors) {
            try {
                connector.init();
            } catch (Exception e) {
                String message = sm.getString(
                        "standardService.connector.initFailed", connector);
                log.error(message, e);

                if (Boolean.getBoolean("org.apache.catalina.startup.EXIT_ON_INIT_FAILURE"))
                    throw new LifecycleException(message);
            }
        }
    }
}
Service.start()
@Override
protected void startInternal() throws LifecycleException {
    if(log.isInfoEnabled())
        log.info(sm.getString("standardService.start.name", this.name));
    setState(LifecycleState.STARTING);

    // Start our defined Container first
    if (engine != null) {
        synchronized (engine) {
            engine.start();
        }
    }

    synchronized (executors) {
        for (Executor executor: executors) {
            executor.start();
        }
    }

    mapperListener.start();

    // Start our defined Connectors second
    synchronized (connectorsLock) {
        for (Connector connector: connectors) {
            try {
                // If it has already failed, don't try and start it
                if (connector.getState() != LifecycleState.FAILED) {
                    connector.start();
                }
            } catch (Exception e) {
                log.error(sm.getString(
                        "standardService.connector.startFailed",
                        connector), e);
            }
        }
    }
}
我们知道Connector实现了Lifecycle接口,所以它是一个生命周期组件。所以Connector的启动逻辑入口在于init()和start()。
Connector构造方法
在分析之前,我们看看server.xml,该文件已经体现出了tomcat中各个组件的大体结构。
<?xml version='1.0' encoding='utf-8'?>
<Server port="8005" shutdown="SHUTDOWN">
<Listener className="org.apache.catalina.startup.VersionLoggerListener" />
<Listener className="org.apache.catalina.core.AprLifecycleListener" SSLEngine="on" />
<Listener className="org.apache.catalina.core.JreMemoryLeakPreventionListener" />
<Listener className="org.apache.catalina.mbeans.GlobalResourcesLifecycleListener" />
<Listener className="org.apache.catalina.core.ThreadLocalLeakPreventionListener" />
<GlobalNamingResources>
<Resource name="UserDatabase" auth="Container"
type="org.apache.catalina.UserDatabase"
description="User database that can be updated and saved"
factory="org.apache.catalina.users.MemoryUserDatabaseFactory"
pathname="conf/tomcat-users.xml" />
</GlobalNamingResources>
<Service name="Catalina">
<Connector port="8080" protocol="HTTP/1.1" connectionTimeout="20000" redirectPort="8443" />
<Connector port="8009" protocol="AJP/1.3" redirectPort="8443" />
<Engine name="Catalina" defaultHost="localhost">
<Realm className="org.apache.catalina.realm.LockOutRealm">
<Realm className="org.apache.catalina.realm.UserDatabaseRealm"
resourceName="UserDatabase"/>
</Realm>
<Host name="localhost" appBase="webapps"
unpackWARs="true" autoDeploy="true">
<Valve className="org.apache.catalina.valves.AccessLogValve" directory="logs"
prefix="localhost_access_log" suffix=".txt"
pattern="%h %l %u %t "%r" %s %b" />
</Host>
</Engine>
</Service>
</Server>
在这个文件中,我们看到一个Connector有几个关键属性,port和protocol是其中的两个。server.xml默认支持两种协议:HTTP/1.1和AJP/1.3。其中HTTP/1.1用于支持http1.1协议,而AJP/1.3用于支持对apache服务器的通信。
接下来我们看看构造方法。
public Connector() {
    this(null); // 1. 无参构造方法,传入参数为空协议,会默认使用`HTTP/1.1`
}

public Connector(String protocol) {
    setProtocol(protocol);
    // Instantiate protocol handler
    // 5. 使用protocolHandler的类名构造ProtocolHandler的实例
    ProtocolHandler p = null;
    try {
        Class<?> clazz = Class.forName(protocolHandlerClassName);
        p = (ProtocolHandler) clazz.getConstructor().newInstance();
    } catch (Exception e) {
        log.error(sm.getString(
                "coyoteConnector.protocolHandlerInstantiationFailed"), e);
    } finally {
        this.protocolHandler = p;
    }

    if (Globals.STRICT_SERVLET_COMPLIANCE) {
        uriCharset = StandardCharsets.ISO_8859_1;
    } else {
        uriCharset = StandardCharsets.UTF_8;
    }
}

@Deprecated
public void setProtocol(String protocol) {
    boolean aprConnector = AprLifecycleListener.isAprAvailable() &&
            AprLifecycleListener.getUseAprConnector();

    // 2. `HTTP/1.1`或`null`,protocolHandler使用`org.apache.coyote.http11.Http11NioProtocol`,不考虑apr
    if ("HTTP/1.1".equals(protocol) || protocol == null) {
        if (aprConnector) {
            setProtocolHandlerClassName("org.apache.coyote.http11.Http11AprProtocol");
        } else {
            setProtocolHandlerClassName("org.apache.coyote.http11.Http11NioProtocol");
        }
    }
    // 3. `AJP/1.3`,protocolHandler使用`org.apache.coyote.ajp.AjpNioProtocol`,不考虑apr
    else if ("AJP/1.3".equals(protocol)) {
        if (aprConnector) {
            setProtocolHandlerClassName("org.apache.coyote.ajp.AjpAprProtocol");
        } else {
            setProtocolHandlerClassName("org.apache.coyote.ajp.AjpNioProtocol");
        }
    }
    // 4. 其他情况,使用传入的protocol作为protocolHandler的类名
    else {
        setProtocolHandlerClassName(protocol);
    }
}
从上面的代码我们看到构造方法主要做了下面几件事情:
- 无参构造方法,传入参数为空协议,会默认使用
HTTP/1.1 HTTP/1.1或null,protocolHandler使用org.apache.coyote.http11.Http11NioProtocol,不考虑aprAJP/1.3,protocolHandler使用org.apache.coyote.ajp.AjpNioProtocol,不考虑apr- 其他情况,使用传入的protocol作为protocolHandler的类名
- 使用protocolHandler的类名构造ProtocolHandler的实例
Connector.init()
@Override
protected void initInternal() throws LifecycleException {
    super.initInternal();

    // Initialize adapter
    // 1. 初始化adapter
    adapter = new CoyoteAdapter(this);
    protocolHandler.setAdapter(adapter);

    // Make sure parseBodyMethodsSet has a default
    // 2. 设置接受body的method列表,默认为POST
    if (null == parseBodyMethodsSet) {
        setParseBodyMethods(getParseBodyMethods());
    }

    if (protocolHandler.isAprRequired() && !AprLifecycleListener.isAprAvailable()) {
        throw new LifecycleException(sm.getString("coyoteConnector.protocolHandlerNoApr",
                getProtocolHandlerClassName()));
    }
    if (AprLifecycleListener.isAprAvailable() && AprLifecycleListener.getUseOpenSSL() &&
            protocolHandler instanceof AbstractHttp11JsseProtocol) {
        AbstractHttp11JsseProtocol<?> jsseProtocolHandler =
                (AbstractHttp11JsseProtocol<?>) protocolHandler;
        if (jsseProtocolHandler.isSSLEnabled() &&
                jsseProtocolHandler.getSslImplementationName() == null) {
            // OpenSSL is compatible with the JSSE configuration, so use it if APR is available
            jsseProtocolHandler.setSslImplementationName(OpenSSLImplementation.class.getName());
        }
    }

    // 3. 初始化protocolHandler
    try {
        protocolHandler.init();
    } catch (Exception e) {
        throw new LifecycleException(
                sm.getString("coyoteConnector.protocolHandlerInitializationFailed"), e);
    }
}
init()方法做了3件事情
- 初始化adapter
- 设置接受body的method列表,默认为POST
- 初始化protocolHandler
从ProtocolHandler类继承层级我们知道ProtocolHandler的子类都必须实现AbstractProtocol抽象类,而protocolHandler.init();的逻辑代码正是在这个抽象类里面。我们来分析一下。
@Override
public void init() throws Exception {
    if (getLog().isInfoEnabled()) {
        getLog().info(sm.getString("abstractProtocolHandler.init", getName()));
    }

    if (oname == null) {
        // Component not pre-registered so register it
        oname = createObjectName();
        if (oname != null) {
            Registry.getRegistry(null, null).registerComponent(this, oname, null);
        }
    }

    if (this.domain != null) {
        rgOname = new ObjectName(domain + ":type=GlobalRequestProcessor,name=" + getName());
        Registry.getRegistry(null, null).registerComponent(
                getHandler().getGlobal(), rgOname, null);
    }

    // 1. 设置endpoint的名字,默认为:http-nio-{port}
    String endpointName = getName();
    endpoint.setName(endpointName.substring(1, endpointName.length()-1));
    endpoint.setDomain(domain);

    // 2. 初始化endpoint
    endpoint.init();
}
我们接着分析一下Endpoint.init()里面又做了什么。该方法位于AbstactEndpoint抽象类,该类是基于模板方法模式实现的,主要调用了子类的bind()方法。
public abstract void bind() throws Exception;
public abstract void unbind() throws Exception;
public abstract void startInternal() throws Exception;
public abstract void stopInternal() throws Exception;

public void init() throws Exception {
    // 执行bind()方法
    if (bindOnInit) {
        bind();
        bindState = BindState.BOUND_ON_INIT;
    }
    if (this.domain != null) {
        // Register endpoint (as ThreadPool - historical name)
        oname = new ObjectName(domain + ":type=ThreadPool,name="" + getName() + """);
        Registry.getRegistry(null, null).registerComponent(this, oname, null);

        ObjectName socketPropertiesOname = new ObjectName(domain +
                ":type=ThreadPool,name="" + getName() + "",subType=SocketProperties");
        socketProperties.setObjectName(socketPropertiesOname);
        Registry.getRegistry(null, null).registerComponent(socketProperties, socketPropertiesOname, null);

        for (SSLHostConfig sslHostConfig : findSslHostConfigs()) {
            registerJmx(sslHostConfig);
        }
    }
}
继续分析bind()方法,我们终于看到了我们想要看的东西了。关键的代码在于serverSock.socket().bind(addr,getAcceptCount());,用于绑定ServerSocket到指定的IP和端口。
@Override
public void bind() throws Exception {

    if (!getUseInheritedChannel()) {
        serverSock = ServerSocketChannel.open();
        socketProperties.setProperties(serverSock.socket());
        InetSocketAddress addr = (getAddress()!=null?new InetSocketAddress(getAddress(),getPort()):new InetSocketAddress(getPort()));
        //绑定ServerSocket到指定的IP和端口
        serverSock.socket().bind(addr,getAcceptCount());
    } else {
        // Retrieve the channel provided by the OS
        Channel ic = System.inheritedChannel();
        if (ic instanceof ServerSocketChannel) {
            serverSock = (ServerSocketChannel) ic;
        }
        if (serverSock == null) {
            throw new IllegalArgumentException(sm.getString("endpoint.init.bind.inherited"));
        }
    }

    serverSock.configureBlocking(true); //mimic APR behavior

    // Initialize thread count defaults for acceptor, poller
    if (acceptorThreadCount == 0) {
        // FIXME: Doesn't seem to work that well with multiple accept threads
        acceptorThreadCount = 1;
    }
    if (pollerThreadCount <= 0) {
        //minimum one poller thread
        pollerThreadCount = 1;
    }
    setStopLatch(new CountDownLatch(pollerThreadCount));

    // Initialize SSL if needed
    initialiseSsl();

    selectorPool.open();
}
好了,我们已经分析完了init()方法,接下来我们分析start()方法。关键代码就一行,调用ProtocolHandler.start()方法。
Connector.start()
@Override
protected void startInternal() throws LifecycleException {

    // Validate settings before starting
    if (getPort() < 0) {
        throw new LifecycleException(sm.getString(
                "coyoteConnector.invalidPort", Integer.valueOf(getPort())));
    }

    setState(LifecycleState.STARTING);

    try {
        protocolHandler.start();
    } catch (Exception e) {
        throw new LifecycleException(
                sm.getString("coyoteConnector.protocolHandlerStartFailed"), e);
    }
}
我们深入ProtocolHandler.start()方法。
- 调用
Endpoint.start()方法 - 开启异步超时线程,线程执行单元为
Asynctimeout
@Override
public void start() throws Exception {
    if (getLog().isInfoEnabled()) {
        getLog().info(sm.getString("abstractProtocolHandler.start", getName()));
    }

    // 1. 调用`Endpoint.start()`方法
    endpoint.start();

    // Start async timeout thread
    // 2. 开启异步超时线程,线程执行单元为`Asynctimeout`
    asyncTimeout = new AsyncTimeout();
    Thread timeoutThread = new Thread(asyncTimeout, getNameInternal() + "-AsyncTimeout");
    int priority = endpoint.getThreadPriority();
    if (priority < Thread.MIN_PRIORITY || priority > Thread.MAX_PRIORITY) {
        priority = Thread.NORM_PRIORITY;
    }
    timeoutThread.setPriority(priority);
    timeoutThread.setDaemon(true);
    timeoutThread.start();
}
这儿我们重点关注Endpoint.start()方法
public final void start() throws Exception {
    // 1. `bind()`已经在`init()`中分析过了
    if (bindState == BindState.UNBOUND) {
        bind();
        bindState = BindState.BOUND_ON_START;
    }
    startInternal();
}

@Override
public void startInternal() throws Exception {
    if (!running) {
        running = true;
        paused = false;

        processorCache = new SynchronizedStack<>(SynchronizedStack.DEFAULT_SIZE,
                socketProperties.getProcessorCache());
        eventCache = new SynchronizedStack<>(SynchronizedStack.DEFAULT_SIZE,
                        socketProperties.getEventCache());
        nioChannels = new SynchronizedStack<>(SynchronizedStack.DEFAULT_SIZE,
                socketProperties.getBufferPool());

        // Create worker collection
        // 2. 创建工作者线程池
        if ( getExecutor() == null ) {
            createExecutor();
        }

        // 3. 初始化连接latch,用于限制请求的并发量
        initializeConnectionLatch();

        // Start poller threads
        // 4. 开启poller线程。poller用于对接受者线程生产的消息(或事件)进行处理,poller最终调用的是Handler的代码
        pollers = new Poller[getPollerThreadCount()];
        for (int i=0; i<pollers.length; i++) {
            pollers[i] = new Poller();
            Thread pollerThread = new Thread(pollers[i], getName() + "-ClientPoller-"+i);
            pollerThread.setPriority(threadPriority);
            pollerThread.setDaemon(true);
            pollerThread.start();
        }
        // 5. 开启acceptor线程
        startAcceptorThreads();
    }
}

protected final void startAcceptorThreads() {
    int count = getAcceptorThreadCount();
    acceptors = new Acceptor[count];

    for (int i = 0; i < count; i++) {
        acceptors[i] = createAcceptor();
        String threadName = getName() + "-Acceptor-" + i;
        acceptors[i].setThreadName(threadName);
        Thread t = new Thread(acceptors[i], threadName);
        t.setPriority(getAcceptorThreadPriority());
        t.setDaemon(getDaemon());
        t.start();
    }
}
bind()已经在init()中分析过了- 创建工作者线程池
- 初始化连接latch,用于限制请求的并发量
- 创建轮询Poller线程。poller用于对接受者线程生产的消息(或事件)进行处理,poller最终调用的是Handler的代码
- 创建Acceptor线程
Connector请求逻辑
分析完了Connector的启动逻辑之后,我们就需要进一步分析一下http的请求逻辑,当请求从客户端发起之后,需要经过哪些操作才能真正地得到执行?
Acceptor
Acceptor线程主要用于监听套接字,将已连接套接字转给Poller线程。Acceptor线程数由AbstracEndPoint的acceptorThreadCount成员变量控制,默认值为1
AbstractEndpoint.Acceptor是AbstractEndpoint类的静态抽象类,实现了Runnable接口,部分代码如下:public abstract static class Acceptor implements Runnable { public enum AcceptorState { NEW, RUNNING, PAUSED, ENDED } protected volatile AcceptorState state = AcceptorState.NEW; public final AcceptorState getState() { return state; } private String threadName; protected final void setThreadName(final String threadName) { this.threadName = threadName; } protected final String getThreadName() { return threadName; } }
NioEndpoint的Acceptor成员内部类继承了AbstractEndpoint.Acceptor:
protected class Acceptor extends AbstractEndpoint.Acceptor {
    @Override
    public void run() {
        int errorDelay = 0;

        // Loop until we receive a shutdown command
        while (running) {

            // Loop if endpoint is paused
            // 1. 运行过程中,如果`Endpoint`暂停了,则`Acceptor`进行自旋(间隔50毫秒) `
            while (paused && running) {
                state = AcceptorState.PAUSED;
                try {
                    Thread.sleep(50);
                } catch (InterruptedException e) {
                    // Ignore
                }
            }
            // 2. 如果`Endpoint`终止运行了,则`Acceptor`也会终止
            if (!running) {
                break;
            }
            state = AcceptorState.RUNNING;

            try {
                //if we have reached max connections, wait
                // 3. 如果请求达到了最大连接数,则wait直到连接数降下来
                countUpOrAwaitConnection();

                SocketChannel socket = null;
                try {
                    // Accept the next incoming connection from the server
                    // socket
                    // 4. 接受下一次连接的socket
                    socket = serverSock.accept();
                } catch (IOException ioe) {
                    // We didn't get a socket
                    countDownConnection();
                    if (running) {
                        // Introduce delay if necessary
                        errorDelay = handleExceptionWithDelay(errorDelay);
                        // re-throw
                        throw ioe;
                    } else {
                        break;
                    }
                }
                // Successful accept, reset the error delay
                errorDelay = 0;

                // Configure the socket
                if (running && !paused) {
                    // setSocketOptions() will hand the socket off to
                    // an appropriate processor if successful
                    // 5. `setSocketOptions()`这儿是关键,会将socket以事件的方式传递给poller
                    if (!setSocketOptions(socket)) {
                        closeSocket(socket);
                    }
                } else {
                    closeSocket(socket);
                }
            } catch (Throwable t) {
                ExceptionUtils.handleThrowable(t);
                log.error(sm.getString("endpoint.accept.fail"), t);
            }
        }
        state = AcceptorState.ENDED;
    }
}
从以上代码可以看到:
- countUpOrAwaitConnection函数检查当前最大连接数,若未达到maxConnections则加一,否则等待;
- socket = serverSock.accept()这一行中的serverSock正是NioEndpoint的bind函数中打开的ServerSocketChannel。为了引用这个变量,NioEndpoint的Acceptor类是成员而不再是静态类;
- setSocketOptions函数调用上的注释表明该函数将已连接套接字交给Poller线程处理。
setSocketOptions方法接着处理已连接套接字:
protected boolean setSocketOptions(SocketChannel socket) {
    // Process the connection
    try {
        //disable blocking, APR style, we are gonna be polling it
        socket.configureBlocking(false);
        Socket sock = socket.socket();
        socketProperties.setProperties(sock);

        NioChannel channel = nioChannels.pop();
        if (channel == null) {
            SocketBufferHandler bufhandler = new SocketBufferHandler(
                    socketProperties.getAppReadBufSize(),
                    socketProperties.getAppWriteBufSize(),
                    socketProperties.getDirectBuffer());
            if (isSSLEnabled()) {
                channel = new SecureNioChannel(socket, bufhandler, selectorPool, this);
            } else {
                channel = new NioChannel(socket, bufhandler);
            }
        } else {
            channel.setIOChannel(socket);
            channel.reset();
        }
        // 将channel注册到poller,注意关键的两个方法,`getPoller0()`和`Poller.register()`
        getPoller0().register(channel);
    } catch (Throwable t) {
        ExceptionUtils.handleThrowable(t);
        try {
            log.error("",t);
        } catch (Throwable tt) {
            ExceptionUtils.handleThrowable(tt);
        }
        // Tell to close the socket
        return false;
    }
    return true;
}
- 从NioChannel栈中出栈一个,若能重用(即不为null)则重用对象,否则新建一个NioChannel对象;
- getPoller0方法利用轮转法选择一个Poller线程,利用Poller类的register方法将上述NioChannel对象注册到该Poller线程上;
- 若成功转给Poller线程该函数返回true,否则返回false。返回false后,Acceptor类的closeSocket函数会关闭通道和底层Socket连接并将当前最大连接数减一。
Poller
Poller线程主要用于以较少的资源轮询已连接套接字以保持连接,当数据可用时转给工作线程。
Poller线程数由NioEndPoint的pollerThreadCount成员变量控制,默认值为2与可用处理器数二者之间的较小值。
Poller实现了Runnable接口,可以看到构造函数为每个Poller打开了一个新的Selector。
public class Poller implements Runnable {
    private Selector selector;
    private final SynchronizedQueue<PollerEvent> events =
            new SynchronizedQueue<>();
    // 省略一些代码
    public Poller() throws IOException {
        this.selector = Selector.open();
    }

    public Selector getSelector() { return selector;}
    // 省略一些代码
}
将channel注册到poller,注意关键的两个方法,getPoller0()和Poller.register()。先来分析一下getPoller0(),该方法比较关键的一个地方就是以取模的方式对poller数量进行轮询获取。
/**
 * The socket poller.
 */
private Poller[] pollers = null;
private AtomicInteger pollerRotater = new AtomicInteger(0);
/**
 * Return an available poller in true round robin fashion.
 *
 * @return The next poller in sequence
 */
public Poller getPoller0() {
    int idx = Math.abs(pollerRotater.incrementAndGet()) % pollers.length;
    return pollers[idx];
}
接下来我们分析一下Poller.register()方法。因为Poller维持了一个events同步队列,所以Acceptor接受到的channel会放在这个队列里面,放置的代码为events.offer(event);
public class Poller implements Runnable {

    private final SynchronizedQueue<PollerEvent> events = new SynchronizedQueue<>();

    /**
     * Registers a newly created socket with the poller.
     *
     * @param socket    The newly created socket
     */
    public void register(final NioChannel socket) {
        socket.setPoller(this);
        NioSocketWrapper ka = new NioSocketWrapper(socket, NioEndpoint.this);
        socket.setSocketWrapper(ka);
        ka.setPoller(this);
        ka.setReadTimeout(getSocketProperties().getSoTimeout());
        ka.setWriteTimeout(getSocketProperties().getSoTimeout());
        ka.setKeepAliveLeft(NioEndpoint.this.getMaxKeepAliveRequests());
        ka.setSecure(isSSLEnabled());
        ka.setReadTimeout(getConnectionTimeout());
        ka.setWriteTimeout(getConnectionTimeout());
        PollerEvent r = eventCache.pop();
        ka.interestOps(SelectionKey.OP_READ);//this is what OP_REGISTER turns into.
        if ( r==null) r = new PollerEvent(socket,ka,OP_REGISTER);
        else r.reset(socket,ka,OP_REGISTER);
        addEvent(r);
    }

    private void addEvent(PollerEvent event) {
        events.offer(event);
        if ( wakeupCounter.incrementAndGet() == 0 ) selector.wakeup();
    }
}
PollerEvent
接下来看一下PollerEvent,PollerEvent实现了Runnable接口,用来表示一个轮询事件,代码如下:
public static class PollerEvent implements Runnable {
    private NioChannel socket;
    private int interestOps;
    private NioSocketWrapper socketWrapper;

    public PollerEvent(NioChannel ch, NioSocketWrapper w, int intOps) {
        reset(ch, w, intOps);
    }

    public void reset(NioChannel ch, NioSocketWrapper w, int intOps) {
        socket = ch;
        interestOps = intOps;
        socketWrapper = w;
    }

    public void reset() {
        reset(null, null, 0);
    }

    @Override
    public void run() {
        if (interestOps == OP_REGISTER) {
            try {
                socket.getIOChannel().register(
                        socket.getPoller().getSelector(), SelectionKey.OP_READ, socketWrapper);
            } catch (Exception x) {
                log.error(sm.getString("endpoint.nio.registerFail"), x);
            }
        } else {
            final SelectionKey key = socket.getIOChannel().keyFor(socket.getPoller().getSelector());
            try {
                if (key == null) {
                    socket.socketWrapper.getEndpoint().countDownConnection();
                    ((NioSocketWrapper) socket.socketWrapper).closed = true;
                } else {
                    final NioSocketWrapper socketWrapper = (NioSocketWrapper) key.attachment();
                    if (socketWrapper != null) {
                        //we are registering the key to start with, reset the fairness counter.
                        int ops = key.interestOps() | interestOps;
                        socketWrapper.interestOps(ops);
                        key.interestOps(ops);
                    } else {
                        socket.getPoller().cancelledKey(key);
                    }
                }
            } catch (CancelledKeyException ckx) {
                try {
                    socket.getPoller().cancelledKey(key);
                } catch (Exception ignore) {}
            }
        }
    }

}
在run函数中:
- 若感兴趣集是自定义的OP_REGISTER,则说明该事件表示的已连接套接字通道尚未被轮询线程处理过,那么将该通道注册到Poller线程的Selector上,感兴趣集是OP_READ,通道注册的附件是一个NioSocketWrapper对象。从Poller的register方法添加事件即是这样的过程;
- 否则获得已连接套接字通道注册到Poller线程的Selector上的SelectionKey,为key添加新的感兴趣集。
重访Poller
上文提到Poller类实现了Runnable接口,其重写的run方法如下所示。
public boolean events() {
    boolean result = false;
    PollerEvent pe = null;
    for (int i = 0, size = events.size(); i < size && (pe = events.poll()) != null; i++ ) {
        result = true;
        try {
            //直接调用run方法
            pe.run();
            pe.reset();
            if (running && !paused) {
                eventCache.push(pe);
            }
        } catch ( Throwable x ) {
            log.error("",x);
        }
    }
    return result;
}

@Override
public void run() {
    // Loop until destroy() is called
    while (true) {
        boolean hasEvents = false;

        try {
            if (!close) {
                /执行PollerEvent的run方法
                hasEvents = events();
                if (wakeupCounter.getAndSet(-1) > 0) {
                    //if we are here, means we have other stuff to do
                    //do a non blocking select
                    keyCount = selector.selectNow();
                } else {
                    keyCount = selector.select(selectorTimeout);
                }
                wakeupCounter.set(0);
            }
            if (close) {
                events();
                timeout(0, false);
                try {
                    selector.close();
                } catch (IOException ioe) {
                    log.error(sm.getString("endpoint.nio.selectorCloseFail"), ioe);
                }
                break;
            }
        } catch (Throwable x) {
            ExceptionUtils.handleThrowable(x);
            log.error("",x);
            continue;
        }
        //either we timed out or we woke up, process events first
        if ( keyCount == 0 ) hasEvents = (hasEvents | events());

        // 获取当前选择器中所有注册的“选择键(已就绪的监听事件)”
        Iterator<SelectionKey> iterator =
            keyCount > 0 ? selector.selectedKeys().iterator() : null;
        // Walk through the collection of ready keys and dispatch
        // any active event.
        // 对已经准备好的key进行处理
        while (iterator != null && iterator.hasNext()) {
            SelectionKey sk = iterator.next();
            NioSocketWrapper attachment = (NioSocketWrapper)sk.attachment();
            // Attachment may be null if another thread has called
            // cancelledKey()
            if (attachment == null) {
                iterator.remove();
            } else {
                iterator.remove();
                // 真正处理key的地方
                processKey(sk, attachment);
            }
        }//while

        //process timeouts
        timeout(keyCount,hasEvents);
    }//while

    getStopLatch().countDown();
}
- 若队列里有元素则会先把队列里的事件均执行一遍,PollerEvent的run方法会将通道注册到Poller的Selector上;
- 对select返回的SelectionKey进行处理,由于在PollerEvent中注册通道时带上了NioSocketWrapper附件,因此这里可以用SelectionKey的attachment方法得到,接着调用processKey去处理已连接套接字通道。
我们接着分析processKey(),该方法又会根据key的类型,来分别处理读和写。
- 处理读事件,比如生成Request对象
- 处理写事件,比如将生成的Response对象通过socket写回客户端
protected void processKey(SelectionKey sk, NioSocketWrapper attachment) {
    try {
        if ( close ) {
            cancelledKey(sk);
        } else if ( sk.isValid() && attachment != null ) {
            if (sk.isReadable() || sk.isWritable() ) {
                if ( attachment.getSendfileData() != null ) {
                    processSendfile(sk,attachment, false);
                } else {
                    unreg(sk, attachment, sk.readyOps());
                    boolean closeSocket = false;
                    // 1. 处理读事件,比如生成Request对象
                    // Read goes before write
                    if (sk.isReadable()) {
                        if (!processSocket(attachment, SocketEvent.OPEN_READ, true)) {
                            closeSocket = true;
                        }
                    }
                    // 2. 处理写事件,比如将生成的Response对象通过socket写回客户端
                    if (!closeSocket && sk.isWritable()) {
                        if (!processSocket(attachment, SocketEvent.OPEN_WRITE, true)) {
                            closeSocket = true;
                        }
                    }
                    if (closeSocket) {
                        cancelledKey(sk);
                    }
                }
            }
        } else {
            //invalid key
            cancelledKey(sk);
        }
    } catch ( CancelledKeyException ckx ) {
        cancelledKey(sk);
    } catch (Throwable t) {
        ExceptionUtils.handleThrowable(t);
        log.error("",t);
    }
}
我们继续来分析方法processSocket()。
- 从
processorCache里面拿一个Processor来处理socket,Processor的实现为SocketProcessor - 将
Processor放到工作线程池中执行
public boolean processSocket(SocketWrapperBase<S> socketWrapper,
        SocketEvent event, boolean dispatch) {
    try {
        if (socketWrapper == null) {
            return false;
        }
        // 1. 从`processorCache`里面拿一个`Processor`来处理socket,`Processor`的实现为`SocketProcessor`
        SocketProcessorBase<S> sc = processorCache.pop();
        if (sc == null) {
            sc = createSocketProcessor(socketWrapper, event);
        } else {
            sc.reset(socketWrapper, event);
        }
        // 2. 将`Processor`放到工作线程池中执行
        Executor executor = getExecutor();
        if (dispatch && executor != null) {
            executor.execute(sc);
        } else {
            sc.run();
        }
    } catch (RejectedExecutionException ree) {
        getLog().warn(sm.getString("endpoint.executor.fail", socketWrapper) , ree);
        return false;
    } catch (Throwable t) {
        ExceptionUtils.handleThrowable(t);
        // This means we got an OOM or similar creating a thread, or that
        // the pool and its queue are full
        getLog().error(sm.getString("endpoint.process.fail"), t);
        return false;
    }
    return true;
}
dispatch参数表示是否要在另外的线程中处理,上文processKey各处传递的参数都是true。
- dispatch为true且工作线程池存在时会执行executor.execute(sc),之后是由工作线程池处理已连接套接字;
- 否则继续由Poller线程自己处理已连接套接字。
AbstractEndPoint类的createSocketProcessor是抽象方法,NioEndPoint类实现了它:
@Override
protected SocketProcessorBase<NioChannel> createSocketProcessor(
        SocketWrapperBase<NioChannel> socketWrapper, SocketEvent event) {
    return new SocketProcessor(socketWrapper, event);
}
接着我们分析SocketProcessor.doRun()方法(SocketProcessor.run()方法最终调用此方法)。该方法将处理逻辑交给Handler处理,当event为null时,则表明是一个OPEN_READ事件。
该类的注释说明SocketProcessor与Worker的作用等价。
/**
 * This class is the equivalent of the Worker, but will simply use in an
 * external Executor thread pool.
 */
protected class SocketProcessor extends SocketProcessorBase<NioChannel> {

    public SocketProcessor(SocketWrapperBase<NioChannel> socketWrapper, SocketEvent event) {
        super(socketWrapper, event);
    }

    @Override
    protected void doRun() {
        NioChannel socket = socketWrapper.getSocket();
        SelectionKey key = socket.getIOChannel().keyFor(socket.getPoller().getSelector());

        try {
            int handshake = -1;

            try {
                if (key != null) {
                    if (socket.isHandshakeComplete()) {
                        // No TLS handshaking required. Let the handler
                        // process this socket / event combination.
                        handshake = 0;
                    } else if (event == SocketEvent.STOP || event == SocketEvent.DISCONNECT ||
                            event == SocketEvent.ERROR) {
                        // Unable to complete the TLS handshake. Treat it as
                        // if the handshake failed.
                        handshake = -1;
                    } else {
                        handshake = socket.handshake(key.isReadable(), key.isWritable());
                        // The handshake process reads/writes from/to the
                        // socket. status may therefore be OPEN_WRITE once
                        // the handshake completes. However, the handshake
                        // happens when the socket is opened so the status
                        // must always be OPEN_READ after it completes. It
                        // is OK to always set this as it is only used if
                        // the handshake completes.
                        event = SocketEvent.OPEN_READ;
                    }
                }
            } catch (IOException x) {
                handshake = -1;
                if (log.isDebugEnabled()) log.debug("Error during SSL handshake",x);
            } catch (CancelledKeyException ckx) {
                handshake = -1;
            }
            if (handshake == 0) {
                SocketState state = SocketState.OPEN;
                // Process the request from this socket
                // 将处理逻辑交给`Handler`处理,当event为null时,则表明是一个`OPEN_READ`事件
                if (event == null) {
                    state = getHandler().process(socketWrapper, SocketEvent.OPEN_READ);
                } else {
                    state = getHandler().process(socketWrapper, event);
                }
                if (state == SocketState.CLOSED) {
                    close(socket, key);
                }
            } else if (handshake == -1 ) {
                close(socket, key);
            } else if (handshake == SelectionKey.OP_READ){
                socketWrapper.registerReadInterest();
            } else if (handshake == SelectionKey.OP_WRITE){
                socketWrapper.registerWriteInterest();
            }
        } catch (CancelledKeyException cx) {
            socket.getPoller().cancelledKey(key);
        } catch (VirtualMachineError vme) {
            ExceptionUtils.handleThrowable(vme);
        } catch (Throwable t) {
            log.error("", t);
            socket.getPoller().cancelledKey(key);
        } finally {
            socketWrapper = null;
            event = null;
            //return to cache
            if (running && !paused) {
                processorCache.push(this);
            }
        }
    }
}
Handler的关键方法是process(),虽然这个方法有很多条件分支,但是逻辑却非常清楚,主要是调用Processor.process()方法。
@Override
public SocketState process(SocketWrapperBase<S> wrapper, SocketEvent status) {
    try {

        if (processor == null) {
            processor = getProtocol().createProcessor();
            register(processor);
        }

        processor.setSslSupport(
                wrapper.getSslSupport(getProtocol().getClientCertProvider()));

        // Associate the processor with the connection
        connections.put(socket, processor);

        SocketState state = SocketState.CLOSED;
        do {
            // 关键的代码,终于找到你了
            state = processor.process(wrapper, status);

        } while ( state == SocketState.UPGRADING);
        return state;
    }
    catch (Throwable e) {
        ExceptionUtils.handleThrowable(e);
        // any other exception or error is odd. Here we log it
        // with "ERROR" level, so it will show up even on
        // less-than-verbose logs.
        getLog().error(sm.getString("abstractConnectionHandler.error"), e);
    } finally {
        ContainerThreadMarker.clear();
    }

    // Make sure socket/processor is removed from the list of current
    // connections
    connections.remove(socket);
    release(processor);
    return SocketState.CLOSED;
}
Processor
createProcessor
protected Http11Processor createProcessor() {
    // 构建 Http11Processor
    Http11Processor processor = new Http11Processor(
            proto.getMaxHttpHeaderSize(), (JIoEndpoint)proto.endpoint, // 1. http header 的最大尺寸
            proto.getMaxTrailerSize(),proto.getMaxExtensionSize());
    processor.setAdapter(proto.getAdapter());
    // 2. 默认的 KeepAlive 情况下, 每个 Socket 处理的最多的 请求次数
    processor.setMaxKeepAliveRequests(proto.getMaxKeepAliveRequests());
    // 3. 开启 KeepAlive 的 Timeout
    processor.setKeepAliveTimeout(proto.getKeepAliveTimeout());
    // 4. http 当遇到文件上传时的 默认超时时间 (300 * 1000)
    processor.setConnectionUploadTimeout(
            proto.getConnectionUploadTimeout());
    processor.setDisableUploadTimeout(proto.getDisableUploadTimeout());
    // 5. 当 http 请求的 body size超过这个值时, 通过 gzip 进行压缩
    processor.setCompressionMinSize(proto.getCompressionMinSize());
    // 6. http 请求是否开启 compression 处理
    processor.setCompression(proto.getCompression());
    processor.setNoCompressionUserAgents(proto.getNoCompressionUserAgents());
    // 7. http body里面的内容是 "text/html,text/xml,text/plain" 才会进行 压缩处理
    processor.setCompressableMimeTypes(proto.getCompressableMimeTypes());
    processor.setRestrictedUserAgents(proto.getRestrictedUserAgents());
    // 8. socket 的 buffer, 默认 9000
    processor.setSocketBuffer(proto.getSocketBuffer());
    // 9. 最大的 Post 处理尺寸的大小 4 * 1000
    processor.setMaxSavePostSize(proto.getMaxSavePostSize());
    processor.setServer(proto.getServer());
    processor.setDisableKeepAlivePercentage(
            proto.getDisableKeepAlivePercentage());
    register(processor);
    return processor;
}
这儿我们主要关注的是Processor对于读的操作,也只有一行代码。调用service()方法。
public abstract class AbstractProcessorLight implements Processor {

    @Override
    public SocketState process(SocketWrapperBase<?> socketWrapper, SocketEvent status)
            throws IOException {

        SocketState state = SocketState.CLOSED;
        Iterator<DispatchType> dispatches = null;
        do {
            if (dispatches != null) {
                DispatchType nextDispatch = dispatches.next();
                state = dispatch(nextDispatch.getSocketStatus());
            } else if (status == SocketEvent.DISCONNECT) {
                // Do nothing here, just wait for it to get recycled
            } else if (isAsync() || isUpgrade() || state == SocketState.ASYNC_END) {
                state = dispatch(status);
                if (state == SocketState.OPEN) {
                    // There may be pipe-lined data to read. If the data isn't
                    // processed now, execution will exit this loop and call
                    // release() which will recycle the processor (and input
                    // buffer) deleting any pipe-lined data. To avoid this,
                    // process it now.
                    state = service(socketWrapper);
                }
            } else if (status == SocketEvent.OPEN_WRITE) {
                // Extra write event likely after async, ignore
                state = SocketState.LONG;
            } else if (status == SocketEvent.OPEN_READ){
                // 调用`service()`方法
                state = service(socketWrapper);
            } else {
                // Default to closing the socket if the SocketEvent passed in
                // is not consistent with the current state of the Processor
                state = SocketState.CLOSED;
            }

            if (getLog().isDebugEnabled()) {
                getLog().debug("Socket: [" + socketWrapper +
                        "], Status in: [" + status +
                        "], State out: [" + state + "]");
            }

            if (state != SocketState.CLOSED && isAsync()) {
                state = asyncPostProcess();
                if (getLog().isDebugEnabled()) {
                    getLog().debug("Socket: [" + socketWrapper +
                            "], State after async post processing: [" + state + "]");
                }
            }

            if (dispatches == null || !dispatches.hasNext()) {
                // Only returns non-null iterator if there are
                // dispatches to process.
                dispatches = getIteratorAndClearDispatches();
            }
        } while (state == SocketState.ASYNC_END ||
                dispatches != null && state != SocketState.CLOSED);

        return state;
    }
}
Processor.service()方法比较重要的地方就两点。该方法非常得长,也超过了200行,在此我们不再拷贝此方法的代码。
- 生成Request和Response对象
- 调用
Adapter.service()方法,将生成的Request和Response对象传进去
Adapter
Adapter用于连接Connector和Container,起到承上启下的作用。Processor会调用Adapter.service()方法。我们来分析一下,主要做了下面几件事情:
- 根据coyote框架的request和response对象,生成connector的request和response对象(是HttpServletRequest和HttpServletResponse的封装)
- 补充header
- 解析请求,该方法会出现代理服务器、设置必要的header等操作
- 真正进入容器的地方,调用Engine容器下pipeline的阀门
- 通过request.finishRequest 与 response.finishResponse(刷OutputBuffer中的数据到浏览器) 来完成整个请求
@Override
public void service(org.apache.coyote.Request req, org.apache.coyote.Response res)
        throws Exception {

    // 1. 根据coyote框架的request和response对象,生成connector的request和response对象(是HttpServletRequest和HttpServletResponse的封装)
    Request request = (Request) req.getNote(ADAPTER_NOTES);
    Response response = (Response) res.getNote(ADAPTER_NOTES);

    if (request == null) {
        // Create objects
        request = connector.createRequest();
        request.setCoyoteRequest(req);
        response = connector.createResponse();
        response.setCoyoteResponse(res);

        // Link objects
        request.setResponse(response);
        response.setRequest(request);

        // Set as notes
        req.setNote(ADAPTER_NOTES, request);
        res.setNote(ADAPTER_NOTES, response);

        // Set query string encoding
        req.getParameters().setQueryStringCharset(connector.getURICharset());
    }

    // 2. 补充header
    if (connector.getXpoweredBy()) {
        response.addHeader("X-Powered-By", POWERED_BY);
    }

    boolean async = false;
    boolean postParseSuccess = false;

    req.getRequestProcessor().setWorkerThreadName(THREAD_NAME.get());

    try {
        // Parse and set Catalina and configuration specific
        // request parameters
        // 3. 解析请求,该方法会出现代理服务器、设置必要的header等操作
        // 用来处理请求映射 (获取 host, context, wrapper, URI 后面的参数的解析, sessionId )
        postParseSuccess = postParseRequest(req, request, res, response);
        if (postParseSuccess) {
            //check valves if we support async
            request.setAsyncSupported(
                    connector.getService().getContainer().getPipeline().isAsyncSupported());
            // Calling the container
            // 4. 真正进入容器的地方,调用Engine容器下pipeline的阀门
            connector.getService().getContainer().getPipeline().getFirst().invoke(
                    request, response);
        }
        if (request.isAsync()) {
            async = true;
            ReadListener readListener = req.getReadListener();
            if (readListener != null && request.isFinished()) {
                // Possible the all data may have been read during service()
                // method so this needs to be checked here
                ClassLoader oldCL = null;
                try {
                    oldCL = request.getContext().bind(false, null);
                    if (req.sendAllDataReadEvent()) {
                        req.getReadListener().onAllDataRead();
                    }
                } finally {
                    request.getContext().unbind(false, oldCL);
                }
            }

            Throwable throwable =
                    (Throwable) request.getAttribute(RequestDispatcher.ERROR_EXCEPTION);

            // If an async request was started, is not going to end once
            // this container thread finishes and an error occurred, trigger
            // the async error process
            if (!request.isAsyncCompleting() && throwable != null) {
                request.getAsyncContextInternal().setErrorState(throwable, true);
            }
        } else {
            //5. 通过request.finishRequest 与 response.finishResponse(刷OutputBuffer中的数据到浏览器) 来完成整个请求
            request.finishRequest();
            //将 org.apache.catalina.connector.Response对应的 OutputBuffer 中的数据 刷到 org.apache.coyote.Response 对应的 InternalOutputBuffer 中, 并且最终调用 socket对应的 outputStream 将数据刷出去( 这里会组装 Http Response 中的 header 与 body 里面的数据, 并且刷到远端 )
            response.finishResponse();
        }

    } catch (IOException e) {
        // Ignore
    } finally {
        AtomicBoolean error = new AtomicBoolean(false);
        res.action(ActionCode.IS_ERROR, error);

        if (request.isAsyncCompleting() && error.get()) {
            // Connection will be forcibly closed which will prevent
            // completion happening at the usual point. Need to trigger
            // call to onComplete() here.
            res.action(ActionCode.ASYNC_POST_PROCESS,  null);
            async = false;
        }

        // Access log
        if (!async && postParseSuccess) {
            // Log only if processing was invoked.
            // If postParseRequest() failed, it has already logged it.
            Context context = request.getContext();
            // If the context is null, it is likely that the endpoint was
            // shutdown, this connection closed and the request recycled in
            // a different thread. That thread will have updated the access
            // log so it is OK not to update the access log here in that
            // case.
            if (context != null) {
                context.logAccess(request, response,
                        System.currentTimeMillis() - req.getStartTime(), false);
            }
        }

        req.getRequestProcessor().setWorkerThreadName(null);

        // Recycle the wrapper request and response
        if (!async) {
            request.recycle();
            response.recycle();
        }
    }
}
请求预处理
postParseRequest方法对请求做预处理,如对路径去除分号表示的路径参数、进行URI解码、规格化(点号和两点号)
protected boolean postParseRequest(org.apache.coyote.Request req, Request request,
        org.apache.coyote.Response res, Response response) throws IOException, ServletException {
    // 省略部分代码
    MessageBytes decodedURI = req.decodedURI();

    if (undecodedURI.getType() == MessageBytes.T_BYTES) {
        // Copy the raw URI to the decodedURI
        decodedURI.duplicate(undecodedURI);

        // Parse the path parameters. This will:
        //   - strip out the path parameters
        //   - convert the decodedURI to bytes
        parsePathParameters(req, request);

        // URI decoding
        // %xx decoding of the URL
        try {
            req.getURLDecoder().convert(decodedURI, false);
        } catch (IOException ioe) {
            res.setStatus(400);
            res.setMessage("Invalid URI: " + ioe.getMessage());
            connector.getService().getContainer().logAccess(
                    request, response, 0, true);
            return false;
        }
        // Normalization
        if (!normalize(req.decodedURI())) {
            res.setStatus(400);
            res.setMessage("Invalid URI");
            connector.getService().getContainer().logAccess(
                    request, response, 0, true);
            return false;
        }
        // Character decoding
        convertURI(decodedURI, request);
        // Check that the URI is still normalized
        if (!checkNormalize(req.decodedURI())) {
            res.setStatus(400);
            res.setMessage("Invalid URI character encoding");
            connector.getService().getContainer().logAccess(
                    request, response, 0, true);
            return false;
        }
    } else {
        /* The URI is chars or String, and has been sent using an in-memory
            * protocol handler. The following assumptions are made:
            * - req.requestURI() has been set to the 'original' non-decoded,
            *   non-normalized URI
            * - req.decodedURI() has been set to the decoded, normalized form
            *   of req.requestURI()
            */
        decodedURI.toChars();
        // Remove all path parameters; any needed path parameter should be set
        // using the request object rather than passing it in the URL
        CharChunk uriCC = decodedURI.getCharChunk();
        int semicolon = uriCC.indexOf(';');
        if (semicolon > 0) {
            decodedURI.setChars
                (uriCC.getBuffer(), uriCC.getStart(), semicolon);
        }
    }

    // Request mapping.
    MessageBytes serverName;
    if (connector.getUseIPVHosts()) {
        serverName = req.localName();
        if (serverName.isNull()) {
            // well, they did ask for it
            res.action(ActionCode.REQ_LOCAL_NAME_ATTRIBUTE, null);
        }
    } else {
        serverName = req.serverName();
    }

    // Version for the second mapping loop and
    // Context that we expect to get for that version
    String version = null;
    Context versionContext = null;
    boolean mapRequired = true;

    while (mapRequired) {
        // This will map the the latest version by default
        connector.getService().getMapper().map(serverName, decodedURI,
                version, request.getMappingData());
        // 省略部分代码
    }
    // 省略部分代码
}
以MessageBytes的类型是T_BYTES为例:
- parsePathParameters方法去除URI中分号表示的路径参数;
- req.getURLDecoder()得到一个UDecoder实例,它的convert方法对URI解码,这里的解码只是移除百分号,计算百分号后两位的十六进制数字值以替代原来的三位百分号编码;
- normalize方法规格化URI,解释路径中的“.”和“..”;
- convertURI方法利用Connector的uriEncoding属性将URI的字节转换为字符表示;
- 注意connector.getService().getMapper().map(serverName, decodedURI, version, request.getMappingData()) 这行,之前Service启动时MapperListener注册了该Service内的各Host和Context。根据URI选择Context时,Mapper的map方法采用的是convertURI方法解码后的URI与每个Context的路径去比较
容器处理
如果请求可以被传给容器的Pipeline即当postParseRequest方法返回true时,则由容器继续处理,在service方法中有connector.getService().getContainer().getPipeline().getFirst().invoke(request, response)这一行:
- Connector调用getService返回StandardService;
- StandardService调用getContainer返回StandardEngine;
- StandardEngine调用getPipeline返回与其关联的StandardPipeline;
后续处理流程请看下一篇文章