==========================Bean懒加载@Lazy介绍==================================
一、问题介绍
Spring在启动时,默认会立即将单实例bean进行实例化,并加载到Spring容器中。也就是说,单实例bean默认在Spring容器启动的时候创建对象,并将对象加载到Spring容器中。如果我们需要对某个bean进行延迟加载(延迟到在第一次调用的时候实例化),我们该如何处理呢?此时,就需要使用到@Lazy注解了。
二、如何配置懒加载
1、在xml配置中
<beans ... default-lazy-init="true"> //全局配置
<bean ...  lazy-init="true" /> //指定bean配置
2、在JavaConfig配置中
//全局配置
@Configuration
@Lazy
public class AppConfig {}

//指定bean配置
@Configuration
public class AppConfig{
    @Bean
    @Lazy
    public LazyBean lazyBean(){
        return new LazyBean();
    }
}
3、SpringBoot中指定bean的懒加载,可以在对应的类上直接使用@Lazy
//指定bean配置
@Component
@Lazy
public class LazyBean {
    public LazyBean() {
        System.out.println("LazyBean should be lazzzzyyyyyy!!!");
    }
    public void doSomething() {}
}
那么SpringBoot中如何全局配置懒加载呢?
通过在stackoverflow上查找, 发现的答案是, 在启动类SpringbootApplication上加上@Lazy注解即可. 原来注解@SpringBootApplication是@Configuration, @EnableAutoConfiguration和@ComponentScan注解的合体.
而这个SpringbootApplication本身就是个配置类, 所以在上面加@Lazy注解理论上是可以的.果然是直观的东西不方便, 方便的东西不直观.
(1) 错误方式一:
//spring boot中声明bean
@Component
public class LazyBean {
    public LazyBean() {
        System.out.println("LazyBean should be lazzzzyyyyyy!!!");
    }
    public void doSomething() {}
}


//配置类上加注解
@SpringBootApplication
@Lazy
public class SpringbootApplication {
    public static void main(String[] args) {
        ApplicationContext ctx = SpringApplication.run(SpringbootApplication.class, args);
    }

}
启动应用, 发现输出了
LazyBean should be lazzzzyyyyyy!!!
也就是说配置并没有生效. 但是so上的回答一般不会是错的. 那会是哪里出了问题呢?
(2)方式一修正
不使用@Component, 而是在配置文件中声明bean:
//@Component
public class LazyBean {
    public LazyBean() {
        System.out.println("LazyBean should be lazzzzyyyyyy!!!");
    }
    public void doSomething() {}
}

//配置类
@SpringBootApplication
@Lazy
public class SpringbootApplication {

   //在配置类中声明bean
    @Bean
    public LazyBean lazyBean() {
        return new LazyBean();
    }
    public static void main(String[] args) {
        ApplicationContext ctx = SpringApplication.run(SpringbootApplication.class, args);
    }

}
这种方式实现了懒加载,但是这跟2(在JavaConfig配置中)中的方式是一样的.
(3)方式二
spring2.2中引入了一个application.properties中的新属性.
spring.main.lazy-initialization=true //指定整个应用的懒加载.
这种方式不论是@Component声明的bean,还是@Bean声明的bean, 都可以实现懒加载.
三、@Lazy的属性
@Lazy只有一个属性value,value取值有 true 和 false 两个,默认值是true
true 表示使用 延迟加载, false 表示不使用,false 纯属多余,如果不使用,不标注该注解就可以了。
通过以下示例看看使用注解和不使用注解的区别
Person 类
public class Person {
    private String name;
    private Integer age;

    public Person() {
    }

    public Person(String name, Integer age) {
        System.out.println(" 对象被创建了.............");
        this.name = name;
        this.age = age;
    }

  // 省略 getter setter 和 toString 方法
}
1、配置类不标注@Lazy注解(不使用延迟加载)
public class LazyConfig {
    @Bean
    public Person person() {
        return new Person("李四", 55);
    }
}
测试:
    @Test
    public void test5() {
        ApplicationContext ctx = new AnnotationConfigApplicationContext(LazyConfig.class);
    }
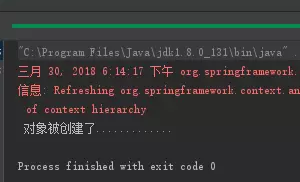
结果:

结论:我们发现,没有获取bean,但是打印了语句,说明对象调用了构造器,那么方法也就被创建了
2、在配置类打上 @Lazy 注解
public class LazyConfig {
    @Lazy
    @Bean
    public Person person() {
        return new Person("李四", 55);
    }
}
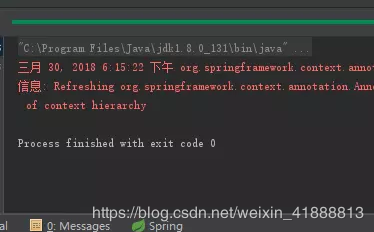
结果:

结论:我们发现,没有获取bean,没有打印了语句,说明对象没有调用构造器,那么方法就没有被创建了
注意:
1、@Lazy(value = false) 或者 @Lazy(false) 那么对象会在初始化的时候被创建,相当于没有使用@Lazy注解,@Lazy注解默认值为true
2、@Lazy注解的作用主要是减少springIOC容器启动的加载时间
3、当出现循环依赖的时候,也可以添加@Lazy
4、虽然 懒加载可以提升应用的启动速度, 但是不利于尽早的发现错误, 对于HTTP请求, 首次访问的响应时间也会增长.
===========================Spring中循环的循环依赖============================
一、什么是循环依赖?
一般场景是一个Bean A依赖Bean B,而Bean B也依赖Bean A.
Bean A → Bean B → Bean A
当然我们也可以添加更多的依赖层次,比如:
Bean A → Bean B → Bean C → Bean D → Bean E → Bean A
二、Spring中的循环依赖
当Spring上下文在加载所有的bean时,他会尝试按照他们他们关联关系的顺序进行创建。比如,如果不存在循环依赖时,例如:
Bean A → Bean B → Bean C
Spring会先创建Bean C,再创建Bean B(并将Bean C注入到Bean B中),最后再创建Bean A(并将Bean B注入到Bean A中)。
但是,如果我们存在循环依赖,Spring上下文不知道应该先创建哪个Bean,因为它们依赖于彼此。在这种情况下,Spring会在加载上下文时,抛出一个BeanCurrentlyInCreationException。
当我们使用构造方法进行注入时,也会遇到这种情况,因为JVM虚拟机在对类进行实例化的时候,需先实例化构造器的参数,而由于循环引用这个参数无法提前实例化,故只能抛出错误。如果您使用其它类型的注入,你应该不会遇到这个问题。因为它是在需要时才会被注入,而不是上下文加载被要求注入。
三、示例
我们定义两个Bean并且互相依赖(通过构造函数注入)。
@Component
public class CircularDependencyA {

    private CircularDependencyB circB;

    @Autowired
    public CircularDependencyA(CircularDependencyB circB) {
        this.circB = circB;
    }
}
@Component
public class CircularDependencyB {

    private CircularDependencyA circA;

    @Autowired
    public CircularDependencyB(CircularDependencyA circA) {
        this.circA = circA;
    }
}
现在,我们写一个测试配置类,姑且称之为TestConfig,指定基本包扫描。假设我们的Bean在包“com.baeldung.circulardependency”中定义:
@Configuration
@ComponentScan(basePackages = { "com.baeldung.circulardependency" })
public class TestConfig {
}
最后,我们可以写一个JUnit测试,以检查循环依赖。该测试方法体可以是空的,因为循环依赖将上下文加载期间被检测到。
@RunWith(SpringJUnit4ClassRunner.class)
@ContextConfiguration(classes = { TestConfig.class })
public class CircularDependencyTest {

    @Test
    public void givenCircularDependency_whenConstructorInjection_thenItFails() {
        // Empty test; we just want the context to load
    }
}
如果您运行这个测试,你会得到以下异常:
BeanCurrentlyInCreationException: Error creating bean with name 'circularDependencyA':
Requested bean is currently in creation: Is there an unresolvable circular reference?
四、解决办法
我们将使用一些最流行的方式来处理这个问题。
1、重新设计
当你有一个循环依赖,很可能你有一个设计问题并且各责任没有得到很好的分离。你应该尽量正确地重新设计组件,以便它们的层次是精心设计的,也没有必要循环依赖。
如果不能重新设计组件(可能有很多的原因:遗留代码,已经被测试并不能修改代码,没有足够的时间或资源来完全重新设计......),但有一些变通方法来解决这个问题。
2、使用@Lazy
解决Spring 循环依赖的一个简单方法就是对一个Bean使用延时加载。也就是说:这个Bean并没有完全的初始化完,实际上他注入的是一个代理,只有当他首次被使用的时候才会被完全的初始化。
我们对CircularDependencyA 进行修改,结果如下:
@Component
public class CircularDependencyA {

    private CircularDependencyB circB;

    @Autowired
    public CircularDependencyA(@Lazy CircularDependencyB circB) {
        this.circB = circB;
    }
}
如果你现在运行测试,你会发现之前的错误不存在了。
3、使用Setter/Field注入
其中最流行的解决方法,就是Spring文档中建议,使用setter注入。
简单地说,你对你须要注入的bean是使用setter注入(或字段注入),而不是构造函数注入。通过这种方式创建Bean,实际上它此时的依赖并没有被注入,只有在你须要的时候他才会被注入进来。
让我们开始动手干吧。我们将在CircularDependencyB 中添加另一个属性,并将我们两个Class Bean从构造方法注入改为setter方法注入:
@Component
public class CircularDependencyA {

    private CircularDependencyB circB;

    @Autowired
    public void setCircB(CircularDependencyB circB) {
        this.circB = circB;
    }

    public CircularDependencyB getCircB() {
        return circB;
    }
}
@Component
public class CircularDependencyB {

    private CircularDependencyA circA;

    private String message = "Hi!";

    @Autowired
    public void setCircA(CircularDependencyA circA) {
        this.circA = circA;
    }

    public String getMessage() {
        return message;
    }
}
现在,我们对修改后的代码进单元测试:
@RunWith(SpringJUnit4ClassRunner.class)
@ContextConfiguration(classes = { TestConfig.class })
public class CircularDependencyTest {

    @Autowired
    ApplicationContext context;

    @Bean
    public CircularDependencyA getCircularDependencyA() {
        return new CircularDependencyA();
    }

    @Bean
    public CircularDependencyB getCircularDependencyB() {
        return new CircularDependencyB();
    }

    @Test
    public void givenCircularDependency_whenSetterInjection_thenItWorks() {
        CircularDependencyA circA = context.getBean(CircularDependencyA.class);

        Assert.assertEquals("Hi!", circA.getCircB().getMessage());
    }
}
@Bean:在Spring框架中,标志着他被创建一个Bean并交给Spring管理
@Test:测试将得到从Spring上下文中获取CircularDependencyA bean并断言CircularDependencyB已被正确注入,并检查该属性的值。
4、使用@PostConstruct
打破循环的另一种方式是,在要注入的属性(该属性是一个bean)上使用 @Autowired ,并使用@PostConstruct 标注在另一个方法,且该方法里设置对其他的依赖。
我们的Bean将修改成下面的代码:
@Component
public class CircularDependencyA {

    @Autowired
    private CircularDependencyB circB;

    @PostConstruct
    public void init() {
        circB.setCircA(this);
    }

    public CircularDependencyB getCircB() {
        return circB;
    }
}
@Component
public class CircularDependencyB {

    private CircularDependencyA circA;

    private String message = "Hi!";

    public void setCircA(CircularDependencyA circA) {
        this.circA = circA;
    }

    public String getMessage() {
        return message;
    }
}
现在我们运行我们修改后的代码,发现并没有抛出异常,并且依赖正确注入进来。
5、实现ApplicationContextAware and InitializingBean接口
如果一个Bean实现了ApplicationContextAware,该Bean可以访问Spring上下文,并可以从那里获取到其他的bean。实现InitializingBean接口,表明这个bean在所有的属性设置完后做一些后置处理操作(调用的顺序为init-method后调用);在这种情况下,我们需要手动设置依赖。
@Component
public class CircularDependencyA implements ApplicationContextAware, InitializingBean {

    private CircularDependencyB circB;

    private ApplicationContext context;

    public CircularDependencyB getCircB() {
        return circB;
    }

    @Override
    public void afterPropertiesSet() throws Exception {
        circB = context.getBean(CircularDependencyB.class);
    }

    @Override
    public void setApplicationContext(final ApplicationContext ctx) throws BeansException {
        context = ctx;
    }
}
public class CircularDependencyB {

    private CircularDependencyA circA;

    private String message = "Hi!";

    @Autowired
    public void setCircA(CircularDependencyA circA) {
        this.circA = circA;
    }

    public String getMessage() {
        return message;
    }
}
同样,我们可以运行之前的测试,看看有没有异常抛出,程序结果是否是我们所期望的那样。
五、总结
有很多种方法来应对Spring的循环依赖。但考虑的第一件事就是重新设计你的bean,所以没有必要循环依赖:他们通常是可以提高设计的一种症状。 但是,如果你在你的项目中确实是需要有循环依赖,那么你可以遵循一些这里提出的解决方法。