在上一章中我们认识了netty,他有三大优点:并发高,传输快,封装好。在这一章我们来用Netty搭建一个HttpServer,从实际开发中了解netty框架的一些特性和概念。

netty.png
认识Http请求
在动手写Netty框架之前,我们先要了解http请求的组成,如下图:

HTTP request component parts
HTTP Request 第一部分是包含的头信息
HttpContent 里面包含的是数据,可以后续有多个 HttpContent 部分
LastHttpContent 标记是 HTTP request 的结束,同时可能包含头的尾部信息
完整的 HTTP request,由1,2,3组成
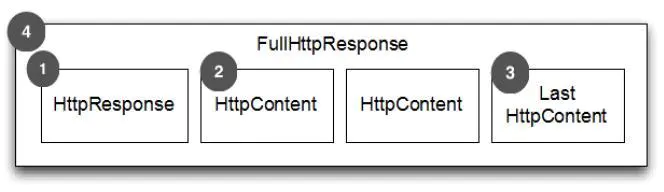
HTTP response component parts
HTTP response 第一部分是包含的头信息
HttpContent 里面包含的是数据,可以后续有多个 HttpContent 部分
LastHttpContent 标记是 HTTP response 的结束,同时可能包含头的尾部信息
完整的 HTTP response,由1,2,3组成
从request的介绍我们可以看出来,一次http请求并不是通过一次对话完成的,他中间可能有很次的连接。通过上一章我们队netty的了解,每一次对话都会建立一个channel,并且一个ChannelInboundHandler一般是不会同时去处理多个Channel的。
如何在一个Channel里面处理一次完整的Http请求?这就要用到我们上图提到的FullHttpRequest,我们只需要在使用netty处理channel的时候,只处理消息是FullHttpRequest的Channel,这样我们就能在一个ChannelHandler中处理一个完整的Http请求了。
开始动手
搭建一个Netty服务器,我们只需要两个类——一个是启动类,负责启动(BootStrap)和main方法,一个是ChannelHandler,负责具体的业务逻辑,我们先从启动类说起。
package com.dz.netty.http;
import io.netty.bootstrap.ServerBootstrap;
import io.netty.channel.ChannelInitializer;
import io.netty.channel.ChannelOption;
import io.netty.channel.nio.NioEventLoopGroup;
import io.netty.channel.socket.SocketChannel;
import io.netty.channel.socket.nio.NioServerSocketChannel;
import io.netty.handler.codec.http.HttpObjectAggregator;
import io.netty.handler.codec.http.HttpRequestDecoder;
import io.netty.handler.codec.http.HttpResponseEncoder;
/**
-
Created by RoyDeng on 17/7/20.
*/
public class HttpServer {private final int port;
public HttpServer(int port) {
this.port = port;
}public static void main(String[] args) throws Exception {
if (args.length != 1) {
System.err.println(
"Usage: " + HttpServer.class.getSimpleName() +
"");
return;
}
int port = Integer.parseInt(args[0]);
new HttpServer(port).start();
}public void start() throws Exception {
ServerBootstrap b = new ServerBootstrap();
NioEventLoopGroup group = new NioEventLoopGroup();
b.group(group)
.channel(NioServerSocketChannel.class)
.childHandler(new ChannelInitializer() {
@Override
public void initChannel(SocketChannel ch)
throws Exception {
System.out.println("initChannel ch:" + ch);
ch.pipeline()
.addLast("decoder", new HttpRequestDecoder()) // 1
.addLast("encoder", new HttpResponseEncoder()) // 2
.addLast("aggregator", new HttpObjectAggregator(512 * 1024)) // 3
.addLast("handler", new HttpHandler()); // 4
}
})
.option(ChannelOption.SO_BACKLOG, 128) // determining the number of connections queued
.childOption(ChannelOption.SO_KEEPALIVE, Boolean.TRUE);b.bind(port).sync();}
}
这个类同上一章中出现的Netty简易封装服务器代码类似,不一样的是这里使用了多个ChannelHandler,在这里一一介绍:
HttpRequestDecoder,用于解码request
HttpResponseEncoder,用于编码response
aggregator,消息聚合器(重要)。为什么能有FullHttpRequest这个东西,就是因为有他,HttpObjectAggregator,如果没有他,就不会有那个消息是FullHttpRequest的那段Channel,同样也不会有FullHttpResponse。
如果我们将z'h
HttpObjectAggregator(512 * 1024)的参数含义是消息合并的数据大小,如此代表聚合的消息内容长度不超过512kb。
添加我们自己的处理接口
完成启动类之后,接下来就是我们的业务处理类HttpHandler了,先上代码:
package com.dz.netty.http;
import io.netty.buffer.Unpooled;
import io.netty.channel.ChannelHandlerContext;
import io.netty.channel.SimpleChannelInboundHandler;
import io.netty.handler.codec.http.*;
import io.netty.util.AsciiString;
/**
-
Created by RoyDeng on 17/7/20.
*/
public class HttpHandler extends SimpleChannelInboundHandler{ // 1 private AsciiString contentType = HttpHeaderValues.TEXT_PLAIN;
@Override
protected void channelRead0(ChannelHandlerContext ctx, FullHttpRequest msg) throws Exception {
System.out.println("class:" + msg.getClass().getName());
DefaultFullHttpResponse response = new DefaultFullHttpResponse(HttpVersion.HTTP_1_1,
HttpResponseStatus.OK,
Unpooled.wrappedBuffer("test".getBytes())); // 2HttpHeaders heads = response.headers(); heads.add(HttpHeaderNames.CONTENT_TYPE, contentType + "; charset=UTF-8"); heads.add(HttpHeaderNames.CONTENT_LENGTH, response.content().readableBytes()); // 3 heads.add(HttpHeaderNames.CONNECTION, HttpHeaderValues.KEEP_ALIVE); ctx.write(response);}
@Override
public void channelReadComplete(ChannelHandlerContext ctx) throws Exception {
System.out.println("channelReadComplete");
super.channelReadComplete(ctx);
ctx.flush(); // 4
}@Override
public void exceptionCaught(ChannelHandlerContext ctx, Throwable cause) throws Exception {
System.out.println("exceptionCaught");
if(null != cause) cause.printStackTrace();
if(null != ctx) ctx.close();
}
}
该段代码需要注意的地方如注释所示,有以下四点:
Handler需要声明泛型为
由于泛型的过滤比较简单,我们就不改代码来验证了,但是在这里我们可以利用泛型的特性另外做个小测试,将泛型去掉,并且将HttpServer中.addLast("aggregator", new HttpObjectAggregator(512 * 1024)) // 3这一行代码注释掉,然后观察注释前后的log。
注释前:
initChannel ch:[id: 0xcb9d8e9e, L:/0:0:0:0:0:0:0:1:8888 - R:/0:0:0:0:0:0:0:1:58855]
class:io.netty.handler.codec.http.HttpObjectAggregator$AggregatedFullHttpRequest
channelReadComplete
注释后:
initChannel ch:[id: 0xc5415409, L:/0:0:0:0:0:0:0:1:8888 - R:/0:0:0:0:0:0:0:1:58567]
class:io.netty.handler.codec.http.DefaultHttpRequest
class:io.netty.handler.codec.http.LastHttpContent$1
channelReadComplete
channelReadComplete
从中可以看出,如果没有aggregator,那么一个http请求就会通过多个Channel被处理,这对我们的业务开发是不方便的,而aggregator的作用就在于此。
生成response,这里使用的FullHttpResponse,同FullHttpRequest类似,通过这个我们就不用将response拆分成多个channel返回给请求端了。
添加header描述length。这一步是很重要的一步,如果没有这一步,你会发现用postman发出请求之后就一直在刷新,因为http请求方不知道返回的数据到底有多长。
channel读取完成之后需要输出缓冲流。如果没有这一步,你会发现postman同样会一直在刷新。
构建HTTPS服务
首先,构建HTTPS服务需要证书,那么什么是SSL证书呢?
SSL 证书就是遵守 SSL协议,由受信任的数字证书颁发机构CA,在验证服务器身份后颁发,具有服务器身份验证和数据传输加密功能。
也就是说,HTTPS相比于HTTP服务,能够防止网络劫持,同时具备一定的安全加密作用。
一般来说,证书可以在阿里云、腾讯云这种云服务上申请。申请下来之后,证书只能用于指定的域名和服务器上。
netty有提供SSL加密的工具包,只需要通过添加SslHandler,就能快速搭建。基于上面的代码,我们重新定义一个ChannelInitializer。
public class SSLChannelInitializer extends ChannelInitializer
private final SslContext sslContext;

public SSLChannelInitializer() {
    String keyStoreFilePath = "/root/.ssl/test.pkcs12";
    String keyStorePassword = "Password@123";

    try {
        KeyStore keyStore = KeyStore.getInstance("PKCS12");
        keyStore.load(new FileInputStream(keyStoreFilePath), keyStorePassword.toCharArray());

        KeyManagerFactory keyManagerFactory = KeyManagerFactory.getInstance(KeyManagerFactory.getDefaultAlgorithm());
        keyManagerFactory.init(keyStore, keyStorePassword.toCharArray());

        sslContext = SslContextBuilder.forServer(keyManagerFactory).build();
    } catch (Exception e) {
        throw new RuntimeException(e);
    }
}

@Override
protected void initChannel(SocketChannel ch) {
    ChannelPipeline pipeline = ch.pipeline();
    SSLEngine sslEngine = sslContext.newEngine(ch.alloc());
    pipeline
            .addLast(new SslHandler(sslEngine))
              .addLast("decoder", new HttpRequestDecoder())
              .addLast("encoder", new HttpResponseEncoder())
              .addLast("aggregator", new HttpObjectAggregator(512 * 1024))
              .addLast("handler", new HttpHandler());
    ;
}
}
以上就是我通过netty做http服务器demo的全部代码和剖析,希望这篇文章能帮到你,有问题评论区沟通。
作者:追那个小女孩
链接:https://www.jianshu.com/p/ed0177a9b2e3
来源:简书
著作权归作者所有。商业转载请联系作者获得授权,非商业转载请注明出处。