之所以选择Sqoop1是因为Sqoop2目前问题太多。无法正常使用,综合比较后选择Sqoop1。
Sqoop1安装配置比较简单
一、安装部署
(1)、下载安装包
下载地址:http://archive.cloudera.com/cdh5/cdh/5/sqoop-1.4.6-cdh5.5.2.tar.gz
解压到/home/duanxz/sqoop
tar -zxvf sqoop-1.4.6-cdh5.5.2.tar.gz
(2)、拷贝mysql的jdbc驱动包mysql-connector-java-5.1.31-bin.jar到sqoop/lib目录下。
duanxz@three:~/sqoop/sqoop-1.4.6-cdh5.5.2/lib$ ll mysql-connector-java-5.1.31.jar
-rw------- 1 duanxz duanxz 964879 Jun 19 08:22 mysql-connector-java-5.1.31.jar
duanxz@three:~/sqoop/sqoop-1.4.6-cdh5.5.2/lib$
(3)、配置环境变量
#sqoop
export SQOOP_HOME=/home/duanxz/sqoop/sqoop-1.4.6-cdh5.5.2
export PATH="$PATH:$JAVA_HOME/bin:$HIVE_HOME/bin:$HIVE_HOME/conf:$SQOOP_HOME/bin"
(4)、复制sqoop/conf/sqoop-env-template.sh为sqoop-env.sh
添加相关的配置

#Set path to where bin/hadoop is available
export HADOOP_COMMON_HOME=/usr/local/hadoop-2.7.6

#Set path to where hadoop-*-core.jar is available
export HADOOP_MAPRED_HOME=/usr/local/hadoop-2.7.6

#set the path to where bin/hbase is available
#export HBASE_HOME=

#Set the path to where bin/hive is available
export HIVE_HOME=/home/duanxz/hive/apache-hive-2.1.1-bin

#Set the path for where zookeper config dir is
#export ZOOCFGDIR=
(5)、测试Sqoop
sqoop help
结果:
duanxz@ubuntu:~/sqoop/sqoop-1.4.6-cdh5.5.2/bin$ sqoop help
Warning: /home/duanxz/sqoop/sqoop-1.4.6-cdh5.5.2/../hbase does not exist! HBase imports will fail.
Please set $HBASE_HOME to the root of your HBase installation.
Warning: /home/duanxz/sqoop/sqoop-1.4.6-cdh5.5.2/../hcatalog does not exist! HCatalog jobs will fail.
Please set $HCAT_HOME to the root of your HCatalog installation.
Warning: /home/duanxz/sqoop/sqoop-1.4.6-cdh5.5.2/../accumulo does not exist! Accumulo imports will fail.
Please set $ACCUMULO_HOME to the root of your Accumulo installation.
Warning: /home/duanxz/sqoop/sqoop-1.4.6-cdh5.5.2/../zookeeper does not exist! Accumulo imports will fail.
Please set $ZOOKEEPER_HOME to the root of your Zookeeper installation.
18/06/19 18:20:23 INFO sqoop.Sqoop: Running Sqoop version: 1.4.6-cdh5.5.2
usage: sqoop COMMAND [ARGS]

Available commands:
  codegen            Generate code to interact with database records
  create-hive-table  Import a table definition into Hive
  eval               Evaluate a SQL statement and display the results
  export             Export an HDFS directory to a database table
  help               List available commands
  import             Import a table from a database to HDFS
  import-all-tables  Import tables from a database to HDFS
  import-mainframe   Import datasets from a mainframe server to HDFS
  job                Work with saved jobs
  list-databases     List available databases on a server
  list-tables        List available tables in a database
  merge              Merge results of incremental imports
  metastore          Run a standalone Sqoop metastore
  version            Display version information

See 'sqoop help COMMAND' for information on a specific command.
duanxz@ubuntu:~/sqoop/sqoop-1.4.6-cdh5.5.2/bin$
说明:因为我们没有基于hadoop安装HBase,所以HBase相关的命令不能用,但是操作hadoop分布式文件系统的命令是可以用的。
再次执行sqoop version
duanxz@ubuntu:~/sqoop/sqoop-1.4.6-cdh5.5.2/bin$ sqoop version
Warning: /home/duanxz/sqoop/sqoop-1.4.6-cdh5.5.2/../hbase does not exist! HBase imports will fail.
Please set $HBASE_HOME to the root of your HBase installation.
Warning: /home/duanxz/sqoop/sqoop-1.4.6-cdh5.5.2/../hcatalog does not exist! HCatalog jobs will fail.
Please set $HCAT_HOME to the root of your HCatalog installation.
Warning: /home/duanxz/sqoop/sqoop-1.4.6-cdh5.5.2/../accumulo does not exist! Accumulo imports will fail.
Please set $ACCUMULO_HOME to the root of your Accumulo installation.
Warning: /home/duanxz/sqoop/sqoop-1.4.6-cdh5.5.2/../zookeeper does not exist! Accumulo imports will fail.
Please set $ZOOKEEPER_HOME to the root of your Zookeeper installation.
18/06/19 18:55:22 INFO sqoop.Sqoop: Running Sqoop version: 1.4.6-cdh5.5.2
Sqoop 1.4.6-cdh5.5.2
git commit id 8e266e052e423af592871e2dfe09d54c03f6a0e8
Compiled by jenkins on Mon Jan 25 16:10:15 PST 2016
duanxz@ubuntu:~/sqoop/sqoop-1.4.6-cdh5.5.2/bin$
二、使用Sqoop测试
2.1、测试连接:
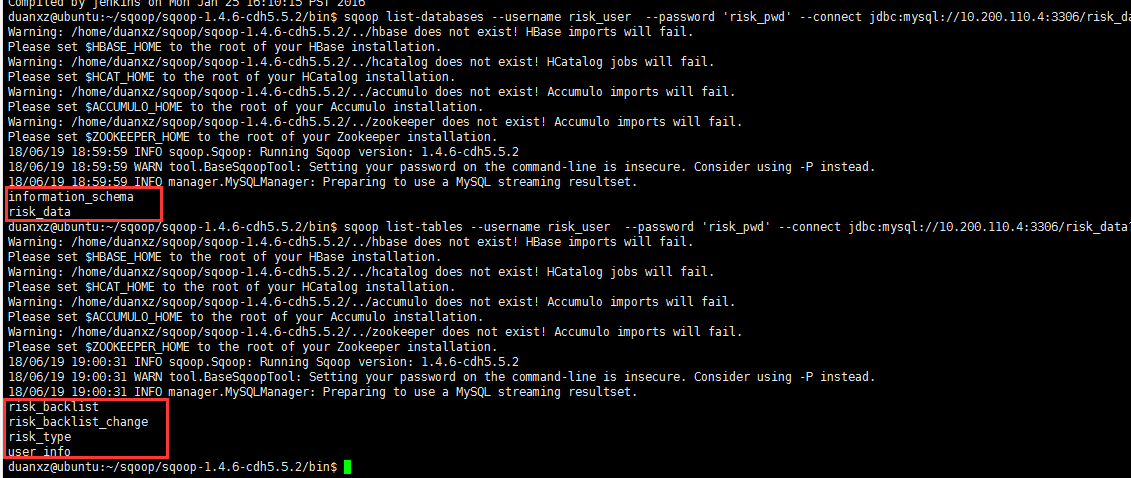
(1)显示mysql数据库列表
sqoop list-databases --username risk_user --password 'risk_pwd' --connect jdbc:mysql://10.200.110.4:3306/risk_data?characterEncoding=UTF-8
(2)显示数据库里所有表:
sqoop list-tables --username risk_user --password 'risk_pwd' --connect jdbc:mysql://10.200.110.4:3306/risk_data?characterEncoding=UTF-8
2、Mysql与HDFS互导
(1)mysql导入到hdfs
mysql中创建一个测试表:
DROP TABLE IF EXISTS `user_info`;

CREATE TABLE `user_info` (
  `id` int(11) NOT NULL,
  `user_name` varchar(50) COLLATE utf8_unicode_ci DEFAULT NULL,
  `age` int(11) DEFAULT NULL,
  `address` varchar(50) COLLATE utf8_unicode_ci DEFAULT NULL,
  PRIMARY KEY (`id`)
) ENGINE=InnoDB DEFAULT CHARSET=utf8 COLLATE=utf8_unicode_ci;
加点数据:
insert into `user_info` (`id`, `user_name`, `age`, `address`) values('1','zhangsan  ','20','shenzhen nanshang');
insert into `user_info` (`id`, `user_name`, `age`, `address`) values('2','lisi','21','shenzhen baoan');
insert into `user_info` (`id`, `user_name`, `age`, `address`) values('3','wangwu','23','shenzhen futian');
insert into `user_info` (`id`, `user_name`, `age`, `address`) values('4','zhuqi','25','shenzhen guangming');
insert into `user_info` (`id`, `user_name`, `age`, `address`) values('5','houba','26','shenzhen xili');
insert into `user_info` (`id`, `user_name`, `age`, `address`) values('6','cailiu','27','shenzhen xili');
insert into `user_info` (`id`, `user_name`, `age`, `address`) values('7','laojiu','27','shenzhen yantian');
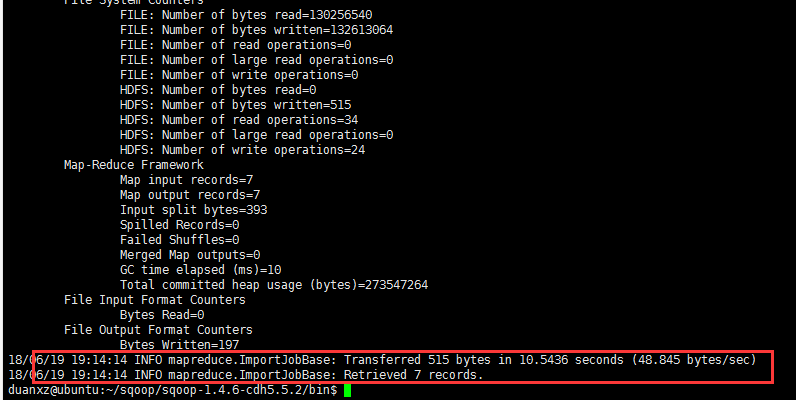
把mysql中表user_info导入到hdfs,导入之前查询一下user_info表中的数据
共:7条
sqoop import --connect jdbc:mysql://10.200.110.4:3306/risk_data --username risk_user --password 'risk_pwd' --table user_info --target-dir /tmp/hive/sqoop/user_info -m 4
参数说明:
-m:表示Map并发数
--target-dir:hdfs的目标目录,若是不写, 则默认是hdfs上的user/username/tablename 路径
如果重复执行,会提示目录已经存在,可以手动删除
运行完mapreduce结束后去HDFS上检查。
HDFS的50070上看到已经成功,如下图:
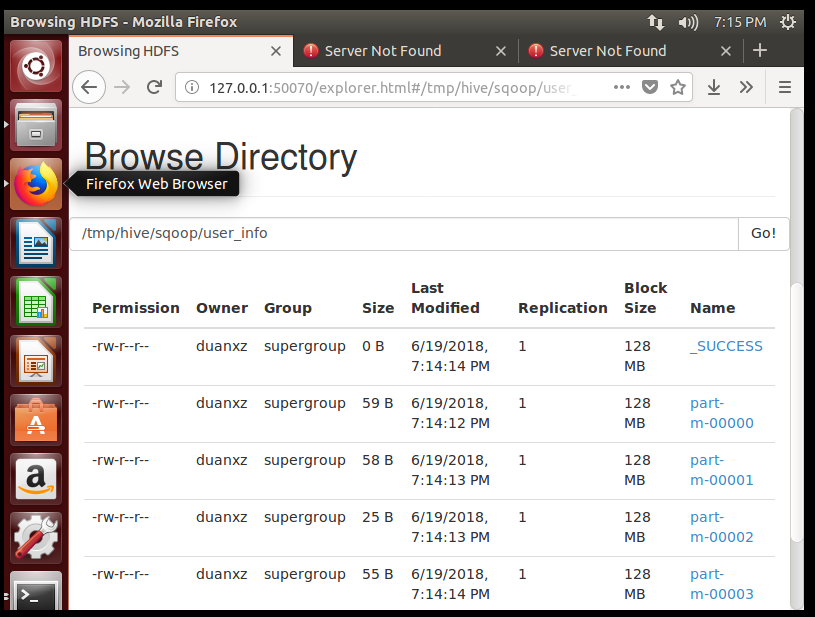
验证hdfs上导入的数据:
duanxz@ubuntu:~/sqoop/sqoop-1.4.6-cdh5.5.2/bin$ hadoop fs -ls /tmp/hive/sqoop/user_info
Found 5 items
-rw-r--r--   1 duanxz supergroup          0 2018-06-19 19:14 /tmp/hive/sqoop/user_info/_SUCCESS
-rw-r--r--   1 duanxz supergroup         59 2018-06-19 19:14 /tmp/hive/sqoop/user_info/part-m-00000
-rw-r--r--   1 duanxz supergroup         58 2018-06-19 19:14 /tmp/hive/sqoop/user_info/part-m-00001
-rw-r--r--   1 duanxz supergroup         25 2018-06-19 19:14 /tmp/hive/sqoop/user_info/part-m-00002
-rw-r--r--   1 duanxz supergroup         55 2018-06-19 19:14 /tmp/hive/sqoop/user_info/part-m-00003
duanxz@ubuntu:~/sqoop/sqoop-1.4.6-cdh5.5.2/bin$ hadoop fs -ls /tmp/hive/sqoop/user_info/part-m-00000
-rw-r--r--   1 duanxz supergroup         59 2018-06-19 19:14 /tmp/hive/sqoop/user_info/part-m-00000
duanxz@ubuntu:~/sqoop/sqoop-1.4.6-cdh5.5.2/bin$ hadoop fs -cat /tmp/hive/sqoop/user_info/part-m-00000
1,zhangsan  ,20,shenzhen nanshang
2,lisi,21,shenzhen baoan
duanxz@ubuntu:~/sqoop/sqoop-1.4.6-cdh5.5.2/bin$
(2)HDFS导入到mysql
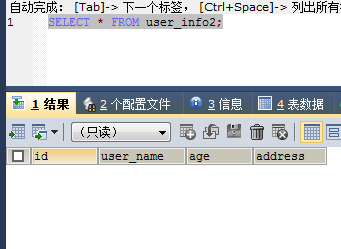
把HDFS中数据导入到Mysql表中,mysql中需要预先建立空表user_info2,此时该表为空
导入指令:
sqoop export --connect jdbc:mysql://10.200.110.4:3306/risk_data --table user_info2 -m 1 --username risk_user --password 'risk_pwd' --export-dir /tmp/hive/sqoop/user_info/ --input-fields-terminated-by ',' --columns="id,user_name,address"
运行完显示

显示导出7条记录。
或者:根据条件筛选部分记录导入到hdfs中。
sqoop import --connect jdbc:mysql://10.200.110.4:3306/risk_data --username risk_user --password 'risk_pwd' --query 'select id, user_name,age,address from user_info where $CONDITIONS LIMIT 100' --target-dir /tmp/hive/import/user_info --num-mappers 1 --fields-terminated-by ','
再到表user_info2查看
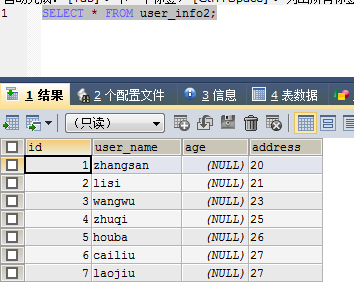
并且正好也是7条。
至此,用Sqoop将mysql与HDFS互导功都验证完毕。
你还可以指定其他的参数:
| 参数 | 说明 |
|---|---|
--append |
将数据追加到hdfs中已经存在的dataset中。使用该参数,sqoop将把数据先导入到一个临时目录中,然后重新给文件命名到一个正式的目录中,以避免和该目录中已存在的文件重名。 |
--as-avrodatafile |
将数据导入到一个Avro数据文件中 |
--as-sequencefile |
将数据导入到一个sequence文件中 |
--as-textfile |
将数据导入到一个普通文本文件中,生成该文本文件后,可以在hive中通过sql语句查询出结果。 |
--boundary-query <statement> |
边界查询,也就是在导入前先通过SQL查询得到一个结果集,然后导入的数据就是该结果集内的数据,格式如:--boundary-query 'select id,no from t where id = 3',表示导入的数据为id=3的记录,或者 select min(<split-by>), max(<split-by>) from <table name>,注意查询的字段中不能有数据类型为字符串的字段,否则会报错 |
--columns<col,col> |
指定要导入的字段值,格式如:--columns id,username |
--direct |
直接导入模式,使用的是关系数据库自带的导入导出工具。官网上是说这样导入会更快 |
--direct-split-size |
在使用上面direct直接导入的基础上,对导入的流按字节数分块,特别是使用直连模式从PostgreSQL导入数据的时候,可以将一个到达设定大小的文件分为几个独立的文件。 |
--inline-lob-limit |
设定大对象数据类型的最大值 |
-m,--num-mappers |
启动N个map来并行导入数据,默认是4个,最好不要将数字设置为高于集群的节点数 |
--query,-e <sql> |
从查询结果中导入数据,该参数使用时必须指定–target-dir、–hive-table,在查询语句中一定要有where条件且在where条件中需要包含 $CONDITIONS,示例:--query 'select * from t where $CONDITIONS ' --target-dir /tmp/t –hive-table t |
--split-by <column> |
表的列名,用来切分工作单元,一般后面跟主键ID |
--table <table-name> |
关系数据库表名,数据从该表中获取 |
--delete-target-dir |
删除目标目录 |
--target-dir <dir> |
指定hdfs路径 |
--warehouse-dir <dir> |
与 --target-dir 不能同时使用,指定数据导入的存放目录,适用于hdfs导入,不适合导入hive目录 |
--where |
从关系数据库导入数据时的查询条件,示例:--where "id = 2" |
-z,--compress |
压缩参数,默认情况下数据是没被压缩的,通过该参数可以使用gzip压缩算法对数据进行压缩,适用于SequenceFile, text文本文件, 和Avro文件 |
--compression-codec |
Hadoop压缩编码,默认是gzip |
--null-string <null-string> |
可选参数,如果没有指定,则字符串null将被使用 |
--null-non-string <null-string> |
可选参数,如果没有指定,则字符串null将被使用 |
示例程序:
$ sqoop import --connect jdbc:mysql://192.168.56.121:3306/metastore --username hiveuser --password redhat --table TBLS --columns "tbl_id,create_time" --where "tbl_id > 1" --target-dir /user/hive/result使用 sql 语句
参照上表,使用 sql 语句查询时,需要指定 $CONDITIONS
$ sqoop import --connect jdbc:mysql://192.168.56.121:3306/metastore --username hiveuser --password redhat --query 'SELECT * from TBLS where $CONDITIONS ' --split-by tbl_id -m 4 --target-dir /user/hive/result
上面命令通过 -m 1 控制并发的 map 数。
使用 direct 模式:
$ sqoop import --connect jdbc:mysql://192.168.56.121:3306/metastore --username hiveuser --password redhat --table TBLS --delete-target-dir --direct --default-character-set UTF-8 --target-dir /user/hive/result
指定文件输出格式:
$ sqoop import --connect jdbc:mysql://192.168.56.121:3306/metastore --username hiveuser --password redhat --table TBLS --fields-terminated-by" " --lines-terminated-by " " --delete-target-dir --target-dir /user/hive/result
这时候查看 hdfs 中数据(观察分隔符是否为制表符):
$ hadoop fs -ls result
Found 5 items
-rw-r--r--   3 root hadoop          0 2014-08-04 16:07 result/_SUCCESS
-rw-r--r--   3 root hadoop         69 2014-08-04 16:07 result/part-m-00000
-rw-r--r--   3 root hadoop          0 2014-08-04 16:07 result/part-m-00001
-rw-r--r--   3 root hadoop        142 2014-08-04 16:07 result/part-m-00002
-rw-r--r--   3 root hadoop         62 2014-08-04 16:07 result/part-m-00003

$ hadoop fs -cat result/part-m-00000
34  1406784308  8   0   root    0   45  test1   EXTERNAL_TABLE  null    null    null

$ hadoop fs -cat result/part-m-00002
40  1406797005  9   0   root    0   52  test2   EXTERNAL_TABLE  null    null    null
42  1407122307  7   0   root    0   59  test3   EXTERNAL_TABLE  null    null    null
指定空字符串:
$ sqoop import --connect jdbc:mysql://192.168.56.121:3306/metastore --username hiveuser --password redhat --table TBLS --fields-terminated-by "	" --lines-terminated-by "
" --delete-target-dir --null-string '\N' --null-non-string '\N' --target-dir /user/hive/result
如果需要指定压缩:
$ sqoop import --connect jdbc:mysql://192.168.56.121:3306/metastore --username hiveuser --password redhat --table TBLS --fields-terminated-by "	" --lines-terminated-by "
" --delete-target-dir --null-string '\N' --null-non-string '\N' --compression-codec "com.hadoop.compression.lzo.LzopCodec" --target-dir /user/hive/result
附:可选的文件参数如下表。
| 参数 | 说明 |
|---|---|
--enclosed-by <char> |
给字段值前后加上指定的字符,比如双引号,示例:--enclosed-by '"',显示例子:"3","jimsss","dd@dd.com" |
--escaped-by <char> |
给双引号作转义处理,如字段值为"测试",经过 --escaped-by "\" 处理后,在hdfs中的显示值为:"测试",对单引号无效 |
--fields-terminated-by <char> |
设定每个字段是以什么符号作为结束的,默认是逗号,也可以改为其它符号,如句号.,示例如:--fields-terminated-by |
--lines-terminated-by <char> |
设定每条记录行之间的分隔符,默认是换行串,但也可以设定自己所需要的字符串,示例如:--lines-terminated-by "#" 以#号分隔 |
--mysql-delimiters |
Mysql默认的分隔符设置,字段之间以,隔开,行之间以换行
隔开,默认转义符号是'包含起来。 |
--optionally-enclosed-by <char> |
enclosed-by是强制给每个字段值前后都加上指定的符号,而--optionally-enclosed-by只是给带有双引号或单引号的字段值加上指定的符号,故叫可选的 |
3、Mysql与Hive互导
下面的命令行,将mysql的user_info表导入到hive的
sqoop import --connect jdbc:mysql://10.200.110.4:3306/risk_data --table user_info --username risk_user --password 'risk_pwd' --fields-terminated-by ',' --delete-target-dir --num-mappers 1 --hive-import --hive-database default --hive-table hive_user_info
出现如下错误:
错误1:Sqoop:Import failed: java.lang.ClassNotFoundException: org.apache.hadoop.hive.conf.HiveConf
解决方法:
将mysql中的数据导入到hive中报错:
这是因为sqoop需要一个hive的包,将hive/lib中的hive-common-2.3.3.jar拷贝到sqoop的lib目录中,重新执行试试。
错误2:ERROR tool.CreateHiveTableTool: Encountered IOException running create table job: java.io.IOException: Hive exited with status 1
解决方法:
我的hive是本地模式,只能一个用户登录。所以要把另外一个hive登录给退出。
错误3:error='Cannot allocate memory' (errno=12)
解决方法:
我的hive是本地模式,只能一个用户登录。所以要把另外一个hive登录给退出。
错误4:Version information not found ,Caused by: MetaException(message:Version information not found in metastore. )
解决方法:
1、mysql-connector-java-5.1.26-bin.jar 是否放到hive/lib 目录下 建议修改权限为777 (chmod 777 mysql-connector-java-5.1.26-bin.jar)
2、修改conf/hive-site.xml 中的 “hive.metastore.schema.verification” 值为 false 即可解决 “Caused by: MetaException(message:Version information not found in metastore. )”
错误3:
ERROR tool.ImportTool: EncounteredIOException running import job: java.io.IOException: DataStreamer Exception:
atorg.apache.hadoop.hdfs.DFSOutputStream$DataStreamer.run(DFSOutputStream.java:796)
Caused by: java.lang.OutOfMemoryError:unable to create new native thread
at java.lang.Thread.start0(Native Method)
at java.lang.Thread.start(Thread.java:714)
atorg.apache.hadoop.hdfs.DFSOutputStream$DataStreamer.initDataStreaming(DFSOutputStream.java:581)
at org.apache.hadoop.hdfs.DFSOutputStream$DataStreamer.run(DFSOutputStream.java:669)
解决方法:
net.ipv4.ip_local_port_range = 1024 65000
修改系统参数
|
echo "100000" > /proc/sys/kernel/threads-max |
|
echo "100000" > /proc/sys/kernel/pid_max (默认32768) |
|
echo "200000" > /proc/sys/vm/max_map_count (默认65530) |
修改/etc/security/limits.conf
* - nproc 999999
* -nofile 999999
PS:nproc是修改系统的max user processes大小;nofile 是修改open files的大小,另外linux 2.6.25内核之前有个宏定义,定义了这个值的最大值,为1024*1024,正好是100万,而在2.6.25内核及其之后,这个值是可以通过/proc/sys/fs/nr_open来设置,不过,999999足够用了。
很多人可能会遇到,只能启动32000多个线程就不能再起更多的线程了,其实就是pid_max = 32768 给限制住了
增加map数量,通过sqoop -m 选项指定更多的map。通过更多的map,降少每个子进程占用的heap space,避免超出hadoop设置的java heap space 大小
sqoop ... -m <map 数量>
错误2:
Caused by: java.lang.RuntimeException:java.sql.SQLException: Access denied for user 'root'@'hadoop003' (usingpassword: YES)
atorg.apache.sqoop.mapreduce.db.DBInputFormat.getConnection(DBInputFormat.java:220)
atorg.apache.sqoop.mapreduce.db.DBInputFormat.setConf(DBInputFormat.java:165)
... 9 more
程序正常运行,结果也正确。说明数据库连接是正确的,而且单独用mysql连接也是可以的。就是报这个异常错误。
查询数据库里用户信息
JDBC连接的机器名是hadoop003,虽然已经赋予root所有机器的远程访问权限(“%”),但是hadoop003这个账户可能没有开通机器的远程权限。于是给hadoop003这个机器开通远程权限。
GRANT ALL PRIVILEGES ON *.* TO'root'@'hadoop003' IDENTIFIED BY '********' WITH GRANT OPTION;
再次执行导入命令。成功。不再出现上面错误。
错误3:
从mysql导入到Hive里报如下错误:
ERROR hive.HiveConfig: Could not loadorg.apache.hadoop.hive.conf.HiveConf. Make sure HIVE_CONF_DIR is set correctly.
16/02/26 14:43:47 ERROR tool.ImportTool:Encountered IOException running import job: java.io.IOException:java.lang.ClassNotFoundException: org.apache.hadoop.hive.conf.HiveConf
数据已经导入到HDFS。从HDFS移动到Hive里时出错。提示HIVE_CONF_DIR配置不对。
但是将HIVE_CONF_DIR添加到sqoop-env.sh、hadoop-env.sh、hive-env.sh都不起作用。
最终正确的解决方法:
在/etc/profile 里添加下面一句话
exportHADOOP_CLASSPATH=$HADOOP_CLASSPATH:$HIVE_HOME/lib/*
Sqoop-1.4.7版本好像解决了这个问题。期待这个版本
转自:https://www.cnblogs.com/duanxz/p/9201606.html